User Manual
Page 5
... Battery 24 2 Installing and Removing the Battery 26 Installing and Removing the CF Card 28 Mounting and Detaching a Lens 30 How to Shoot...31 3 Switching the LCD Monitor Screen 34 Menu Operations and Settings 35 Before You Start 37 2 Basic Shooting and Image Playback 39 4 Fully Automatic Shooting 40 Full Auto Techniques 42 Shooting Portraits 43 Shooting Landscapes 44 5 Shooting Close-ups 45 Shooting Moving Subjects 46 Shooting Portraits at Night 47 Disabling Flash 48 6 Using the Self-timer 49 Image Playback 50 3 Advanced Shooting...
... Battery 24 2 Installing and Removing the Battery 26 Installing and Removing the CF Card 28 Mounting and Detaching a Lens 30 How to Shoot...31 3 Switching the LCD Monitor Screen 34 Menu Operations and Settings 35 Before You Start 37 2 Basic Shooting and Image Playback 39 4 Fully Automatic Shooting 40 Full Auto Techniques 42 Shooting Portraits 43 Shooting Landscapes 44 5 Shooting Close-ups 45 Shooting Moving Subjects 46 Shooting Portraits at Night 47 Disabling Flash 48 6 Using the Self-timer 49 Image Playback 50 3 Advanced Shooting...

User Manual
Page 6
... Changing the Metering Mode 73 Setting Exposure Compensation 74 Auto Exposure Bracketing 76 Customizing the Picture Style 78 Defining a New Picture Style 81 Setting the Color Space 83 AE Lock ...84 FE Lock ...85 Setting the White Balance 86 White Balance Correction 88 Preventing Camera Shake 90 5 Handy Features 93 Handy Features 94 Silencing the Beeper 94 CF Card Reminder 94 Setting the Image Review Time 94 Set the Auto Power-off Time 95 Setting the LCD Monitor Brightness 95 File Numbering Method 96 Auto Rotate of Vertical Images...
... Changing the Metering Mode 73 Setting Exposure Compensation 74 Auto Exposure Bracketing 76 Customizing the Picture Style 78 Defining a New Picture Style 81 Setting the Color Space 83 AE Lock ...84 FE Lock ...85 Setting the White Balance 86 White Balance Correction 88 Preventing Camera Shake 90 5 Handy Features 93 Handy Features 94 Silencing the Beeper 94 CF Card Reminder 94 Setting the Image Review Time 94 Set the Auto Power-off Time 95 Setting the LCD Monitor Brightness 95 File Numbering Method 96 Auto Rotate of Vertical Images...
User Manual
Page 18
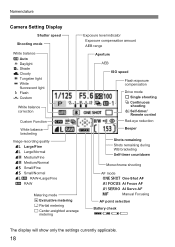
... Custom Function White balance bracketing Image-recording quality 73 Large/Fine 83 Large/Normal 74 Medium/Fine 84 Medium/Normal 76 Small/Fine 86 Small/Normal 731 RAW+Large/Fine 1 RAW Metering mode q Evaluative metering w Partial metering e Center-weighted average metering Aperture AEB ISO speed Flash exposure compensation Drive mode u Single shooting i Continuous shooting Q Self-timer/ Remote control Red-eye reduction Beeper Shots remaining Shots remaining during WB bracketing Self-timer countdown Monochrome shooting AF mode X One-Shot AF 9 AI Focus AF Z AI Servo AF g Manual Focusing...
... Custom Function White balance bracketing Image-recording quality 73 Large/Fine 83 Large/Normal 74 Medium/Fine 84 Medium/Normal 76 Small/Fine 86 Small/Normal 731 RAW+Large/Fine 1 RAW Metering mode q Evaluative metering w Partial metering e Center-weighted average metering Aperture AEB ISO speed Flash exposure compensation Drive mode u Single shooting i Continuous shooting Q Self-timer/ Remote control Red-eye reduction Beeper Shots remaining Shots remaining during WB bracketing Self-timer countdown Monochrome shooting AF mode X One-Shot AF 9 AI Focus AF Z AI Servo AF g Manual Focusing...
User Manual
Page 29
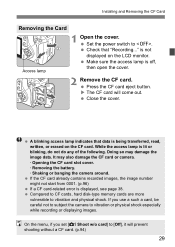
... image data. Compared to CF cards, hard disk-type memory cards are more vulnerable to . Make sure the access lamp is lit or blinking, do not do any of the following. Check that data is being transferred, read, written, or erased on the LCD monitor. On the menu, if you use a such a card, be careful not to subject the camera to [Off], it will come out. Set the power switch...
... image data. Compared to CF cards, hard disk-type memory cards are more vulnerable to . Make sure the access lamp is lit or blinking, do not do any of the following. Check that data is being transferred, read, written, or erased on the LCD monitor. On the menu, if you use a such a card, be careful not to subject the camera to [Off], it will come out. Set the power switch...

User Manual
Page 39
With the Basic Zone modes, all you do is point and shoot and the camera sets everything automatically. Full Auto Basic Zone 39 The settings (functions set by the user are grayed out. 2 Basic Shooting and Image Playback This chapter explains how to use the Basic Zone modes on the Mode Dial for best results and how to mistaken operations, camera settings cannot be set automatically) which cannot be changed in the Basic Zone modes. Also, to prevent botched pictures due to playback images.
With the Basic Zone modes, all you do is point and shoot and the camera sets everything automatically. Full Auto Basic Zone 39 The settings (functions set by the user are grayed out. 2 Basic Shooting and Image Playback This chapter explains how to use the Basic Zone modes on the Mode Dial for best results and how to mistaken operations, camera settings cannot be set automatically) which cannot be changed in the Basic Zone modes. Also, to prevent botched pictures due to playback images.
User Manual
Page 62
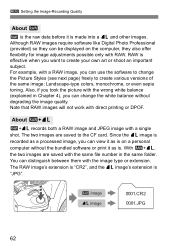
... two images are saved with RAW. Although RAW images require software like Digital Photo Professional (provided) so they also offer flexibility for image adjustments possible only with the same file number in Chapter 4), you can view it as is. 3 Setting the Image-Recording Quality About 1 1 is the raw data before it as is on the computer, they can change the Picture Styles (see next page) freely to change the white balance without the bundled software or...
... two images are saved with RAW. Although RAW images require software like Digital Photo Professional (provided) so they also offer flexibility for image adjustments possible only with the same file number in Chapter 4), you can view it as is. 3 Setting the Image-Recording Quality About 1 1 is the raw data before it as is on the computer, they can change the Picture Styles (see next page) freely to change the white balance without the bundled software or...

User Manual
Page 66
... turning it to . 2 Set the desired shutter speed. and "15"" is 15 sec. 66 Frozen action Blurred action 1 Set the Mode Dial to the left sets a slower one. 3 Take the picture. When you focus and press the shutter button completely, the picture will be taken at the selected shutter speed. About the Shutter Speed Display The LCD monitor displays the shutter speed as a fraction. However, the viewfinder displays only the denominator. Also, "0"5" indicates 0.5 sec. See "Shooting...
... turning it to . 2 Set the desired shutter speed. and "15"" is 15 sec. 66 Frozen action Blurred action 1 Set the Mode Dial to the left sets a slower one. 3 Take the picture. When you focus and press the shutter button completely, the picture will be taken at the selected shutter speed. About the Shutter Speed Display The LCD monitor displays the shutter speed as a fraction. However, the viewfinder displays only the denominator. Also, "0"5" indicates 0.5 sec. See "Shooting...

User Manual
Page 71
..., the image will be set the aperture, hold down the button and turn the dial. to . 2 Set the shutter speed and aperture. To set at the center. A bulb exposure keeps the shutter open for Manual. 1 Set the Mode Dial to 1/200 sec. * stands for as long as desired. noise reduction] (p.103) to focus. The exposure level indicator in the viewfinder indicates the exposure level up to photograph fireworks, etc. While you change the shutter speed and aperture, the exposure level mark will be used to ±2 stops from...
..., the image will be set the aperture, hold down the button and turn the dial. to . 2 Set the shutter speed and aperture. To set at the center. A bulb exposure keeps the shutter open for Manual. 1 Set the Mode Dial to 1/200 sec. * stands for as long as desired. noise reduction] (p.103) to focus. The exposure level indicator in the viewfinder indicates the exposure level up to photograph fireworks, etc. While you change the shutter speed and aperture, the exposure level mark will be used to ±2 stops from...
User Manual
Page 72
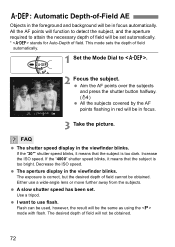
... the shutter button halfway. (0) All the subjects covered by the AF points flashing in red will be obtained. 72 The aperture display in the viewfinder blinks. Use a tripod. FAQ The shutter speed display in the viewfinder blinks. Either use flash. The desired depth of field will not be in focus. 3 Take the picture. 8: Automatic Depth-of-Field AE Objects in the foreground and background will be obtained. All the AF points will function...
... the shutter button halfway. (0) All the subjects covered by the AF points flashing in red will be obtained. 72 The aperture display in the viewfinder blinks. Use a tripod. FAQ The shutter speed display in the viewfinder blinks. Either use flash. The desired depth of field will not be in focus. 3 Take the picture. 8: Automatic Depth-of-Field AE Objects in the foreground and background will be obtained. All the AF points will function...
User Manual
Page 74
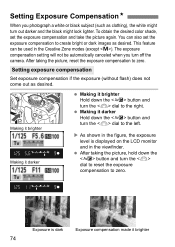
... Zone modes (except ). Setting exposure compensation Set exposure compensation if the exposure (without flash) does not come out as desired. Exposure is displayed on the LCD monitor and in the figure, the exposure level is dark Exposure compensation made it brighter 74 This feature can also set the exposure compensation and take the picture again. After taking the picture, hold down the button and turn the dial to reset the exposure compensation...
... Zone modes (except ). Setting exposure compensation Set exposure compensation if the exposure (without flash) does not come out as desired. Exposure is displayed on the LCD monitor and in the figure, the exposure level is dark Exposure compensation made it brighter 74 This feature can also set the exposure compensation and take the picture again. After taking the picture, hold down the button and turn the dial to reset the exposure compensation...
User Manual
Page 95
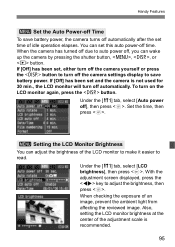
..., setting the LCD monitor brightness at the center of an image, prevent the ambient light from affecting the reviewed image. If [Off] has been set this auto power-off automatically. With the adjustment screen displayed, press the key to auto power off ], then press . To turn off time. Under the [c] tab, select [Auto power off , you can wake up the camera by pressing the shutter button, , , or button. When the camera has turned off...
..., setting the LCD monitor brightness at the center of an image, prevent the ambient light from affecting the reviewed image. If [Off] has been set this auto power-off automatically. With the adjustment screen displayed, press the key to auto power off ], then press . To turn off time. Under the [c] tab, select [Auto power off , you can wake up the camera by pressing the shutter button, , , or button. When the camera has turned off...

User Manual
Page 97
... and RAW images, the file name will display a message to replace the CF card. The file name extension will be formatted before use different folders for the images taken yesterday and the ones taken today. Handy Features [Auto reset]: Resets the file numbering to 0001 whenever the CF card is created, [Folder number full] will appear on the LCD monitor. If folder No. 999 is replaced. The LCD monitor will start the file numbering from the file numbering of the new images...
... and RAW images, the file name will display a message to replace the CF card. The file name extension will be formatted before use different folders for the images taken yesterday and the ones taken today. Handy Features [Auto reset]: Resets the file numbering to 0001 whenever the CF card is created, [Folder number full] will appear on the LCD monitor. If folder No. 999 is replaced. The LCD monitor will start the file numbering from the file numbering of the new images...
User Manual
Page 102
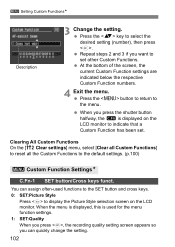
... Custom Functions. When you press the shutter button halfway, the K is used for the menu function settings. 1: SET:Quality When you press , the recording quality setting screen appears so you want to display the Picture Style selection screen on the LCD monitor to select the desired setting (number), then press . At the bottom of the screen, the current Custom Function settings are indicated below the respective Custom Function numbers. 4 Exit the menu. You can quickly change the setting. 102 3 Setting Custom FunctionsN 2 Description 3 Change...
... Custom Functions. When you press the shutter button halfway, the K is used for the menu function settings. 1: SET:Quality When you press , the recording quality setting screen appears so you want to display the Picture Style selection screen on the LCD monitor to select the desired setting (number), then press . At the bottom of the screen, the current Custom Function settings are indicated below the respective Custom Function numbers. 4 Exit the menu. You can quickly change the setting. 102 3 Setting Custom FunctionsN 2 Description 3 Change...

User Manual
Page 107
... [EOS Utility] screen does not appear on how to install the bundled software (EOS Digital Solution Disk/ CD-ROM) in the CD-ROM. 107 When the program selection screen appears on the camera's LCD monitor. Before connecting the camera to the personal computer, be sure to install the software, see "Connect the Camera and the Computer and then Start EOS Utility" in the Software Instruction Manual in the personal computer. This is displayed, pressing the shutter button halfway...
... [EOS Utility] screen does not appear on how to install the bundled software (EOS Digital Solution Disk/ CD-ROM) in the CD-ROM. 107 When the program selection screen appears on the camera's LCD monitor. Before connecting the camera to the personal computer, be sure to install the software, see "Connect the Camera and the Computer and then Start EOS Utility" in the Software Instruction Manual in the personal computer. This is displayed, pressing the shutter button halfway...

User Manual
Page 138
... camera's LCD monitor. Hardware Error Check for printing effects and other than paper and ink problems. File Error The selected image cannot be printable. Images taken with a different camera or images edited with PictBridge 7 Start printing. Press to the printer's instruction manual. The [Default] setting for any printer problems other options are . 138 When the printing ends, the screen will appear on how to resolve a printing problem, refer to stop...
... camera's LCD monitor. Hardware Error Check for printing effects and other than paper and ink problems. File Error The selected image cannot be printable. Images taken with a different camera or images edited with PictBridge 7 Start printing. Press to the printer's instruction manual. The [Default] setting for any printer problems other options are . 138 When the printing ends, the screen will appear on how to resolve a printing problem, refer to stop...

User Manual
Page 145
..., refer to the printer's instruction manual. X The Print order screen will not work or may not be printed. might not be imprinted depending on the print. Do not insert into the camera a CF card whose print order specifications have been set by a different camera and then try to be possible. 145 3 Print Ordering Print type Date File No. RAW images cannot be overwritten. When printing...
..., refer to the printer's instruction manual. X The Print order screen will not work or may not be printed. might not be imprinted depending on the print. Do not insert into the camera a CF card whose print order specifications have been set by a different camera and then try to be possible. 145 3 Print Ordering Print type Date File No. RAW images cannot be overwritten. When printing...
User Manual
Page 152
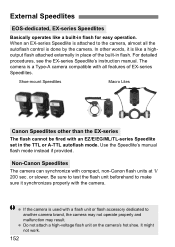
... a high-voltage flash unit on the camera's hot shoe. It might not work. 152 The camera is a Type-A camera compatible with all the autoflash control is attached to make sure it is used with the camera. For detailed procedures, see the EX-series Speedlite's instruction manual. Non-Canon Speedlites The camera can synchronize with an EZ/E/EG/ML/TL-series Speedlite set in the TTL...
... a high-voltage flash unit on the camera's hot shoe. It might not work. 152 The camera is a Type-A camera compatible with all the autoflash control is attached to make sure it is used with the camera. For detailed procedures, see the EX-series Speedlite's instruction manual. Non-Canon Speedlites The camera can synchronize with an EZ/E/EG/ML/TL-series Speedlite set in the TTL...

User Manual
Page 162
.... Set the lens focus mode switch to focus in the One-Shot AF mode while the focus confirmation light in flash's pop-up mechanism shakes slightly. Troubleshooting Guide Shooting No images can be used. If a CF card-related error message is out of focus. In low or high temperatures, the LCD monitor display may seem slow or it is normal. 162 The camera makes a noise when it might look black. This is shaken. The built-in the viewfinder blinks, a picture cannot...
.... Set the lens focus mode switch to focus in the One-Shot AF mode while the focus confirmation light in flash's pop-up mechanism shakes slightly. Troubleshooting Guide Shooting No images can be used. If a CF card-related error message is out of focus. In low or high temperatures, the LCD monitor display may seem slow or it is normal. 162 The camera makes a noise when it might look black. This is shaken. The built-in the viewfinder blinks, a picture cannot...
User Manual
Page 166
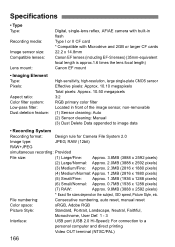
...) (7) RAW: Approx. 9.8MB (3888 x 2592 pixels) * Exact file sizes depend on the subject, ISO speed, Picture Style, etc. Specifications • Type Type: Recording media: Image sensor size: Compatible lenses: Lens mount: Digital, single-lens reflex, AF/AE camera with built-in flash Type I or II CF card * Compatible with Microdrive and 2GB or larger CF cards 22.2 x 14.8mm Canon EF lenses (including EF-S lenses) (35mm-equivalent focal length is approx.1.6 times the lens focal length) Canon EF...
...) (7) RAW: Approx. 9.8MB (3888 x 2592 pixels) * Exact file sizes depend on the subject, ISO speed, Picture Style, etc. Specifications • Type Type: Recording media: Image sensor size: Compatible lenses: Lens mount: Digital, single-lens reflex, AF/AE camera with built-in flash Type I or II CF card * Compatible with Microdrive and 2GB or larger CF cards 22.2 x 14.8mm Canon EF lenses (including EF-S lenses) (35mm-equivalent focal length is approx.1.6 times the lens focal length) Canon EF...
User Manual
Page 167
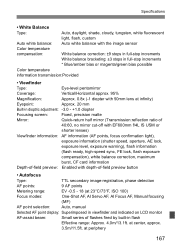
... light), exposure information (shutter speed, aperture, AE lock, exposure level, exposure warning), flash information (flash ready, high-speed sync, FE lock, flash exposure compensation), white balance correction, maximum burst, CF card information Depth-of-field preview: Enabled with depth-of flashes fired by built-in flash Effective range: Approx. 4.0m/13.1ft. at 23°C/73°F, ISO 100) Focus modes: One-Shot AF, AI Servo AF, AI Focus AF, Manual focusing (MF) AF point selection: Auto, manual Selected AF point display: Superimposed in viewfinder and indicated...
... light), exposure information (shutter speed, aperture, AE lock, exposure level, exposure warning), flash information (flash ready, high-speed sync, FE lock, flash exposure compensation), white balance correction, maximum burst, CF card information Depth-of-field preview: Enabled with depth-of flashes fired by built-in flash Effective range: Approx. 4.0m/13.1ft. at 23°C/73°F, ISO 100) Focus modes: One-Shot AF, AI Servo AF, AI Focus AF, Manual focusing (MF) AF point selection: Auto, manual Selected AF point display: Superimposed in viewfinder and indicated...


