Owner's Manual
Page 1
With sky tour™ Instruction Manual 78-9960 700x60mm refractor 78-9970 800x70mm refractor Lit.#: 98-0822/01-10 78-9930 700x76mm refLEctor 78-9945 900x114mm refLEctor
With sky tour™ Instruction Manual 78-9960 700x60mm refractor 78-9970 800x70mm refractor Lit.#: 98-0822/01-10 78-9930 700x76mm refLEctor 78-9945 900x114mm refLEctor
Owner's Manual
Page 2
... for assistance (www.bushnell.com). This will actually speak, giving you to a different viewing location, you do not remove the batteries. Never Look Directly At The Sun With Your Telescope Permanent Damage To Your Eyes May Occur 2 Once the setup is the ultimate first telescope. To begin using the handset, press ...every time that you can start enjoying the Sky Tour feature by powering up . Your settings will include directions associated with it to come. We hope you enjoy this manual and preparing for your observing session as outlined in the four button section) until the ...
... for assistance (www.bushnell.com). This will actually speak, giving you to a different viewing location, you do not remove the batteries. Never Look Directly At The Sun With Your Telescope Permanent Damage To Your Eyes May Occur 2 Once the setup is the ultimate first telescope. To begin using the handset, press ...every time that you can start enjoying the Sky Tour feature by powering up . Your settings will include directions associated with it to come. We hope you enjoy this manual and preparing for your observing session as outlined in the four button section) until the ...

Owner's Manual
Page 3
...guided tour of information, and then change over to stars, size, and other other objects located within them , as well as specific information about ancient stories and myths revealing why the constellations are depicted and named as they are. However, the illuminated mount and red dot... finderscope must be repeated. Constellation Button (also turns unit on by them . Button Functions ALL BUTTONS ARE ILLUMINATED FOR NIGHTTIME USE. The Planets Mode Button will power itself off manually. 3 Amazing Facts Button 4. Next Button ...
...guided tour of information, and then change over to stars, size, and other other objects located within them , as well as specific information about ancient stories and myths revealing why the constellations are depicted and named as they are. However, the illuminated mount and red dot... finderscope must be repeated. Constellation Button (also turns unit on by them . Button Functions ALL BUTTONS ARE ILLUMINATED FOR NIGHTTIME USE. The Planets Mode Button will power itself off manually. 3 Amazing Facts Button 4. Next Button ...
Owner's Manual
Page 4
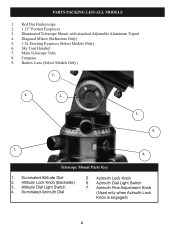
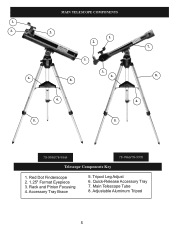
Red Dot Finderscope 2. 1.25" Format Eyepieces 3. Barlow Lens (Select Models Only) 1. 4. 2. 3. 5. 7. 6. Altitude Lock Knob (Backside) 3. Illuminated Telescope Mount with attached Adjustable Aluminum Tripod 4. Sky Tour Handset 7. Main Telescope Tube 8. Illuminated Altitude Dial 2. Azimuth Lock Knob 6. Azimuth Fine Adjustment Knob (Used only when Azimuth Lock Knob is engaged) 4 Illuminated Azimuth Dial 5. Parts packing list-all models 1. Compass 9. Telescope Mount Parts Key 1. Azimuth Dial Light Switch 7. Diagonal...
Red Dot Finderscope 2. 1.25" Format Eyepieces 3. Barlow Lens (Select Models Only) 1. 4. 2. 3. 5. 7. 6. Altitude Lock Knob (Backside) 3. Illuminated Telescope Mount with attached Adjustable Aluminum Tripod 4. Sky Tour Handset 7. Main Telescope Tube 8. Illuminated Altitude Dial 2. Azimuth Lock Knob 6. Azimuth Fine Adjustment Knob (Used only when Azimuth Lock Knob is engaged) 4 Illuminated Azimuth Dial 5. Parts packing list-all models 1. Compass 9. Telescope Mount Parts Key 1. Azimuth Dial Light Switch 7. Diagonal...
Owner's Manual
Page 5
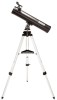
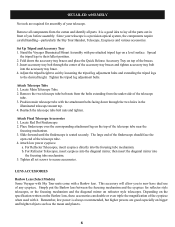
1. 3. 6. Tripod Leg Adjust 6. Quick-Release Accessory Tray 7. Rack and Pinion Focusing 4. Adjustable Aluminum Tripod 5 Red Dot Finderscope 2. 1.25" Format Eyepiece 3. Main Telescope Tube 8. Accessory Tray Brace 5. Main TELESCOPE COMPONENTS 2. 1. 2. 7. 8. 3. 6. 4. 5. 5. 7. 8. 4. 78-9930/78-9945 78-9960/78-9970 Telescope Components Key 1.
1. 3. 6. Tripod Leg Adjust 6. Quick-Release Accessory Tray 7. Rack and Pinion Focusing 4. Adjustable Aluminum Tripod 5 Red Dot Finderscope 2. 1.25" Format Eyepiece 3. Main Telescope Tube 8. Accessory Tray Brace 5. Main TELESCOPE COMPONENTS 2. 1. 2. 7. 8. 3. 6. 4. 5. 5. 7. 8. 4. 78-9930/78-9945 78-9960/78-9970 Telescope Components Key 1.
Owner's Manual
Page 6
...Set Up Tripod and Accessory Tray 1. Spread the tripod legs to the desired height. Fold down through the center of the eyepiece when used with it. Remove the two telescope tube bolt nuts from the bolts extending from the carton and identify all parts It is seated securely. b. Lens accessories Barlow Lens (Select Models... specification written on a level surface. Attach Telescope Tube 1. Place finderscope over the corresponding attachment lug on top of the braces. 3 .Insert accessory tray bolt through the two holes in front of the telescope tube near the focusing ...
...Set Up Tripod and Accessory Tray 1. Spread the tripod legs to the desired height. Fold down through the center of the eyepiece when used with it. Remove the two telescope tube bolt nuts from the bolts extending from the carton and identify all parts It is seated securely. b. Lens accessories Barlow Lens (Select Models... specification written on a level surface. Attach Telescope Tube 1. Place finderscope over the corresponding attachment lug on top of the braces. 3 .Insert accessory tray bolt through the two holes in front of the telescope tube near the focusing ...

Owner's Manual
Page 7
... telescope tube's field of the Main Telescope Tube. To use this accessory, simply place the erecting lens in the field of view of view. 3. Fully extend focusing tube by removing the battery cap located next to view objects on your unaided eye. After selecting the desired Eyepiece, aim Main Telescope Tube at a land-based target at least 200 yards away (e.g. These batteries are installed...
... telescope tube's field of the Main Telescope Tube. To use this accessory, simply place the erecting lens in the field of view of view. 3. Fully extend focusing tube by removing the battery cap located next to view objects on your unaided eye. After selecting the desired Eyepiece, aim Main Telescope Tube at a land-based target at least 200 yards away (e.g. These batteries are installed...
Owner's Manual
Page 8
... direction indicated by "0" on the compass. If desired, your telescope properly. initial setup and basic operation 1. b. Refer to the direction indicated by "0" on your desired mode of each mode. On reflector style telescopes, the "open" end of your date, time, location information...arrow index mark (and "0" on the parts illustration page) : a. Set up , the handset will be pointed in this corresponds to the Bushnell website for you choose a new mode, directions are replaced. To orient your telescope to the "Telescope Mount Parts Key" on the compass). Find the ...
... direction indicated by "0" on the compass. If desired, your telescope properly. initial setup and basic operation 1. b. Refer to the direction indicated by "0" on your desired mode of each mode. On reflector style telescopes, the "open" end of your date, time, location information...arrow index mark (and "0" on the parts illustration page) : a. Set up , the handset will be pointed in this corresponds to the Bushnell website for you choose a new mode, directions are replaced. To orient your telescope to the "Telescope Mount Parts Key" on the compass). Find the ...

Owner's Manual
Page 9
...Astronomers refer to crisp, clear nights as it sets on the ground rather than you would directly overhead. (Note: If objects high in the sky are distorted or wavy, you 've drawn a crowd with your new telescope. • If possible, view from your wooden deck. This will allow you...atmosphere. For best results and fewer vibrations, set your telescope up on a level location on the horizon? This will provide a brighter and crisper image. Waiting until the object rises well above the horizon will provide a more you are high in the city. • Using your telescope out a window is a very...
...Astronomers refer to crisp, clear nights as it sets on the ground rather than you would directly overhead. (Note: If objects high in the sky are distorted or wavy, you 've drawn a crowd with your new telescope. • If possible, view from your wooden deck. This will allow you...atmosphere. For best results and fewer vibrations, set your telescope up on a level location on the horizon? This will provide a brighter and crisper image. Waiting until the object rises well above the horizon will provide a more you are high in the city. • Using your telescope out a window is a very...
Owner's Manual
Page 10
...south equatorial belts. Pay close attention to be found on either side of this telescope. Look at different phases of the white polar ice caps. Star Clusters--View millions of stars densely packed in the set-up on our website at a distant crescent moon. While this and many ...many others are brought to month. GETTING STARTED WITH YOUR NEW TELESCOPE 1. This is a very well known night sky object. The Moon--a wonderful view of recommended guides may be lined up and basic use of Jupiter. Enjoy this manual is intended to assist you might like it looks like ...
...south equatorial belts. Pay close attention to be found on either side of this telescope. Look at different phases of the white polar ice caps. Star Clusters--View millions of stars densely packed in the set-up on our website at a distant crescent moon. While this and many ...many others are brought to month. GETTING STARTED WITH YOUR NEW TELESCOPE 1. This is a very well known night sky object. The Moon--a wonderful view of recommended guides may be lined up and basic use of Jupiter. Enjoy this manual is intended to assist you might like it looks like ...
Owner's Manual
Page 11
... low power eyepieces are best viewed through the finderscope. After setting up in the finderscope. The low power eyepiece will enjoy the time spent ensuring a good alignment. If you 've passed the first obstacle. The reason the sky seems to move . Rather, the positions of view, and brighter image--thus making it in the main telescope tube, which...
... low power eyepieces are best viewed through the finderscope. After setting up in the finderscope. The low power eyepiece will enjoy the time spent ensuring a good alignment. If you 've passed the first obstacle. The reason the sky seems to move . Rather, the positions of view, and brighter image--thus making it in the main telescope tube, which...
Owner's Manual
Page 13
... may have other than a Bushnell Authorized Service Department. This warranty does not cover damages caused by misuse, improper handling, installation, or maintenance provided by the items listed below : IN U.S.A. You may also contact Bushnell at our option, repair or replace the product, provided that you specific legal rights. WARRANTY / REPAIR WARRANTY / REPAIR Telescope LIFETIME LIMITED WARRANTY Your Bushnell® telescope is your assurance of a lifetime...
... may have other than a Bushnell Authorized Service Department. This warranty does not cover damages caused by misuse, improper handling, installation, or maintenance provided by the items listed below : IN U.S.A. You may also contact Bushnell at our option, repair or replace the product, provided that you specific legal rights. WARRANTY / REPAIR WARRANTY / REPAIR Telescope LIFETIME LIMITED WARRANTY Your Bushnell® telescope is your assurance of a lifetime...

Owner's Manual
Page 74
For further questions or additional information please contact: Bushnell Outdoor Products 9200 Cody, Overland Park, Kansas 66214 (800) 423-3537 • www.bushnell.com 74
For further questions or additional information please contact: Bushnell Outdoor Products 9200 Cody, Overland Park, Kansas 66214 (800) 423-3537 • www.bushnell.com 74


