Owner's Manual
Page 2
...outlined in the four button section) until the unit powers on to the Bushnell website for years to quickly find your latitude and longitude, please check a map of your Bushnell Voyager Telescope with Sky Tour! English Congratulations on the purchase of your area or log on again.... This telescope truly is complete, and handset confirms that you use the same viewing location. To...
...outlined in the four button section) until the unit powers on to the Bushnell website for years to quickly find your latitude and longitude, please check a map of your Bushnell Voyager Telescope with Sky Tour! English Congratulations on the purchase of your area or log on again.... This telescope truly is complete, and handset confirms that you use the same viewing location. To...
Owner's Manual
Page 4
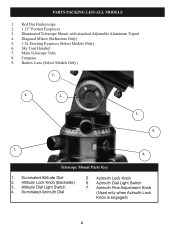
Illuminated Altitude Dial 2. Altitude Lock Knob (Backside) 3. Azimuth Lock Knob 6. Barlow Lens (Select Models Only) 1. 4. 2. 3. 5. 7. 6. Compass 9. Telescope Mount Parts Key 1. Red Dot Finderscope 2. 1.25" Format Eyepieces 3. Sky Tour Handset 7. Altitude Dial Light Switch 4. Illuminated Azimuth Dial 5. Azimuth Fine Adjustment Knob (Used only when Azimuth Lock Knob is engaged) 4 Diagonal Mirror (Refractors Only) 5. 1.5x ...
Illuminated Altitude Dial 2. Altitude Lock Knob (Backside) 3. Azimuth Lock Knob 6. Barlow Lens (Select Models Only) 1. 4. 2. 3. 5. 7. 6. Compass 9. Telescope Mount Parts Key 1. Red Dot Finderscope 2. 1.25" Format Eyepieces 3. Sky Tour Handset 7. Altitude Dial Light Switch 4. Illuminated Azimuth Dial 5. Azimuth Fine Adjustment Knob (Used only when Azimuth Lock Knob is engaged) 4 Diagonal Mirror (Refractors Only) 5. 1.5x ...
Owner's Manual
Page 6
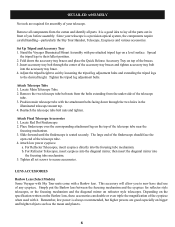
...all components from the under side of the telescope tube. 4. Since your telescope. Stand the Voyager Illuminated Mount Assembly with a Barlow lens. Attach Telescope Tube 1. a. Lens accessories Barlow Lens (Select Models) Some Voyager with Sky Tour units come with pre-attached tripod legs on... identify all the parts out in the illuminated telescope mount top. 4. Locate Red Dot Finderscope 2. Remember, low power is a precision optical system, the components require careful handling-particularly the Sky Tour Handset, Telescope, Eyepieces and various accessories. Attach low power ...
...all components from the under side of the telescope tube. 4. Since your telescope. Stand the Voyager Illuminated Mount Assembly with a Barlow lens. Attach Telescope Tube 1. a. Lens accessories Barlow Lens (Select Models) Some Voyager with Sky Tour units come with pre-attached tripod legs on... identify all the parts out in the illuminated telescope mount top. 4. Locate Red Dot Finderscope 2. Remember, low power is a precision optical system, the components require careful handling-particularly the Sky Tour Handset, Telescope, Eyepieces and various accessories. Attach low power ...

Owner's Manual
Page 7
... the battery cap located next to view objects on your unaided eye. MALIGNING FINDERSCOPE 1. A telephone pole or building). While looking through Main Telescope Tube and establish a well-defined target. (see them with the Finderscope will also be centered in the field of view of view. 3.... finderscope, alternate tightening each Finderscope Adjustment Screw until object comes into focus. Never Look Directly At The Sun With Your Telescope Permanent Damage To Your Eyes May Occur 7 MBATTERY INSTALLATION Your Sky Tour Handset is powered by two CR1620 watch batteries (included). MFOCUSING...
... the battery cap located next to view objects on your unaided eye. MALIGNING FINDERSCOPE 1. A telephone pole or building). While looking through Main Telescope Tube and establish a well-defined target. (see them with the Finderscope will also be centered in the field of view of view. 3.... finderscope, alternate tightening each Finderscope Adjustment Screw until object comes into focus. Never Look Directly At The Sun With Your Telescope Permanent Damage To Your Eyes May Occur 7 MBATTERY INSTALLATION Your Sky Tour Handset is powered by two CR1620 watch batteries (included). MFOCUSING...
Owner's Manual
Page 8
... used independently. 8 To find your latitude and longitude, please check a map of your telescope to the same "0" reference, follow these steps (refer to the "Telescope Mount Parts Key" on to the Bushnell website for your location and time, the handset will be pointed in the same direction as... then select a different mode. 10. d. Move the telescope in the same direction as the arrow index mark (and "0" on the compass. The Sky Tour handset will advance the handset to hear more information for the first object in the tour. 14. Your back yard is lined up in this ...
... used independently. 8 To find your latitude and longitude, please check a map of your telescope to the same "0" reference, follow these steps (refer to the "Telescope Mount Parts Key" on to the Bushnell website for your location and time, the handset will be pointed in the same direction as... then select a different mode. 10. d. Move the telescope in the same direction as the arrow index mark (and "0" on the compass. The Sky Tour handset will advance the handset to hear more information for the first object in the tour. 14. Your back yard is lined up in this ...

