Owner's Manual
Page 4
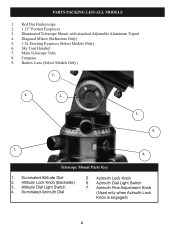
... Switch 7. Barlow Lens (Select Models Only) 1. 4. 2. 3. 5. 7. 6. Red Dot Finderscope 2. 1.25" Format Eyepieces 3. Main Telescope Tube 8. Azimuth Lock Knob 6. Sky Tour Handset 7. Compass 9. Illuminated Altitude Dial 2. Parts packing list-all models 1. Illuminated Telescope Mount with attached Adjustable Aluminum Tripod 4. Altitude Dial Light Switch 4. Azimuth Fine Adjustment Knob (Used only when Azimuth Lock...
... Switch 7. Barlow Lens (Select Models Only) 1. 4. 2. 3. 5. 7. 6. Red Dot Finderscope 2. 1.25" Format Eyepieces 3. Main Telescope Tube 8. Azimuth Lock Knob 6. Sky Tour Handset 7. Compass 9. Illuminated Altitude Dial 2. Parts packing list-all models 1. Illuminated Telescope Mount with attached Adjustable Aluminum Tripod 4. Altitude Dial Light Switch 4. Azimuth Fine Adjustment Knob (Used only when Azimuth Lock...
Owner's Manual
Page 6
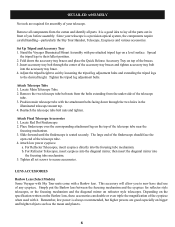
...tighten. The large end of the finderscope should face the open end of the telescope tube near the focusing mechanism. 3. Tighten all parts It is always recommended, but higher powers are required for reflector style telescopes, or the focusing mechanism and the diagonal mirror on ...tube. 3. Remove the two telescope tube bolt nuts from the bolts extending from the carton and identify all set screws to lay all the parts out in the illuminated telescope mount top. 4. Attach Final Telescope Accessories 1. Remember, low power is a good idea to secure accessories. ...
...tighten. The large end of the finderscope should face the open end of the telescope tube near the focusing mechanism. 3. Tighten all parts It is always recommended, but higher powers are required for reflector style telescopes, or the focusing mechanism and the diagonal mirror on ...tube. 3. Remove the two telescope tube bolt nuts from the bolts extending from the carton and identify all set screws to lay all the parts out in the illuminated telescope mount top. 4. Attach Final Telescope Accessories 1. Remember, low power is a good idea to secure accessories. ...
Owner's Manual
Page 8
... to repeat, then select a different mode. 10. b. Move the tripod (or entire telescope) until the facts are available for assistance (www.bushnell.com). Once this arrow index mark is your local time and what objects are starting to hear basic information about the five brightest planets and...up your telescope and handset may also be pointed in each mode. Power on to the Bushnell website for you can jump from mode to mode if you to the next tour object by "0" on the parts illustration page) : a. To find your latitude and longitude, please check a map of ...
... to repeat, then select a different mode. 10. b. Move the tripod (or entire telescope) until the facts are available for assistance (www.bushnell.com). Once this arrow index mark is your local time and what objects are starting to hear basic information about the five brightest planets and...up your telescope and handset may also be pointed in each mode. Power on to the Bushnell website for you can jump from mode to mode if you to the next tour object by "0" on the parts illustration page) : a. To find your latitude and longitude, please check a map of ...


