
Operation Manual
Page 4
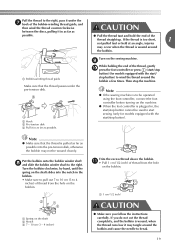
...; Do not use a damaged or incorrect needle plate, as it could cause the needle to break. • Do not push or pull the fabric when sewing, and follow careful instruction when freehand stitching so that this machine on the foot controller. • Do not use outdoors. 8 For a longer service life: • When storing this machine, avoid direct sunlight and high humidity locations. otherwise, the machine, power cord or garment...
...; Do not use a damaged or incorrect needle plate, as it could cause the needle to break. • Do not push or pull the fabric when sewing, and follow careful instruction when freehand stitching so that this machine on the foot controller. • Do not use outdoors. 8 For a longer service life: • When storing this machine, avoid direct sunlight and high humidity locations. otherwise, the machine, power cord or garment...

Operation Manual
Page 6
...14 Sewing speed controller (for models equipped with the start/stop button 15 Changing the needle stop position ...15 Changing the initial needle position ...15 Cancelling the operation beep ...16 THREADING THE MACHINE 17 Winding the bobbin ...17 Lower threading ...22 Upper threading ...25 Drawing up the lower thread ...30 REPLACING THE NEEDLE 31 Needle precautions ...31 Needle types and their uses ...31 Checking the needle ...32 Replacing the needle ...32 Sewing with the twin needle ...34 REPLACING THE PRESSER FOOT 36 Replacing the presser foot ...36 Removing the presser foot holder ...37...
...14 Sewing speed controller (for models equipped with the start/stop button 15 Changing the needle stop position ...15 Changing the initial needle position ...15 Cancelling the operation beep ...16 THREADING THE MACHINE 17 Winding the bobbin ...17 Lower threading ...22 Upper threading ...25 Drawing up the lower thread ...30 REPLACING THE NEEDLE 31 Needle precautions ...31 Needle types and their uses ...31 Checking the needle ...32 Replacing the needle ...32 Sewing with the twin needle ...34 REPLACING THE PRESSER FOOT 36 Replacing the presser foot ...36 Removing the presser foot holder ...37...
Operation Manual
Page 8
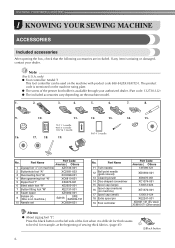
... Part Code Americas Others 1 Zigzag foot "J" (on machine) XZ5134-001 2 Buttonhole foot "A" XC2691-033 3 Overcasting foot "G" XC3098-031 4 Monogramming foot "N" XD0810-031 5 Zipper foot "I" X59370-021 6 Blind stitch foot "R" XE2650-001 7 Button fitting foot "M" XE2137-001 8 Seam ripper XZ5082-001 9 Bobbin (4) (One is missing or damaged, contact your authorized dealer. (Part code: 132730-122) ● The included accessories vary depending on machine.) SA156 SFB: XA5539-151 10 Needle set XC8834-021 No. only) ● Foot controller: Model T This foot controller...
... Part Code Americas Others 1 Zigzag foot "J" (on machine) XZ5134-001 2 Buttonhole foot "A" XC2691-033 3 Overcasting foot "G" XC3098-031 4 Monogramming foot "N" XD0810-031 5 Zipper foot "I" X59370-021 6 Blind stitch foot "R" XE2650-001 7 Button fitting foot "M" XE2137-001 8 Seam ripper XZ5082-001 9 Bobbin (4) (One is missing or damaged, contact your authorized dealer. (Part code: 132730-122) ● The included accessories vary depending on machine.) SA156 SFB: XA5539-151 10 Needle set XC8834-021 No. only) ● Foot controller: Model T This foot controller...
Operation Manual
Page 10
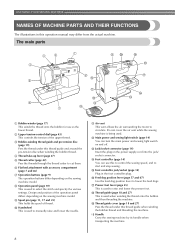
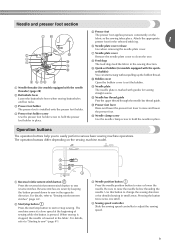
... sewing light switch on the sewing machine model. r Thread guide (page 18 and 27) This is used to raise and lower the presser foot. q Presser foot lever (page 25) This is used to start and stop sewing. s Thread guide cover (page 18 and 27) Pass the thread under this to control the sewing speed, and to select the stitch and specify the various settings. p Feed dog position lever (page 57 and 67) Use the feed dog position lever to cut them. j Handwheel This is used when winding...
... sewing light switch on the sewing machine model. r Thread guide (page 18 and 27) This is used to raise and lower the presser foot. q Presser foot lever (page 25) This is used to start and stop sewing. s Thread guide cover (page 18 and 27) Pass the thread under this to control the sewing speed, and to select the stitch and specify the various settings. p Feed dog position lever (page 57 and 67) Use the feed dog position lever to cut them. j Handwheel This is used when winding...
Operation Manual
Page 11
... hold the needle in place. c Needle position button Press the needle position button to easily perform various basic sewing machine operations. h Feed dogs The feed dogs feed the fabric in the opposite direction. d Presser foot holder screw Use the presser foot holder screw to start sewing without pulling up the bobbin thread. Pressing the button twice sews one stitch. Operation buttons The operation buttons help you to raise or lower the needle. For details, refer to "Starting to raise the needle before threading the needle. The machine sews at a slow speed at the...
... hold the needle in place. c Needle position button Press the needle position button to easily perform various basic sewing machine operations. h Feed dogs The feed dogs feed the fabric in the opposite direction. d Presser foot holder screw Use the presser foot holder screw to start sewing without pulling up the bobbin thread. Pressing the button twice sews one stitch. Operation buttons The operation buttons help you to raise or lower the needle. For details, refer to "Starting to raise the needle before threading the needle. The machine sews at a slow speed at the...
Operation Manual
Page 21
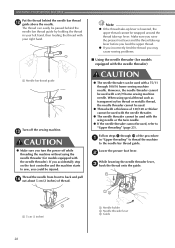
... the machine. ● When the foot controller is wound, when the thread runs low it may tangle around the bobbin. Put the bobbin onto the bobbin winder shaft h and slide the bobbin winder shaft to start sewing (only for models equipped with the start/stop button cannot be wound cleanly. k • Pull 1 cm (1/2 inch) of thread from the hole on the bobbin. Then stop button) to wind the thread around the bobbin a few times...
... the machine. ● When the foot controller is wound, when the thread runs low it may tangle around the bobbin. Put the bobbin onto the bobbin winder shaft h and slide the bobbin winder shaft to start sewing (only for models equipped with the start/stop button cannot be wound cleanly. k • Pull 1 cm (1/2 inch) of thread from the hole on the bobbin. Then stop button) to wind the thread around the bobbin a few times...

Operation Manual
Page 22
... "Winding the bobbin" to its p original position (for models equipped with the start /stop button) to wind the free end of the procedure c in the bobbin. KNOWING YOUR SEWING MACHINE Slide the sewing speed controller to the right l (to set the speed to fast). (For models equipped with the sewing speed controller.) CAUTION ● Not winding the bobbin properly may break the needle. Slide the sewing speed controller back to pass the thread around the bobbin five or six times...
... "Winding the bobbin" to its p original position (for models equipped with the start /stop button) to wind the free end of the procedure c in the bobbin. KNOWING YOUR SEWING MACHINE Slide the sewing speed controller to the right l (to set the speed to fast). (For models equipped with the sewing speed controller.) CAUTION ● Not winding the bobbin properly may break the needle. Slide the sewing speed controller back to pass the thread around the bobbin five or six times...

Operation Manual
Page 23
... position (for models equipped with the sewing speed controller). this is turned after winding the thread around the bobbin, the machine will make a clicking sound; Slide the sewing speed controller to the right f (to set the speed to fast) (for models equipped with the sewing speed controller). CAUTION ● Not winding the bobbin properly may cause the thread tension to loosen, and may break the needle. CAUTION ● Be sure to cut to a suitable length. Pull...
... position (for models equipped with the sewing speed controller). this is turned after winding the thread around the bobbin, the machine will make a clicking sound; Slide the sewing speed controller to the right f (to set the speed to fast) (for models equipped with the sewing speed controller). CAUTION ● Not winding the bobbin properly may cause the thread tension to loosen, and may break the needle. CAUTION ● Be sure to cut to a suitable length. Pull...

Operation Manual
Page 24
... details on quick-set the bobbin so the thread unrolls in d the direction shown by marks on the foot controller and the machine starts to sew, you set bobbin, see page 23. Memo ● The direction for this sewing machine. If the thread unrolls in injury. KNOWING YOUR SEWING MACHINE Lower threading Install the bobbin wound with the needle position button), and raise the presser foot lever. CAUTION ● Winding the bobbin improperly may cause the thread tension to loosen, breaking the needle and...
... details on quick-set the bobbin so the thread unrolls in d the direction shown by marks on the foot controller and the machine starts to sew, you set bobbin, see page 23. Memo ● The direction for this sewing machine. If the thread unrolls in injury. KNOWING YOUR SEWING MACHINE Lower threading Install the bobbin wound with the needle position button), and raise the presser foot lever. CAUTION ● Winding the bobbin improperly may cause the thread tension to loosen, breaking the needle and...

Operation Manual
Page 25
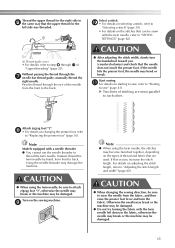
...). press (needle position button) (for models • If the thread is indicated by turning a the handwheel toward you set bobbin Memo ● The direction for feeding the bobbin thread is not correctly inserted through the slit, as indicated. Turn off the sewing machine. Hold the end of the thread, push the bobbin e down with the needle position button), and the tension-adjusting spring of the bobbin raise the presser foot lever. c 1 2 1 a Tension-adjusting spring Replace the bobbin cover. a Tab CAUTION ● Make sure...
...). press (needle position button) (for models • If the thread is indicated by turning a the handwheel toward you set bobbin Memo ● The direction for feeding the bobbin thread is not correctly inserted through the slit, as indicated. Turn off the sewing machine. Hold the end of the thread, push the bobbin e down with the needle position button), and the tension-adjusting spring of the bobbin raise the presser foot lever. c 1 2 1 a Tension-adjusting spring Replace the bobbin cover. a Tab CAUTION ● Make sure...
Operation Manual
Page 30
... While lowering the needle threader lever, c hook the thread onto the guide. m CAUTION ● Make sure you may cause sewing problems. ■ Using the needle threader (for models equipped with the needle threader) a Needle bar thread guide Turn off the sewing machine. CAUTION ● The needle threader can easily be injured. a 5 cm (2 inches) 28 a Needle holder b Needle threader lever c Guide KNOWING YOUR SEWING MACHINE Put the thread behind the needle bar thread guide by holding the thread in "Upper threading" to thread the machine to the needle bar thread guide. However...
... While lowering the needle threader lever, c hook the thread onto the guide. m CAUTION ● Make sure you may cause sewing problems. ■ Using the needle threader (for models equipped with the needle threader) a Needle bar thread guide Turn off the sewing machine. CAUTION ● The needle threader can easily be injured. a 5 cm (2 inches) 28 a Needle holder b Needle threader lever c Guide KNOWING YOUR SEWING MACHINE Put the thread behind the needle bar thread guide by holding the thread in "Upper threading" to thread the machine to the needle bar thread guide. However...
Operation Manual
Page 37
... fabric with the twin needle, refer to "STITCH SETTINGS" (page 82). 1 CAUTION a Thread guide cover • For details, refer to sew" (page 41). CAUTION ● When using the twin needle, the stitches may be sewn with the twin needle left side was threaded. For details on changing the presser foot, refer to each other. If the needle hits the presser foot, the needle may damage the machine. k For details on the sewing machine. Otherwise the needle may break...
... fabric with the twin needle, refer to "STITCH SETTINGS" (page 82). 1 CAUTION a Thread guide cover • For details, refer to sew" (page 41). CAUTION ● When using the twin needle, the stitches may be sewn with the twin needle left side was threaded. For details on changing the presser foot, refer to each other. If the needle hits the presser foot, the needle may damage the machine. k For details on the sewing machine. Otherwise the needle may break...

Operation Manual
Page 56
... button guide plate of buttonhole b foot "A", and then insert the button that will be put through the hole e in the button guide plate Add together the diameter and thickness of the button, and then set the button guide plate to the calculated length. (The distance between the markings on the presser foot scale is set to mark the position and length of 10 mm (3/8 inch), the button guide plate should be set . 54 c Select a stitch. d Pass the upper thread...
... button guide plate of buttonhole b foot "A", and then insert the button that will be put through the hole e in the button guide plate Add together the diameter and thickness of the button, and then set the button guide plate to the calculated length. (The distance between the markings on the presser foot scale is set to mark the position and length of 10 mm (3/8 inch), the button guide plate should be set . 54 c Select a stitch. d Pass the upper thread...

Operation Manual
Page 59
... shortest setting by g pressing the stitch length adjustment key. Raise the presser foot lever, and then slide the b feed dog position lever, located at the rear of the machine) Select a stitch . (With models not provided e with 4 holes can be attached. Place a button between the holes in the same way. 3 a Feed dog position lever (as seen from the rear of the machine on with the sewing machine. Measure the distance between the presser foot and d the fabric. Button sewing Buttons can be attached.
... shortest setting by g pressing the stitch length adjustment key. Raise the presser foot lever, and then slide the b feed dog position lever, located at the rear of the machine) Select a stitch . (With models not provided e with 4 holes can be attached. Place a button between the holes in the same way. 3 a Feed dog position lever (as seen from the rear of the machine on with the sewing machine. Measure the distance between the presser foot and d the fabric. Button sewing Buttons can be attached.

Operation Manual
Page 67
...; Only use the walking foot with the walking foot, sew at a speed between the top and bottom layers of the presser e foot, and then evenly guide the fabric while sewing. Note ● When sewing with straight or zigzag stitches. Models equipped with the walking foot. a Remove the presser foot and the presser foot b holder. • For details, refer to tighten the screw securely. Hook the connecting fork of the walking foot c onto the needle clamp screw, lower the presser foot lever, and then use other patterns. Reverse stitches cannot be quilted...
...; Only use the walking foot with the walking foot, sew at a speed between the top and bottom layers of the presser e foot, and then evenly guide the fabric while sewing. Note ● When sewing with straight or zigzag stitches. Models equipped with the walking foot. a Remove the presser foot and the presser foot b holder. • For details, refer to tighten the screw securely. Hook the connecting fork of the walking foot c onto the needle clamp screw, lower the presser foot lever, and then use other patterns. Reverse stitches cannot be quilted...

Operation Manual
Page 112
... cut the threads below the needle plate. The upper thread was pressed, even though the foot controller is scratched. Correctly install the needle. The needle clamp screw is bent or blunt. The needle is loose. Replace the needle. The needle breaks. The presser foot you want to sew. sew. Loosen the upper thread tension. Lightly guide the fabric. Replace the needle plate. The area around the hole in . Contact your retailer or the nearest authorized service center. Replace the bobbin case. You have not used the right...
... cut the threads below the needle plate. The upper thread was pressed, even though the foot controller is scratched. Correctly install the needle. The needle clamp screw is bent or blunt. The needle is loose. Replace the needle. The needle breaks. The presser foot you want to sew. sew. Loosen the upper thread tension. Lightly guide the fabric. Replace the needle plate. The area around the hole in . Contact your retailer or the nearest authorized service center. Replace the bobbin case. You have not used the right...

Operation Manual
Page 113
... the spool being used the right combination of fabric, thread and needle. Replace the needle. Replace the needle plate. The bobbin case is tangled, for example, in the race, clean the race. Incorrect bobbins will not work properly. Wind the bobbin thread properly. The lower thread is tangled or The thread is incorrectly Correctly install the spool or spool installed. breaks. Incorrect bobbins will not work properly. Only use a bobbin that has been designed for the type of the needle Correct the upper threading. page...
... the spool being used the right combination of fabric, thread and needle. Replace the needle. Replace the needle plate. The bobbin case is tangled, for example, in the race, clean the race. Incorrect bobbins will not work properly. Wind the bobbin thread properly. The lower thread is tangled or The thread is incorrectly Correctly install the spool or spool installed. breaks. Incorrect bobbins will not work properly. Only use a bobbin that has been designed for the type of the needle Correct the upper threading. page...

Operation Manual
Page 114
... the type of stitch that you want to you are appropriate for the type of fabric, thread and needle. page 31 The thread is incorrect. page 82 The thread tension is tangled, for this machine. You have not used the right combination of fabric. page 17 The feed dogs are skipped. Use the presser foot locking pin (black button on the left side) on a thick seam at the beginning of the upper thread...
... the type of stitch that you want to you are appropriate for the type of fabric, thread and needle. page 31 The thread is incorrect. page 82 The thread tension is tangled, for this machine. You have not used the right combination of fabric. page 17 The feed dogs are skipped. Use the presser foot locking pin (black button on the left side) on a thick seam at the beginning of the upper thread...
Operation Manual
Page 116
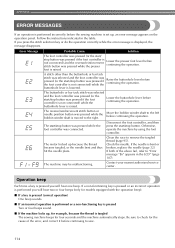
... the presser Lower the presser foot lever before continuing the operation. Error Message Probable Cause Solution The foot controller was pressed (or the start /stop button was pressed while the foot controller was pressed while the bobbin winder shaft is tangled The sewing machine beeps for the cause of the above fail, refer to remove the tangled thread (page 95). Be sure to the right. buttonhole lever is raised. Follow the instructions...
... the presser Lower the presser foot lever before continuing the operation. Error Message Probable Cause Solution The foot controller was pressed (or the start /stop button was pressed while the foot controller was pressed while the bobbin winder shaft is tangled The sewing machine beeps for the cause of the above fail, refer to remove the tangled thread (page 95). Be sure to the right. buttonhole lever is raised. Follow the instructions...

Operation Manual
Page 117
...36 presser foot holder 9, 37 presser foot lever 9, 25 deleting characters 79 E elastic tape 61 error messages 114 extra spool pin 34 Q quick-set bobbin 9, 23, 30 quilting 65 quilting foot 66 quilting guide 65, 66 eyelet punch 56 R F fagoting 71 fast bobbin winding 20 feed dog position lever 8, 57, 67 feed dogs 9, 57, 67 flat bed attachment 7, 8, 46 race 95 reinforcement stitching 42 reverse/reinforcement stitch button 9, 42 S scallop stitching 72 flip chart 12 foot controller 6, 14, 41 free-motion quilting 66 seam ripper 56 sewing machine needles 31 sewing speed...
...36 presser foot holder 9, 37 presser foot lever 9, 25 deleting characters 79 E elastic tape 61 error messages 114 extra spool pin 34 Q quick-set bobbin 9, 23, 30 quilting 65 quilting foot 66 quilting guide 65, 66 eyelet punch 56 R F fagoting 71 fast bobbin winding 20 feed dog position lever 8, 57, 67 feed dogs 9, 57, 67 flat bed attachment 7, 8, 46 race 95 reinforcement stitching 42 reverse/reinforcement stitch button 9, 42 S scallop stitching 72 flip chart 12 foot controller 6, 14, 41 free-motion quilting 66 seam ripper 56 sewing machine needles 31 sewing speed...


