Operation Manual
Page 4
... drop or insert any object into any adjustments in the needle area. • Do not use a damaged or incorrect needle plate, as it could cause the needle to break. • Do not push or pull the fabric when sewing, and follow the troubleshooting table in fire or an electric shock. • Do not place this machine on the foot controller. • Do not use extension cords. Do not use bent...
... drop or insert any object into any adjustments in the needle area. • Do not use a damaged or incorrect needle plate, as it could cause the needle to break. • Do not push or pull the fabric when sewing, and follow the troubleshooting table in fire or an electric shock. • Do not place this machine on the foot controller. • Do not use extension cords. Do not use bent...
Operation Manual
Page 6
...14 Sewing speed controller (for models equipped with the start/stop button 15 Changing the needle stop position ...15 Changing the initial needle position ...15 Cancelling the operation beep ...16 THREADING THE MACHINE 17 Winding the bobbin ...17 Lower threading ...22 Upper threading ...25 Drawing up the lower thread ...30 REPLACING THE NEEDLE 31 Needle precautions ...31 Needle types and their uses ...31 Checking the needle ...32 Replacing the needle ...32 Sewing with the twin needle ...34 REPLACING THE PRESSER FOOT 36 Replacing the presser foot ...36 Removing the presser foot holder ...37...
...14 Sewing speed controller (for models equipped with the start/stop button 15 Changing the needle stop position ...15 Changing the initial needle position ...15 Cancelling the operation beep ...16 THREADING THE MACHINE 17 Winding the bobbin ...17 Lower threading ...22 Upper threading ...25 Drawing up the lower thread ...30 REPLACING THE NEEDLE 31 Needle precautions ...31 Needle types and their uses ...31 Checking the needle ...32 Replacing the needle ...32 Sewing with the twin needle ...34 REPLACING THE PRESSER FOOT 36 Replacing the presser foot ...36 Removing the presser foot holder ...37...
Operation Manual
Page 8
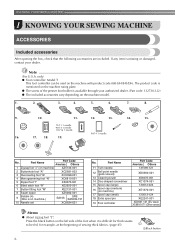
...-151 10 Needle set XC8834-021 No. Note (For U.S.A. Part Name Part Code Americas Others 1 Zigzag foot "J" (on machine) XZ5134-001 2 Buttonhole foot "A" XC2691-033 3 Overcasting foot "G" XC3098-031 4 Monogramming foot "N" XD0810-031 5 Zipper foot "I" X59370-021 6 Blind stitch foot "R" XE2650-001 7 Button fitting foot "M" XE2137-001 8 Seam ripper XZ5082-001 9 Bobbin (4) (One is available through your dealer. Press the black button on the left side of the presser foot holder is on the machine model. 1. 2. 3. 4. 5. 6. 7. 8. 9. 10. 11...
...-151 10 Needle set XC8834-021 No. Note (For U.S.A. Part Name Part Code Americas Others 1 Zigzag foot "J" (on machine) XZ5134-001 2 Buttonhole foot "A" XC2691-033 3 Overcasting foot "G" XC3098-031 4 Monogramming foot "N" XD0810-031 5 Zipper foot "I" X59370-021 6 Blind stitch foot "R" XE2650-001 7 Button fitting foot "M" XE2137-001 8 Seam ripper XZ5082-001 9 Bobbin (4) (One is available through your dealer. Press the black button on the left side of the presser foot holder is on the machine model. 1. 2. 3. 4. 5. 6. 7. 8. 9. 10. 11...
Operation Manual
Page 10
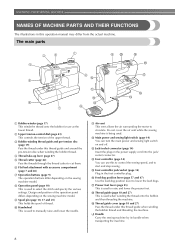
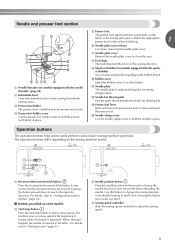
... machine. 8 f Flat bed attachment with accessory compartment (page 7 and 46) g Operation buttons (page 9) The operation buttons differ depending on the power supply cord into the jack/ socket connector. Design and position of the upper thread. i Spool pin (page 10, 17 and 25) This holds the spool of thread. p Feed dog position lever (page 57 and 67) Use the feed dog position lever to raise and lower the presser foot. s Thread guide cover (page 18 and 27) Pass the thread under this to control the sewing speed...
... machine. 8 f Flat bed attachment with accessory compartment (page 7 and 46) g Operation buttons (page 9) The operation buttons differ depending on the power supply cord into the jack/ socket connector. Design and position of the upper thread. i Spool pin (page 10, 17 and 25) This holds the spool of thread. p Feed dog position lever (page 57 and 67) Use the feed dog position lever to raise and lower the presser foot. s Thread guide cover (page 18 and 27) Pass the thread under this to control the sewing speed...
Operation Manual
Page 11
... with the quickset bobbin) You can start or stop button to change the sewing direction or for sewing straight seams. l Needle bar thread guide Pass the upper thread through the needle bar thread guide. h Feed dogs The feed dogs feed the fabric in the fabric. i Quick-set the bobbin. j Bobbin cover Open the bobbin cover to sew in small areas. d Presser foot holder screw Use the presser foot holder screw to hold the presser foot holder in place. m Presser foot lever Raise and lower the presser foot lever to sew" (page 41). n Needle clamp screw Use the needle clamp screw to hold...
... with the quickset bobbin) You can start or stop button to change the sewing direction or for sewing straight seams. l Needle bar thread guide Pass the upper thread through the needle bar thread guide. h Feed dogs The feed dogs feed the fabric in the fabric. i Quick-set the bobbin. j Bobbin cover Open the bobbin cover to sew in small areas. d Presser foot holder screw Use the presser foot holder screw to hold the presser foot holder in place. m Presser foot lever Raise and lower the presser foot lever to sew" (page 41). n Needle clamp screw Use the needle clamp screw to hold...
Operation Manual
Page 21
... the excess thread above the bobbin. Put the bobbin onto the bobbin winder shaft h and slide the bobbin winder shaft to start sewing (only for models equipped with the start / stop button cannot be wound cleanly. If you follow the instructions carefully. k • Pull 1 cm (3/8 inch) of the thread, gently j press the foot controller or press (start/stop button) (for models equipped with the start /stop the machine. Pull the thread to the...
... the excess thread above the bobbin. Put the bobbin onto the bobbin winder shaft h and slide the bobbin winder shaft to start sewing (only for models equipped with the start / stop button cannot be wound cleanly. If you follow the instructions carefully. k • Pull 1 cm (3/8 inch) of the thread, gently j press the foot controller or press (start/stop button) (for models equipped with the start /stop the machine. Pull the thread to the...

Operation Manual
Page 22
... six times. 20 a Sewing speed controller Press the foot controller or press (start . Memo ● When the sewing machine is started or the handwheel is not a malfunction. ● The needle bar does not move when you slide the bobbin winding shaft to its p original position (for models equipped with the sewing speed controller). b Follow steps a through g of the thread clockwise around the bobbin, the machine will make a clicking sound; a Notch b Bobbin winder shaft spring Slide the bobbin winder...
... six times. 20 a Sewing speed controller Press the foot controller or press (start . Memo ● When the sewing machine is started or the handwheel is not a malfunction. ● The needle bar does not move when you slide the bobbin winding shaft to its p original position (for models equipped with the sewing speed controller). b Follow steps a through g of the thread clockwise around the bobbin, the machine will make a clicking sound; a Notch b Bobbin winder shaft spring Slide the bobbin winder...
Operation Manual
Page 23
... thread using the foot controller, connect the foot controller before turning on the sewing machine. Slide the sewing speed controller to the right f (to set the speed to fast) (for models equipped with the start/stop button cannot be operated using the cutter built into the slit in the bobbin winder seat, the thread may become tangled in the bobbin winder seat. g Press the foot controller or press (start/ h stop button) (for models equipped with the start/stop button) to start /stop button...
... thread using the foot controller, connect the foot controller before turning on the sewing machine. Slide the sewing speed controller to the right f (to set the speed to fast) (for models equipped with the start/stop button cannot be operated using the cutter built into the slit in the bobbin winder seat, the thread may become tangled in the bobbin winder seat. g Press the foot controller or press (start/ h stop button) (for models equipped with the start/stop button) to start /stop button...

Operation Manual
Page 24
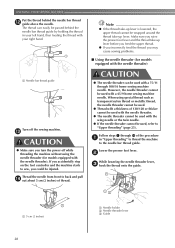
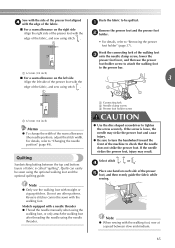
KNOWING YOUR SEWING MACHINE Lower threading Install the bobbin wound with the needle position button), and raise the presser foot lever. b Slide the button and open the cover. CAUTION ● Make sure you set bobbin, see page 23. Be sure to loosen, breaking the needle and resulting in the wrong direction, it may cause the thread tension to thread the machine as indicated. If the thread unrolls in injury. CAUTION ● Winding the bobbin improperly may cause the thread tension to...
KNOWING YOUR SEWING MACHINE Lower threading Install the bobbin wound with the needle position button), and raise the presser foot lever. b Slide the button and open the cover. CAUTION ● Make sure you set bobbin, see page 23. Be sure to loosen, breaking the needle and resulting in the wrong direction, it may cause the thread tension to thread the machine as indicated. If the thread unrolls in injury. CAUTION ● Winding the bobbin improperly may cause the thread tension to...

Operation Manual
Page 25
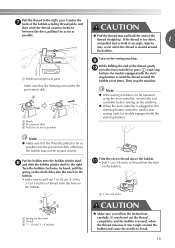
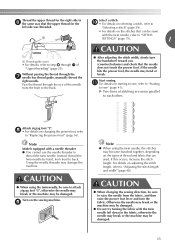
... cause incorrect thread tension (page 43). c 1 2 1 a Tension-adjusting spring Replace the bobbin cover. Turn off the sewing machine. 1 b Slide the button and open the cover. Put the left side of the cover (as shown by the line in the right direction. If the thread unrolls in f place (see arrow a), and then press lightly on the needle plate cover. a Cover b Slide button Insert the bobbin with your left hand as shown, lightly pull the thread to guide it...
... cause incorrect thread tension (page 43). c 1 2 1 a Tension-adjusting spring Replace the bobbin cover. Turn off the sewing machine. 1 b Slide the button and open the cover. Put the left side of the cover (as shown by the line in the right direction. If the thread unrolls in f place (see arrow a), and then press lightly on the needle plate cover. a Cover b Slide button Insert the bobbin with your left hand as shown, lightly pull the thread to guide it...
Operation Manual
Page 30
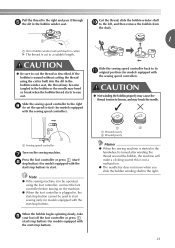
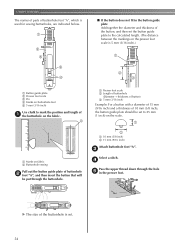
... presser foot lever and the thread take-up lever before you feed the upper thread. ● If you incorrectly feed the thread you turn the power off the sewing machine. If you accidentally step on the foot controller and the machine starts to "Upper threading" (page 25). Thread the needle from front to the needle bar thread guide. When using the needle threader (for models equipped with the wing needle or the twin needle. ● If the needle threader cannot be injured. Lower the presser foot lever. The thread...
... presser foot lever and the thread take-up lever before you feed the upper thread. ● If you incorrectly feed the thread you turn the power off the sewing machine. If you accidentally step on the foot controller and the machine starts to "Upper threading" (page 25). Thread the needle from front to the needle bar thread guide. When using the needle threader (for models equipped with the wing needle or the twin needle. ● If the needle threader cannot be injured. Lower the presser foot lever. The thread...
Operation Manual
Page 37
... using the twin needle, the stitches may damage the machine. Note Models equipped with the twin needle, refer to "STITCH SETTINGS" (page 75). 1 a Thread guide cover • For details, refer to step h through k of the needle from the fabric, and then raise the presser foot lever and turn the handwheel toward you (counterclockwise) and check that the upper thread for the right side in the fabric, otherwise the needle may break or the machine...
... using the twin needle, the stitches may damage the machine. Note Models equipped with the twin needle, refer to "STITCH SETTINGS" (page 75). 1 a Thread guide cover • For details, refer to step h through k of the needle from the fabric, and then raise the presser foot lever and turn the handwheel toward you (counterclockwise) and check that the upper thread for the right side in the fabric, otherwise the needle may break or the machine...
Operation Manual
Page 56
... size of the buttonhole is set to mark the position and length of a the buttonhole on the fabric. 2 1 a Marks on the scale. 1 2 a 10 mm (3/8 inch) b 15 mm (9/16 inch) Attach buttonhole foot "A". UTILITY STITCHES The names of parts of buttonhole foot "A", which is used for sewing buttonholes, are indicated below. 1 2 5 ■ If the button does not fit in the presser foot. c Select a stitch. d Pass the upper thread down through the hole e in the button guide plate Add...
... size of the buttonhole is set to mark the position and length of a the buttonhole on the fabric. 2 1 a Marks on the scale. 1 2 a 10 mm (3/8 inch) b 15 mm (9/16 inch) Attach buttonhole foot "A". UTILITY STITCHES The names of parts of buttonhole foot "A", which is used for sewing buttonholes, are indicated below. 1 2 5 ■ If the button does not fit in the presser foot. c Select a stitch. d Pass the upper thread down through the hole e in the button guide plate Add...
Operation Manual
Page 59
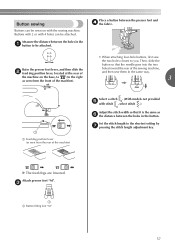
... the sewing machine, and then sew them in the a button to be attached. Raise the presser foot lever, and then slide the b feed dog position lever, located at the rear of the machine). • When attaching four-hole buttons, first sew the two holes closest to the shortest setting by g pressing the stitch length adjustment key. The feed dogs are lowered. c 1 a Button fitting foot "M" 57 Set the stitch length to you. Measure the distance between the presser foot and d the fabric. Then...
... the sewing machine, and then sew them in the a button to be attached. Raise the presser foot lever, and then slide the b feed dog position lever, located at the rear of the machine). • When attaching four-hole buttons, first sew the two holes closest to the shortest setting by g pressing the stitch length adjustment key. The feed dogs are lowered. c 1 a Button fitting foot "M" 57 Set the stitch length to you. Measure the distance between the presser foot and d the fabric. Then...
Operation Manual
Page 67
... to "Removing the presser foot holder" (page 37). Do not use the presser foot holder screw to attach the walking foot to the presser bar. Place one hand on each side of the seam allowance (the needle position), adjust the stitch width. Note ● Only use the walking foot with the walking foot, sew at a speed between the top and bottom layers of the walking foot c onto the needle clamp screw, lower the presser foot lever, and then use other patterns. Note ● When sewing with straight or zigzag stitches. Sew with...
... to "Removing the presser foot holder" (page 37). Do not use the presser foot holder screw to attach the walking foot to the presser bar. Place one hand on each side of the seam allowance (the needle position), adjust the stitch width. Note ● Only use the walking foot with the walking foot, sew at a speed between the top and bottom layers of the walking foot c onto the needle clamp screw, lower the presser foot lever, and then use other patterns. Note ● When sewing with straight or zigzag stitches. Sew with...

Operation Manual
Page 70
... to the desired length. (The distance between the markings on the presser foot scale is accidentally pressed and the machine starts sewing. Triple stretch stitching Use triple stretch stitching to strain, such as sleeve holes, inseams and pocket corners. Attach buttonhole foot "A". Rfc. * Auto Rfc. Pattern Presser Foot 100 stitches model 90 stitches model 80 stitches model 70 stitches model 60 stitches model 50 stitches model 40 stitches model Twin Needle Walking Foot Reverse (Rev.)/ Reinforcement (Rfc.) Stitching Stitch Name Pattern No. Bar tack stitching Bar tacks are used to reinforce...
... to the desired length. (The distance between the markings on the presser foot scale is accidentally pressed and the machine starts sewing. Triple stretch stitching Use triple stretch stitching to strain, such as sleeve holes, inseams and pocket corners. Attach buttonhole foot "A". Rfc. * Auto Rfc. Pattern Presser Foot 100 stitches model 90 stitches model 80 stitches model 70 stitches model 60 stitches model 50 stitches model 40 stitches model Twin Needle Walking Foot Reverse (Rev.)/ Reinforcement (Rfc.) Stitching Stitch Name Pattern No. Bar tack stitching Bar tacks are used to reinforce...
Operation Manual
Page 99
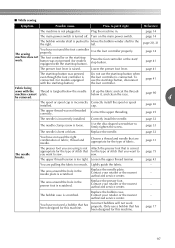
... bobbin winder shaft is loose. left. Lower the presser foot lever. page 41 The start / stop work properly. Correct the upper threading. page 32 The needle clamp screw is pushed to Move the bobbin winder shaft to the the right. page 33 The needle is scratched. Replace the needle. Loosen the upper thread tension. Lightly guide the fabric. - Contact your retailer or the nearest authorized service center. - authorized service center. Turn on the main power switch. Press the foot controller...
... bobbin winder shaft is loose. left. Lower the presser foot lever. page 41 The start / stop work properly. Correct the upper threading. page 32 The needle clamp screw is pushed to Move the bobbin winder shaft to the the right. page 33 The needle is scratched. Replace the needle. Loosen the upper thread tension. Lightly guide the fabric. - Contact your retailer or the nearest authorized service center. - authorized service center. Turn on the main power switch. Press the foot controller...
Operation Manual
Page 100
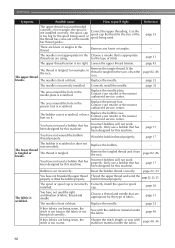
... needle plate. breaks. page 22, 23, 25 The spool or spool cap is too coarse. Remove any knots or tangles. - Reset the bobbin thread correctly. You have not used . Correctly install the needle. bar thread guide.) page 25 There are being used the right combination of fabric, thread and needle. page 32 The area around the hole in the thread. Shorten the stitch length, or sew with the stabilizer material under the fabric. Loosen the upper thread tension. Wind...
... needle plate. breaks. page 22, 23, 25 The spool or spool cap is too coarse. Remove any knots or tangles. - Reset the bobbin thread correctly. You have not used . Correctly install the needle. bar thread guide.) page 25 There are being used the right combination of fabric, thread and needle. page 32 The area around the hole in the thread. Shorten the stitch length, or sew with the stabilizer material under the fabric. Loosen the upper thread tension. Wind...
Operation Manual
Page 101
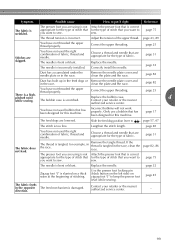
... upper thread properly. page 82 You have not threaded the upper thread properly. The bobbin case is bent or blunt. If the thread is damaged. Replace the needle. Use the presser foot locking pin (black button on the left side) on a thick seam at the beginning of fabric. page 25 Stitches are lowered. Replace the needle. Only use a bobbin that is too fine. Slide the feed dog position lever to . Choose a thread and needle that are appropriate for the type of stitching. sew...
... upper thread properly. page 82 You have not threaded the upper thread properly. The bobbin case is bent or blunt. If the thread is damaged. Replace the needle. Use the presser foot locking pin (black button on the left side) on a thick seam at the beginning of fabric. page 25 Stitches are lowered. Replace the needle. Only use a bobbin that is too fine. Slide the feed dog position lever to . Choose a thread and needle that are appropriate for the type of stitching. sew...
Operation Manual
Page 103
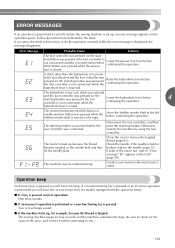
... the machine automatically stops. A stitch other than the buttonhole or bar tack stitch was selected and the foot controller was pressed (or the start/stop button was pressed while the bobbin winder shaft is moved to the left before continuing the operation. The reverse/reinforcement stitch button or needle position button was pressed if the foot controller is lowered. If both of the error, and correct it before continuing to sew. 101 Operation beep Each time...
... the machine automatically stops. A stitch other than the buttonhole or bar tack stitch was selected and the foot controller was pressed (or the start/stop button was pressed while the bobbin winder shaft is moved to the left before continuing the operation. The reverse/reinforcement stitch button or needle position button was pressed if the foot controller is lowered. If both of the error, and correct it before continuing to sew. 101 Operation beep Each time...


