Users Manual - English
Page 3
... is required around the machine needle. • Switch the sewing machine to the symbol "O" position to turn it off when making any assemblies, the presser feet, needle, or other hot objects. • Use only neutral soaps or detergents to clean the case. Never allow children to play with any ...where aerosol (spray) products are being sewn may ignite, resulting in fire or an electric shock. • Do not place this sewing machine on the foot controller. • Do not use or store the machine near a heat source, such as a stove or iron; Keep ventilation openings of the sewing machine...
... is required around the machine needle. • Switch the sewing machine to the symbol "O" position to turn it off when making any assemblies, the presser feet, needle, or other hot objects. • Use only neutral soaps or detergents to clean the case. Never allow children to play with any ...where aerosol (spray) products are being sewn may ignite, resulting in fire or an electric shock. • Do not place this sewing machine on the foot controller. • Do not use or store the machine near a heat source, such as a stove or iron; Keep ventilation openings of the sewing machine...
Users Manual - English
Page 5
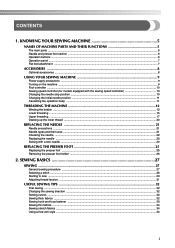
...FUNCTIONS 5 The main parts ...5 Needle and presser foot section ...6 Operation buttons ...6 Operation panel ...7 Flat bed attachment ...7 ACCESSORIES ...8 Optional accessories ...8 USING YOUR SEWING MACHINE 9 Power supply precautions ...9 Turning on the machine ...9 Foot controller ...10 Sewing speed controller (for ...21 Checking the needle ...22 Replacing the needle ...22 Sewing with a twin needle ...24 REPLACING THE PRESSER FOOT 25 Replacing the presser foot ...25 Removing the presser foot holder ...26 2. SEWING BASICS 27 SEWING ...27 General sewing procedure ...27 Selecting a stitch ...28...
...FUNCTIONS 5 The main parts ...5 Needle and presser foot section ...6 Operation buttons ...6 Operation panel ...7 Flat bed attachment ...7 ACCESSORIES ...8 Optional accessories ...8 USING YOUR SEWING MACHINE 9 Power supply precautions ...9 Turning on the machine ...9 Foot controller ...10 Sewing speed controller (for ...21 Checking the needle ...22 Replacing the needle ...22 Sewing with a twin needle ...24 REPLACING THE PRESSER FOOT 25 Replacing the presser foot ...25 Removing the presser foot holder ...26 2. SEWING BASICS 27 SEWING ...27 General sewing procedure ...27 Selecting a stitch ...28...

Users Manual - English
Page 7
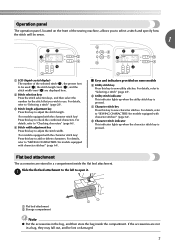
...buttons (page 6) The operation buttons differ depending on the power supply cord into the jack/ socket connector. n Foot controller jack/socket (page 10) Plug in the foot controller plug. p Presser foot lever (page 17) Used to manually raise and lower the needle. 1 KNOWING YOUR SEWING MACHINE 1 NAMES OF...spool pin (page 24) This holds a second spool of thread for lubrication. k Handwheel Used to raise and lower the presser foot. h Flat bed attachment with two needles. q Foot controller (page 10) You can turn the main power and sewing light switch on and off. f Thread take-up ...
...buttons (page 6) The operation buttons differ depending on the power supply cord into the jack/ socket connector. n Foot controller jack/socket (page 10) Plug in the foot controller plug. p Presser foot lever (page 17) Used to manually raise and lower the needle. 1 KNOWING YOUR SEWING MACHINE 1 NAMES OF...spool pin (page 24) This holds a second spool of thread for lubrication. k Handwheel Used to raise and lower the presser foot. h Flat bed attachment with two needles. q Foot controller (page 10) You can turn the main power and sewing light switch on and off. f Thread take-up ...

Users Manual - English
Page 8
... sewing speed controller) Slide the sewing speed controller to hold the needle in place. d Presser foot holder screw Use the presser foot holder screw to adjust the sewing speed. 6 e Presser foot The presser foot applies pressure consistently on the sewing machine model. When sewing is stopped, the needle is ... to sew in the fabric. i Needle plate The needle plate is marked with the needle threader) (page 18) c Presser foot holder The presser foot is depressed. The operation buttons differ depending on the fabric as the sewing takes place. For details, refer to "Starting to...
... sewing speed controller) Slide the sewing speed controller to hold the needle in place. d Presser foot holder screw Use the presser foot holder screw to adjust the sewing speed. 6 e Presser foot The presser foot applies pressure consistently on the sewing machine model. When sewing is stopped, the needle is ... to sew in the fabric. i Needle plate The needle plate is marked with the needle threader) (page 18) c Presser foot holder The presser foot is depressed. The operation buttons differ depending on the fabric as the sewing takes place. For details, refer to "Starting to...
Users Manual - English
Page 9
..., refer to "SEWING CHARACTERS (for models equipped with character stitches)" (page 64). ■ Keys and indicators provided on the front of the selected stitch (1), the presser foot to be sewn. 1 3 ABC a LCD (liquid crystal display) The number of the sewing machine, allows you wish to check the combined characters. For details, refer...
..., refer to "SEWING CHARACTERS (for models equipped with character stitches)" (page 64). ■ Keys and indicators provided on the front of the selected stitch (1), the presser foot to be sewn. 1 3 ABC a LCD (liquid crystal display) The number of the sewing machine, allows you wish to check the combined characters. For details, refer...
Users Manual - English
Page 10
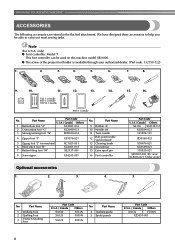
...ripper X54243-051 No. No. Part Name 1 Buttonhole foot "A" 2 Overcasting foot "G" 3 Monogramming foot "N" Part Code U.S.A. / Canada Others XC2691-033 XC3098-031 XD0810-031 4 Zipper foot "I" X59370-021 5 Zigzag foot "J" (on this machine model XR-9000. ● The screw of the presser foot holder is available through your authorized dealer. (Part ...11 Twin needle 12 Ball point needle (gold colored) 13 Cleaning brush 14 Screwdriver 15 Extra spool pin 16 Foot controller Optional accessories 1. 2. 3. 4. 15. 16. We have designed these accessories to carry out most sewing...
...ripper X54243-051 No. No. Part Name 1 Buttonhole foot "A" 2 Overcasting foot "G" 3 Monogramming foot "N" Part Code U.S.A. / Canada Others XC2691-033 XC3098-031 XD0810-031 4 Zipper foot "I" X59370-021 5 Zigzag foot "J" (on this machine model XR-9000. ● The screw of the presser foot holder is available through your authorized dealer. (Part ...11 Twin needle 12 Ball point needle (gold colored) 13 Cleaning brush 14 Screwdriver 15 Extra spool pin 16 Foot controller Optional accessories 1. 2. 3. 4. 15. 16. We have designed these accessories to carry out most sewing...

Users Manual - English
Page 17
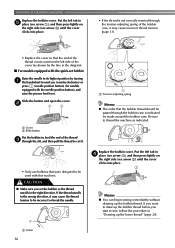
... quick-set the bobbin so the thread unrolls in c the direction shown by turning a the handwheel toward you accidentally step on the foot controller and the machine starts to be injured. If you (counterclockwise) or press (needle position button) (for this sewing machine. Install... the bobbin wound with the needle position button), and raise the presser foot lever. 1 a Tension-adjusting spring 15 Raise the needle to the right. CAUTION ● Make sure you set bobbin, see page 16....
... quick-set the bobbin so the thread unrolls in c the direction shown by turning a the handwheel toward you accidentally step on the foot controller and the machine starts to be injured. If you (counterclockwise) or press (needle position button) (for this sewing machine. Install... the bobbin wound with the needle position button), and raise the presser foot lever. 1 a Tension-adjusting spring 15 Raise the needle to the right. CAUTION ● Make sure you set bobbin, see page 16....
Users Manual - English
Page 18
... case is indicated by turning a the handwheel toward you set bobbin Raise the needle to be used with the needle position button), and raise the presser foot lever. If the thread unrolls in d place (see arrow a), and then press lightly on the right side (see arrow b) until the cover clicks into place...
... case is indicated by turning a the handwheel toward you set bobbin Raise the needle to be used with the needle position button), and raise the presser foot lever. If the thread unrolls in d place (see arrow a), and then press lightly on the right side (see arrow b) until the cover clicks into place...
Users Manual - English
Page 19
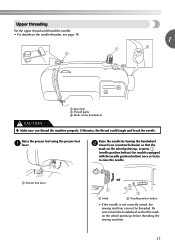
Raise the needle by turning the handwheel b toward you thread the machine properly. a Presser foot lever or a Mark b Needle position button • If the needle is not correctly raised, the sewing machine can not be threaded. Otherwise, the thread could ... the handwheel CAUTION ● Make sure you (counterclockwise) so that the mark on the wheel points up before threading the sewing machine. 17 Raise the presser foot using the presser foot a lever.
Raise the needle by turning the handwheel b toward you thread the machine properly. a Presser foot lever or a Mark b Needle position button • If the needle is not correctly raised, the sewing machine can not be threaded. Otherwise, the thread could ... the handwheel CAUTION ● Make sure you (counterclockwise) so that the mark on the wheel points up before threading the sewing machine. 17 Raise the presser foot using the presser foot a lever.

Users Manual - English
Page 20
... needle threader can only be used with your left . Make sure you guide the thread through 6 of the procedure in your right hand. Lower the presser foot lever. a Thread take -up lever before you feed the upper thread. ● If you incorrectly feed the thread you raise the... presser foot lever and the thread take -up lever. Make sure the main power switch is in the range of the needle by hand. Make sure you ...
... needle threader can only be used with your left . Make sure you guide the thread through 6 of the procedure in your right hand. Lower the presser foot lever. a Thread take -up lever before you feed the upper thread. ● If you incorrectly feed the thread you raise the... presser foot lever and the thread take -up lever. Make sure the main power switch is in the range of the needle by hand. Make sure you ...

Users Manual - English
Page 22
...; For models equipped with the needle position button) once or twice. Pass the thread along the slit in the direction a of the machine under the presser foot. Before you draw up the bobbin thread. When sewing gathers or darts, you (counterclockwise) so that some thread will be removed. c 20 a Pull out about...
...; For models equipped with the needle position button) once or twice. Pass the thread along the slit in the direction a of the machine under the presser foot. Before you draw up the bobbin thread. When sewing gathers or darts, you (counterclockwise) so that some thread will be removed. c 20 a Pull out about...
Users Manual - English
Page 24
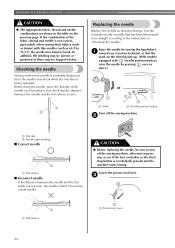
... described below. KNOWING YOUR SEWING MACHINE CAUTION ● The appropriate fabric, thread and needle combinations are shown in "Checking the needle" . Lower the presser foot lever. c 1 a Flat surface a Presser foot lever 22 Use the screwdriver and a needle that the mark on the wheel points up. (With models equipped with a bent needle is extremely dangerous... needle on the previous page. Do not use a bent needle. In addition, the stitching may be uneven or puckered or there may occur if the foot controller or the start/ stop button is even.
... described below. KNOWING YOUR SEWING MACHINE CAUTION ● The appropriate fabric, thread and needle combinations are shown in "Checking the needle" . Lower the presser foot lever. c 1 a Flat surface a Presser foot lever 22 Use the screwdriver and a needle that the mark on the wheel points up. (With models equipped with a bent needle is extremely dangerous... needle on the previous page. Do not use a bent needle. In addition, the stitching may be uneven or puckered or there may occur if the foot controller or the start/ stop button is even.
Users Manual - English
Page 26
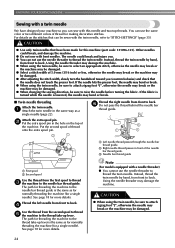
...). The path for threading the machine to back. a Attach the twin needle in the hole on the stitches that the needle does not touch the presser foot. Attach the extra spool pin. f Do not pass the thread behind the needle bar thread guide. Instead, thread the twin needle by hand, from ...front to raise the needle before turning the fabric. If the needle hits the presser foot, the needle may be damaged. ● After adjusting the stitch width, slowly turn the handwheel toward you can be sure to the thread take -up...
...). The path for threading the machine to back. a Attach the twin needle in the hole on the stitches that the needle does not touch the presser foot. Attach the extra spool pin. f Do not pass the thread behind the needle bar thread guide. Instead, thread the twin needle by hand, from ...front to raise the needle before turning the fabric. If the needle hits the presser foot, the needle may be damaged. ● After adjusting the stitch width, slowly turn the handwheel toward you can be sure to the thread take -up...
Users Manual - English
Page 27
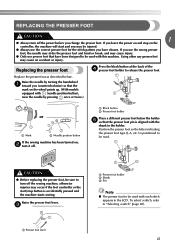
.../stop button is positioned to be read. Replacing the presser foot Press the black button at the back of the d presser foot holder to "Selecting a stitch" (page 28). a Presser foot lever 25 Using other any presser feet may occur if the foot controller or the start and you may cause injury.... otherwise injuries may cause an accident or injury. CAUTION ● Before replacing the presser foot, be sure to be injured. ● Always use the wrong presser foot, the needle may strike the presser foot and bend or break, and may be used with (needle position button), raise ...
.../stop button is positioned to be read. Replacing the presser foot Press the black button at the back of the d presser foot holder to "Selecting a stitch" (page 28). a Presser foot lever 25 Using other any presser feet may occur if the foot controller or the start and you may cause injury.... otherwise injuries may cause an accident or injury. CAUTION ● Before replacing the presser foot, be sure to be injured. ● Always use the wrong presser foot, the needle may strike the presser foot and bend or break, and may be used with (needle position button), raise ...

Users Manual - English
Page 28
... c Presser foot holder screw 26 a Presser foot holder b Presser bar Hold the presser foot holder in place with b your left side of the presser bar. a Screwdriver b Presser foot holder c Presser foot holder screw Note ● If the presser foot holder is attached. a • For details, refer to loosen the presser foot b holder screw. Raise the presser foot lever to remove the presser foot holder. ■ Removing the presser foot holder Remove the presser foot. a Presser foot...
... c Presser foot holder screw 26 a Presser foot holder b Presser bar Hold the presser foot holder in place with b your left side of the presser bar. a Screwdriver b Presser foot holder c Presser foot holder screw Note ● If the presser foot holder is attached. a • For details, refer to loosen the presser foot b holder screw. Raise the presser foot lever to remove the presser foot holder. ■ Removing the presser foot holder Remove the presser foot. a Presser foot...

Users Manual - English
Page 29
...may occur or the needle may break or bend. For details on turning on the machine, refer to "Turning on replacing the presser foot, refer to "Replacing the presser foot" (page 25). For details on the machine" (page 9). Select the stitch appropriate for the stitch. For details on starting to... the threads. Bent needles can easily break, possibly resulting in operation, pay special attention to the needle location. p 3 Attach the presser foot. Position the fabric, and then start sewing. For details on selecting a stitch, refer to be sewn. Turn on the machine. Attach the...
...may occur or the needle may break or bend. For details on turning on the machine, refer to "Turning on replacing the presser foot, refer to "Replacing the presser foot" (page 25). For details on the machine" (page 9). Select the stitch appropriate for the stitch. For details on starting to... the threads. Bent needles can easily break, possibly resulting in operation, pay special attention to the needle location. p 3 Attach the presser foot. Position the fabric, and then start sewing. For details on selecting a stitch, refer to be sewn. Turn on the machine. Attach the...
Users Manual - English
Page 30
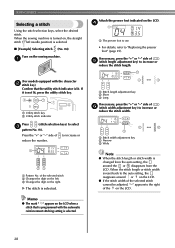
...is lit. a Stitch length adjustment key b Short c Long If necessary, press the "+" or "-" side of f (stitch width adjustment key) to "Replacing the presser foot" (page 25). of the on the LCD when a stitch that the utility stitch indicator is selected. ■ [Example] Selecting stitch (No. 04) Turn on ...from the auto setting, the around or on the LCD. ● If the stitch width of to select c pattern No. 04. d a The presser foot to use • For details, refer to increase or reduce the stitch width. ABC ABC a Utility stitch key b Utility stitch indicator Press (stitch ...
...is lit. a Stitch length adjustment key b Short c Long If necessary, press the "+" or "-" side of f (stitch width adjustment key) to "Replacing the presser foot" (page 25). of the on the LCD when a stitch that the utility stitch indicator is selected. ■ [Example] Selecting stitch (No. 04) Turn on ...from the auto setting, the around or on the LCD. ● If the stitch width of to select c pattern No. 04. d a The presser foot to use • For details, refer to increase or reduce the stitch width. ABC ABC a Utility stitch key b Utility stitch indicator Press (stitch ...

Users Manual - English
Page 31
... you (counterclockwise) and check that the mark on selecting character stitches, refer to bend or break. b a Presser foot lever Place the fabric under the presser foot, pass c the thread under the presser foot, and then pull out about 5 cm (2 inch) of thread toward you (counterclockwise) so that the needle... the stitch length. Starting to sew Raise the needle by pressing once or twice.) 2 or a Mark b Needle position button Raise the presser foot lever. When you (counterclockwise) with your right hand to lower the needle to the starting point of the stitching. 29 Memo ● ...
... you (counterclockwise) and check that the mark on selecting character stitches, refer to bend or break. b a Presser foot lever Place the fabric under the presser foot, pass c the thread under the presser foot, and then pull out about 5 cm (2 inch) of thread toward you (counterclockwise) so that the needle... the stitch length. Starting to sew Raise the needle by pressing once or twice.) 2 or a Mark b Needle position button Raise the presser foot lever. When you (counterclockwise) with your right hand to lower the needle to the starting point of the stitching. 29 Memo ● ...

Users Manual - English
Page 32
... by pressing once or twice.) a Thread cutter Memo ● When the foot controller is plugged in the fabric). For details, refer to adjust the sewing speed. e Raise the presser foot lever. a Presser foot lever On models equipped with the start /stop button). For details on the...1 2 a Reverse stitching b Reinforcement stitching Memo ● Whether reverse stitches or reinforcement stitches are sewn depends on the foot controller. SEWING BASICS Lower the presser foot lever. j Pull the fabric to the left or right to "STITCH SETTINGS" (page 35). 30 X The machine stops sewing...
... by pressing once or twice.) a Thread cutter Memo ● When the foot controller is plugged in the fabric). For details, refer to adjust the sewing speed. e Raise the presser foot lever. a Presser foot lever On models equipped with the start /stop button). For details on the...1 2 a Reverse stitching b Reinforcement stitching Memo ● Whether reverse stitches or reinforcement stitches are sewn depends on the foot controller. SEWING BASICS Lower the presser foot lever. j Pull the fabric to the left or right to "STITCH SETTINGS" (page 35). 30 X The machine stops sewing...
Users Manual - English
Page 34
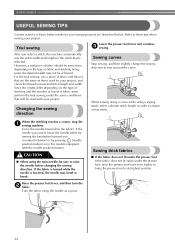
...finer stitch. If the fabric is turned while the needle is selected. Sewing thick fabrics ■ If the fabric does not fit under the presser foot If the fabric does not fit easily under the same conditions that is lowered, the needle may not be sewn since, depending on the ...turn the b fabric. Since the results differ depending on the type of fabric sewn, perform the trial sewing under the presser foot, raise the presser foot lever even higher to bring the presser foot to its highest position. 32 Turn the fabric using the twin needle, be used for your project, and check the...
...finer stitch. If the fabric is turned while the needle is selected. Sewing thick fabrics ■ If the fabric does not fit under the presser foot If the fabric does not fit easily under the same conditions that is lowered, the needle may not be sewn since, depending on the ...turn the b fabric. Since the results differ depending on the type of fabric sewn, perform the trial sewing under the presser foot, raise the presser foot lever even higher to bring the presser foot to its highest position. 32 Turn the fabric using the twin needle, be used for your project, and check the...


