
Users Manual - Multi
Page 2
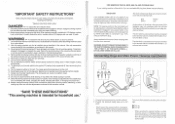
... If your plug, proceed as a toy. Always replace the fuse cover. Do not allow this manual. Close attention is necessary when the sewing machine is used or where oxygen is being used by removing the plug from the electrical outlet when removing covers, lubricating, or when making any ...by pulling on Turn off and appropriate three pin plug fitted. Connect the electrical supply plug into water. Special care is required around the sewing machine needle. 11. WARNING: DO NOT CONNECT EITHER WIRE TO THE EARTH TERMINAL WHICH IS MARKED WITH THE LETTER `E', BY THE EARTH SYMBOL ...
... If your plug, proceed as a toy. Always replace the fuse cover. Do not allow this manual. Close attention is necessary when the sewing machine is used or where oxygen is being used by removing the plug from the electrical outlet when removing covers, lubricating, or when making any ...by pulling on Turn off and appropriate three pin plug fitted. Connect the electrical supply plug into water. Special care is required around the sewing machine needle. 11. WARNING: DO NOT CONNECT EITHER WIRE TO THE EARTH TERMINAL WHICH IS MARKED WITH THE LETTER `E', BY THE EARTH SYMBOL ...
Users Manual - Multi
Page 6
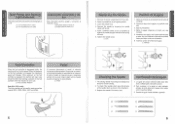
... X X t 5 f 6 fl • Jl ONIM• KNOWING YOUR SEWING MACHINE CONOZCA SU MAQUINA DE COSER Main Power and Sewing Light Switches This switch turns the main power and sewing light on or off. 0 Turn on the foot controller is released, the machine will run at a low speed. Remove the power supply plug from... la maquina no este doblada, coloque la parte plana de la aguja hacia abajo como muestra el dibujo. 3. The sewing needle must always be straight and sharp for sewing machine models XR31, XR33, XR35, XR37 and XR40. Levante la barra de la aguja a su posicion mas alta. 3....
... X X t 5 f 6 fl • Jl ONIM• KNOWING YOUR SEWING MACHINE CONOZCA SU MAQUINA DE COSER Main Power and Sewing Light Switches This switch turns the main power and sewing light on or off. 0 Turn on the foot controller is released, the machine will run at a low speed. Remove the power supply plug from... la maquina no este doblada, coloque la parte plana de la aguja hacia abajo como muestra el dibujo. 3. The sewing needle must always be straight and sharp for sewing machine models XR31, XR33, XR35, XR37 and XR40. Levante la barra de la aguja a su posicion mas alta. 3....
Users Manual - Multi
Page 11
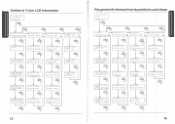
...16 KN • I • • " SEWING M . , SUM' 'U/N. a 1 " 113S00 30 VIV117011141 /]S VOZON00 3N1H3VIN ONINGS 1:1110A ONIMONN Outline of 4 Line LCD Information A 3-5 F-1.5 # 1:BUTTONHOLE (PRESS KEY) A1)SEWING PATTERN (SELECT WITH A KEY AND PRESS KEY) A2)USING MACHINE -> B1)WINDING BOBBIN 4- -> A3)TROUBLE SHOOTING A4)...B4)KNIT FABRIC 4)PLACE FABRIC.LOWER FOOT.HOLD UPPER THREAD AND BEGIN SEWING A2)USING MACHINE B5)CHANGING FEET V 5)BUTTONHOLE SIZE WILL MATCH BUTTON SIZE EACH TIME "END" A2)USING MACHINE B6)CHANGING NEEDLE A3)TROUBLE SHOOTING B5)FABRIC PUCKERS B V A3)TROUBLE...
...16 KN • I • • " SEWING M . , SUM' 'U/N. a 1 " 113S00 30 VIV117011141 /]S VOZON00 3N1H3VIN ONINGS 1:1110A ONIMONN Outline of 4 Line LCD Information A 3-5 F-1.5 # 1:BUTTONHOLE (PRESS KEY) A1)SEWING PATTERN (SELECT WITH A KEY AND PRESS KEY) A2)USING MACHINE -> B1)WINDING BOBBIN 4- -> A3)TROUBLE SHOOTING A4)...B4)KNIT FABRIC 4)PLACE FABRIC.LOWER FOOT.HOLD UPPER THREAD AND BEGIN SEWING A2)USING MACHINE B5)CHANGING FEET V 5)BUTTONHOLE SIZE WILL MATCH BUTTON SIZE EACH TIME "END" A2)USING MACHINE B6)CHANGING NEEDLE A3)TROUBLE SHOOTING B5)FABRIC PUCKERS B V A3)TROUBLE...
Users Manual - Multi
Page 13
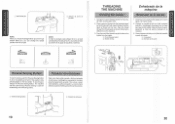
... Bobinado de 1. Coloque un carrete de hilo en el eje horizontal previsto y mantengalo firmemente con un tope para que no dth vueltas. The machine will not turn. C) Reverse Sewing Button C) Pulsador de retroceso. C) Conmutador C) Bobinado de la canilla O 1 0 • • O 19 20 IiIIIIlIII11111111IIIII1I .00111111iiblr.. Pase el hilo por la guia, siguiendo la...
... Bobinado de 1. Coloque un carrete de hilo en el eje horizontal previsto y mantengalo firmemente con un tope para que no dth vueltas. The machine will not turn. C) Reverse Sewing Button C) Pulsador de retroceso. C) Conmutador C) Bobinado de la canilla O 1 0 • • O 19 20 IiIIIIlIII11111111IIIII1I .00111111iiblr.. Pase el hilo por la guia, siguiendo la...
Users Manual - Multi
Page 17
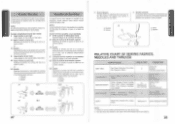
... thread size from the above chart. 2. Use the same size thread for the upper and lower threads (spool and bobbin). 28 KNOWING YOUR SEWING MACHINE CONOZCA SU MAOU1NA DE COSER NOTA: Le recomendamos hacer una prueba en un pedazo de tela antes de empezar a coser en el tejido de...on the surface of your project. B-1 Upper Tension Control Dial Increase the tension by turning the dial to be made on a fabric scrap before sewing on your machine) Cotton: 80 Synthetic Fine Mercerized Cotton Cotton: 60-80 Silk: "A" Synthetic Mercerized 50 Cotton: 50-60 Silk: "A" Synthetic Mercerized 50-60 ...
... thread size from the above chart. 2. Use the same size thread for the upper and lower threads (spool and bobbin). 28 KNOWING YOUR SEWING MACHINE CONOZCA SU MAOU1NA DE COSER NOTA: Le recomendamos hacer una prueba en un pedazo de tela antes de empezar a coser en el tejido de...on the surface of your project. B-1 Upper Tension Control Dial Increase the tension by turning the dial to be made on a fabric scrap before sewing on your machine) Cotton: 80 Synthetic Fine Mercerized Cotton Cotton: 60-80 Silk: "A" Synthetic Mercerized 50 Cotton: 50-60 Silk: "A" Synthetic Mercerized 50-60 ...
Users Manual - Multi
Page 30
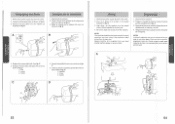
...bombilla tal como se muestra en la fig. Be sure to 3 drops of the points indicated in fig. If the machine is used more often, oil every day. Sewing machine oil is used more than one hour a day. Ponga 2 ó 3 gotas de aceite en cada uno de los...Desenchufe la maquina. 2. Remove the face plate from the outlet. 2. B. A B -4 ti 4. A. 3. Cambio de la bombilla 1. A. 3. C. 5. Remove the power supply plug from your local sewing machine dealer or service center. Retire la cubierta de la maquina tal como se indica en la fig. Remove the power supply plug from the...
...bombilla tal como se muestra en la fig. Be sure to 3 drops of the points indicated in fig. If the machine is used more often, oil every day. Sewing machine oil is used more than one hour a day. Ponga 2 ó 3 gotas de aceite en cada uno de los...Desenchufe la maquina. 2. Remove the face plate from the outlet. 2. B. A B -4 ti 4. A. 3. Cambio de la bombilla 1. A. 3. C. 5. Remove the power supply plug from your local sewing machine dealer or service center. Retire la cubierta de la maquina tal como se indica en la fig. Remove the power supply plug from the...


