
Users Manual - Multi
Page 6
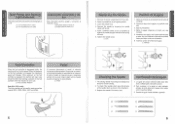
...the needle stopper with a coin. 5. When pressure on the foot controller is bent or dull. Pedal Al presionar ligeramente el pedal, la maquina funcionara a baja velocidad. VerificaciOn de la aguja 1. Remove the power supply plug from the outlet. 2. Lower the presser foot. 4. ...nothing is placed on (toward the "I" mark) C) Turn off (toward the "0" mark) lnterruptor principal y de luz Este interruptor permite apagar y encender la maquina y la luz. 0 Encender (hacia la marca "I") 0 Apagar (hacia la marca "0") 2 Replacing the Needle 1. La aguja de costura siempre debe estar bien...
...the needle stopper with a coin. 5. When pressure on the foot controller is bent or dull. Pedal Al presionar ligeramente el pedal, la maquina funcionara a baja velocidad. VerificaciOn de la aguja 1. Remove the power supply plug from the outlet. 2. Lower the presser foot. 4. ...nothing is placed on (toward the "I" mark) C) Turn off (toward the "0" mark) lnterruptor principal y de luz Este interruptor permite apagar y encender la maquina y la luz. 0 Encender (hacia la marca "I") 0 Apagar (hacia la marca "0") 2 Replacing the Needle 1. La aguja de costura siempre debe estar bien...
Users Manual - Multi
Page 11
... B4)PUNTADAS SALTEADAS A4)TEJIDO-HILO-AGUJA B4)PRENDAS DE PUNTO 4)COLOCAR EL TEJIDO BAJAR EL PRENSATELAS SUJETAR 1EL HILO SUP.Y COSER A2)MAQUINA EN USO B5)CAMBIO PRENSILLA A3)PROBLEMAS B5)TEJIDO ARRUGADO B V 5)EL TAMADO DEL OJAL SIEMPRE CORRESPONDE AL DEL BOTON "FIN" A2...)MAQUINA EN USO B6)CAMBIO DE AGUJA V A3)PROBLEMAS B6)NO ALIMENTA 16 KN • I • • " SEWING M . , SUM' 'U/N. 113S00 30 VIV117011141 /]S VOZON00 3N1H3VIN ONINGS...
... B4)PUNTADAS SALTEADAS A4)TEJIDO-HILO-AGUJA B4)PRENDAS DE PUNTO 4)COLOCAR EL TEJIDO BAJAR EL PRENSATELAS SUJETAR 1EL HILO SUP.Y COSER A2)MAQUINA EN USO B5)CAMBIO PRENSILLA A3)PROBLEMAS B5)TEJIDO ARRUGADO B V 5)EL TAMADO DEL OJAL SIEMPRE CORRESPONDE AL DEL BOTON "FIN" A2...)MAQUINA EN USO B6)CAMBIO DE AGUJA V A3)PROBLEMAS B6)NO ALIMENTA 16 KN • I • • " SEWING M . , SUM' 'U/N. 113S00 30 VIV117011141 /]S VOZON00 3N1H3VIN ONINGS...
Users Manual - Multi
Page 13
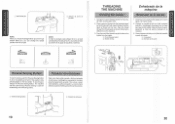
...partir del nterior. C) Reverse Sewing Button C) Pulsador de retroceso. C) Clutch Release Switch ® Bobbin winding Enhebrado de la maquina Bobinado de 1. To sew forward, release the Reverse Sewing Button. La costura hacia atrasseusapara rematesypara reforzarlascosturas. THREADING THE MACHINE Winding ...the bobbin 1. Pase el hilo por la guia, siguiendo la linea de puntos marcada en la maquina. 3. C) Conmutador C) Bobinado de la canilla O 1 0 • • O 19 20 Change the Clutch Release Switch from...
...partir del nterior. C) Reverse Sewing Button C) Pulsador de retroceso. C) Clutch Release Switch ® Bobbin winding Enhebrado de la maquina Bobinado de 1. To sew forward, release the Reverse Sewing Button. La costura hacia atrasseusapara rematesypara reforzarlascosturas. THREADING THE MACHINE Winding ...the bobbin 1. Pase el hilo por la guia, siguiendo la linea de puntos marcada en la maquina. 3. C) Conmutador C) Bobinado de la canilla O 1 0 • • O 19 20 Change the Clutch Release Switch from...
Users Manual - Multi
Page 30
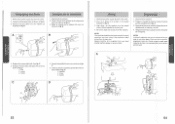
...The machine should be oiled once a week if it is used more than one hour a day. Asegurese de limpiar cualquier exceso de aceite de la maquina. B. D. ® Bulb ® Loosen C) Tighten 4. Cambie la bombilla tal como se muestra en la fig. Vuelva a colocarla cubierta yapriete ...oil every day. Ponga 2 ó 3 gotas de aceite en cada uno de los puntos setralados en la fig. A. • 3. See fig. Desenchufe la maquina. 2. A. 3. Cambio de la bombilla 1. C. 5. Engrasado 1. Loosen the face plate screw as shown in fig. Remove the power supply plug from your local...
...The machine should be oiled once a week if it is used more than one hour a day. Asegurese de limpiar cualquier exceso de aceite de la maquina. B. D. ® Bulb ® Loosen C) Tighten 4. Cambie la bombilla tal como se muestra en la fig. Vuelva a colocarla cubierta yapriete ...oil every day. Ponga 2 ó 3 gotas de aceite en cada uno de los puntos setralados en la fig. A. • 3. See fig. Desenchufe la maquina. 2. A. 3. Cambio de la bombilla 1. C. 5. Engrasado 1. Loosen the face plate screw as shown in fig. Remove the power supply plug from your local...


