
Users Manual - Multi
Page 1
OPERATION MANUAL MANUAL DE INSTRUCCIONES English Spanish 194232-111 Printed in Taiwan brother®
OPERATION MANUAL MANUAL DE INSTRUCCIONES English Spanish 194232-111 Printed in Taiwan brother®
Users Manual - Multi
Page 2
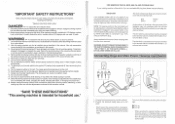
... the fabric while stitching. Always unplug before using." "SAVE THESE INSTRUCTIONS" "This sewing machine is required around the sewing machine needle. 11. Connecting Plugs and Main Power / Sewing Light Switch 0 t ,nn, ►11h1 1. Keep the ventilation openings of electric shock: 1. The wrong plate can cause the needle to be used as marked on or off When servicing the sewing machine, or when removing covers or changing lamps, the machine or the electrical set must...
... the fabric while stitching. Always unplug before using." "SAVE THESE INSTRUCTIONS" "This sewing machine is required around the sewing machine needle. 11. Connecting Plugs and Main Power / Sewing Light Switch 0 t ,nn, ►11h1 1. Keep the ventilation openings of electric shock: 1. The wrong plate can cause the needle to be used as marked on or off When servicing the sewing machine, or when removing covers or changing lamps, the machine or the electrical set must...
Users Manual - Multi
Page 6
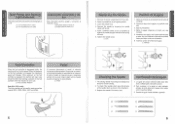
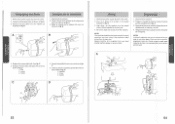
... SEWING MACHINE CONOZCA SU MAQUINA DE COSER Main Power and Sewing Light Switches This switch turns the main power and sewing light on or off. 0 Turn on the foot controller is not in the illustration. 3. Remove the power supply plug from the outlet. 2. Lower the presser foot. 4. Remove the needle by loosening the needle clamp with its highest position. 3. Retire la aguja, aflojando el tomillo con una moneda. 5. lntroduzca otra aguja, con la parte...
... SEWING MACHINE CONOZCA SU MAQUINA DE COSER Main Power and Sewing Light Switches This switch turns the main power and sewing light on or off. 0 Turn on the foot controller is not in the illustration. 3. Remove the power supply plug from the outlet. 2. Lower the presser foot. 4. Remove the needle by loosening the needle clamp with its highest position. 3. Retire la aguja, aflojando el tomillo con una moneda. 5. lntroduzca otra aguja, con la parte...
Users Manual - Multi
Page 8
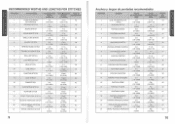
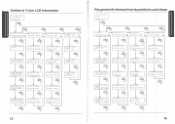
... CONOZCA SU MAQU1NA DE COSER RECOMMENDED WIDTHS AND LENGTHS FOR STITCHES PATTERN STITCH NAME 1 1-STEP AUTOMATIC BUTTONHOLE 2 STRAIGHT STITCH 3 ZIGZAG STITCH 4 BLIND HEM STITCH 5 SHELL TUCK STITCH 6 ELASTIC STITCH 7 STRETCH BLIND STITCH 8 DOUBLE ACTION STITCH 9 SCALLOP STITCH 10 LIGHTNING STITCH 11 BEAD STITCH 12 LINK STITCH 13 FAGOTING STITCH 14 LEAF STITCH 15 COMB STITCH 16 ARROWHEAD STITCH 17 FEATHER STITCH 18 SLANT OVERLOCK STITCH 19 ELASTIC OVERLOCK STITCH 20 TRIPLE ZIGZAG STRETCH STITCH 21 TRIPLE STRETCH STITCH RECOMMENDED WIDTH [mm(inch...
... CONOZCA SU MAQU1NA DE COSER RECOMMENDED WIDTHS AND LENGTHS FOR STITCHES PATTERN STITCH NAME 1 1-STEP AUTOMATIC BUTTONHOLE 2 STRAIGHT STITCH 3 ZIGZAG STITCH 4 BLIND HEM STITCH 5 SHELL TUCK STITCH 6 ELASTIC STITCH 7 STRETCH BLIND STITCH 8 DOUBLE ACTION STITCH 9 SCALLOP STITCH 10 LIGHTNING STITCH 11 BEAD STITCH 12 LINK STITCH 13 FAGOTING STITCH 14 LEAF STITCH 15 COMB STITCH 16 ARROWHEAD STITCH 17 FEATHER STITCH 18 SLANT OVERLOCK STITCH 19 ELASTIC OVERLOCK STITCH 20 TRIPLE ZIGZAG STRETCH STITCH 21 TRIPLE STRETCH STITCH RECOMMENDED WIDTH [mm(inch...
Users Manual - Multi
Page 11
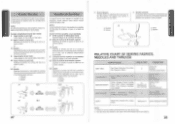
...) A1)SEWING PATTERN (SELECT WITH A KEY AND PRESS KEY) A2)USING MACHINE -> B1)WINDING BOBBIN 4- -> A3)TROUBLE SHOOTING A4)FABRIC•THREAD• NEEDLE B1)NEEDLE BREAKS B1)NORMAL FABRIC B 1)ATTACH BUTTONHOLE FOOT(A) A2)USING MACHINE B2)REPLACING BOBBIN A3)TROUBLE SHOOTING B2)UPPER THREAD BREAKS V A4)FABRIC•THREAD• NEEDLE B2)LIGHT FABRIC B 2)PULL OUT BACK OF FOOT.SET BUTTON IN PLACE AND CLAMP 1 A2)USING MACHINE B3)UPPER THREADING 3)LOWER BUTTONHOLE LEVER AND PRESS LIGHTLY TOWARDS 1 THE REAR 4 A2)USING MACHINE B4)PULLING UP THE LOWER THREAD A3)TROUBLE SHOOTING...
...) A1)SEWING PATTERN (SELECT WITH A KEY AND PRESS KEY) A2)USING MACHINE -> B1)WINDING BOBBIN 4- -> A3)TROUBLE SHOOTING A4)FABRIC•THREAD• NEEDLE B1)NEEDLE BREAKS B1)NORMAL FABRIC B 1)ATTACH BUTTONHOLE FOOT(A) A2)USING MACHINE B2)REPLACING BOBBIN A3)TROUBLE SHOOTING B2)UPPER THREAD BREAKS V A4)FABRIC•THREAD• NEEDLE B2)LIGHT FABRIC B 2)PULL OUT BACK OF FOOT.SET BUTTON IN PLACE AND CLAMP 1 A2)USING MACHINE B3)UPPER THREADING 3)LOWER BUTTONHOLE LEVER AND PRESS LIGHTLY TOWARDS 1 THE REAR 4 A2)USING MACHINE B4)PULLING UP THE LOWER THREAD A3)TROUBLE SHOOTING...
Users Manual - Multi
Page 13
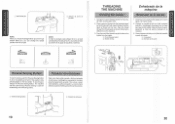
...; Bobbin winding Enhebrado de la maquina Bobinado de 1. SEWING M , 1:13S00 30 vmnovuu ns VOZON00 3NIH0VIN DNINGS I # • - La costura hacia atrasseusapara rematesypara reforzarlascosturas. THREADING THE MACHINE Winding the bobbin 1. Place a spool of thread onto the horizontal spool pin and firmly hold in as far as shown following the dotted line on the foot pedal. Gamble elconmutadorbobina-aguja de la marca aguje a la marca canilla. 2. Change...
...; Bobbin winding Enhebrado de la maquina Bobinado de 1. SEWING M , 1:13S00 30 vmnovuu ns VOZON00 3NIH0VIN DNINGS I # • - La costura hacia atrasseusapara rematesypara reforzarlascosturas. THREADING THE MACHINE Winding the bobbin 1. Place a spool of thread onto the horizontal spool pin and firmly hold in as far as shown following the dotted line on the foot pedal. Gamble elconmutadorbobina-aguja de la marca aguje a la marca canilla. 2. Change...
Users Manual - Multi
Page 17
... tension superior Aumente la tension al poner el disco en un numero superior. B-1 Upper Tension Control Dial Increase the tension by turning the dial to a higher number. 0 A-2 Canilla Aumente la tension del hilo de la canilla al apretareltomillo, enelsentido delasmanecillas de un reloj, con el pequelio destornillador suministrado. Use the same size thread for the upper and lower threads (spool and bobbin). 28 KNOWING YOUR SEWING MACHINE CONOZCA SU MAOU1NA DE COSER B Upper tension...
... tension superior Aumente la tension al poner el disco en un numero superior. B-1 Upper Tension Control Dial Increase the tension by turning the dial to a higher number. 0 A-2 Canilla Aumente la tension del hilo de la canilla al apretareltomillo, enelsentido delasmanecillas de un reloj, con el pequelio destornillador suministrado. Use the same size thread for the upper and lower threads (spool and bobbin). 28 KNOWING YOUR SEWING MACHINE CONOZCA SU MAOU1NA DE COSER B Upper tension...
Users Manual - Multi
Page 24
... to 17. 2. Triple Zigzag Stretch Stitching Pattern Stitch Length Stitch Width 20 (Triple Zigzag Stretch Stitch) Fixed 2.5 3-5 This stitch can also be used as a decorative top stitch or when hemming blankets, tablecloths or draperies or when embroidering. 1. Esta puntada elastica de triplepespuntoopuntada fest& triple tambienpuede server como puntada decorativa en el derecho del tejido. Set the Pattern Selection Dial to sew heavyweight stretch fabrics wherever a Zigzag Stitch could be used . Triple puntada zigzag elastica Numero de puntada...
... to 17. 2. Triple Zigzag Stretch Stitching Pattern Stitch Length Stitch Width 20 (Triple Zigzag Stretch Stitch) Fixed 2.5 3-5 This stitch can also be used as a decorative top stitch or when hemming blankets, tablecloths or draperies or when embroidering. 1. Esta puntada elastica de triplepespuntoopuntada fest& triple tambienpuede server como puntada decorativa en el derecho del tejido. Set the Pattern Selection Dial to sew heavyweight stretch fabrics wherever a Zigzag Stitch could be used . Triple puntada zigzag elastica Numero de puntada...
Users Manual - Multi
Page 30
... usa mas de una hora diaria. Cambio de la bombilla 1. Put 2 to wipe any excess oil off the machine. After oiling, run the machine at each of oil at a fast speed without thread installed for a short time. 4. C. 5. A. 3. D. Remove the power supply plug from the outlet. 2. Desenchufe la maquina. 2. Replace the sewing light bulb. See fig. D. ® Bulb ® Loosen C) Tighten 4. If the machine is used more often, oil every day. Si...
... usa mas de una hora diaria. Cambio de la bombilla 1. Put 2 to wipe any excess oil off the machine. After oiling, run the machine at each of oil at a fast speed without thread installed for a short time. 4. C. 5. A. 3. D. Remove the power supply plug from the outlet. 2. Desenchufe la maquina. 2. Replace the sewing light bulb. See fig. D. ® Bulb ® Loosen C) Tighten 4. If the machine is used more often, oil every day. Si...
Users Manual - Multi
Page 35
... 40 P Pattern Lengths Pattern Selection Dial Pattern Widths Performance Checklist Principal Parts 9, 18 8 9 56 1 R Relative Chart of Sewing Fabrics, Needles and Threads 28 Repacking 61 Reverse Sewing Button 19 S Scallop Stitch 37 Sewing Light Switch 5 Light Bulb Replacement 53 Shell Tuck Stitch 35 Shuttle Hook Removal 55 Shuttle Race Cleaning 55 Slant Overlock Stitch 40 Stitch Length Dial 18 Stitch Width Dial 18 Straight Stitch 30 Stretch Blind Stitch 34 T Thread Tension Triple Stretch Stitch Triple Zigzag Stretch Stitch Troubleshooting Twin Needle Sewing 27...
... 40 P Pattern Lengths Pattern Selection Dial Pattern Widths Performance Checklist Principal Parts 9, 18 8 9 56 1 R Relative Chart of Sewing Fabrics, Needles and Threads 28 Repacking 61 Reverse Sewing Button 19 S Scallop Stitch 37 Sewing Light Switch 5 Light Bulb Replacement 53 Shell Tuck Stitch 35 Shuttle Hook Removal 55 Shuttle Race Cleaning 55 Slant Overlock Stitch 40 Stitch Length Dial 18 Stitch Width Dial 18 Straight Stitch 30 Stretch Blind Stitch 34 T Thread Tension Triple Stretch Stitch Triple Zigzag Stretch Stitch Troubleshooting Twin Needle Sewing 27...


