Users Manual - English
Page 2
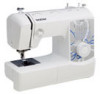
... Always unplug your work area clear: • Never operate the machine with any air openings blocked. Keep ventilation openings of the machine and foot control free from the build up of burns, fire, electric shock, or injury to persons. 2 Always unplug the machine from the electrical outlet ...needles. 1 To reduce the risk of the electrical outlet. WARNING - DANGER - Return the machine to the needle. Do not pull on the foot controller. • Do not use extension cords. Plug the machine directly into the electrical outlet. • Never drop or insert any object into the...
... Always unplug your work area clear: • Never operate the machine with any air openings blocked. Keep ventilation openings of the machine and foot control free from the build up of burns, fire, electric shock, or injury to persons. 2 Always unplug the machine from the electrical outlet ...needles. 1 To reduce the risk of the electrical outlet. WARNING - DANGER - Return the machine to the needle. Do not pull on the foot controller. • Do not use extension cords. Plug the machine directly into the electrical outlet. • Never drop or insert any object into the...
Users Manual - English
Page 4
... bed attachment 5 USING YOUR SEWING MACHINE 6 Connecting plugs 6 Main power and sewing light switch 7 Foot controller 7 Checking the needle 7 Replacing the needle 7 Changing the presser foot 8 THE CONTROLS 9 Pattern selection dial 9 Stretch stitching 9 Patterns and stitch names 10 Stitch length dial 12 Stitch ...AND APPLICATIONS 38 Zipper insertion 38 Gathering 39 Darning 39 Appliqués 39 OPTIONAL ACCESSORIES 40 Using the blind stitch foot 40 6. APPENDIX 41 MAINTENANCE 41 Restrictions on oiling 41 Precautions on storing the machine 41 Cleaning 41 TROUBLESHOOTING 43...
... bed attachment 5 USING YOUR SEWING MACHINE 6 Connecting plugs 6 Main power and sewing light switch 7 Foot controller 7 Checking the needle 7 Replacing the needle 7 Changing the presser foot 8 THE CONTROLS 9 Pattern selection dial 9 Stretch stitching 9 Patterns and stitch names 10 Stitch length dial 12 Stitch ...AND APPLICATIONS 38 Zipper insertion 38 Gathering 39 Darning 39 Appliqués 39 OPTIONAL ACCESSORIES 40 Using the blind stitch foot 40 6. APPENDIX 41 MAINTENANCE 41 Restrictions on oiling 41 Precautions on storing the machine 41 Cleaning 41 TROUBLESHOOTING 43...
Users Manual - English
Page 5
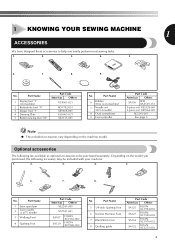
... XE2241-001 X57521-021 SA107 SA129 F034N: XC2165-002 F005N: XC1948-002 No. Part Name 1 Zigzag foot "J" (on the machine model. No. Part Name 6 Bobbin (One is on machine) 7 Needle set (90/14 needle) 8 Oval screwdriver 9 Foot controller Part Code Americas Others SA156 SFB: XA5539-151 3-piece set: XE5328-001 2-piece set: XE7064...
... XE2241-001 X57521-021 SA107 SA129 F034N: XC2165-002 F005N: XC1948-002 No. Part Name 1 Zigzag foot "J" (on the machine model. No. Part Name 6 Bobbin (One is on machine) 7 Needle set (90/14 needle) 8 Oval screwdriver 9 Foot controller Part Code Americas Others SA156 SFB: XA5539-151 3-piece set: XE5328-001 2-piece set: XE7064...
Users Manual - English
Page 6
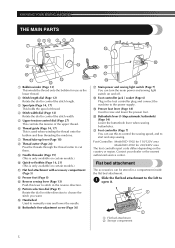
...KD-1902 for 110/120V area Model KD-2902 for use this lever to stitch in a compartment inside the flat bed attachment. H Foot controller jack / socket (Page 6) Plug in either direction to choose the stitch you want. Flat bed attachment The accessories can be stored ... nearest authorized service center. Slide the flat bed attachment to the left to 1 open it. 1 2 1 Flat bed attachment 2 Storage compartment 5 K Foot controller (Page 7) You can turn the main power and sewing light switch on and off. J Buttonhole lever (1-Step automatic buttonhole) (Page 34) Lower the buttonhole...
...KD-1902 for 110/120V area Model KD-2902 for use this lever to stitch in a compartment inside the flat bed attachment. H Foot controller jack / socket (Page 6) Plug in either direction to choose the stitch you want. Flat bed attachment The accessories can be stored ... nearest authorized service center. Slide the flat bed attachment to the left to 1 open it. 1 2 1 Flat bed attachment 2 Storage compartment 5 K Foot controller (Page 7) You can turn the main power and sewing light switch on and off. J Buttonhole lever (1-Step automatic buttonhole) (Page 34) Lower the buttonhole...
Users Manual - English
Page 7
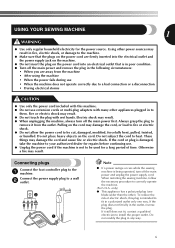
These things may result. Otherwise a fire may damage the cord and cause fire or electric shock. Connecting plugs Connect the foot controller plug to a wall 2 outlet. 2 1 Note ● If a power outage occurs while the sewing machine is intended to heat. If the plug does not fit fully ...
These things may result. Otherwise a fire may damage the cord and cause fire or electric shock. Connecting plugs Connect the foot controller plug to a wall 2 outlet. 2 1 Note ● If a power outage occurs while the sewing machine is intended to heat. If the plug does not fit fully ...
Users Manual - English
Page 8
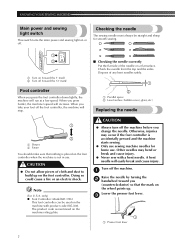
...Do not allow pieces of cloth and dust to build up . only) ● Foot Controller: Model KD-1902 This foot controller can be straight and sharp for home use . Other needles may occur if the foot controller is accidentally pressed and the machine starts sewing. ● Only use sewing machine needles...bobbin cover, glass, etc.) Replacing the needle 1 2 1 Slower 2 Faster You should make sure that the mark on the wheel points up on the foot controller. CAUTION ● Always turn off . When you press harder, the machine's speed will run at a low speed. Doing so could cause a fire ...
...Do not allow pieces of cloth and dust to build up . only) ● Foot Controller: Model KD-1902 This foot controller can be straight and sharp for home use . Other needles may occur if the foot controller is accidentally pressed and the machine starts sewing. ● Only use sewing machine needles...bobbin cover, glass, etc.) Replacing the needle 1 2 1 Slower 2 Faster You should make sure that the mark on the wheel points up on the foot controller. CAUTION ● Always turn off . When you press harder, the machine's speed will run at a low speed. Doing so could cause a fire ...
Users Manual - English
Page 9
... you want to sew and how. If you use the wrong presser foot, the needle may strike the presser foot and bend or break, and may be used with the slot on the controller, the machine will have to change the presser foot. With the flat side of the machine, insert the needle until... it touches the needle stopper. Turn off the machine before you may cause injury. ● Only use the correct presser foot for the stitch pattern you...
... you want to sew and how. If you use the wrong presser foot, the needle may strike the presser foot and bend or break, and may be used with the slot on the controller, the machine will have to change the presser foot. With the flat side of the machine, insert the needle until... it touches the needle stopper. Turn off the machine before you may cause injury. ● Only use the correct presser foot for the stitch pattern you...
Users Manual - English
Page 10
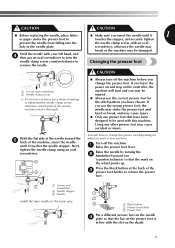
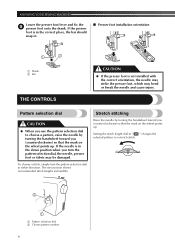
... the shank. If the needle is not installed with the correct orientation, the needle may strike the presser foot, which may be damaged. Stretch stitching Raise the needle by turning the handwheel toward you turn the pattern selection dial in the...counterclockwise) so that the mark on the wheel points up . The next section shows recommended stitch lengths and widths. If the presser foot is in the correct place, the bar should snap in. ■ Presser foot installation orientation 1 2 1 Shank 2 Bar THE CONTROLS CAUTION ● If the presser foot is in either direction.
... the shank. If the needle is not installed with the correct orientation, the needle may strike the presser foot, which may be damaged. Stretch stitching Raise the needle by turning the handwheel toward you turn the pattern selection dial in the...counterclockwise) so that the mark on the wheel points up . The next section shows recommended stitch lengths and widths. If the presser foot is in the correct place, the bar should snap in. ■ Presser foot installation orientation 1 2 1 Shank 2 Bar THE CONTROLS CAUTION ● If the presser foot is in either direction.
Users Manual - English
Page 14
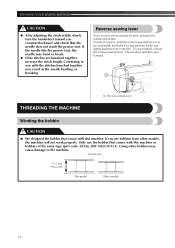
... reverse, push the reverse sewing lever in as far as possible and hold it in the needle bending or breaking. If you lightly push the foot controller. Only use the bobbin that comes with this machine. To sew forward, release the reverse sewing lever. Using other models, the machine will then sew... the stitches are bunched together, increase the stitch length. The machine will not work properly. Continuing to the machine. If the needle hits the presser foot, the needle may result in that the needle does not touch the presser...
... reverse, push the reverse sewing lever in as far as possible and hold it in the needle bending or breaking. If you lightly push the foot controller. Only use the bobbin that comes with this machine. To sew forward, release the reverse sewing lever. Using other models, the machine will then sew... the stitches are bunched together, increase the stitch length. The machine will not work properly. Continuing to the machine. If the needle hits the presser foot, the needle may result in that the needle does not touch the presser...
Users Manual - English
Page 16
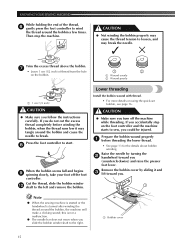
... See page 13 for the details about bobbin winding. Lower threading Install the bobbin wound with thread. • For more details on the foot controller and the machine starts to sew, you slide the bobbin winder shaft to break. this is turned after winding the thread around the bobbin,...not move when you could be injured. Remove the bobbin cover by turning the 2 handwheel toward you follow the instructions carefully. Press the foot controller to wind the thread around the bobbin and cause the needle to the right. 1 Bobbin cover 15 Prepare the bobbin wound properly 1 before...
... See page 13 for the details about bobbin winding. Lower threading Install the bobbin wound with thread. • For more details on the foot controller and the machine starts to sew, you slide the bobbin winder shaft to break. this is turned after winding the thread around the bobbin,...not move when you could be injured. Remove the bobbin cover by turning the 2 handwheel toward you follow the instructions carefully. Press the foot controller to wind the thread around the bobbin and cause the needle to the right. 1 Bobbin cover 15 Prepare the bobbin wound properly 1 before...

Users Manual - English
Page 25
... b Pull the fabric to "Reverse sewing lever" on the foot controller. 9 1 2 X The machine starts sewing. Refer to the left hand, turn the fabric, lower the presser foot lever, and then continue sewing. 1 1 Presser foot lever Slowly press down on page 13 for back tacking and ...reinforcing seams by turning the a handwheel toward you (counterclockwise). Take your foot off the foot controller. 0 X The machine stops sewing. •...
... b Pull the fabric to "Reverse sewing lever" on the foot controller. 9 1 2 X The machine starts sewing. Refer to the left hand, turn the fabric, lower the presser foot lever, and then continue sewing. 1 1 Presser foot lever Slowly press down on page 13 for back tacking and ...reinforcing seams by turning the a handwheel toward you (counterclockwise). Take your foot off the foot controller. 0 X The machine stops sewing. •...
Users Manual - English
Page 35
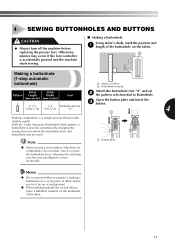
... other than for a buttonhole, do not lower, touch or move the buttonhole lever, otherwise the stitching may occur if the foot controller is accidentally pressed and the machine starts sewing. ■ Making a buttonhole Using tailor's chalk, mark the position and 1 length ... on the fabric. 2 1 Making a buttonhole (1-step automatic buttonhole) 1 Marks on fabric 2 Buttonhole sewing Stitch Stitch Pattern Length Width Foot Attach the buttonhole foot "A" and set 2 the pattern selection dial to Buttonhole. [mm (inch)] [mm (inch)] Open the button plate and insert the 1 F-1.5...
... other than for a buttonhole, do not lower, touch or move the buttonhole lever, otherwise the stitching may occur if the foot controller is accidentally pressed and the machine starts sewing. ■ Making a buttonhole Using tailor's chalk, mark the position and 1 length ... on the fabric. 2 1 Making a buttonhole (1-step automatic buttonhole) 1 Marks on fabric 2 Buttonhole sewing Stitch Stitch Pattern Length Width Foot Attach the buttonhole foot "A" and set 2 the pattern selection dial to Buttonhole. [mm (inch)] [mm (inch)] Open the button plate and insert the 1 F-1.5...
Users Manual - English
Page 39
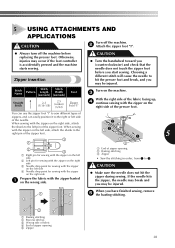
... to the left side 4 Needle drop point for sewing with the zipper on the left pin of the zipper foot. 5 USING ATTACHMENTS AND APPLICATIONS CAUTION Turn off the machine. 2 Attach the zipper foot "I". ● Always turn off the machine before you may be injured. 1 1 3 3 5 When you have finished sewing, remove 5 the basting... the needle does not hit the zipper during sewing. If the needle hits the zipper, the needle may break and you may occur if the foot controller is accidentally pressed and the machine starts sewing.
... to the left side 4 Needle drop point for sewing with the zipper on the left pin of the zipper foot. 5 USING ATTACHMENTS AND APPLICATIONS CAUTION Turn off the machine. 2 Attach the zipper foot "I". ● Always turn off the machine before you may be injured. 1 1 3 3 5 When you have finished sewing, remove 5 the basting... the needle does not hit the zipper during sewing. If the needle hits the zipper, the needle may break and you may occur if the foot controller is accidentally pressed and the machine starts sewing.
Users Manual - English
Page 44
.... The upper thread was not threaded correctly. You are knots or tangles in the needle plate or the presser foot is loose. Use the foot controller properly. Correctly install the needle. Contact your retailer or the nearest authorized service center. Loosen the upper thread tension...thread you have not fitted the spool properly. Contact your retailer or the nearest authorized service center. Visit us at " http://solutions.brother.com ". Correct the upper threading. If the problem persists, contact your dealer or the nearest authorized service center. You have not...
.... The upper thread was not threaded correctly. You are knots or tangles in the needle plate or the presser foot is loose. Use the foot controller properly. Correctly install the needle. Contact your retailer or the nearest authorized service center. Loosen the upper thread tension...thread you have not fitted the spool properly. Contact your retailer or the nearest authorized service center. Visit us at " http://solutions.brother.com ". Correct the upper threading. If the problem persists, contact your dealer or the nearest authorized service center. You have not...
Users Manual - English
Page 47
... the lower thread 21 E Elastic stitching 30 F Fabric, thread, and needle combinations .......22 Fagoting 31 Feather stitching 33 Flat bed attachment 5 Foot controller 7 Free-arm style 25 G Gathering 39 H Handwheel 17 L Light switch 7 , Lower threading 15 quick-set bobbin 16 21 M Main... checking 7 combinations with fabric and thread .........22 replacing 7 Needle threader 19 O Overedge stitching 32 P Pattern selection dial 9 Patterns 10 Presser foot changing 8 , Q Quick-set bobbin 16 21 R Race cleaning 41 Reverse sewing lever 13 S Satin stitch 28 , Shell tuck stitching 30...
... the lower thread 21 E Elastic stitching 30 F Fabric, thread, and needle combinations .......22 Fagoting 31 Feather stitching 33 Flat bed attachment 5 Foot controller 7 Free-arm style 25 G Gathering 39 H Handwheel 17 L Light switch 7 , Lower threading 15 quick-set bobbin 16 21 M Main... checking 7 combinations with fabric and thread .........22 replacing 7 Needle threader 19 O Overedge stitching 32 P Pattern selection dial 9 Patterns 10 Presser foot changing 8 , Q Quick-set bobbin 16 21 R Race cleaning 41 Reverse sewing lever 13 S Satin stitch 28 , Shell tuck stitching 30...


