Users Manual - English
Page 1
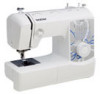
Operation Manual Sewing Machine Product Code: 885-X06/X08/X16/X18/X26/X28 Please visit us at http://solutions.brother.com where you can get product support and answers to frequently asked questions (FAQs).
Operation Manual Sewing Machine Product Code: 885-X06/X08/X16/X18/X26/X28 Please visit us at http://solutions.brother.com where you can get product support and answers to frequently asked questions (FAQs).
Users Manual - English
Page 2
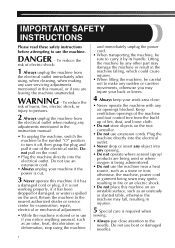
... the nearest authorized dealer or service center for examination, repair, electrical or mechanical adjustment. • While the machine is required when sewing: • Always pay close attention to make any air openings blocked. Lifting the machine by its handle. Do not use an extension cord. • Always unplug your work area clear: •...
... the nearest authorized dealer or service center for examination, repair, electrical or mechanical adjustment. • While the machine is required when sewing: • Always pay close attention to make any air openings blocked. Lifting the machine by its handle. Do not use an extension cord. • Always unplug your work area clear: •...
Users Manual - English
Page 3
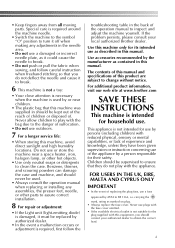
...use outdoors. 7 For a longer service life: • When storing this machine was supplied in the back of the operation manual to break. • Do not push or pull the fabric when sewing, and follow careful instruction when freehand stitching so that they have been given supervision...humidity locations. • Keep fingers away from all moving parts. For additional product information, visit our web site at www.brother.com SAVE THESE INSTRUCTIONS This machine is used . • Always consult the operation manual when replacing or installing any adjustments in the needle area. •...
...use outdoors. 7 For a longer service life: • When storing this machine was supplied in the back of the operation manual to break. • Do not push or pull the fabric when sewing, and follow careful instruction when freehand stitching so that they have been given supervision...humidity locations. • Keep fingers away from all moving parts. For additional product information, visit our web site at www.brother.com SAVE THESE INSTRUCTIONS This machine is used . • Always consult the operation manual when replacing or installing any adjustments in the needle area. •...
Users Manual - English
Page 4
... 39 Darning 39 Appliqués 39 OPTIONAL ACCESSORIES 40 Using the blind stitch foot 40 6. KNOWING YOUR SEWING MACHINE 4 ACCESSORIES 4 Optional accessories 4 THE MAIN PARTS 5 Flat bed attachment 5 USING YOUR SEWING MACHINE 6 Connecting plugs 6 Main power and sewing light switch 7 Foot controller 7 Checking the needle 7 Replacing the needle 7 Changing the presser foot 8 THE CONTROLS 9 Pattern...
... 39 Darning 39 Appliqués 39 OPTIONAL ACCESSORIES 40 Using the blind stitch foot 40 6. KNOWING YOUR SEWING MACHINE 4 ACCESSORIES 4 Optional accessories 4 THE MAIN PARTS 5 Flat bed attachment 5 USING YOUR SEWING MACHINE 6 Connecting plugs 6 Main power and sewing light switch 7 Foot controller 7 Checking the needle 7 Replacing the needle 7 Changing the presser foot 8 THE CONTROLS 9 Pattern...
Users Manual - English
Page 5
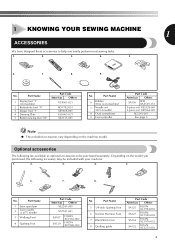
...set: XE7064-001 XE5241-001 See page 5 Note ● The included accessories vary depending on machine) 2 Buttonhole foot "A" 3 Zipper foot "I" 4 Darning Plate 5 Button sewing foot "M" Part Code Americas Others XC4901-021 XD1792-031 XE9369-001 XC6063-021 XE2137-001 No... accessories to help you purchased, the following accessory may be purchased separately. Part Name 1 Zigzag foot "J" (on the machine model. Depending on the model you easily perform most sewing tasks. 1. 2. 3. 4. 5. 6. 7. 8. 9. Part Name 5 1/4-inch Quilting Foot 6 Narrow Hemmer Foot 7...
...set: XE7064-001 XE5241-001 See page 5 Note ● The included accessories vary depending on machine) 2 Buttonhole foot "A" 3 Zipper foot "I" 4 Darning Plate 5 Button sewing foot "M" Part Code Americas Others XC4901-021 XD1792-031 XE9369-001 XC6063-021 XE2137-001 No... accessories to help you purchased, the following accessory may be purchased separately. Part Name 1 Zigzag foot "J" (on the machine model. Depending on the model you easily perform most sewing tasks. 1. 2. 3. 4. 5. 6. 7. 8. 9. Part Name 5 1/4-inch Quilting Foot 6 Narrow Hemmer Foot 7...
Users Manual - English
Page 6
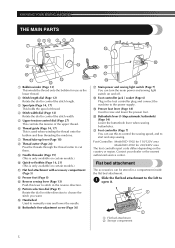
... lever (Page 18) Used to 1 open it. 1 2 1 Flat bed attachment 2 Storage compartment 5 K Foot controller (Page 7) You can turn the main power and sewing light switch on and off. KNOWING YOUR SEWING MACHINE THE MAIN PARTS 654 3 2 1 7 E 8 9 D 0 A C B 1 Bobbin winder (Page 13) This winds the thread onto the bobbin for 220/240V area The foot...
... lever (Page 18) Used to 1 open it. 1 2 1 Flat bed attachment 2 Storage compartment 5 K Foot controller (Page 7) You can turn the main power and sewing light switch on and off. KNOWING YOUR SEWING MACHINE THE MAIN PARTS 654 3 2 1 7 E 8 9 D 0 A C B 1 Bobbin winder (Page 13) This winds the thread onto the bobbin for 220/240V area The foot...
Users Manual - English
Page 7
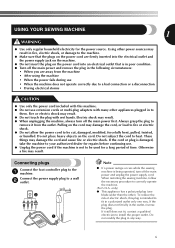
...the power fails during use . ● Unplug the power cord if the machine is not to a wall 2 outlet. 2 1 Note ● If a power outage occurs while the sewing machine is intended to the 1 machine. Using other ). Electric shock may result. ● Do not touch the...to remove it still does not fit, contact a qualified electrician to correctly operate the machine. (For U.S.A. When restarting the sewing machine, follow the necessary procedure to install the proper outlet. USING YOUR SEWING MACHINE 1 WARNING ● Use only regular household electricity for a long period of electric ...
...the power fails during use . ● Unplug the power cord if the machine is not to a wall 2 outlet. 2 1 Note ● If a power outage occurs while the sewing machine is intended to the 1 machine. Using other ). Electric shock may result. ● Do not touch the...to remove it still does not fit, contact a qualified electrician to correctly operate the machine. (For U.S.A. When restarting the sewing machine, follow the necessary procedure to install the proper outlet. USING YOUR SEWING MACHINE 1 WARNING ● Use only regular household electricity for a long period of electric ...
Users Manual - English
Page 8
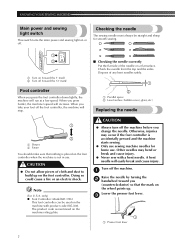
...pieces of cloth and dust to build up . A bent needle will increase. KNOWING YOUR SEWING MACHINE Main power and sewing light switch This switch turns the main power and sewing light on the machine with a bent needle. Note (For U.S.A. only) ● Foot Controller: Model KD...mentioned on the foot controller. Checking the needle The sewing needle must always be used on or off the machine before you (counterclockwise) so that nothing is accidentally pressed and the machine starts sewing. ● Only use sewing machine needles for smooth sewing. 1 2 1 Turn on a flat surface....
...pieces of cloth and dust to build up . A bent needle will increase. KNOWING YOUR SEWING MACHINE Main power and sewing light switch This switch turns the main power and sewing light on the machine with a bent needle. Note (For U.S.A. only) ● Foot Controller: Model KD...mentioned on the foot controller. Checking the needle The sewing needle must always be used on or off the machine before you (counterclockwise) so that nothing is accidentally pressed and the machine starts sewing. ● Only use sewing machine needles for smooth sewing. 1 2 1 Turn on a flat surface....
Users Manual - English
Page 9
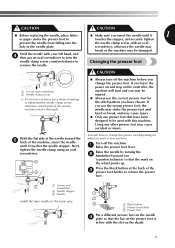
...needle from falling into the the needle clamp screw with the slot on the shank. 8 Press the black button at the back of the sewing machine may cause injury. ● Only use presser feet that the mark on what you use the wrong presser foot, the needle may strike the... you may be damaged. ● Always turn the needle clamp screw counterclockwise to sew and how. With the flat side of the machine, insert the needle until it touches the needle stopper. Turn off the machine before you change the presser foot depending on the wheel points up. screwdriver, otherwise...
...needle from falling into the the needle clamp screw with the slot on the shank. 8 Press the black button at the back of the sewing machine may cause injury. ● Only use presser feet that the mark on what you use the wrong presser foot, the needle may strike the... you may be damaged. ● Always turn the needle clamp screw counterclockwise to sew and how. With the flat side of the machine, insert the needle until it touches the needle stopper. Turn off the machine before you change the presser foot depending on the wheel points up. screwdriver, otherwise...
Users Manual - English
Page 10
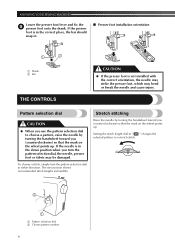
... pattern to choose a pattern, raise the needle by turning the handwheel toward you (counterclockwise) so that the mark on the wheel points up . KNOWING YOUR SEWING MACHINE Lower the presser foot lever and fix the 5 presser foot onto the shank. Stretch stitching Raise the needle by turning the handwheel toward you turn...
... pattern to choose a pattern, raise the needle by turning the handwheel toward you (counterclockwise) so that the mark on the wheel points up . KNOWING YOUR SEWING MACHINE Lower the presser foot lever and fix the 5 presser foot onto the shank. Stretch stitching Raise the needle by turning the handwheel toward you turn...
Users Manual - English
Page 12
...) Fixed 2.5 (3/32) Fixed 2.5 (3/32) Fixed 2.5 (3/32) 28 33 32 32 33 32 33 31 31 31 32, 33 33 11 LIGHTNING STITCH 18 - KNOWING YOUR SEWING MACHINE Pattern 37 Stitches 27 Stitches 13 13 Stitch Name BEAD STITCH 14 14 ARROWHEAD STITCH 15 - SQUARE STITCH 19 - PARALLELOGRAM STITCH 16 - SCALLOP STITCH 17 -
...) Fixed 2.5 (3/32) Fixed 2.5 (3/32) Fixed 2.5 (3/32) 28 33 32 32 33 32 33 31 31 31 32, 33 33 11 LIGHTNING STITCH 18 - KNOWING YOUR SEWING MACHINE Pattern 37 Stitches 27 Stitches 13 13 Stitch Name BEAD STITCH 14 14 ARROWHEAD STITCH 15 - SQUARE STITCH 19 - PARALLELOGRAM STITCH 16 - SCALLOP STITCH 17 -
Users Manual - English
Page 14
... push the foot controller. If the needle hits the presser foot, the needle may cause damage to sew with this machine or bobbins of the same type (part code: SA156, SFB: XA5539-151). KNOWING YOUR SEWING MACHINE CAUTION ● After adjusting the stitch width, slowly turn the handwheel toward you (counterclockwise) and check that...
... push the foot controller. If the needle hits the presser foot, the needle may cause damage to sew with this machine or bobbins of the same type (part code: SA156, SFB: XA5539-151). KNOWING YOUR SEWING MACHINE CAUTION ● After adjusting the stitch width, slowly turn the handwheel toward you (counterclockwise) and check that...
Users Manual - English
Page 16
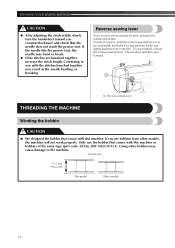
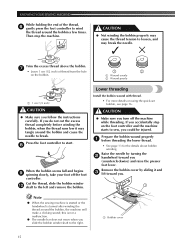
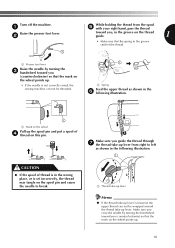
... completely before threading the lower thread. • See page 13 for the details about bobbin winding. If you . 1 Note ● When the sewing machine is started or the handwheel is not a malfunction. ● The needle bar does not move when you follow the instructions carefully. Lower threading Install ... clicking sound; Press the foot controller to break. this is turned after winding the thread around the bobbin a few times. KNOWING YOUR SEWING MACHINE While holding the end of thread from the hole on using the quick-set bobbin, see page 16. If you could be injured. ...
... completely before threading the lower thread. • See page 13 for the details about bobbin winding. If you . 1 Note ● When the sewing machine is started or the handwheel is not a malfunction. ● The needle bar does not move when you follow the instructions carefully. Lower threading Install ... clicking sound; Press the foot controller to break. this is turned after winding the thread around the bobbin a few times. KNOWING YOUR SEWING MACHINE While holding the end of thread from the hole on using the quick-set bobbin, see page 16. If you could be injured. ...
Users Manual - English
Page 17
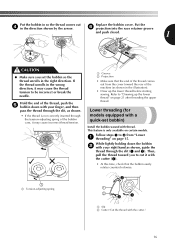
... direction, it may cause the thread tension to "Drawing up the lower thread before starting sewing. Refer to be incorrect or break the needle. Replace the bobbin cover. Then, pull the thread toward the rear of the machine (as shown, guide the thread through the tension-adjusting spring of the thread comes...
... direction, it may cause the thread tension to "Drawing up the lower thread before starting sewing. Refer to be incorrect or break the needle. Replace the bobbin cover. Then, pull the thread toward the rear of the machine (as shown, guide the thread through the tension-adjusting spring of the thread comes...
Users Manual - English
Page 18
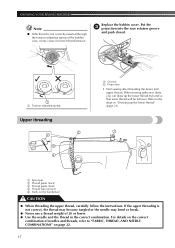
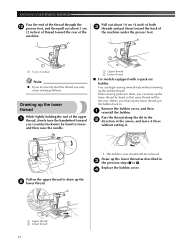
... the 3 projection into the race retainer groove and push closed. 12 1 1 Tension-adjusting spring Upper threading 2 2 3 4 1 Groove 2 Projection • Start sewing after threading the lower and upper thread. KNOWING YOUR SEWING MACHINE Note ● If the thread is not correct, the thread may become tangled or the needle may cause incorrect thread tension...
... the 3 projection into the race retainer groove and push closed. 12 1 1 Tension-adjusting spring Upper threading 2 2 3 4 1 Groove 2 Projection • Start sewing after threading the lower and upper thread. KNOWING YOUR SEWING MACHINE Note ● If the thread is not correct, the thread may become tangled or the needle may cause incorrect thread tension...
Users Manual - English
Page 19
... you (counterclockwise) so that the mark on the wheel points up lever is set incorrectly, the thread may tangle on this pin. Turn off the machine. 1 Raise the presser foot lever. 2 1 While holding the thread from right to break. Make sure you guide the thread through 7 the thread take-...by turning the handwheel toward you (counterclockwise) so that the mark on the wheel points up. • If the needle is not correctly raised, the sewing machine can not be threaded. 1 1 Spring Feed the upper thread as shown in the wrong place, or is lowered, the upper thread can not be...
... you (counterclockwise) so that the mark on the wheel points up lever is set incorrectly, the thread may tangle on this pin. Turn off the machine. 1 Raise the presser foot lever. 2 1 While holding the thread from right to break. Make sure you guide the thread through 7 the thread take-...by turning the handwheel toward you (counterclockwise) so that the mark on the wheel points up. • If the needle is not correctly raised, the sewing machine can not be threaded. 1 1 Spring Feed the upper thread as shown in the wrong place, or is lowered, the upper thread can not be...

Users Manual - English
Page 20
... sure that the mark on the wheel 3 points up as shown in your left hand, then feeding the thread with your sewing machine is only available on page 17. KNOWING YOUR SEWING MACHINE Put the thread behind the guide above the 8 needle. • The thread can be used with a 65/9 home...onto the guide. 2 1 1 Needle holder 2 Needle threader lever 19 However, the needle threader cannot be used with a 75/11 through 100/16 home sewing machine needle. Follow steps 1 to 8 from front to back 9 leaving a thread tail of 130/120 or thicker cannot be used with the needle threader. &#...
... sure that the mark on the wheel 3 points up as shown in your left hand, then feeding the thread with your sewing machine is only available on page 17. KNOWING YOUR SEWING MACHINE Put the thread behind the guide above the 8 needle. • The thread can be used with a 65/9 home...onto the guide. 2 1 1 Needle holder 2 Needle threader lever 19 However, the needle threader cannot be used with a 75/11 through 100/16 home sewing machine needle. Follow steps 1 to 8 from front to back 9 leaving a thread tail of 130/120 or thicker cannot be used with the needle threader. &#...
Users Manual - English
Page 22
...will be removed. Replace the bobbin cover. 4 21 Remove the bobbin cover, and then 1 reinstall the bobbin. Pass the thread along the slit in . When sewing gathers or darts, you draw up the 2 lower thread. 1 2 1 2 1 Upper thread 2 Lower thread • The bobbin cover should still be left... the presser foot. 1 1 5 cm (2 inches) Note ● If you incorrectly feed the thread you may cause sewing problems. Drawing up the bobbin thread. KNOWING YOUR SEWING MACHINE Pass the end of the thread through the 0 presser foot, and then pull out about 10 cm (4 inch) of both 3 ...
...will be removed. Replace the bobbin cover. 4 21 Remove the bobbin cover, and then 1 reinstall the bobbin. Pass the thread along the slit in . When sewing gathers or darts, you draw up the 2 lower thread. 1 2 1 2 1 Upper thread 2 Lower thread • The bobbin cover should still be left... the presser foot. 1 1 5 cm (2 inches) Note ● If you incorrectly feed the thread you may cause sewing problems. Drawing up the bobbin thread. KNOWING YOUR SEWING MACHINE Pass the end of the thread through the 0 presser foot, and then pull out about 10 cm (4 inch) of both 3 ...
Users Manual - English
Page 23
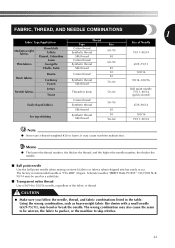
... table. and the higher the needle number, the thicker the needle. ■ Ball point needle Use the ball point needle when sewing on stretch fabrics or fabrics where skipped stitches easily occur. The wrong combination may also cause the seam to be used as heavyweight... ■ Transparent nylon thread Use a 90/14 to skip stitches. 22 Schmetz needles "JERSEY BALL POINT" 130/705H SUK 90/14 may cause machine malfunction. The factory recommended needle is "HG-4BR" (Organ). FABRIC, THREAD, AND NEEDLE COMBINATIONS 1 Fabric Type/Application Medium weight fabrics Thin fabrics ...
... table. and the higher the needle number, the thicker the needle. ■ Ball point needle Use the ball point needle when sewing on stretch fabrics or fabrics where skipped stitches easily occur. The wrong combination may also cause the seam to be used as heavyweight... ■ Transparent nylon thread Use a 90/14 to skip stitches. 22 Schmetz needles "JERSEY BALL POINT" 130/705H SUK 90/14 may cause machine malfunction. The factory recommended needle is "HG-4BR" (Organ). FABRIC, THREAD, AND NEEDLE COMBINATIONS 1 Fabric Type/Application Medium weight fabrics Thin fabrics ...
Users Manual - English
Page 44
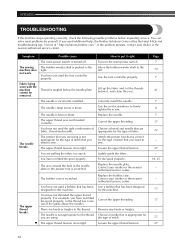
You can solve most problems by yourself. Visit us at " http://solutions.brother.com ". Fabric being sewn with the machine cannot be removed. Possible cause The main power switch is incorrectly installed. You have not threaded the upper thread properly. (For example, you want... 27 43 If you are appropriate for the type of stitch that are using is not appropriate for this machine. Symptom The sewing machine does not work. The upper thread tension is pushed to sew. The upper thread breaks. The needle is not appropriate for the type of stitch. Correct the upper threading....
You can solve most problems by yourself. Visit us at " http://solutions.brother.com ". Fabric being sewn with the machine cannot be removed. Possible cause The main power switch is incorrectly installed. You have not threaded the upper thread properly. (For example, you want... 27 43 If you are appropriate for the type of stitch that are using is not appropriate for this machine. Symptom The sewing machine does not work. The upper thread tension is pushed to sew. The upper thread breaks. The needle is not appropriate for the type of stitch. Correct the upper threading....


