Users Manual - English
Page 3
...the correct lead. 2 Use accessories recommended by ASTA to clean the case. For additional product information, visit our web site at www.brother.com SAVE THESE INSTRUCTIONS This machine is not intended for household use a damaged or incorrect needle plate, as marked on plug. •...fuse, use as contained in the needle area. • Do not use . Special care is required, first follow careful instruction when freehand stitching so that they have been given supervision or instruction concerning use outdoors. 7 For a longer service life: • When storing this machine was...
...the correct lead. 2 Use accessories recommended by ASTA to clean the case. For additional product information, visit our web site at www.brother.com SAVE THESE INSTRUCTIONS This machine is not intended for household use a damaged or incorrect needle plate, as marked on plug. •...fuse, use as contained in the needle area. • Do not use . Special care is required, first follow careful instruction when freehand stitching so that they have been given supervision or instruction concerning use outdoors. 7 For a longer service life: • When storing this machine was...
Users Manual - English
Page 4
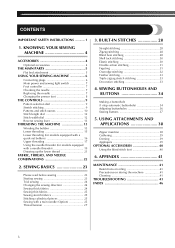
... the blind stitch foot 40 6. BUILT-IN STITCHES 28 Straight stitching 28 Zigzag stitching 28 Blind hem stitching 28 Shell tuck stitching 30 Elastic stitching 30 Double action stitching 31 Fagoting 31 Overedge stitching 32 Feather stitching 33 Triple zigzag stretch stitching 33 Decorative stitching 33 4. CONTENTS... the needle 7 Changing the presser foot 8 THE CONTROLS 9 Pattern selection dial 9 Stretch stitching 9 Patterns and stitch names 10 Stitch length dial 12 Stitch width dial 12 Reverse sewing lever 13 THREADING THE MACHINE 13 Winding the bobbin 13 Lower threading...
... the blind stitch foot 40 6. BUILT-IN STITCHES 28 Straight stitching 28 Zigzag stitching 28 Blind hem stitching 28 Shell tuck stitching 30 Elastic stitching 30 Double action stitching 31 Fagoting 31 Overedge stitching 32 Feather stitching 33 Triple zigzag stretch stitching 33 Decorative stitching 33 4. CONTENTS... the needle 7 Changing the presser foot 8 THE CONTROLS 9 Pattern selection dial 9 Stretch stitching 9 Patterns and stitch names 10 Stitch length dial 12 Stitch width dial 12 Reverse sewing lever 13 THREADING THE MACHINE 13 Winding the bobbin 13 Lower threading...
Users Manual - English
Page 5
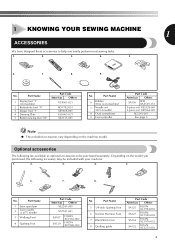
... available as optional accessories to help you purchased, the following accessory may be purchased separately. No. Part Name 5 1/4-inch Quilting Foot 6 Narrow Hemmer Foot 7 Blind Stitch Foot 8 Quilting guide Part Code Americas Others SA125 F001N: XC1944-052 SA127 F003N: XC1945-002 SA134 F018N: XC1976-052 SA132 F016N: XC2215-002 4 Part Name...
... available as optional accessories to help you purchased, the following accessory may be purchased separately. No. Part Name 5 1/4-inch Quilting Foot 6 Narrow Hemmer Foot 7 Blind Stitch Foot 8 Quilting guide Part Code Americas Others SA125 F001N: XC1944-052 SA127 F003N: XC1945-002 SA134 F018N: XC1976-052 SA132 F016N: XC2215-002 4 Part Name...
Users Manual - English
Page 6
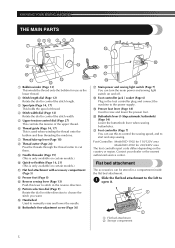
...7) You can use as the lower thread. 2 Stitch length dial (Page 12) Rotate the dial to control the stitch length. 3 Spool pin (Page 14, 17) This holds the spool of thread. 4 Stitch width dial (Page 12) Rotate the dial to control the stitch width. 5 Upper tension-control dial (Page 27)...accessory compartment (Page 5) B Presser foot (Page 8) C Reverse sewing lever (Page 13) Push this to control the sewing speed, and to choose the stitch you want. K Foot controller (Page 7) You can turn the main power and sewing light switch on the country or region. F Buttonhole fine-adjustment screw...
...7) You can use as the lower thread. 2 Stitch length dial (Page 12) Rotate the dial to control the stitch length. 3 Spool pin (Page 14, 17) This holds the spool of thread. 4 Stitch width dial (Page 12) Rotate the dial to control the stitch width. 5 Upper tension-control dial (Page 27)...accessory compartment (Page 5) B Presser foot (Page 8) C Reverse sewing lever (Page 13) Push this to control the sewing speed, and to choose the stitch you want. K Foot controller (Page 7) You can turn the main power and sewing light switch on the country or region. F Buttonhole fine-adjustment screw...
Users Manual - English
Page 9
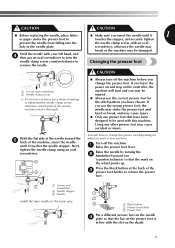
... off the machine. 1 Raise the presser foot lever. Using any other presser foot may cause injury. ● Only use the correct presser foot for the stitch pattern you (counterclockwise) so that the mark on the shank. 8 Press the black button at the back of the sewing machine may be used with...
... off the machine. 1 Raise the presser foot lever. Using any other presser foot may cause injury. ● Only use the correct presser foot for the stitch pattern you (counterclockwise) so that the mark on the shank. 8 Press the black button at the back of the sewing machine may be used with...
Users Manual - English
Page 10
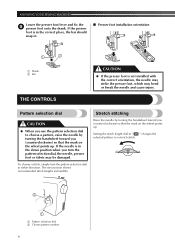
... is not installed with the correct orientation, the needle may strike the presser foot, which may be damaged. To choose a stitch, simply turn the pattern selection dial, the needle, presser foot or fabric may bend or break the needle and cause injury. Setting the... 2 1 Shank 2 Bar THE CONTROLS CAUTION ● If the presser foot is in either direction. The next section shows recommended stitch lengths and widths. Stretch stitching Raise the needle by turning the handwheel toward you turn the pattern selection dial in the down position when you (counterclockwise) so that...
... is not installed with the correct orientation, the needle may strike the presser foot, which may be damaged. To choose a stitch, simply turn the pattern selection dial, the needle, presser foot or fabric may bend or break the needle and cause injury. Setting the... 2 1 Shank 2 Bar THE CONTROLS CAUTION ● If the presser foot is in either direction. The next section shows recommended stitch lengths and widths. Stretch stitching Raise the needle by turning the handwheel toward you turn the pattern selection dial in the down position when you (counterclockwise) so that...
Users Manual - English
Page 11
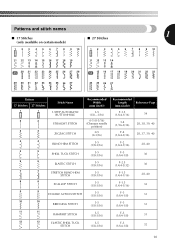
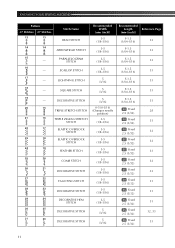
... 25 26 27 Pattern 37 Stitches 27 Stitches 1 1 Stitch Name 1-STEP AUTOMATIC BUTTONHOLE Recommended Width (mm (inch)) 3-5 (1/8 - 3/16) 2 2 0-5 (0-3/16) STRAIGHT STITCH (Changes needle position) 3 3 ZIGZAG STITCH 0-5 (0-3/16) 4 4 BLIND HEM STITCH 3-5 (1/8-3/16) 5 5 SHELL TUCK STITCH 3-5 (1/8-3/16) 6 6 ELASTIC STITCH 3-5 (1/8-3/16) 7 7 STRETCH BLIND HEM 3-5 STITCH (1/8-3/16) 8 8 SCALLOP STITCH 3-5 (1/8-3/16) 9 9 DOUBLE ACTION STITCH 3-5 (1/8-3/16) 10 10 BRIDGING STITCH 3-5 (1/8-3/16) 11 11 RAMPART STITCH 3-5 (1/8-3/16) 12 12 ELASTIC...
... 25 26 27 Pattern 37 Stitches 27 Stitches 1 1 Stitch Name 1-STEP AUTOMATIC BUTTONHOLE Recommended Width (mm (inch)) 3-5 (1/8 - 3/16) 2 2 0-5 (0-3/16) STRAIGHT STITCH (Changes needle position) 3 3 ZIGZAG STITCH 0-5 (0-3/16) 4 4 BLIND HEM STITCH 3-5 (1/8-3/16) 5 5 SHELL TUCK STITCH 3-5 (1/8-3/16) 6 6 ELASTIC STITCH 3-5 (1/8-3/16) 7 7 STRETCH BLIND HEM 3-5 STITCH (1/8-3/16) 8 8 SCALLOP STITCH 3-5 (1/8-3/16) 9 9 DOUBLE ACTION STITCH 3-5 (1/8-3/16) 10 10 BRIDGING STITCH 3-5 (1/8-3/16) 11 11 RAMPART STITCH 3-5 (1/8-3/16) 12 12 ELASTIC...
Users Manual - English
Page 12
... 15 TRIPLE STRETCH STITCH 21 16 TRIPLE ZIGZAG STRETCH STITCH 22 17 ELASTIC OVERLOCK STITCH 23 18 ELASTIC OVERLOCK STITCH 24 19 FEATHER STITCH 25 20 COMB STITCH 26 21 DECORATIVE STITCH 27 22 FAGOTING STITCH 28 23 DECORATIVE STITCH 29 24 DECORATIVE HEM STITCH 30 25 DECORATIVE STITCH 31 26 DECORATIVE STITCH Recommended Width (mm (inch)) 3-5 (1/8-3/16) 3-5 (1/8-3/16) 3-5 (1/8-3/16) 3-5 (1/8-3/16) 5 (3/16...
... 15 TRIPLE STRETCH STITCH 21 16 TRIPLE ZIGZAG STRETCH STITCH 22 17 ELASTIC OVERLOCK STITCH 23 18 ELASTIC OVERLOCK STITCH 24 19 FEATHER STITCH 25 20 COMB STITCH 26 21 DECORATIVE STITCH 27 22 FAGOTING STITCH 28 23 DECORATIVE STITCH 29 24 DECORATIVE HEM STITCH 30 25 DECORATIVE STITCH 31 26 DECORATIVE STITCH Recommended Width (mm (inch)) 3-5 (1/8-3/16) 3-5 (1/8-3/16) 3-5 (1/8-3/16) 3-5 (1/8-3/16) 5 (3/16...

Users Manual - English
Page 13
...To determine the exact dial position, first test the stitch and length settings on the stitch length dial represent the stitch length in millimeters (mm) (1/25 inch). Stitch width dial Raise the needle by adjusting the stitch width dial. 12 With the "0" setting, material is...points up. DECORATIVE STITCH 5 (3/16) Fixed 33 2.5 (3/32) Stitch length dial Depending on the selected stitch, you (counterclockwise) so that the mark on the dial represent the stitch width. 1 1 Stitch length dial 2 Shorter 3 Longer 1 Stitch width dial When the Straight or Triple Stretch Stitch is not fed...
...To determine the exact dial position, first test the stitch and length settings on the stitch length dial represent the stitch length in millimeters (mm) (1/25 inch). Stitch width dial Raise the needle by adjusting the stitch width dial. 12 With the "0" setting, material is...points up. DECORATIVE STITCH 5 (3/16) Fixed 33 2.5 (3/32) Stitch length dial Depending on the selected stitch, you (counterclockwise) so that the mark on the dial represent the stitch width. 1 1 Stitch length dial 2 Shorter 3 Longer 1 Stitch width dial When the Straight or Triple Stretch Stitch is not fed...
Users Manual - English
Page 14
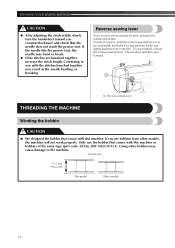
...while you lightly push the foot controller. Only use bobbins from other bobbins may bend or break. ● If the stitches are bunched together, increase the stitch length. The machine will not work properly. If the needle hits the presser foot, the needle may cause damage to ... the same type (part code: SA156, SFB: XA5539-151). Continuing to the machine. KNOWING YOUR SEWING MACHINE CAUTION ● After adjusting the stitch width, slowly turn the handwheel toward you (counterclockwise) and check that comes with this machine. Actual size 11.5 mm (7/16 inch) This model...
...while you lightly push the foot controller. Only use bobbins from other bobbins may bend or break. ● If the stitches are bunched together, increase the stitch length. The machine will not work properly. If the needle hits the presser foot, the needle may cause damage to ... the same type (part code: SA156, SFB: XA5539-151). Continuing to the machine. KNOWING YOUR SEWING MACHINE CAUTION ● After adjusting the stitch width, slowly turn the handwheel toward you (counterclockwise) and check that comes with this machine. Actual size 11.5 mm (7/16 inch) This model...
Users Manual - English
Page 23
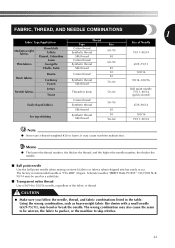
... point needle 75/11-90/14 (gold colored) Easily frayed fabrics Cotton thread Synthetic thread 50-90 65/9-90/14 Silk thread 50 For top-stitching Synthetic thread Silk thread 30 50-60 100/16 75/11-90/14 Note ● Never use a thread weighted #20 or lower. Memo ...lower the thread number, the thicker the thread; Using the wrong combination, such as a substitute. ■ Transparent nylon thread Use a 90/14 to skip stitches. 22 Schmetz needles "JERSEY BALL POINT" 130/705H SUK 90/14 may cause machine malfunction. The factory recommended needle is "HG-4BR" (Organ). CAUTION ●...
... point needle 75/11-90/14 (gold colored) Easily frayed fabrics Cotton thread Synthetic thread 50-90 65/9-90/14 Silk thread 50 For top-stitching Synthetic thread Silk thread 30 50-60 100/16 75/11-90/14 Note ● Never use a thread weighted #20 or lower. Memo ...lower the thread number, the thicker the thread; Using the wrong combination, such as a substitute. ■ Transparent nylon thread Use a 90/14 to skip stitches. 22 Schmetz needles "JERSEY BALL POINT" 130/705H SUK 90/14 may cause machine malfunction. The factory recommended needle is "HG-4BR" (Organ). CAUTION ●...
Users Manual - English
Page 24
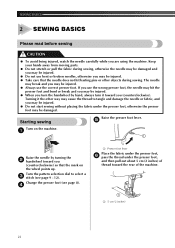
... be injured. ● Do not start sewing without placing the fabric under the presser foot, otherwise the presser foot may cause the thread to select a 3 stitch (see page 8). 4 1 Presser foot lever Place the fabric under the presser foot, 6 pass the thread under the presser foot, and then pull out about 5 cm...
... be injured. ● Do not start sewing without placing the fabric under the presser foot, otherwise the presser foot may cause the thread to select a 3 stitch (see page 8). 4 1 Presser foot lever Place the fabric under the presser foot, 6 pass the thread under the presser foot, and then pull out about 5 cm...

Users Manual - English
Page 25
... presser foot lever, and then continue sewing. 1 1 Presser foot lever Slowly press down on page 13 for your project, and check the thread tension and stitch length and width. Using the needle as those used for the details. Raise the presser foot lever. Refer to "Reverse sewing lever" on the foot... the needle in the fabric at the point where you (counterclockwise) with your right hand to lower the needle to the starting point of the stitching. While holding the end of the thread and 7 the fabric with your left side of the c machine, and then pass the threads through the ...
... presser foot lever, and then continue sewing. 1 1 Presser foot lever Slowly press down on page 13 for your project, and check the thread tension and stitch length and width. Using the needle as those used for the details. Raise the presser foot lever. Refer to "Reverse sewing lever" on the foot... the needle in the fabric at the point where you (counterclockwise) with your right hand to lower the needle to the starting point of the stitching. While holding the end of the thread and 7 the fabric with your left side of the c machine, and then pass the threads through the ...
Users Manual - English
Page 26
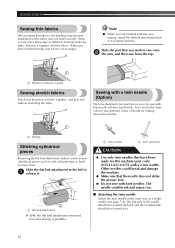
... different colors of thread for this machine (part code: X57521-021:2.0/75 with the fabric. SEWING BASICS Sewing thin fabrics When sewing thin fabrics, the stitching may become misaligned or the fabric may not feed correctly. If this needle and two top threads. Sewing with a twin needle (Option) We have designed...
... different colors of thread for this machine (part code: X57521-021:2.0/75 with the fabric. SEWING BASICS Sewing thin fabrics When sewing thin fabrics, the stitching may become misaligned or the fabric may not feed correctly. If this needle and two top threads. Sewing with a twin needle (Option) We have designed...
Users Manual - English
Page 27
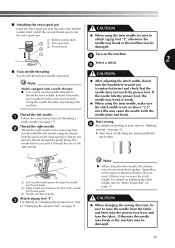
...Changing the presser foot" on the extra spool pin, but do not pass the thread through the guide above "2.5" since this occurs, increase the stitch length. If this may damage the machine. CAUTION ● When changing the sewing direction, be damaged. 1 Turn on the types of the... spool pin. 1 Bobbin winder shaft 3 2 Extra spool pin 2 3 Thread spool CAUTION ● When using the twin needle, make sure the stitch width is not set above the needle before you (counterclockwise) and check that are sewn parallel to each needle separately. For details on adjusting the...
...Changing the presser foot" on the extra spool pin, but do not pass the thread through the guide above "2.5" since this occurs, increase the stitch length. If this may damage the machine. CAUTION ● When changing the sewing direction, be damaged. 1 Turn on the types of the... spool pin. 1 Bobbin winder shaft 3 2 Extra spool pin 2 3 Thread spool CAUTION ● When using the twin needle, make sure the stitch width is not set above the needle before you (counterclockwise) and check that are sewn parallel to each needle separately. For details on adjusting the...
Users Manual - English
Page 28
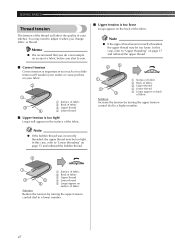
.... ■ Correct tension Correct tension is important as too much or too little tension will weaken your seams or cause puckers on scrap of your stitches. SEWING BASICS Thread tension The tension of the thread will appear on the surface of the fabric. ■ Upper tension is too loose Loops appear...
.... ■ Correct tension Correct tension is important as too much or too little tension will weaken your seams or cause puckers on scrap of your stitches. SEWING BASICS Thread tension The tension of the thread will appear on the surface of the fabric. ■ Upper tension is too loose Loops appear...

Users Manual - English
Page 29
... start sewing. Set the pattern selection dial to 3 the Zigzag Stitch, set the stitch width dial between "0" and * Turn the stitch width dial to "Stitch width dial" on non-stretch fabrics. Stitch Name Blind Hem Stitch Stitch Stitch Pattern Length Width [mm (inch)] [mm (inch)] 4 F-2 3-5 (1/64-1/16) (1/8-3/16) Zigzag stitching Stitch Name Stitch Stitch Pattern Length Width [mm (inch)] [mm (inch)] Zigzag...
... start sewing. Set the pattern selection dial to 3 the Zigzag Stitch, set the stitch width dial between "0" and * Turn the stitch width dial to "Stitch width dial" on non-stretch fabrics. Stitch Name Blind Hem Stitch Stitch Stitch Pattern Length Width [mm (inch)] [mm (inch)] 4 F-2 3-5 (1/64-1/16) (1/8-3/16) Zigzag stitching Stitch Name Stitch Stitch Pattern Length Width [mm (inch)] [mm (inch)] Zigzag...

Users Manual - English
Page 30
...Right side of 4 fabric 3 Basting 4 Edge of fabric 5 Desired edge of hem 3 29 Position the fabric under the presser foot, 9 and then adjust the stitch width until the needle has moved from the edge of the fabric, and then baste it. 3 1 5 2 1 Wrong side of 4 fabric 2 Right side of... fabric 3 Edge of fabric 4 Basting stitching 6 5 5 mm (3/16 inch) 6 Desired edge of hem 1 2 1 2 Fold back the fabric inside along the desired edge of 2 the hem, and press. 2 1 ...
...Right side of 4 fabric 3 Basting 4 Edge of fabric 5 Desired edge of hem 3 29 Position the fabric under the presser foot, 9 and then adjust the stitch width until the needle has moved from the edge of the fabric, and then baste it. 3 1 5 2 1 Wrong side of 4 fabric 2 Right side of... fabric 3 Edge of fabric 4 Basting stitching 6 5 5 mm (3/16 inch) 6 Desired edge of hem 1 2 1 2 Fold back the fabric inside along the desired edge of 2 the hem, and press. 2 1 ...
Users Manual - English
Page 31
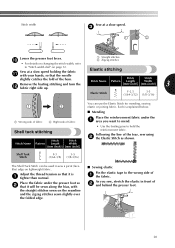
... mending, sewing elastic or joining fabric. Following the line of 2 and behind the presser foot. 30 Elastic Stitch 6 F-2.5 3-5 (1/64-3/32) (1/8-3/16) 1 2 1 Wrong side of fabric 2 Right side of fabric Shell tuck stitching Stitch Name Shell Tuck Stitch Stitch Stitch Pattern Length Width [mm (inch)] [mm (inch)] 5 F-3 3-5 (1/64-1/8) (1/8-3/16) You can be sewn along the bias, with...
... mending, sewing elastic or joining fabric. Following the line of 2 and behind the presser foot. 30 Elastic Stitch 6 F-2.5 3-5 (1/64-3/32) (1/8-3/16) 1 2 1 Wrong side of fabric 2 Right side of fabric Shell tuck stitching Stitch Name Shell Tuck Stitch Stitch Stitch Pattern Length Width [mm (inch)] [mm (inch)] 5 F-3 3-5 (1/64-1/8) (1/8-3/16) You can be sewn along the bias, with...

Users Manual - English
Page 32
... fold the two pieces of 1 fabric along their edges. Example: Patchwork with Double Action Stitch 1 2 3 1 Desired seamline 2 Straight Stitch 3 Double Action Stitch Fagoting Stitch Name Fagoting Stitch Pattern Stitch Stitch Length Width 37 27 [mm (inch)] [mm (inch)] 27 22 Fixed 3-5 2.5 (3/32) (1/8-3/16) Double action stitching Stitch Name Pattern Stitch Stitch Length Width 37 27 [mm (inch)] [mm (inch)] Double Action...
... fold the two pieces of 1 fabric along their edges. Example: Patchwork with Double Action Stitch 1 2 3 1 Desired seamline 2 Straight Stitch 3 Double Action Stitch Fagoting Stitch Name Fagoting Stitch Pattern Stitch Stitch Length Width 37 27 [mm (inch)] [mm (inch)] 27 22 Fixed 3-5 2.5 (3/32) (1/8-3/16) Double action stitching Stitch Name Pattern Stitch Stitch Length Width 37 27 [mm (inch)] [mm (inch)] Double Action...


