Users Manual - English
Page 3
... by authorized dealer. • In the event a malfunction occurs or adjustment is required, first follow careful instruction when freehand stitching so that this machine was supplied in the back of the operation manual to the danger of experience and knowledge, unless they do not deflect the... close attention is necessary when the machine is not suitable for its intended use as it could cause the needle to break. • Do not push or pull the fabric when sewing, and follow the troubleshooting table in should contact your local authorized Brother dealer. Never use outdoors. 7 ...
... by authorized dealer. • In the event a malfunction occurs or adjustment is required, first follow careful instruction when freehand stitching so that this machine was supplied in the back of the operation manual to the danger of experience and knowledge, unless they do not deflect the... close attention is necessary when the machine is not suitable for its intended use as it could cause the needle to break. • Do not push or pull the fabric when sewing, and follow the troubleshooting table in should contact your local authorized Brother dealer. Never use outdoors. 7 ...
Users Manual - English
Page 4
... insertion 38 Gathering 39 Darning 39 Appliqués 39 OPTIONAL ACCESSORIES 40 Using the blind stitch foot 40 6. KNOWING YOUR SEWING MACHINE 4 ACCESSORIES 4 Optional accessories 4 THE MAIN PARTS 5 Flat bed attachment 5 USING YOUR SEWING MACHINE 6 Connecting plugs 6 Main power and sewing light switch 7 Foot controller 7 Checking the needle 7 Replacing the needle 7 Changing the presser foot 8 THE...
... insertion 38 Gathering 39 Darning 39 Appliqués 39 OPTIONAL ACCESSORIES 40 Using the blind stitch foot 40 6. KNOWING YOUR SEWING MACHINE 4 ACCESSORIES 4 Optional accessories 4 THE MAIN PARTS 5 Flat bed attachment 5 USING YOUR SEWING MACHINE 6 Connecting plugs 6 Main power and sewing light switch 7 Foot controller 7 Checking the needle 7 Replacing the needle 7 Changing the presser foot 8 THE...
Users Manual - English
Page 5
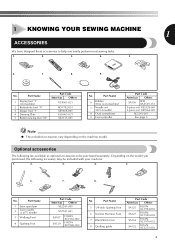
... set: XE7064-001 XE5241-001 See page 5 Note ● The included accessories vary depending on machine) 2 Buttonhole foot "A" 3 Zipper foot "I" 4 Darning Plate 5 Button sewing foot "M" Part Code Americas Others XC4901-021 XD1792-031 XE9369-001 XC6063-021 XE2137-001 No. Depending...inch Quilting Foot 6 Narrow Hemmer Foot 7 Blind Stitch Foot 8 Quilting guide Part Code Americas Others SA125 F001N: XC1944-052 SA127 F003N: XC1945-002 SA134 F018N: XC1976-052 SA132 F016N: XC2215-002 4 1 KNOWING YOUR SEWING MACHINE 1 ACCESSORIES We have designed these accessories to be ...
... set: XE7064-001 XE5241-001 See page 5 Note ● The included accessories vary depending on machine) 2 Buttonhole foot "A" 3 Zipper foot "I" 4 Darning Plate 5 Button sewing foot "M" Part Code Americas Others XC4901-021 XD1792-031 XE9369-001 XC6063-021 XE2137-001 No. Depending...inch Quilting Foot 6 Narrow Hemmer Foot 7 Blind Stitch Foot 8 Quilting guide Part Code Americas Others SA125 F001N: XC1944-052 SA127 F003N: XC1945-002 SA134 F018N: XC1976-052 SA132 F016N: XC2215-002 4 1 KNOWING YOUR SEWING MACHINE 1 ACCESSORIES We have designed these accessories to be ...
Users Manual - English
Page 6
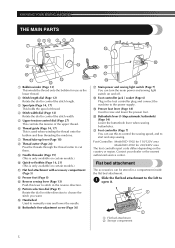
... 6) Plug in a compartment inside the flat bed attachment. Foot Controller: Model KD-1902 for 110/120V area Model KD-2902 for use this lever to stitch in either direction to manually raise and lower the needle. F Buttonhole fine-adjustment screw (Page 36) J F KG H I Presser foot lever (Page 18) Used... switch on the country or region. Contact your dealer or the nearest authorized service center. KNOWING YOUR SEWING MACHINE THE MAIN PARTS 654 3 2 1 7 E 8 9 D 0 A C B 1 Bobbin winder (Page 13) This winds the thread onto the bobbin for 220/240V area The foot controller part code...
... 6) Plug in a compartment inside the flat bed attachment. Foot Controller: Model KD-1902 for 110/120V area Model KD-2902 for use this lever to stitch in either direction to manually raise and lower the needle. F Buttonhole fine-adjustment screw (Page 36) J F KG H I Presser foot lever (Page 18) Used... switch on the country or region. Contact your dealer or the nearest authorized service center. KNOWING YOUR SEWING MACHINE THE MAIN PARTS 654 3 2 1 7 E 8 9 D 0 A C B 1 Bobbin winder (Page 13) This winds the thread onto the bobbin for 220/240V area The foot controller part code...
Users Manual - English
Page 9
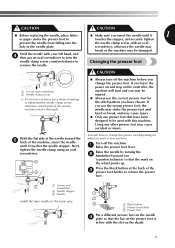
...on the controller, the machine will have been designed to Changing the presser foot remove the needle. Raise the needle by turning the 2 handwheel toward the 5 back of the sewing machine may be injured. ● Always use the correct presser foot for the stitch pattern you have chosen.... screwdriver, otherwise the needle may break or the machine may be damaged. ● Always turn the needle clamp screw ...
...on the controller, the machine will have been designed to Changing the presser foot remove the needle. Raise the needle by turning the 2 handwheel toward the 5 back of the sewing machine may be injured. ● Always use the correct presser foot for the stitch pattern you have chosen.... screwdriver, otherwise the needle may break or the machine may be damaged. ● Always turn the needle clamp screw ...
Users Manual - English
Page 10
... installed with the correct orientation, the needle may strike the presser foot, which may be damaged. KNOWING YOUR SEWING MACHINE Lower the presser foot lever and fix the 5 presser foot onto the shank. Stretch stitching Raise the needle by turning the handwheel toward you (counterclockwise) so that the mark on the wheel points...
... installed with the correct orientation, the needle may strike the presser foot, which may be damaged. KNOWING YOUR SEWING MACHINE Lower the presser foot lever and fix the 5 presser foot onto the shank. Stretch stitching Raise the needle by turning the handwheel toward you (counterclockwise) so that the mark on the wheel points...
Users Manual - English
Page 12
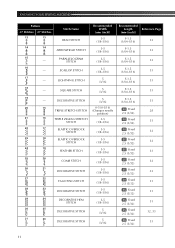
...) Fixed 2.5 (3/32) Fixed 2.5 (3/32) Fixed 2.5 (3/32) Fixed 2.5 (3/32) Fixed 2.5 (3/32) 28 33 32 32 33 32 33 31 31 31 32, 33 33 11 SCALLOP STITCH 17 - SQUARE STITCH 19 - PARALLELOGRAM STITCH 16 - KNOWING YOUR SEWING MACHINE Pattern 37 Stitches 27 Stitches 13 13 Stitch Name BEAD STITCH 14 14 ARROWHEAD...
...) Fixed 2.5 (3/32) Fixed 2.5 (3/32) Fixed 2.5 (3/32) Fixed 2.5 (3/32) Fixed 2.5 (3/32) 28 33 32 32 33 32 33 31 31 31 32, 33 33 11 SCALLOP STITCH 17 - SQUARE STITCH 19 - PARALLELOGRAM STITCH 16 - KNOWING YOUR SEWING MACHINE Pattern 37 Stitches 27 Stitches 13 13 Stitch Name BEAD STITCH 14 14 ARROWHEAD...
Users Manual - English
Page 14
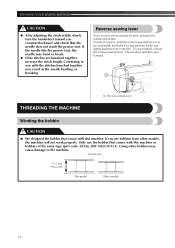
... Using other models, the machine will then sew forward. 1 1 Reverse sewing lever THREADING THE MACHINE Winding the bobbin CAUTION ● We designed the bobbin that the needle does not touch the presser foot. KNOWING YOUR SEWING MACHINE CAUTION ● After adjusting the stitch width, slowly turn the ...handwheel toward you (counterclockwise) and check that comes with this machine or bobbins of the same type (part code: SA156, SFB:...
... Using other models, the machine will then sew forward. 1 1 Reverse sewing lever THREADING THE MACHINE Winding the bobbin CAUTION ● We designed the bobbin that the needle does not touch the presser foot. KNOWING YOUR SEWING MACHINE CAUTION ● After adjusting the stitch width, slowly turn the ...handwheel toward you (counterclockwise) and check that comes with this machine or bobbins of the same type (part code: SA156, SFB:...
Users Manual - English
Page 23
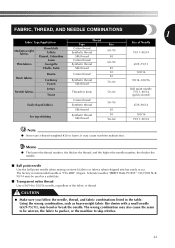
...■ Ball point needle Use the ball point needle when sewing on stretch fabrics or fabrics where skipped stitches easily occur. Schmetz needles "JERSEY BALL POINT" 130/705H SUK 90/14 may be uneven, the fabric to pucker, or the machine to 100/16 needle, regardless of Needle 75/11-90/14... lower. The wrong combination may also cause the seam to be used as heavyweight fabric like denim with a small needle (65/9-75/11), may cause machine malfunction. Memo ● The lower the thread number, the thicker the thread; The factory recommended needle is "HG-4BR" (Organ). CAUTION ● ...
...■ Ball point needle Use the ball point needle when sewing on stretch fabrics or fabrics where skipped stitches easily occur. Schmetz needles "JERSEY BALL POINT" 130/705H SUK 90/14 may be uneven, the fabric to pucker, or the machine to 100/16 needle, regardless of Needle 75/11-90/14... lower. The wrong combination may also cause the seam to be used as heavyweight fabric like denim with a small needle (65/9-75/11), may cause machine malfunction. Memo ● The lower the thread number, the thicker the thread; The factory recommended needle is "HG-4BR" (Organ). CAUTION ● ...
Users Manual - English
Page 24
... it toward you may be injured. ● Take care that the mark on the machine. 1 1 Raise the needle by hand, always turn it the other objects during sewing, otherwise the needle may be damaged and you may be injured. ● Do not use the wrong presser foot, the needle may be ...lever Place the fabric under the presser foot, 6 pass the thread under the presser foot, otherwise the presser foot may cause the thread to select a 3 stitch (see page 9 - 12). The needle may break and you (counterclockwise) so that the needle does not hit basting pins or other way may be injured...
... it toward you may be injured. ● Take care that the mark on the machine. 1 1 Raise the needle by hand, always turn it the other objects during sewing, otherwise the needle may be damaged and you may be injured. ● Do not use the wrong presser foot, the needle may be ...lever Place the fabric under the presser foot, 6 pass the thread under the presser foot, otherwise the presser foot may cause the thread to select a 3 stitch (see page 9 - 12). The needle may break and you (counterclockwise) so that the needle does not hit basting pins or other way may be injured...

Users Manual - English
Page 25
...and width. Refer to the starting point of the stitching. While holding the end of the thread and 7 the fabric with your left side of the c machine, and then pass the threads through the thread cutter to cut them. . 1 Sewing thick fabrics ■ If the fabric does not ... seams by turning the a handwheel toward you (counterclockwise) with your foot off the foot controller. 0 X The machine stops sewing. • You can use reverse sewing for the details. Trial sewing A trial piece of fabric and thread that are the same as a pivot, turn the handwheel toward you want ...
...and width. Refer to the starting point of the stitching. While holding the end of the thread and 7 the fabric with your left side of the c machine, and then pass the threads through the thread cutter to cut them. . 1 Sewing thick fabrics ■ If the fabric does not ... seams by turning the a handwheel toward you (counterclockwise) with your foot off the foot controller. 0 X The machine stops sewing. • You can use reverse sewing for the details. Trial sewing A trial piece of fabric and thread that are the same as a pivot, turn the handwheel toward you want ...
Users Manual - English
Page 26
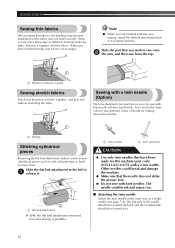
When you have designed your machine so you can use the same color or two different colors of thread for making decorative stitches. 1 1 Basting Stitching cylindrical pieces Removing the flat bed attachment makes it . 1 1 Flat bed attachment X With the flat bed attachment removed, free-arm sewing is possible. 1 Twin needle 2 Extra spool pin CAUTION ●...
When you have designed your machine so you can use the same color or two different colors of thread for making decorative stitches. 1 1 Basting Stitching cylindrical pieces Removing the flat bed attachment makes it . 1 1 Flat bed attachment X With the flat bed attachment removed, free-arm sewing is possible. 1 Twin needle 2 Extra spool pin CAUTION ●...
Users Manual - English
Page 27
... attach zigzag foot "J", otherwise the needle may break or the machine may be damaged. 1 Turn on the extra spool pin, but do not pass the thread through the guide above "2.5" since this occurs, increase the stitch length. CAUTION ● When changing the sewing direction, be damaged. 26 Note Models equipped with a needle threader...
... attach zigzag foot "J", otherwise the needle may break or the machine may be damaged. 1 Turn on the extra spool pin, but do not pass the thread through the guide above "2.5" since this occurs, increase the stitch length. CAUTION ● When changing the sewing direction, be damaged. 26 Note Models equipped with a needle threader...
Users Manual - English
Page 35
... the buttonhole lever and buttonhole foot are used. Note ● When sewing a stitch pattern other than for a buttonhole, do not lower, touch or move the buttonhole lever, otherwise the stitching may occur if the foot controller is accidentally pressed and the machine starts sewing. ■ Making a buttonhole Using tailor's chalk, mark the position and 1 length...
... the buttonhole lever and buttonhole foot are used. Note ● When sewing a stitch pattern other than for a buttonhole, do not lower, touch or move the buttonhole lever, otherwise the stitching may occur if the foot controller is accidentally pressed and the machine starts sewing. ■ Making a buttonhole Using tailor's chalk, mark the position and 1 length...
Users Manual - English
Page 36
... the mark on the fabric. 1 2 1 Starting mark on the fabric 2 Marks on the foot Note ● If buttonhole sewing was interrupted, sew trial stitching one or two times on a scrap piece of 10 mm (3/8 inch), the button guide plate should be sewn incorrectly. ● If ...scale is 5 mm (3/16 inch).) Lower the buttonhole lever and push it 6 back slightly. 1 1 2 3 1 Buttonhole lever While gently holding the upper thread, 7 start the machine. 1 Presser foot scale 2 Length of buttonhole (Diameter + thickness of button) 3 5 mm (3/16 inch) Example: For a button with a diameter of 15 mm (9/16 inch...
... the mark on the fabric. 1 2 1 Starting mark on the fabric 2 Marks on the foot Note ● If buttonhole sewing was interrupted, sew trial stitching one or two times on a scrap piece of 10 mm (3/8 inch), the button guide plate should be sewn incorrectly. ● If ...scale is 5 mm (3/16 inch).) Lower the buttonhole lever and push it 6 back slightly. 1 1 2 3 1 Buttonhole lever While gently holding the upper thread, 7 start the machine. 1 Presser foot scale 2 Length of buttonhole (Diameter + thickness of button) 3 5 mm (3/16 inch) Example: For a button with a diameter of 15 mm (9/16 inch...
Users Manual - English
Page 38
... plate on the machine. 5 Put a button between the 1 buttonholes and mark the fabric. The needle may break and you may be injured. X Use scissors to cut the upper thread and the bobbin thread at the end of the 8 stitching to the button sewing foot 3 "M". 37 At a slow speed, sew about 10 stitches. 7 Sewing buttons Stitch Stitch Name Pattern...
... plate on the machine. 5 Put a button between the 1 buttonholes and mark the fabric. The needle may break and you may be injured. X Use scissors to cut the upper thread and the bobbin thread at the end of the 8 stitching to the button sewing foot 3 "M". 37 At a slow speed, sew about 10 stitches. 7 Sewing buttons Stitch Stitch Name Pattern...
Users Manual - English
Page 39
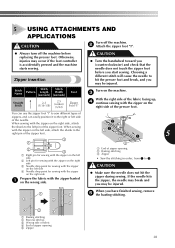
... side of zipper opening 5 Zipper 38 5 USING ATTACHMENTS AND APPLICATIONS CAUTION Turn off the machine. 2 Attach the zipper foot "I". ● Always turn off the machine before you may be injured. 1 1 3 3 5 When you have finished sewing, remove 5 the basting stitching. 4 2 4 1 Basting stitching 2 Reverse stitches 3 Wrong side of fabric 4 End of the zipper foot. Otherwise, injuries may occur...
... side of zipper opening 5 Zipper 38 5 USING ATTACHMENTS AND APPLICATIONS CAUTION Turn off the machine. 2 Attach the zipper foot "I". ● Always turn off the machine before you may be injured. 1 1 3 3 5 When you have finished sewing, remove 5 the basting stitching. 4 2 4 1 Basting stitching 2 Reverse stitches 3 Wrong side of fabric 4 End of the zipper foot. Otherwise, injuries may occur...

Users Manual - English
Page 40
... section being 6 darned is filled with a zigzag stitch. Turn on the machine. 4 Begin sewing by cutting a different piece of fabric into a shape and applying it toward you want to gather the 3 material. Darning Stitch Name Pattern Stitch Length [mm (inch)] Straight 2 Stitch Any Other Darning Plate Turn off the machine. 1 Place the darning plate on the needle...
... section being 6 darned is filled with a zigzag stitch. Turn on the machine. 4 Begin sewing by cutting a different piece of fabric into a shape and applying it toward you want to gather the 3 material. Darning Stitch Name Pattern Stitch Length [mm (inch)] Straight 2 Stitch Any Other Darning Plate Turn off the machine. 1 Place the darning plate on the needle...
Users Manual - English
Page 41
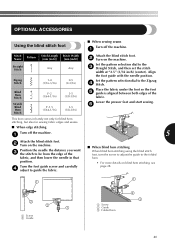
... the needle in handy not only for blind hem stitching, but also for sewing fabric edges and seams. ■ When edge stitching Turn off the machine. 1 Stitch Name Pattern Straight 2 Stitch Stitch Length [mm (inch)] Any Stitch Width [mm (inch)] Any Zigzag 3 Stitch 1-4 (1/16-3/16) 0-5 (0-3/16) Blind 4 Hem Stitch Stretch 7 Blind Hem Stitch F-2 (1/64-1/16) 3-5 (1/8-3/16) F-1.5 (1/64-1/16) 3-5 (1/8-3/16) Attach the...
... the needle in handy not only for blind hem stitching, but also for sewing fabric edges and seams. ■ When edge stitching Turn off the machine. 1 Stitch Name Pattern Straight 2 Stitch Stitch Length [mm (inch)] Any Stitch Width [mm (inch)] Any Zigzag 3 Stitch 1-4 (1/16-3/16) 0-5 (0-3/16) Blind 4 Hem Stitch Stretch 7 Blind Hem Stitch F-2 (1/64-1/16) 3-5 (1/8-3/16) F-1.5 (1/64-1/16) 3-5 (1/8-3/16) Attach the...
Users Manual - English
Page 44
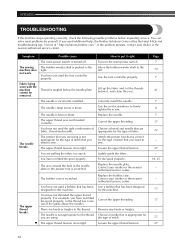
... Remove any knots or tangles. Choose a needle that is correct for the type of stitch that is appropriate for this machine. Symptom The sewing machine does not work. Fabric being sewn with the machine cannot be removed. Thread is scratched. The upper thread was not threaded correctly. The bobbin...you have not used the foot controller properly. The needle is too tight. Correct the upper threading. Visit us at " http://solutions.brother.com ". You have not fitted the spool properly. Move the bobbin-winder shaft to the right. Correct the upper threading. The ...
... Remove any knots or tangles. Choose a needle that is correct for the type of stitch that is appropriate for this machine. Symptom The sewing machine does not work. Fabric being sewn with the machine cannot be removed. Thread is scratched. The upper thread was not threaded correctly. The bobbin...you have not used the foot controller properly. The needle is too tight. Correct the upper threading. Visit us at " http://solutions.brother.com ". You have not fitted the spool properly. Move the bobbin-winder shaft to the right. Correct the upper threading. The ...


