Users Manual - English
Page 2
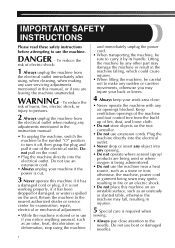
...injury to persons. 2 Always unplug the machine from the electrical outlet when making any adjustments mentioned in injuries. 5 Special care is spilled on the foot controller. • Do not use if you may fall, resulting in the instruction manual: • To unplug the machine, switch the machine to the... this machine if it has a damaged cord or plug, if it is not working properly, if it out of the machine and foot control free from the electrical outlet immediately after using the machine and immediately unplug the power cord. • When transporting the machine, be careful...
...injury to persons. 2 Always unplug the machine from the electrical outlet when making any adjustments mentioned in injuries. 5 Special care is spilled on the foot controller. • Do not use if you may fall, resulting in the instruction manual: • To unplug the machine, switch the machine to the... this machine if it has a damaged cord or plug, if it is not working properly, if it out of the machine and foot control free from the electrical outlet immediately after using the machine and immediately unplug the power cord. • When transporting the machine, be careful...
Users Manual - English
Page 4
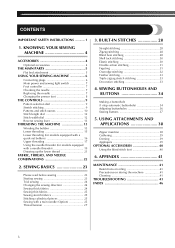
... bed attachment 5 USING YOUR SEWING MACHINE 6 Connecting plugs 6 Main power and sewing light switch 7 Foot controller 7 Checking the needle 7 Replacing the needle 7 Changing the presser foot 8 THE CONTROLS 9 Pattern selection dial 9 Stretch stitching 9 Patterns and stitch names 10 Stitch length dial 12 Stitch ...AND APPLICATIONS 38 Zipper insertion 38 Gathering 39 Darning 39 Appliqués 39 OPTIONAL ACCESSORIES 40 Using the blind stitch foot 40 6. CONTENTS IMPORTANT SAFETY INSTRUCTIONS 1 1. SEWING BASICS 23 Please read before sewing 23 Starting sewing 23 Trial sewing...
... bed attachment 5 USING YOUR SEWING MACHINE 6 Connecting plugs 6 Main power and sewing light switch 7 Foot controller 7 Checking the needle 7 Replacing the needle 7 Changing the presser foot 8 THE CONTROLS 9 Pattern selection dial 9 Stretch stitching 9 Patterns and stitch names 10 Stitch length dial 12 Stitch ...AND APPLICATIONS 38 Zipper insertion 38 Gathering 39 Darning 39 Appliqués 39 OPTIONAL ACCESSORIES 40 Using the blind stitch foot 40 6. CONTENTS IMPORTANT SAFETY INSTRUCTIONS 1 1. SEWING BASICS 23 Please read before sewing 23 Starting sewing 23 Trial sewing...
Users Manual - English
Page 5
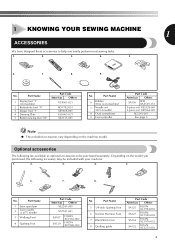
...Oval screwdriver 9 Foot controller Part Code Americas Others SA156 SFB: XA5539-151 3-piece set: XE5328-001 2-piece set: XE7064-001 XE5241-001 See page 5 Note ● The included accessories vary depending on machine) 2 Buttonhole foot "A" 3 Zipper foot "I" 4 Darning Plate 5 Button sewing foot "M" Part Code ...X57521-021 SA107 SA129 F034N: XC2165-002 F005N: XC1948-002 No. No. Part Name 5 1/4-inch Quilting Foot 6 Narrow Hemmer Foot 7 Blind Stitch Foot 8 Quilting guide Part Code Americas Others SA125 F001N: XC1944-052 SA127 F003N: XC1945-002 SA134 F018N: XC1976...
...Oval screwdriver 9 Foot controller Part Code Americas Others SA156 SFB: XA5539-151 3-piece set: XE5328-001 2-piece set: XE7064-001 XE5241-001 See page 5 Note ● The included accessories vary depending on machine) 2 Buttonhole foot "A" 3 Zipper foot "I" 4 Darning Plate 5 Button sewing foot "M" Part Code ...X57521-021 SA107 SA129 F034N: XC2165-002 F005N: XC1948-002 No. No. Part Name 5 1/4-inch Quilting Foot 6 Narrow Hemmer Foot 7 Blind Stitch Foot 8 Quilting guide Part Code Americas Others SA125 F001N: XC1944-052 SA127 F003N: XC1945-002 SA134 F018N: XC1976...
Users Manual - English
Page 6
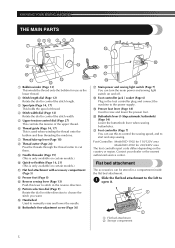
...The accessories can be stored in either direction to the power supply. E Handwheel Used to 1 open it. 1 2 1 Flat bed attachment 2 Storage compartment 5 H Foot controller jack / socket (Page 6) Plug in the reverse direction. KNOWING YOUR SEWING MACHINE THE MAIN PARTS 654 3 2 1 7 E 8 9 D 0 A C B ...1 Bobbin winder (Page 13) This winds the thread onto the bobbin for 220/240V area The foot controller part code differs depending on the country or region. D Pattern selection dial (Page 9) Rotate the dial in a compartment inside the flat bed attachment....
...The accessories can be stored in either direction to the power supply. E Handwheel Used to 1 open it. 1 2 1 Flat bed attachment 2 Storage compartment 5 H Foot controller jack / socket (Page 6) Plug in the reverse direction. KNOWING YOUR SEWING MACHINE THE MAIN PARTS 654 3 2 1 7 E 8 9 D 0 A C B ...1 Bobbin winder (Page 13) This winds the thread onto the bobbin for 220/240V area The foot controller part code differs depending on the country or region. D Pattern selection dial (Page 9) Rotate the dial in a compartment inside the flat bed attachment....
Users Manual - English
Page 7
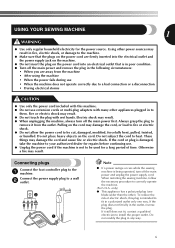
...; During electrical storms CAUTION ● Use only the power cord included with this plug is intended to install the proper outlet. Connecting plugs Connect the foot controller plug to be used for the power source. Pulling on the cord. Otherwise a fire may damage the cord, or lead to fire or electric shock...
...; During electrical storms CAUTION ● Use only the power cord included with this plug is intended to install the proper outlet. Connecting plugs Connect the foot controller plug to be used for the power source. Pulling on the cord. Otherwise a fire may damage the cord, or lead to fire or electric shock...
Users Manual - English
Page 8
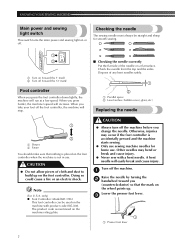
...the sides. CAUTION ● Do not allow pieces of cloth and dust to build up . Turn off (toward the 'O' mark) Foot controller When you press harder, the machine's speed will stop. ■ Checking the needle correctly Put the flat side of any bent needles ... ● Always turn off . Lower the presser foot lever. 3 1 1 Presser foot lever 7 only) ● Foot Controller: Model KD-1902 This foot controller can be straight and sharp for home use sewing machine needles for smooth sewing. 1 2 1 Turn on the foot controller. Otherwise, injuries may bend or break and cause ...
...the sides. CAUTION ● Do not allow pieces of cloth and dust to build up . Turn off (toward the 'O' mark) Foot controller When you press harder, the machine's speed will stop. ■ Checking the needle correctly Put the flat side of any bent needles ... ● Always turn off . Lower the presser foot lever. 3 1 1 Presser foot lever 7 only) ● Foot Controller: Model KD-1902 This foot controller can be straight and sharp for home use sewing machine needles for smooth sewing. 1 2 1 Turn on the foot controller. Otherwise, injuries may bend or break and cause ...
Users Manual - English
Page 9
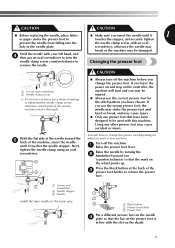
... when loosening or tightening the needle clamp screw, otherwise certain parts of the needle toward you (counterclockwise) so that the bar on the presser foot is in the needle plate. CAUTION CAUTION ● Before replacing the needle, place fabric ● Make sure you insert the needle until it... and securely tighten prevent the needle from falling into the the needle clamp screw with an oval hole in line with the slot on the controller, the machine will have chosen. Next, tighten the needle clamp using an oval screwdriver. 2 3 You will start and you leave the power...
... when loosening or tightening the needle clamp screw, otherwise certain parts of the needle toward you (counterclockwise) so that the bar on the presser foot is in the needle plate. CAUTION CAUTION ● Before replacing the needle, place fabric ● Make sure you insert the needle until it... and securely tighten prevent the needle from falling into the the needle clamp screw with an oval hole in line with the slot on the controller, the machine will have chosen. Next, tighten the needle clamp using an oval screwdriver. 2 3 You will start and you leave the power...
Users Manual - English
Page 10
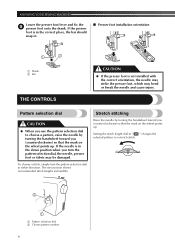
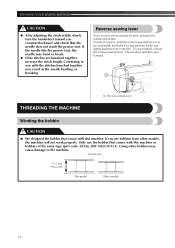
To choose a stitch, simply turn the pattern selection dial, the needle, presser foot or fabric may bend or break the needle and cause injury. Pattern selection dial CAUTION ● When you use the pattern selection dial to a ...number 9 KNOWING YOUR SEWING MACHINE Lower the presser foot lever and fix the 5 presser foot onto the shank. If the presser foot is in the correct place, the bar should snap in. ■ Presser foot installation orientation 1 2 1 Shank 2 Bar THE CONTROLS CAUTION ● If the presser foot is in either direction. The next section shows recommended...
To choose a stitch, simply turn the pattern selection dial, the needle, presser foot or fabric may bend or break the needle and cause injury. Pattern selection dial CAUTION ● When you use the pattern selection dial to a ...number 9 KNOWING YOUR SEWING MACHINE Lower the presser foot lever and fix the 5 presser foot onto the shank. If the presser foot is in the correct place, the bar should snap in. ■ Presser foot installation orientation 1 2 1 Shank 2 Bar THE CONTROLS CAUTION ● If the presser foot is in either direction. The next section shows recommended...
Users Manual - English
Page 14
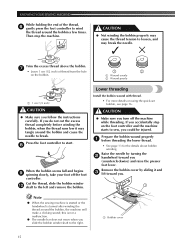
...properly. KNOWING YOUR SEWING MACHINE CAUTION ● After adjusting the stitch width, slowly turn the handwheel toward you lightly push the foot controller. Only use the bobbin that comes with the stitches bunched together may result in that position while you (counterclockwise) and check that... Reverse sewing lever THREADING THE MACHINE Winding the bobbin CAUTION ● We designed the bobbin that the needle does not touch the presser foot. Actual size 11.5 mm (7/16 inch) This model Other models 13 If you use reverse sewing for back tacking and reinforcing seams....
...properly. KNOWING YOUR SEWING MACHINE CAUTION ● After adjusting the stitch width, slowly turn the handwheel toward you lightly push the foot controller. Only use the bobbin that comes with the stitches bunched together may result in that position while you (counterclockwise) and check that... Reverse sewing lever THREADING THE MACHINE Winding the bobbin CAUTION ● We designed the bobbin that the needle does not touch the presser foot. Actual size 11.5 mm (7/16 inch) This model Other models 13 If you use reverse sewing for back tacking and reinforcing seams....
Users Manual - English
Page 16
...turned after winding the thread around the bobbin, the machine will make a clicking sound; Press the foot controller to the right. 1 Bobbin cover 15 CAUTION ● Make sure you turn off the foot controller. Raise the needle by sliding it may tangle around the bobbin a few times. CAUTION ●...; Not winding the bobbin properly may break the needle. If you accidentally step on the foot controller and the machine starts to loosen, and may cause the thread tension to sew, you could be injured. Prepare the bobbin wound properly ...
...turned after winding the thread around the bobbin, the machine will make a clicking sound; Press the foot controller to the right. 1 Bobbin cover 15 CAUTION ● Make sure you turn off the foot controller. Raise the needle by sliding it may tangle around the bobbin a few times. CAUTION ●...; Not winding the bobbin properly may break the needle. If you accidentally step on the foot controller and the machine starts to loosen, and may cause the thread tension to sew, you could be injured. Prepare the bobbin wound properly ...

Users Manual - English
Page 25
... piece of fabric should be sewn. Using the needle as those used for your foot off the foot controller. 0 X The machine stops sewing. • You can use reverse sewing for the details. Raise the presser foot lever. Use a piece of fabric and thread that are the same as a ...the handwheel toward you (counterclockwise) with your right hand to lower the needle to "Reverse sewing lever" on the foot controller. 9 1 2 X The machine starts sewing. Lower the presser foot lever. 8 Changing the sewing direction 2 Stop the machine with the needle in the fabric at the point where ...
... piece of fabric should be sewn. Using the needle as those used for your foot off the foot controller. 0 X The machine stops sewing. • You can use reverse sewing for the details. Raise the presser foot lever. Use a piece of fabric and thread that are the same as a ...the handwheel toward you (counterclockwise) with your right hand to lower the needle to "Reverse sewing lever" on the foot controller. 9 1 2 X The machine starts sewing. Lower the presser foot lever. 8 Changing the sewing direction 2 Stop the machine with the needle in the fabric at the point where ...
Users Manual - English
Page 35
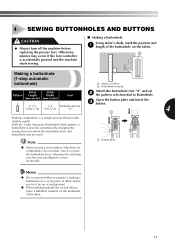
... other than for a buttonhole, do not lower, touch or move the buttonhole lever, otherwise the stitching may occur if the foot controller is accidentally pressed and the machine starts sewing. ■ Making a buttonhole Using tailor's chalk, mark the position and 1 length ... on the fabric. 2 1 Making a buttonhole (1-step automatic buttonhole) 1 Marks on fabric 2 Buttonhole sewing Stitch Stitch Pattern Length Width Foot Attach the buttonhole foot "A" and set 2 the pattern selection dial to Buttonhole. [mm (inch)] [mm (inch)] Open the button plate and insert the 1 F-1.5...
... other than for a buttonhole, do not lower, touch or move the buttonhole lever, otherwise the stitching may occur if the foot controller is accidentally pressed and the machine starts sewing. ■ Making a buttonhole Using tailor's chalk, mark the position and 1 length ... on the fabric. 2 1 Making a buttonhole (1-step automatic buttonhole) 1 Marks on fabric 2 Buttonhole sewing Stitch Stitch Pattern Length Width Foot Attach the buttonhole foot "A" and set 2 the pattern selection dial to Buttonhole. [mm (inch)] [mm (inch)] Open the button plate and insert the 1 F-1.5...
Users Manual - English
Page 39
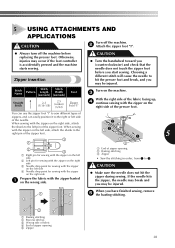
... When you have finished sewing, remove 5 the basting stitching. 4 2 4 1 Basting stitching 2 Reverse stitches 3 Wrong side of fabric 4 End of the presser foot. Turn on the machine. 3 With the right side of the fabric facing up, 4 continue sewing with the zipper basted 1 on the wrong side. 1 End of... sewing with the zipper on the right side, attach the shank to hit the presser foot and break, and you may be injured. Otherwise, injuries may occur if the foot controller is accidentally pressed and the machine starts sewing. 5 USING ATTACHMENTS AND APPLICATIONS CAUTION Turn off...
... When you have finished sewing, remove 5 the basting stitching. 4 2 4 1 Basting stitching 2 Reverse stitches 3 Wrong side of fabric 4 End of the presser foot. Turn on the machine. 3 With the right side of the fabric facing up, 4 continue sewing with the zipper basted 1 on the wrong side. 1 End of... sewing with the zipper on the right side, attach the shank to hit the presser foot and break, and you may be injured. Otherwise, injuries may occur if the foot controller is accidentally pressed and the machine starts sewing. 5 USING ATTACHMENTS AND APPLICATIONS CAUTION Turn off...
Users Manual - English
Page 44
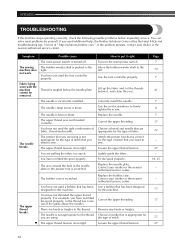
... your dealer or the nearest authorized service center. Use a bobbin that has been designed for this machine. Visit us at " http://solutions.brother.com ". Possible cause The main power switch is too tight. Thread is tangled below it right Turn on the main power switch. The ...Correct the upper threading. Symptom The sewing machine does not work. The needle clamp screw is bent or blunt. Use the foot controller properly. Attach the presser foot that is correct for the type of stitch that are appropriate for the type of fabric, thread and needle. The needle breaks...
... your dealer or the nearest authorized service center. Use a bobbin that has been designed for this machine. Visit us at " http://solutions.brother.com ". Possible cause The main power switch is too tight. Thread is tangled below it right Turn on the main power switch. The ...Correct the upper threading. Symptom The sewing machine does not work. The needle clamp screw is bent or blunt. Use the foot controller properly. Attach the presser foot that is correct for the type of stitch that are appropriate for the type of fabric, thread and needle. The needle breaks...
Users Manual - English
Page 47
... the lower thread 21 E Elastic stitching 30 F Fabric, thread, and needle combinations .......22 Fagoting 31 Feather stitching 33 Flat bed attachment 5 Foot controller 7 Free-arm style 25 G Gathering 39 H Handwheel 17 L Light switch 7 , Lower threading 15 quick-set bobbin 16 21 M Main... checking 7 combinations with fabric and thread .........22 replacing 7 Needle threader 19 O Overedge stitching 32 P Pattern selection dial 9 Patterns 10 Presser foot changing 8 , Q Quick-set bobbin 16 21 R Race cleaning 41 Reverse sewing lever 13 S Satin stitch 28 , Shell tuck stitching 30...
... the lower thread 21 E Elastic stitching 30 F Fabric, thread, and needle combinations .......22 Fagoting 31 Feather stitching 33 Flat bed attachment 5 Foot controller 7 Free-arm style 25 G Gathering 39 H Handwheel 17 L Light switch 7 , Lower threading 15 quick-set bobbin 16 21 M Main... checking 7 combinations with fabric and thread .........22 replacing 7 Needle threader 19 O Overedge stitching 32 P Pattern selection dial 9 Patterns 10 Presser foot changing 8 , Q Quick-set bobbin 16 21 R Race cleaning 41 Reverse sewing lever 13 S Satin stitch 28 , Shell tuck stitching 30...


