Users Manual - English
Page 3
... manual when replacing or installing any adjustments in the needle area. • Do not use . Never allow children to play with the fuse cover omitted. • If the available electrical outlet is damaged, it off when making any assemblies, the presser feet, needle, or other hot objects...are subject to clean the case. If the problem persists, please consult your authorized dealer to ensure that you should contact your local authorized Brother dealer. The contents of this manual and specifications of the operation manual to BS 1362, i.e. FOR USERS IN THE UK, EIRE, ...
... manual when replacing or installing any adjustments in the needle area. • Do not use . Never allow children to play with the fuse cover omitted. • If the available electrical outlet is damaged, it off when making any assemblies, the presser feet, needle, or other hot objects...are subject to clean the case. If the problem persists, please consult your authorized dealer to ensure that you should contact your local authorized Brother dealer. The contents of this manual and specifications of the operation manual to BS 1362, i.e. FOR USERS IN THE UK, EIRE, ...
Users Manual - English
Page 8
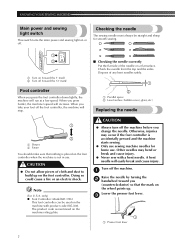
Dispose of any bent needles safely. 1 2 1 Parallel space 2 Level surface (bobbin cover, glass, etc.) Replacing the needle 1 2 1 Slower 2 Faster You should make sure that the mark on the wheel points up on the foot controller. Note (For U.S.A. ...
Dispose of any bent needles safely. 1 2 1 Parallel space 2 Level surface (bobbin cover, glass, etc.) Replacing the needle 1 2 1 Slower 2 Faster You should make sure that the mark on the wheel points up on the foot controller. Note (For U.S.A. ...
Users Manual - English
Page 16
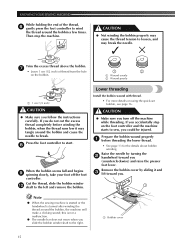
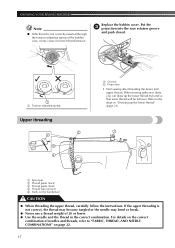
...lower thread. • See page 13 for the details about bobbin winding. Cut the thread, slide the bobbin winder 0 shaft to the right. 1 Bobbin cover 15 this is not a malfunction. ● The needle bar does not move when you . 1 Note ● When the sewing machine is started or ... the machine will make a clicking sound; CAUTION ● Not winding the bobbin properly may cause the thread tension to break. Remove the bobbin cover by turning the 2 handwheel toward you slide the bobbin winder shaft to the left and remove the bobbin. KNOWING YOUR SEWING MACHINE While holding the...
...lower thread. • See page 13 for the details about bobbin winding. Cut the thread, slide the bobbin winder 0 shaft to the right. 1 Bobbin cover 15 this is not a malfunction. ● The needle bar does not move when you . 1 Note ● When the sewing machine is started or ... the machine will make a clicking sound; CAUTION ● Not winding the bobbin properly may cause the thread tension to break. Remove the bobbin cover by turning the 2 handwheel toward you slide the bobbin winder shaft to the left and remove the bobbin. KNOWING YOUR SEWING MACHINE While holding the...
Users Manual - English
Page 17
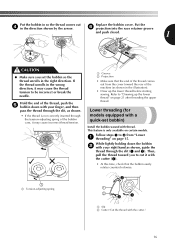
Replace the bobbin cover. Hold the end of the thread, push the 5 bobbin down the bobbin 2 with the cutter (3). • At this time, check that the end of the ... the cutter.) 16 While lightly holding down with your right hand as shown in the direction shown by the arrow. Follow steps 1 to 4 from the cover toward you set bobbin) Install the bobbin wound with a quick-set the bobbin so the thread unrolls in the wrong direction, it with your finger...
Replace the bobbin cover. Hold the end of the thread, push the 5 bobbin down the bobbin 2 with the cutter (3). • At this time, check that the end of the ... the cutter.) 16 While lightly holding down with your right hand as shown in the direction shown by the arrow. Follow steps 1 to 4 from the cover toward you set bobbin) Install the bobbin wound with a quick-set the bobbin so the thread unrolls in the wrong direction, it with your finger...
Users Manual - English
Page 18
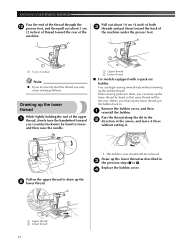
... 2 Thread guide (back) 3 Thread guide (front) 4 Thread take-up the lower thread by hand so that some thread will be left over. Replace the bobbin cover. Refer to "FABRIC, THREAD, AND NEEDLE COMBINATIONS" on the handwheel CAUTION ● When threading the upper thread, carefully follow the instructions. Put the 3 projection into...
... 2 Thread guide (back) 3 Thread guide (front) 4 Thread take-up the lower thread by hand so that some thread will be left over. Replace the bobbin cover. Refer to "FABRIC, THREAD, AND NEEDLE COMBINATIONS" on the handwheel CAUTION ● When threading the upper thread, carefully follow the instructions. Put the 3 projection into...
Users Manual - English
Page 22
... Pull on the upper thread to draw up the 2 lower thread. 1 2 1 2 1 Upper thread 2 Lower thread • The bobbin cover should still be left over. Pull out about 5 cm (2 inches) of thread toward you (counterclockwise) by hand to lower and then raise the needle. 1 2 1 Upper ... While lightly holding the end of the upper 1 thread, slowly turn the handwheel toward the rear of the arrow, and leave it . Remove the bobbin cover, and then 1 reinstall the bobbin. Pass the thread along the slit in the 2 direction of the machine. KNOWING YOUR SEWING MACHINE Pass the end of...
... Pull on the upper thread to draw up the 2 lower thread. 1 2 1 2 1 Upper thread 2 Lower thread • The bobbin cover should still be left over. Pull out about 5 cm (2 inches) of thread toward you (counterclockwise) by hand to lower and then raise the needle. 1 2 1 Upper ... While lightly holding the end of the upper 1 thread, slowly turn the handwheel toward the rear of the arrow, and leave it . Remove the bobbin cover, and then 1 reinstall the bobbin. Pass the thread along the slit in the 2 direction of the machine. KNOWING YOUR SEWING MACHINE Pass the end of...


