Operation Manual
Page 3
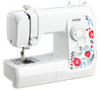
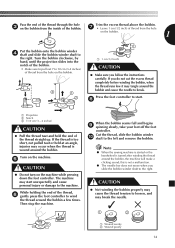
....brother.com 2 • Do not use the machine near a space heater, iron, halogen lamp, or other parts to assure correct installation. 9 For repair or adjustment: • If the light unit (light-emitting diode) is damaged, it could cause the needle to break. • Do not push or pull the fabric when sewing, and follow the troubleshooting table in the back of the operation manual to inspect and adjust...
....brother.com 2 • Do not use the machine near a space heater, iron, halogen lamp, or other parts to assure correct installation. 9 For repair or adjustment: • If the light unit (light-emitting diode) is damaged, it could cause the needle to break. • Do not push or pull the fabric when sewing, and follow the troubleshooting table in the back of the operation manual to inspect and adjust...

Operation Manual
Page 5
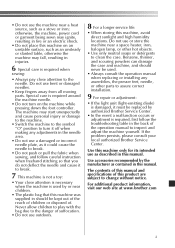
...5 Optional accessories 5 THE MAIN PARTS 6 Flat bed attachment 6 USING YOUR SEWING MACHINE 7 Connecting plugs 7 Main power and sewing light switch 8 Foot controller 8 Checking the needle 8 Replacing the needle 8 Changing the presser foot 10 THE CONTROLS 11 Pattern selection dial 11 Patterns and stitch names 11 Reverse sewing lever 12 THREADING THE MACHINE 13 Winding the bobbin 13 Lower threading 15 Lower threading (for models equipped with a quick-set bobbin 16 Upper threading 17 Using the needle threader (for models equipped with a twin needle (Option 25 Thread tension 27...
...5 Optional accessories 5 THE MAIN PARTS 6 Flat bed attachment 6 USING YOUR SEWING MACHINE 7 Connecting plugs 7 Main power and sewing light switch 8 Foot controller 8 Checking the needle 8 Replacing the needle 8 Changing the presser foot 10 THE CONTROLS 11 Pattern selection dial 11 Patterns and stitch names 11 Reverse sewing lever 12 THREADING THE MACHINE 13 Winding the bobbin 13 Lower threading 15 Lower threading (for models equipped with a quick-set bobbin 16 Upper threading 17 Using the needle threader (for models equipped with a twin needle (Option 25 Thread tension 27...
Operation Manual
Page 6
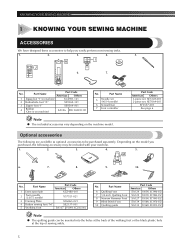
...2 Twin needle (2.0/75 needle) X57521-021 3 Darning Plate XC6063-021 4 Button sewing foot "M" XE2137-001 5 Walking Foot SA107 F034N: XC2165-002 No. No. Depending on machine) SA156 SFB: XA5539-151 No. Part Code Americas Others 3-piece set: XE5328-001 2-piece set (90/14 needle) 6 Screwdriver 7 Foot controller Note ● The included accessories vary depending on machine) XC4901-121 2 Buttonhole foot "A" X59369-321 3 Zipper foot "I JJ 6. 7. Part Name 6 Quilting Foot 7 1/4-inch Quilting Foot 8 Narrow Hemmer Foot 9 Blind Stitch Foot 10 Quilting guide Part Code...
...2 Twin needle (2.0/75 needle) X57521-021 3 Darning Plate XC6063-021 4 Button sewing foot "M" XE2137-001 5 Walking Foot SA107 F034N: XC2165-002 No. No. Depending on machine) SA156 SFB: XA5539-151 No. Part Code Americas Others 3-piece set: XE5328-001 2-piece set (90/14 needle) 6 Screwdriver 7 Foot controller Note ● The included accessories vary depending on machine) XC4901-121 2 Buttonhole foot "A" X59369-321 3 Zipper foot "I JJ 6. 7. Part Name 6 Quilting Foot 7 1/4-inch Quilting Foot 8 Narrow Hemmer Foot 9 Blind Stitch Foot 10 Quilting guide Part Code...
Operation Manual
Page 7
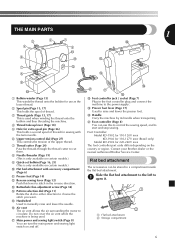
... to control the sewing speed, and to the power supply. I Presser foot lever (Page 17) Used to circulate. Flat bed attachment The accessories can use as the lower thread. 2 Spool pin (Page 13, 17) This holds the spool of thread. 3 Thread guide (Page 13, 17) This is used when winding the thread onto the bobbin and then threading the machine. 4 Thread take-up lever (Page 18) 5 Hole for extra spool pin (Page 26) This holds a second spool of thread for sewing with the twin needle. 6 Upper tension-control dial...
... to control the sewing speed, and to the power supply. I Presser foot lever (Page 17) Used to circulate. Flat bed attachment The accessories can use as the lower thread. 2 Spool pin (Page 13, 17) This holds the spool of thread. 3 Thread guide (Page 13, 17) This is used when winding the thread onto the bobbin and then threading the machine. 4 Thread take-up lever (Page 18) 5 Hole for extra spool pin (Page 26) This holds a second spool of thread for sewing with the twin needle. 6 Upper tension-control dial...

Operation Manual
Page 12
..., 38, 39 11 KNOWING YOUR SEWING MACHINE THE CONTROLS Pattern selection dial CAUTION ● When you use the pattern selection dial to choose a pattern, raise the needle by turning the handwheel toward you turn the pattern selection dial in the down position when you (counterclockwise) so that the mark on certain models. If the needle is in either direction. 2 1 1 Pattern selection dial 2 Chosen pattern number Patterns and stitch names 1 23 4 5 67 *1 *1 *1 8 9 10...
..., 38, 39 11 KNOWING YOUR SEWING MACHINE THE CONTROLS Pattern selection dial CAUTION ● When you use the pattern selection dial to choose a pattern, raise the needle by turning the handwheel toward you turn the pattern selection dial in the down position when you (counterclockwise) so that the mark on certain models. If the needle is in either direction. 2 1 1 Pattern selection dial 2 Chosen pattern number Patterns and stitch names 1 23 4 5 67 *1 *1 *1 8 9 10...
Operation Manual
Page 15
... turn on the bobbin. 1 Put the bobbin onto the bobbin winder 4 shaft and slide the bobbin winder shaft to the right. Note ● When the sewing machine is started or the handwheel is not a malfunction. ● The needle bar does not move when you follow the instructions carefully. this is turned after winding the thread around the bobbin a few times. Press the foot controller to start unexpectedly and cause...
... turn on the bobbin. 1 Put the bobbin onto the bobbin winder 4 shaft and slide the bobbin winder shaft to the right. Note ● When the sewing machine is started or the handwheel is not a malfunction. ● The needle bar does not move when you follow the instructions carefully. this is turned after winding the thread around the bobbin a few times. Press the foot controller to start unexpectedly and cause...
Operation Manual
Page 16
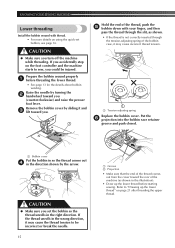
... lower thread" on page 21 after threading the upper thread. If the thread unrolls in the wrong direction, it may cause incorrect thread tension. 1 1 Tension-adjusting spring Replace the bobbin cover. If you accidentally step on the foot controller and the machine starts to be incorrect or break the needle. 15 1 2 1 Groove 2 Projection • Make sure that the end of the thread comes out from the cover toward you could be injured. KNOWING YOUR SEWING MACHINE Lower threading Install the bobbin...
... lower thread" on page 21 after threading the upper thread. If the thread unrolls in the wrong direction, it may cause incorrect thread tension. 1 1 Tension-adjusting spring Replace the bobbin cover. If you accidentally step on the foot controller and the machine starts to be incorrect or break the needle. 15 1 2 1 Groove 2 Projection • Make sure that the end of the thread comes out from the cover toward you could be injured. KNOWING YOUR SEWING MACHINE Lower threading Install the bobbin...
Operation Manual
Page 18
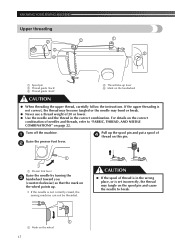
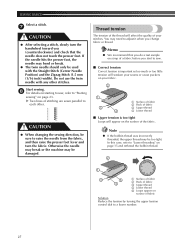
... threading the upper thread, carefully follow the instructions. If the upper threading is not correct, the thread may become tangled or the needle may tangle on the spool pin and cause the needle to "FABRIC, THREAD, AND NEEDLE COMBINATIONS" on the wheel 17 KNOWING YOUR SEWING MACHINE Upper threading 2 2 3 4 1 5 1 Spool pin 2 Thread guide (back) 3 Thread guide (front) 4 Thread take-up . • If the needle is set incorrectly, the thread may bend or break. ● Never use a thread weight of 20 or lower...
... threading the upper thread, carefully follow the instructions. If the upper threading is not correct, the thread may become tangled or the needle may tangle on the spool pin and cause the needle to "FABRIC, THREAD, AND NEEDLE COMBINATIONS" on the wheel 17 KNOWING YOUR SEWING MACHINE Upper threading 2 2 3 4 1 5 1 Spool pin 2 Thread guide (back) 3 Thread guide (front) 4 Thread take-up . • If the needle is set incorrectly, the thread may bend or break. ● Never use a thread weight of 20 or lower...

Operation Manual
Page 22
... you (counterclockwise) by hand so that some thread will be removed. Draw up the bobbin thread. Replace the bobbin cover. 4 2 1 Upper thread 2 Lower thread Pull out about 10 cm (4 inches) of both 3 threads and put the bobbin back in the 2 direction of the machine under the presser foot. 1 2 1 Upper thread 2 Lower thread 21 KNOWING YOUR SEWING MACHINE Drawing up the lower thread While lightly holding the end of the upper 1 thread, slowly turn the handwheel toward the back...
... you (counterclockwise) by hand so that some thread will be removed. Draw up the bobbin thread. Replace the bobbin cover. 4 2 1 Upper thread 2 Lower thread Pull out about 10 cm (4 inches) of both 3 threads and put the bobbin back in the 2 direction of the machine under the presser foot. 1 2 1 Upper thread 2 Lower thread 21 KNOWING YOUR SEWING MACHINE Drawing up the lower thread While lightly holding the end of the upper 1 thread, slowly turn the handwheel toward the back...
Operation Manual
Page 23
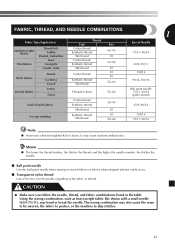
...; Make sure you follow the needle, thread, and fabric combinations listed in the table. The wrong combination may bend or break the needle. and the higher the needle number, the thicker the needle. ■ Ball point needle Use the ball point needle when sewing on stretch fabrics or fabrics where skipped stitches easily occur. ■ Transparent nylon thread Use a 90/14 to skip stitches. 22 Memo ● The lower the thread number, the thicker the thread; Using...
...; Make sure you follow the needle, thread, and fabric combinations listed in the table. The wrong combination may bend or break the needle. and the higher the needle number, the thicker the needle. ■ Ball point needle Use the ball point needle when sewing on stretch fabrics or fabrics where skipped stitches easily occur. ■ Transparent nylon thread Use a 90/14 to skip stitches. 22 Memo ● The lower the thread number, the thicker the thread; Using...
Operation Manual
Page 26
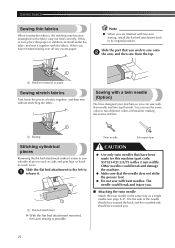
... making decorative stitches. 1 1 Basting Twin needle Extra spool pin Stitching cylindrical pieces Removing the flat bed attachment makes it together with the fabric. The needle could break and damage the machine. ● Make sure that you wish to 1 release it. 1 1 Flat bed attachment With the flat bed attachment removed, free-arm sewing is possible. SEWING BASICS Sewing thin fabrics When sewing thin fabrics, the stitching may become misaligned or the fabric may not feed correctly. The flat side of fabric...
... making decorative stitches. 1 1 Basting Twin needle Extra spool pin Stitching cylindrical pieces Removing the flat bed attachment makes it together with the fabric. The needle could break and damage the machine. ● Make sure that you wish to 1 release it. 1 1 Flat bed attachment With the flat bed attachment removed, free-arm sewing is possible. SEWING BASICS Sewing thin fabrics When sewing thin fabrics, the stitching may become misaligned or the fabric may not feed correctly. The flat side of fabric...
Operation Manual
Page 28
... lines of a fabric before you change fabric or thread. Do not use the twin needle with the Straight Stitch (Center Needle Position) and the Zigzag Stitch (1.5 mm (1/16 inch) width). Memo ● We recommend that the needle does not touch the presser foot. You may be damaged. Note ● If the bobbin thread was incorrectly threaded, the upper thread may need to raise the needle from the fabric, and then raise the presser foot lever and turn...
... lines of a fabric before you change fabric or thread. Do not use the twin needle with the Straight Stitch (Center Needle Position) and the Zigzag Stitch (1.5 mm (1/16 inch) width). Memo ● We recommend that the needle does not touch the presser foot. You may be damaged. Note ● If the bobbin thread was incorrectly threaded, the upper thread may need to raise the needle from the fabric, and then raise the presser foot lever and turn...
Operation Manual
Page 30
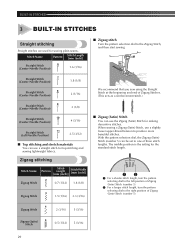
... the pattern selection dial, the Zigzag (Satin) Stitch (number 5) can be set to one of Zigzag Stitches. (This acts as a reinforcement stitch.) ■ Zigzag (Satin) Stitch You can use a straight stitch for making decorative stitches. The middle position is the setting for sewing plain seams. Stitch Name Pattern Stitch Length [mm (inch)] Straight Stitch 6 (Center Needle Position) 1.6 (1/16) ■ Zigzag stitch Turn the pattern selection dial to the Zigzag Stitch, and then start sewing. BUILT-IN STITCHES 3 BUILT-IN STITCHES Straight stitching Straight stitches are used...
... the pattern selection dial, the Zigzag (Satin) Stitch (number 5) can be set to one of Zigzag Stitches. (This acts as a reinforcement stitch.) ■ Zigzag (Satin) Stitch You can use a straight stitch for making decorative stitches. The middle position is the setting for sewing plain seams. Stitch Name Pattern Stitch Length [mm (inch)] Straight Stitch 6 (Center Needle Position) 1.6 (1/16) ■ Zigzag stitch Turn the pattern selection dial to the Zigzag Stitch, and then start sewing. BUILT-IN STITCHES 3 BUILT-IN STITCHES Straight stitching Straight stitches are used...
Operation Manual
Page 34
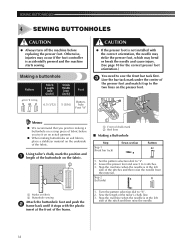
... replacing the presser foot. Sew the length of chalk mark 2 Red lines ■ Making a Buttonhole Step Step 1 (Front bar tack) Sewn section Pattern 1. Set the pattern selection dial to "a". 2. Stop the machine when the needle is at the left side of the stitches and then raise the needle from the material. Using tailor's chalk, mark the position and 1 length of the buttonhole on the fabric. 2 1 1 1 Front of the tailor's chalk line. 3. SEWING BUTTONHOLES 4 SEWING BUTTONHOLES...
... replacing the presser foot. Sew the length of chalk mark 2 Red lines ■ Making a Buttonhole Step Step 1 (Front bar tack) Sewn section Pattern 1. Set the pattern selection dial to "a". 2. Stop the machine when the needle is at the left side of the stitches and then raise the needle from the material. Using tailor's chalk, mark the position and 1 length of the buttonhole on the fabric. 2 1 1 1 Front of the tailor's chalk line. 3. SEWING BUTTONHOLES 4 SEWING BUTTONHOLES...
Operation Manual
Page 38
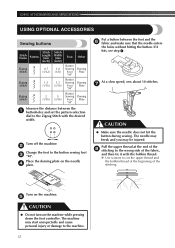
... the button during sewing. Put a button between the 1 buttonholes and set the pattern selection dial to the Zigzag Stitch with the bobbin thread. Use scissors to cut the upper thread and the bobbin thread at the end of the 8 stitching to the wrong side of the stitching. The needle may break and you may start unexpectedly and cause personal injury or damage to the machine. 37 USING ATTACHMENTS AND APPLICATIONS USING OPTIONAL ACCESSORIES L Sewing buttons Stitch Name Pattern Zigzag 2 Stitch Zigzag 3 Stitch Zigzag 4 Stitch Stitch Length [mm...
... the button during sewing. Put a button between the 1 buttonholes and set the pattern selection dial to the Zigzag Stitch with the bobbin thread. Use scissors to cut the upper thread and the bobbin thread at the end of the 8 stitching to the wrong side of the stitching. The needle may break and you may start unexpectedly and cause personal injury or damage to the machine. 37 USING ATTACHMENTS AND APPLICATIONS USING OPTIONAL ACCESSORIES L Sewing buttons Stitch Name Pattern Zigzag 2 Stitch Zigzag 3 Stitch Zigzag 4 Stitch Stitch Length [mm...
Operation Manual
Page 40
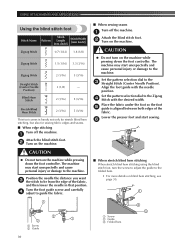
... fabric. Position the needle the distance you want 3 the stitch to the Zigzag 4 Stitch with the needle position. Turn the foot guide screw and carefully 4 adjust to guide the fabric. ■ When stretch blind hem stitching When stretch blind hem stitching using the blind stitch foot, turn the screw to adjust the guide to the machine. Set the pattern selection dial to the machine. Align the foot guide with the desired width. CAUTION ● Do not turn on blind hem stitching, see page 30. 1 1 2 2 1 1 Screw 2 Guide 1 Screw 2 Guide 3 Folded hem 2 3 39 The machine may start...
... fabric. Position the needle the distance you want 3 the stitch to the Zigzag 4 Stitch with the needle position. Turn the foot guide screw and carefully 4 adjust to guide the fabric. ■ When stretch blind hem stitching When stretch blind hem stitching using the blind stitch foot, turn the screw to adjust the guide to the machine. Set the pattern selection dial to the machine. Align the foot guide with the desired width. CAUTION ● Do not turn on blind hem stitching, see page 30. 1 1 2 2 1 1 Screw 2 Guide 1 Screw 2 Guide 3 Folded hem 2 3 39 The machine may start...

Operation Manual
Page 43
... the hole in the thread. authorized Brother Service Center. TROUBLESHOOTING If the machine stops operating correctly, check the following possible problems before requesting service. Replace the bobbin case. the type of the guide above the needle.) thread breaks. Lightly guide the fabric. for you are using . Contact your retailer or the nearest - You can solve most problems by yourself. Loosen the upper thread tension. 27 You are knots or tangles in the needle plate or the presser foot is...
... the hole in the thread. authorized Brother Service Center. TROUBLESHOOTING If the machine stops operating correctly, check the following possible problems before requesting service. Replace the bobbin case. the type of the guide above the needle.) thread breaks. Lightly guide the fabric. for you are using . Contact your retailer or the nearest - You can solve most problems by yourself. Loosen the upper thread tension. 27 You are knots or tangles in the needle plate or the presser foot is...
Operation Manual
Page 44
... upper thread. The presser foot you want to sew. Replace the needle plate. Replace the bobbin case. Remove the tangled thread and clean the race. Adjust the tension of fabric, thread and needle. Reset the bobbin thread correctly. Thread the upper thread and wind the bobbin thread properly. Page 8 8 - - 13 13 - 40 13 15 17 13 22 - 27 13 15 13-21 17 22 8 25 35 27 43 You have not used a bobbin that has been designed for this machine. Correctly install the needle. Use a bobbin...
... upper thread. The presser foot you want to sew. Replace the needle plate. Replace the bobbin case. Remove the tangled thread and clean the race. Adjust the tension of fabric, thread and needle. Reset the bobbin thread correctly. Thread the upper thread and wind the bobbin thread properly. Page 8 8 - - 13 13 - 40 13 15 17 13 22 - 27 13 15 13-21 17 22 8 25 35 27 43 You have not used a bobbin that has been designed for this machine. Correctly install the needle. Use a bobbin...
Operation Manual
Page 45
... stitch is incorrectly installed. Correctly install the needle. Insert the needle properly. Choose a thread and needle that you are appropriate for the type of fabric. Attach the presser foot that is correct for the type of stitch that you (counterclockwise) so that you want to sew. The fabric does not feed. Remove the needle plate and clean the plate and the bobbin case. Symptom Stitches are appropriate for the type of fabric. You have not threaded the upper thread properly. The thread...
... stitch is incorrectly installed. Correctly install the needle. Insert the needle properly. Choose a thread and needle that you are appropriate for the type of fabric. Attach the presser foot that is correct for the type of stitch that you (counterclockwise) so that you want to sew. The fabric does not feed. Remove the needle plate and clean the plate and the bobbin case. Symptom Stitches are appropriate for the type of fabric. You have not threaded the upper thread properly. The thread...
Operation Manual
Page 46
...Accessories 5 optional 5 37 Appliqués 36 B Blind hem stitching 30 Blind stitch foot 39 Bobbin winding 13 Button sewing 37 Buttonhole adjusting 34 making 33 Buttonhole fine-adjustment screw 34 C Cleaning 40 Connecting plugs 7 D , Darning 38 Darning plate 37 38 Double action stitching 32 Drawing up the lower thread 21 E Elastic stitching 31 F Fabric, thread, and needle combinations ...... 22 Flat bed attachment 6 Foot controller 8 Free-arm style 25 G Gathering 36 H Handwheel 17 L Light switch 8 Lower threading 15 M Main parts 6 Main power 8 Maintenance 40 N Needle...
...Accessories 5 optional 5 37 Appliqués 36 B Blind hem stitching 30 Blind stitch foot 39 Bobbin winding 13 Button sewing 37 Buttonhole adjusting 34 making 33 Buttonhole fine-adjustment screw 34 C Cleaning 40 Connecting plugs 7 D , Darning 38 Darning plate 37 38 Double action stitching 32 Drawing up the lower thread 21 E Elastic stitching 31 F Fabric, thread, and needle combinations ...... 22 Flat bed attachment 6 Foot controller 8 Free-arm style 25 G Gathering 36 H Handwheel 17 L Light switch 8 Lower threading 15 M Main parts 6 Main power 8 Maintenance 40 N Needle...


