
Users Manual - English and Spanish
Page 3
... down the foot controller. Benzene, thinner, and scouring powders can be used by or near a space heater, iron, halogen lamp, or other parts to assure correct installation. 8 For repair or adjustment: • If the Light unit (light-emitting diode) is required, first follow careful instruction when freehand stitching so that this machine was supplied in this manual. The contents of this manual and specifications of...
... down the foot controller. Benzene, thinner, and scouring powders can be used by or near a space heater, iron, halogen lamp, or other parts to assure correct installation. 8 For repair or adjustment: • If the Light unit (light-emitting diode) is required, first follow careful instruction when freehand stitching so that this machine was supplied in this manual. The contents of this manual and specifications of...
Users Manual - English and Spanish
Page 4
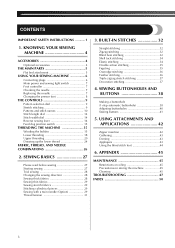
... SEWING MACHINE 4 ACCESSORIES 4 Optional accessories 4 THE MAIN PARTS 5 Flat bed attachment 5 USING YOUR SEWING MACHINE 6 Connecting plugs 6 Main power and sewing light switch 7 Foot controller 7 Checking the needle 7 Replacing the needle 7 Changing the presser foot 8 THE CONTROLS 9 Pattern selection dial 9 Stretch stitching 9 Patterns and stitch names 10 Stitch length dial 14 Stitch width dial 14 Reverse sewing lever 14 Feed dog position switch 15 THREADING THE MACHINE 15 Winding the bobbin 15 Lower threading 18 Upper threading 20 Drawing up the lower thread 24 FABRIC...
... SEWING MACHINE 4 ACCESSORIES 4 Optional accessories 4 THE MAIN PARTS 5 Flat bed attachment 5 USING YOUR SEWING MACHINE 6 Connecting plugs 6 Main power and sewing light switch 7 Foot controller 7 Checking the needle 7 Replacing the needle 7 Changing the presser foot 8 THE CONTROLS 9 Pattern selection dial 9 Stretch stitching 9 Patterns and stitch names 10 Stitch length dial 14 Stitch width dial 14 Reverse sewing lever 14 Feed dog position switch 15 THREADING THE MACHINE 15 Winding the bobbin 15 Lower threading 18 Upper threading 20 Drawing up the lower thread 24 FABRIC...
Users Manual - English and Spanish
Page 5
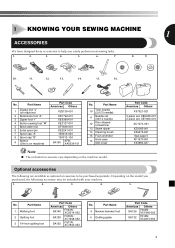
...XA5539-151 No. Part Name 1 Walking foot 2 Quilting foot 3 1/4-inch quilting foot Part Code Americas Others SA140 F033N: XC2214-052 SA129 F005N: XC1948-052 SA125 F001N: XC1944-052 No. Part Name 1 Zigzag foot "J" (on machine) 2 Buttonhole foot "A" 3 Zipper foot "I" 4 Button sewing foot "M" 5 Blind stitch foot 6 Extra spool pin 7 Spool cap "A" 8 Spool cap "B" 9 Bobbin (One is on the machine model. Part Name 10 Twin needle (2.0/75 needle) 11 Needle set : XE7064-001 XC1074-051 XZ5082-001 X59476-021 See page 5 XF1570-001 X53984-027 Optional accessories The following...
...XA5539-151 No. Part Name 1 Walking foot 2 Quilting foot 3 1/4-inch quilting foot Part Code Americas Others SA140 F033N: XC2214-052 SA129 F005N: XC1948-052 SA125 F001N: XC1944-052 No. Part Name 1 Zigzag foot "J" (on machine) 2 Buttonhole foot "A" 3 Zipper foot "I" 4 Button sewing foot "M" 5 Blind stitch foot 6 Extra spool pin 7 Spool cap "A" 8 Spool cap "B" 9 Bobbin (One is on the machine model. Part Name 10 Twin needle (2.0/75 needle) 11 Needle set : XE7064-001 XC1074-051 XZ5082-001 X59476-021 See page 5 XF1570-001 X53984-027 Optional accessories The following...
Users Manual - English and Spanish
Page 6
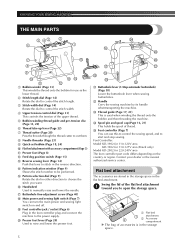
...) 9 Quick-set bobbin (Page 18, 24) 0 Flat bed attachment with accessory compartment (Page 5) A Presser foot (Page 8) B Feed dog position switch (Page 15) C Reverse sewing lever (Page 14) Push this to control the sewing speed, and to start and stop sewing. I J K Buttonhole lever (1-Step automatic buttonhole) (Page 38) Lower the buttonhole lever when sewing buttonholes. M Thread guide (Page 17, 21) This is in the foot controller plug and connect the machine to stitch in the flat bed attachment. O Foot controller (Page 7) You can turn the main power and sewing light...
...) 9 Quick-set bobbin (Page 18, 24) 0 Flat bed attachment with accessory compartment (Page 5) A Presser foot (Page 8) B Feed dog position switch (Page 15) C Reverse sewing lever (Page 14) Push this to control the sewing speed, and to start and stop sewing. I J K Buttonhole lever (1-Step automatic buttonhole) (Page 38) Lower the buttonhole lever when sewing buttonholes. M Thread guide (Page 17, 21) This is in the foot controller plug and connect the machine to stitch in the flat bed attachment. O Foot controller (Page 7) You can turn the main power and sewing light...
Users Manual - English and Spanish
Page 9
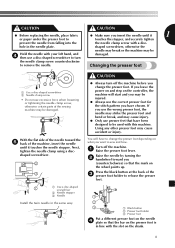
...; Always use excessive force when loosening or tightening the needle clamp screw, otherwise certain parts of the sewing machine may cause accident or injury. hole in the same way. With the flat side of the needle toward you change the presser foot depending on the shank. 8 CAUTION ● Always turn damaged. CAUTION CAUTION ● Before replacing the needle, place fabric ● Make sure you insert the needle until it...
...; Always use excessive force when loosening or tightening the needle clamp screw, otherwise certain parts of the sewing machine may cause accident or injury. hole in the same way. With the flat side of the needle toward you change the presser foot depending on the shank. 8 CAUTION ● Always turn damaged. CAUTION CAUTION ● Before replacing the needle, place fabric ● Make sure you insert the needle until it...
Users Manual - English and Spanish
Page 10
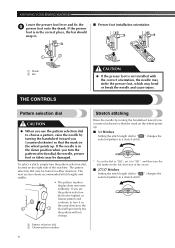
... down position when you use the pattern selection dial to a stretch stitch. 1 Pattern selection dial 2 Chosen pattern number 9 If the needle is not installed with the correct orientation, the needle may strike the presser foot, which may be turned in . ■ Presser foot installation orientation 1 2 1 Shank 2 Bar THE CONTROLS CAUTION ● If the presser foot is in 2 1 the same direction, the dial will spin freely but the pattern will not change. The next section shows recommended stitch lengths and...
... down position when you use the pattern selection dial to a stretch stitch. 1 Pattern selection dial 2 Chosen pattern number 9 If the needle is not installed with the correct orientation, the needle may strike the presser foot, which may be turned in . ■ Presser foot installation orientation 1 2 1 Shank 2 Bar THE CONTROLS CAUTION ● If the presser foot is in 2 1 the same direction, the dial will spin freely but the pattern will not change. The next section shows recommended stitch lengths and...

Users Manual - English and Spanish
Page 15
... machine will then sew forward. 1 1 Reverse sewing lever 1 Stitch width dial 14 This is used for making buttonholes and decorative stitches. If fabric to 1 sew with the stitches bunched together may bend or break. 1 2 3 ● If the stitches are bunched together, lengthen the stitch length and continue sewing. THE HIGHER THE NUMBER, THE LONGER THE STITCH. The position needed for making a satin stitch (closed CAUTION zigzag stitch), which is used when sewing a button. To sew forward, release the reverse sewing lever. the needle hits the presser foot, the needle...
... machine will then sew forward. 1 1 Reverse sewing lever 1 Stitch width dial 14 This is used for making buttonholes and decorative stitches. If fabric to 1 sew with the stitches bunched together may bend or break. 1 2 3 ● If the stitches are bunched together, lengthen the stitch length and continue sewing. THE HIGHER THE NUMBER, THE LONGER THE STITCH. The position needed for making a satin stitch (closed CAUTION zigzag stitch), which is used when sewing a button. To sew forward, release the reverse sewing lever. the needle hits the presser foot, the needle...
Users Manual - English and Spanish
Page 19
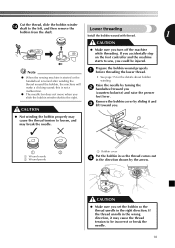
.... ● Not winding the bobbin properly may break the needle. 1 2 1 Wound evenly 2 Wound poorly 1 Bobbin cover Put the bobbin in so the thread comes out 4 in the right direction. If the thread unrolls in the wrong direction, it and 3 lift toward you (counterclockwise) and raise the presser foot lever. If you accidentally step on the foot controller and the machine starts to the left, and then remove the Lower threading bobbin from the...
.... ● Not winding the bobbin properly may break the needle. 1 2 1 Wound evenly 2 Wound poorly 1 Bobbin cover Put the bobbin in so the thread comes out 4 in the right direction. If the thread unrolls in the wrong direction, it and 3 lift toward you (counterclockwise) and raise the presser foot lever. If you accidentally step on the foot controller and the machine starts to the left, and then remove the Lower threading bobbin from the...
Users Manual - English and Spanish
Page 25
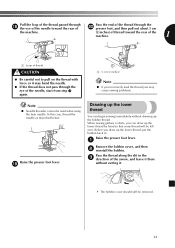
... or it may cause sewing problems. Note ● Needle threader cannot be used when using the twin needle. In this case, thread the needle as described below. Pass the thread along the slit in . Raise the presser foot lever. 1 Remove the bobbin cover, and then 2 reinstall the bobbin. Raise the presser foot lever. i Drawing up the lower thread You can draw up the lower thread, put the bobbin back in the 3 direction of the needle, start from step c again. 1 1 5 cm...
... or it may cause sewing problems. Note ● Needle threader cannot be used when using the twin needle. In this case, thread the needle as described below. Pass the thread along the slit in . Raise the presser foot lever. 1 Remove the bobbin cover, and then 2 reinstall the bobbin. Raise the presser foot lever. i Drawing up the lower thread You can draw up the lower thread, put the bobbin back in the 3 direction of the needle, start from step c again. 1 1 5 cm...
Users Manual - English and Spanish
Page 30
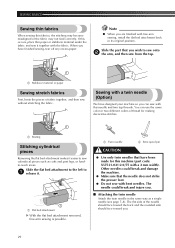
... threads. Other needles could break and injure you. ■ Attaching the twin needle Attach the twin needle in its original position. Note ● When you can use the same color or two different colors of thread for making decorative stitches. 1 1 Basting Stitching cylindrical pieces Removing the flat bed attachment makes it . 1 1 Flat bed attachment X With the flat bed attachment removed, free-arm sewing is possible. 1 Twin needle 2 Extra spool pin CAUTION ● Use only twin needles that have been made for this machine (part code...
... threads. Other needles could break and injure you. ■ Attaching the twin needle Attach the twin needle in its original position. Note ● When you can use the same color or two different colors of thread for making decorative stitches. 1 1 Basting Stitching cylindrical pieces Removing the flat bed attachment makes it . 1 1 Flat bed attachment X With the flat bed attachment removed, free-arm sewing is possible. 1 Twin needle 2 Extra spool pin CAUTION ● Use only twin needles that have been made for this machine (part code...
Users Manual - English and Spanish
Page 31
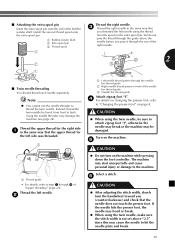
... to "Changing the presser foot" on changing the presser foot, refer to step 1 through the eye of the bobbin winder shaft. Turn on the machine. 5 CAUTION ● Do not turn the handwheel toward you pass it through 0 of the needle bar thread guide 3 Needle bar thread guide Attach zigzag foot "J". 4 For details on page 8. Instead, thread the twin needle by hand, from the spool on the machine while pressing down the foot controller. Using the needle threader may start unexpectedly and...
... to "Changing the presser foot" on changing the presser foot, refer to step 1 through the eye of the bobbin winder shaft. Turn on the machine. 5 CAUTION ● Do not turn the handwheel toward you pass it through 0 of the needle bar thread guide 3 Needle bar thread guide Attach zigzag foot "J". 4 For details on page 8. Instead, thread the twin needle by hand, from the spool on the machine while pressing down the foot controller. Using the needle threader may start unexpectedly and...
Users Manual - English and Spanish
Page 32
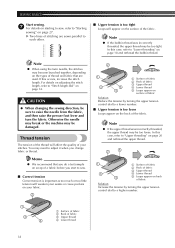
... the types of the fabric. SEWING BASICS Start sewing. 7 For details on starting to sew, refer to "Starting sewing" on page 18 and rethread the bobbin thread. If this case, refer to "Lower threading" on page 27. Otherwise the needle may break or the machine may be too loose. Note ● When using the twin needle, the stitches may need to adjust it when you start to raise the needle from the fabric, and then raise the presser foot lever...
... the types of the fabric. SEWING BASICS Start sewing. 7 For details on starting to sew, refer to "Starting sewing" on page 18 and rethread the bobbin thread. If this case, refer to "Lower threading" on page 27. Otherwise the needle may break or the machine may be too loose. Note ● When using the twin needle, the stitches may need to adjust it when you start to raise the needle from the fabric, and then raise the presser foot lever...
Users Manual - English and Spanish
Page 33
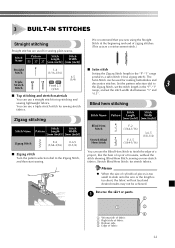
...reinforcement stitch.) Straight Stitch Triple Stretch Stitch 2 1-4 (1/16-3/16) 20 15 / 1 Fixed 2.5 (3/32) 6.5 (1/4) ■ Top stitching and stretch materials ■ Satin stitch Setting the Zigzag Stitch length in the "F"-"1" range, and set the stitch length in the "F"-"1" range produces a satin stitch (close zigzag stitch). You can use a straight stitch for making buttonholes and decorative stitches. Zigzag stitching Blind hem stitching Stitch Name Stitch Stitch Pattern Length Width [mm (inch)] [mm (inch)] Stitch Name Stitch Stitch Pattern Length Width...
...reinforcement stitch.) Straight Stitch Triple Stretch Stitch 2 1-4 (1/16-3/16) 20 15 / 1 Fixed 2.5 (3/32) 6.5 (1/4) ■ Top stitching and stretch materials ■ Satin stitch Setting the Zigzag Stitch length in the "F"-"1" range, and set the stitch length in the "F"-"1" range produces a satin stitch (close zigzag stitch). You can use a straight stitch for making buttonholes and decorative stitches. Zigzag stitching Blind hem stitching Stitch Name Stitch Stitch Pattern Length Width [mm (inch)] [mm (inch)] Stitch Name Stitch Stitch Pattern Length Width...
Users Manual - English and Spanish
Page 39
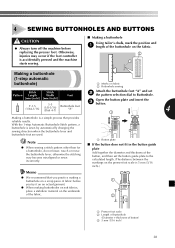
... the buttonhole lever, otherwise the stitching may occur if the foot controller is accidentally pressed and the machine starts sewing. ■ Making a buttonhole Using tailor's chalk, mark the position and 1 length of the buttonhole on the fabric. 2 1 Making a buttonhole (1-step automatic buttonhole) 1 Marks on fabric 2 Buttonhole sewing Stitch Stitch Pattern Length Width Foot Attach the buttonhole foot "A" and set the button guide plate to Buttonhole. [mm (inch)] [mm (inch)] Open the button plate and insert the 1 F-1.5 (1/64-1/16) 3-5 (1/8-3/16) (Dial 4-7) Buttonhole foot...
... the buttonhole lever, otherwise the stitching may occur if the foot controller is accidentally pressed and the machine starts sewing. ■ Making a buttonhole Using tailor's chalk, mark the position and 1 length of the buttonhole on the fabric. 2 1 Making a buttonhole (1-step automatic buttonhole) 1 Marks on fabric 2 Buttonhole sewing Stitch Stitch Pattern Length Width Foot Attach the buttonhole foot "A" and set the button guide plate to Buttonhole. [mm (inch)] [mm (inch)] Open the button plate and insert the 1 F-1.5 (1/64-1/16) 3-5 (1/8-3/16) (Dial 4-7) Buttonhole foot...
Users Manual - English and Spanish
Page 42
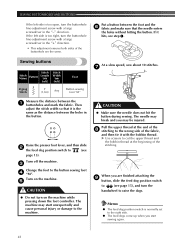
...; The feed dogs come up when you may be injured. Then adjust the stitch width so that the needle enters the holes without hitting the button. X Use scissors to (see step 1. The machine may break and you start unexpectedly and cause personal injury or damage to the button sewing foot 4 "M". Memo ● The feed dog position switch is the same as the distance between the holes in the "-" direction. Sewing buttons Stitch Stitch Name Pattern Length...
...; The feed dogs come up when you may be injured. Then adjust the stitch width so that the needle enters the holes without hitting the button. X Use scissors to (see step 1. The machine may break and you start unexpectedly and cause personal injury or damage to the button sewing foot 4 "M". Memo ● The feed dog position switch is the same as the distance between the holes in the "-" direction. Sewing buttons Stitch Stitch Name Pattern Length...
Users Manual - English and Spanish
Page 43
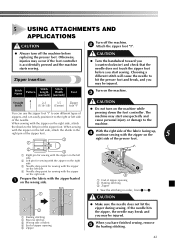
... sewing, remove 5 the basting stitching. 42 Zipper insertion Stitch Name Stitch Stitch Pattern Length Width [mm (inch)] [mm (inch)] Foot CAUTION ● Turn the handwheel toward you (counterclockwise) and check that the needle does not touch the zipper foot before replacing the presser foot. Turn on the machine. 3 Straight 2 2-3 3.5 Zipper Stitch (1/16-1/8) (Center) foot "I" CAUTION ● Do not turn off the machine before you start unexpectedly and of the zipper foot. with the zipper on the left pin of zipper opening 2 Basting stitching 3 Zipper...
... sewing, remove 5 the basting stitching. 42 Zipper insertion Stitch Name Stitch Stitch Pattern Length Width [mm (inch)] [mm (inch)] Foot CAUTION ● Turn the handwheel toward you (counterclockwise) and check that the needle does not touch the zipper foot before replacing the presser foot. Turn on the machine. 3 Straight 2 2-3 3.5 Zipper Stitch (1/16-1/8) (Center) foot "I" CAUTION ● Do not turn off the machine before you start unexpectedly and of the zipper foot. with the zipper on the left pin of zipper opening 2 Basting stitching 3 Zipper...
Users Manual - English and Spanish
Page 48
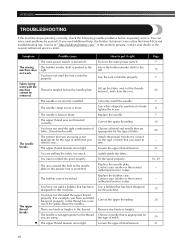
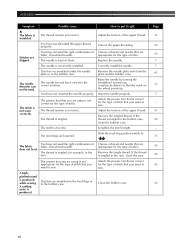
... not used a bobbin that are knots or tangles in the needle plate or the presser foot is scratched. Replace the needle plate. Contact your retailer or the nearest authorized service center. Replace the bobbin case. Remove any knots or tangles. The needle is loose. Choose a needle that you are pulling the fabric too much. Correct the upper threading. Choose a thread and needle that has been designed for this machine. The needle clamp screw is incorrectly installed. The presser foot you...
... not used a bobbin that are knots or tangles in the needle plate or the presser foot is scratched. Replace the needle plate. Contact your retailer or the nearest authorized service center. Replace the bobbin case. Remove any knots or tangles. The needle is loose. Choose a needle that you are pulling the fabric too much. Correct the upper threading. Choose a thread and needle that has been designed for this machine. The needle clamp screw is incorrectly installed. The presser foot you...

Users Manual - English and Spanish
Page 49
... been Use a bobbin that has been designed for designed for this machine. 15 Bobbin is bent or blunt. Wind the bobbin thread properly. 15 The lower The bobbin is tangled. for this machine. Correctly install the needle. 7 The upper thread The area around the hole in the needle plate or the presser foot is set incorrectly. The thread tension is incorrectly installed. Replace the needle. 7 The needle is incorrect. this machine. 15 6 Bobbin is scratched. Symptom Possible cause How to sew. fabric...
... been Use a bobbin that has been designed for designed for this machine. 15 Bobbin is bent or blunt. Wind the bobbin thread properly. 15 The lower The bobbin is tangled. for this machine. Correctly install the needle. 7 The upper thread The area around the hole in the needle plate or the presser foot is set incorrectly. The thread tension is incorrectly installed. Replace the needle. 7 The needle is incorrect. this machine. 15 6 Bobbin is scratched. Symptom Possible cause How to sew. fabric...
Users Manual - English and Spanish
Page 50
... in the bobbin case. The presser foot that you want to sew. The feed dogs are skipped. Choose a thread and needle that are using is correct for the type of stitch that you are appropriate for the type of fabric. Raise the needle by turning the handwheel toward you want to the correct position. Adjust the tension of fabric, thread and needle. You have not used the right combination of the upper thread. Dust...
... in the bobbin case. The presser foot that you want to sew. The feed dogs are skipped. Choose a thread and needle that are using is correct for the type of stitch that you are appropriate for the type of fabric. Raise the needle by turning the handwheel toward you want to the correct position. Adjust the tension of fabric, thread and needle. You have not used the right combination of the upper thread. Dust...

Users Manual - English and Spanish
Page 51
... stitching 36 Feed dog position switch 15 Feed dogs 15 Flat bed attachment 5 Foot controller 7 Free-arm style 29 G Gathering 43 H Handwheel 20 L Light switch 7 , Lower threading 18 quick-set bobbin 18 24 M Main parts 5 Main power 7 Maintenance 45 N Needle checking 7 combinations with fabric and thread .........26 replacing 7 Needle threader 23 O Overedge stitching 36 P Pattern selection dial 9 Patterns 10 Presser foot changing 8 , Q Quick-set bobbin 18 24 R Race cleaning 45 Reverse sewing lever 14 S Satin stitch 32 , Shell tuck stitching 34 Spool cap 16 21 Spool pin...
... stitching 36 Feed dog position switch 15 Feed dogs 15 Flat bed attachment 5 Foot controller 7 Free-arm style 29 G Gathering 43 H Handwheel 20 L Light switch 7 , Lower threading 18 quick-set bobbin 18 24 M Main parts 5 Main power 7 Maintenance 45 N Needle checking 7 combinations with fabric and thread .........26 replacing 7 Needle threader 23 O Overedge stitching 36 P Pattern selection dial 9 Patterns 10 Presser foot changing 8 , Q Quick-set bobbin 18 24 R Race cleaning 45 Reverse sewing lever 14 S Satin stitch 32 , Shell tuck stitching 34 Spool cap 16 21 Spool pin...


