

Users Manual - English and Spanish
Page 2
... the risk of the electrical outlet. DANGER - Return the machine to the nearest authorized dealer or service center for examination, repair, electrical or mechanical adjustment. • While the machine is required when sewing: • Always pay close attention to make any adjustments ...mentioned in use the machine near a heat source, such as an odor, heat, discoloration or deformation, stop ...
... the risk of the electrical outlet. DANGER - Return the machine to the nearest authorized dealer or service center for examination, repair, electrical or mechanical adjustment. • While the machine is required when sewing: • Always pay close attention to make any adjustments ...mentioned in use the machine near a heat source, such as an odor, heat, discoloration or deformation, stop ...
Users Manual - English and Spanish
Page 4
... 37 4. APPENDIX 45 MAINTENANCE 45 Restrictions on oiling 45 Precautions on storing the machine 45 Cleaning 45 TROUBLESHOOTING 47 INDEX 50 3 KNOWING YOUR SEWING MACHINE 4 ACCESSORIES 4 Optional accessories 4 THE MAIN PARTS 5 Flat bed attachment 5 USING YOUR SEWING MACHINE 6 Connecting plugs 6 Main power and sewing light switch 7 Foot controller 7 Checking the needle 7 Replacing the needle 7 Changing the...
... 37 4. APPENDIX 45 MAINTENANCE 45 Restrictions on oiling 45 Precautions on storing the machine 45 Cleaning 45 TROUBLESHOOTING 47 INDEX 50 3 KNOWING YOUR SEWING MACHINE 4 ACCESSORIES 4 Optional accessories 4 THE MAIN PARTS 5 Flat bed attachment 5 USING YOUR SEWING MACHINE 6 Connecting plugs 6 Main power and sewing light switch 7 Foot controller 7 Checking the needle 7 Replacing the needle 7 Changing the...
Users Manual - English and Spanish
Page 5
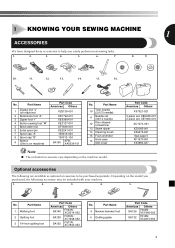
...Americas Others SA140 F033N: XC2214-052 SA129 F005N: XC1948-052 SA125 F001N: XC1944-052 No. Part Name 1 Zigzag foot "J" (on machine) 2 Buttonhole foot "A" 3 Zipper foot "I" 4 Button sewing foot "M" 5 Blind stitch foot 6 Extra spool pin 7 Spool cap "A" 8 Spool cap "B" 9 Bobbin (One is on ... foot 5 Quilting guide Part Code Americas Others SA126 F002N: XC1946-052 SA132 F016N: XC2215-052 4 1 KNOWING YOUR SEWING MACHINE 1 ACCESSORIES We have designed these accessories to help you purchased, the following are available as optional accessories to be included with your...
...Americas Others SA140 F033N: XC2214-052 SA129 F005N: XC1948-052 SA125 F001N: XC1944-052 No. Part Name 1 Zigzag foot "J" (on machine) 2 Buttonhole foot "A" 3 Zipper foot "I" 4 Button sewing foot "M" 5 Blind stitch foot 6 Extra spool pin 7 Spool cap "A" 8 Spool cap "B" 9 Bobbin (One is on ... foot 5 Quilting guide Part Code Americas Others SA126 F002N: XC1946-052 SA132 F016N: XC2215-052 4 1 KNOWING YOUR SEWING MACHINE 1 ACCESSORIES We have designed these accessories to help you purchased, the following are available as optional accessories to be included with your...
Users Manual - English and Spanish
Page 6
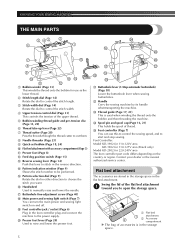
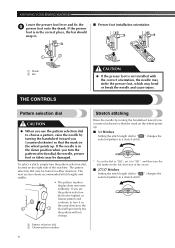
... to control the stitch length. 3 Stitch width dial (Page 14) Rotate the dial to manually raise and lower the needle. L Handle Carry the sewing machine by its handle whentransporting the machine. J Presser foot lever (Page 20) Used to be performed. M Thread guide (Page 17, 21) This is in the flat bed attachment. Contact...
... to control the stitch length. 3 Stitch width dial (Page 14) Rotate the dial to manually raise and lower the needle. L Handle Carry the sewing machine by its handle whentransporting the machine. J Presser foot lever (Page 20) Used to be performed. M Thread guide (Page 17, 21) This is in the flat bed attachment. Contact...
Users Manual - English and Spanish
Page 7
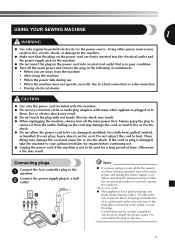
...qualified electrician to install the proper outlet. Connecting plugs Connect the foot controller plug to correctly operate the machine. (For U.S.A. When restarting the sewing machine, follow the necessary procedure to the 1 machine. If the plug does not fit fully in any way. 6 Connect the power supply plug to ...off the main power and unplug the power supply cord. b a Note ● If a power outage occurs while the sewing machine is damaged, take the machine to your authorized dealer for the power source. Do not modify the plug in the outlet, reverse the plug.
...qualified electrician to install the proper outlet. Connecting plugs Connect the foot controller plug to correctly operate the machine. (For U.S.A. When restarting the sewing machine, follow the necessary procedure to the 1 machine. If the plug does not fit fully in any way. 6 Connect the power supply plug to ...off the main power and unplug the power supply cord. b a Note ● If a power outage occurs while the sewing machine is damaged, take the machine to your authorized dealer for the power source. Do not modify the plug in the outlet, reverse the plug.
Users Manual - English and Spanish
Page 8
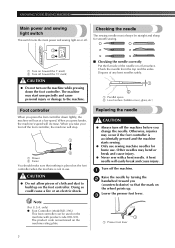
...(toward the 'I' mark) 2 Turn off the machine before you press harder, the machine's speed will easily break and cause injury. The machine may occur if the foot controller is accidentally pressed and the machine starts sewing. ● Only use sewing machine needles for smooth sewing. 1 2 1 Turn on the foot controller. ... needles may bend or break and cause injury. ● Never sew with product code 885-X39. KNOWING YOUR SEWING MACHINE Main power and sewing light switch This switch turns the main power and sewing light on the machine rating plate. Dispose of the needle on the...
...(toward the 'I' mark) 2 Turn off the machine before you press harder, the machine's speed will easily break and cause injury. The machine may occur if the foot controller is accidentally pressed and the machine starts sewing. ● Only use sewing machine needles for smooth sewing. 1 2 1 Turn on the foot controller. ... needles may bend or break and cause injury. ● Never sew with product code 885-X39. KNOWING YOUR SEWING MACHINE Main power and sewing light switch This switch turns the main power and sewing light on the machine rating plate. Dispose of the needle on the...
Users Manual - English and Spanish
Page 9
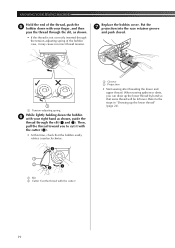
...damaged. You will start and you may be Hold the needle with a disc- Raise the needle by turning the 2 handwheel toward the 5 back of the sewing machine may cause accident or injury. CAUTION CAUTION ● Before replacing the needle, place fabric ● Make sure you insert the needle until it 1 or paper...needle in the needle plate. With the flat side of the 3 presser foot holder to sew and how. If you leave the power on and step on the presser foot is in line with this machine. Using any other presser foot may be used with the slot on the wheel points up...
...damaged. You will start and you may be Hold the needle with a disc- Raise the needle by turning the 2 handwheel toward the 5 back of the sewing machine may cause accident or injury. CAUTION CAUTION ● Before replacing the needle, place fabric ● Make sure you insert the needle until it 1 or paper...needle in the needle plate. With the flat side of the 3 presser foot holder to sew and how. If you leave the power on and step on the presser foot is in line with this machine. Using any other presser foot may be used with the slot on the wheel points up...
Users Manual - English and Spanish
Page 10
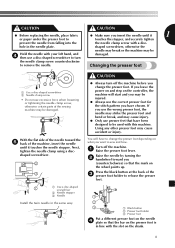
... next section shows recommended stitch lengths and widths. • The pattern number display does not rotate endlessly. KNOWING YOUR SEWING MACHINE Lower the presser foot lever and fix the 5 presser foot onto the shank. If the needle is not installed with the correct orientation, the needle ...
... next section shows recommended stitch lengths and widths. • The pattern number display does not rotate endlessly. KNOWING YOUR SEWING MACHINE Lower the presser foot lever and fix the 5 presser foot onto the shank. If the needle is not installed with the correct orientation, the needle ...
Users Manual - English and Spanish
Page 12
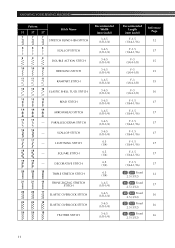
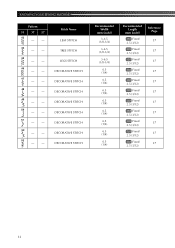
...) 37 F-1.5 (1/64-1/16) 37 F-1.5 (1/64-1/16) 37 / 1 Fixed 32 2.5 (3/32) / 1 Fixed 37 2.5 (3/32) / 1 Fixed 36 2.5 (3/32) / 1 Fixed 36 2.5 (3/32) / 1 Fixed 36 2.5 (3/32) 11 KNOWING YOUR SEWING MACHINE Pattern 53 37 27 7 7 7 Stitch Name STRETCH BLIND HEM STITCH 8 8 8 SCALLOP STITCH 9 9 9 DOUBLE ACTION STITCH 10 10 10 BRIDGING STITCH 11 11 11 RAMPART STITCH...
...) 37 F-1.5 (1/64-1/16) 37 F-1.5 (1/64-1/16) 37 / 1 Fixed 32 2.5 (3/32) / 1 Fixed 37 2.5 (3/32) / 1 Fixed 36 2.5 (3/32) / 1 Fixed 36 2.5 (3/32) / 1 Fixed 36 2.5 (3/32) 11 KNOWING YOUR SEWING MACHINE Pattern 53 37 27 7 7 7 Stitch Name STRETCH BLIND HEM STITCH 8 8 8 SCALLOP STITCH 9 9 9 DOUBLE ACTION STITCH 10 10 10 BRIDGING STITCH 11 11 11 RAMPART STITCH...
Users Manual - English and Spanish
Page 14
KNOWING YOUR SEWING MACHINE Pattern 53 37 27 43 -- 44 -- 45 -- 46 -- 47 -- 48 -- 49 -- 50 -- 51 -- 52 -- 53 -- Stitch Name LEAF STITCH TREE STITCH LEGS STITCH DECORATIVE STITCH ...
KNOWING YOUR SEWING MACHINE Pattern 53 37 27 43 -- 44 -- 45 -- 46 -- 47 -- 48 -- 49 -- 50 -- 51 -- 52 -- 53 -- Stitch Name LEAF STITCH TREE STITCH LEGS STITCH DECORATIVE STITCH ...
Users Manual - English and Spanish
Page 16
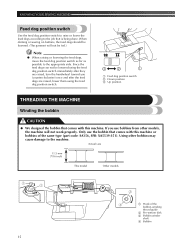
...the same type (part code: SA156, SFB: XA5539-151). KNOWING YOUR SEWING MACHINE Feed dog position switch Use the feed dog position switch to raise or lower the feed dogs according to the appropriate side. When darning or sewing on buttons, the feed dogs should be lowered. (The garment will ...not work properly. Only use bobbins from other bobbins may cause damage to the machine. Using other models, the machine will not be lowered using the feed dog position ...
...the same type (part code: SA156, SFB: XA5539-151). KNOWING YOUR SEWING MACHINE Feed dog position switch Use the feed dog position switch to raise or lower the feed dogs according to the appropriate side. When darning or sewing on buttons, the feed dogs should be lowered. (The garment will ...not work properly. Only use bobbins from other bobbins may cause damage to the machine. Using other models, the machine will not be lowered using the feed dog position ...
Users Manual - English and Spanish
Page 18
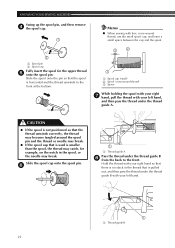
... A Pass the thread under the thread guide A. Press the foot controller to the front. CAUTION ● When the bobbin winding becomes slow, stop the machine, otherwise the sewing machine may be wound correctly. Pass the end of the bobbin-winding thread guide, and then wind the thread counterclockwise between the discs, pulling it... may bend or break when the bobbin thread starts to cut it in the bobbin or the needle may not be damaged. 17 KNOWING YOUR SEWING MACHINE While holding the spool with your right 7 hand, pull the thread with your left hand.
... A Pass the thread under the thread guide A. Press the foot controller to the front. CAUTION ● When the bobbin winding becomes slow, stop the machine, otherwise the sewing machine may be wound correctly. Pass the end of the bobbin-winding thread guide, and then wind the thread counterclockwise between the discs, pulling it... may bend or break when the bobbin thread starts to cut it in the bobbin or the needle may not be damaged. 17 KNOWING YOUR SEWING MACHINE While holding the spool with your right 7 hand, pull the thread with your left hand.
Users Manual - English and Spanish
Page 19
... by turning the 2 handwheel toward you (counterclockwise) and raise the presser foot lever. this is turned after winding the thread around the bobbin, the machine will make a clicking sound; If the thread unrolls in the wrong direction, it and 3 lift toward you . ● Not winding the bobbin ...bobbin wound properly 1 before threading the lower thread. • See page 15 for the details about bobbin winding. Note ● When the sewing machine is started or the handwheel is not a malfunction. ● The needle bar does not move when you slide the bobbin winder shaft to...
... by turning the 2 handwheel toward you (counterclockwise) and raise the presser foot lever. this is turned after winding the thread around the bobbin, the machine will make a clicking sound; If the thread unrolls in the wrong direction, it and 3 lift toward you . ● Not winding the bobbin ...bobbin wound properly 1 before threading the lower thread. • See page 15 for the details about bobbin winding. Note ● When the sewing machine is started or the handwheel is not a malfunction. ● The needle bar does not move when you slide the bobbin winder shaft to...
Users Manual - English and Spanish
Page 20
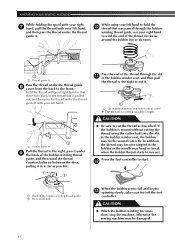
...that the bobbin easily rotates counterclockwise. 2 1 2 3 1 1 Slit 2 Cutter (Cut the thread with the cutter.) 1 Groove 2 Projection • Start sewing after threading the lower and upper thread. Put the 7 projection into the race retainer groove and push closed. 12 1 1 Tension-adjusting spring While lightly holding... as shown. • If the thread is not correctly inserted through the slit (1 and 2). Replace the bobbin cover. KNOWING YOUR SEWING MACHINE Hold the end of the bobbin case, it with your finger, and then pass the thread through the slit, as shown, guide ...
...that the bobbin easily rotates counterclockwise. 2 1 2 3 1 1 Slit 2 Cutter (Cut the thread with the cutter.) 1 Groove 2 Projection • Start sewing after threading the lower and upper thread. Put the 7 projection into the race retainer groove and push closed. 12 1 1 Tension-adjusting spring While lightly holding... as shown. • If the thread is not correctly inserted through the slit (1 and 2). Replace the bobbin cover. KNOWING YOUR SEWING MACHINE Hold the end of the bobbin case, it with your finger, and then pass the thread through the slit, as shown, guide ...

Users Manual - English and Spanish
Page 21
...● When threading the upper thread, carefully follow the instructions. However, the needle threader cannot be used with a 65/9 home sewing machine needle. If the upper threading is not correctly raised, the sewing machine can be threaded. 1 1 Presser foot lever 1 1 Mark on the wheel 20 Upper threading 3 21 1 4 1 Spool ... NEEDLE COMBINATIONS" on page 26. ● The needle threader can not be used with a 75/11 through 100/16 home sewing machine needle. For details on the correct combination of 20 or lower. ● Use the needle and the thread in the correct combination.
...● When threading the upper thread, carefully follow the instructions. However, the needle threader cannot be used with a 65/9 home sewing machine needle. If the upper threading is not correctly raised, the sewing machine can be threaded. 1 1 Presser foot lever 1 1 Mark on the wheel 20 Upper threading 3 21 1 4 1 Spool ... NEEDLE COMBINATIONS" on page 26. ● The needle threader can not be used with a 75/11 through 100/16 home sewing machine needle. For details on the correct combination of 20 or lower. ● Use the needle and the thread in the correct combination.
Users Manual - English and Spanish
Page 22
... that is used is horizontal and the thread unwinds to the front. Memo ● When sewing with your left hand, and then pass the thread under the thread guide B 8 from the back to the front at the bottom. KNOWING YOUR SEWING MACHINE Swing up the spool pin, and then remove 4 the spool cap.
... that is used is horizontal and the thread unwinds to the front. Memo ● When sewing with your left hand, and then pass the thread under the thread guide B 8 from the back to the front at the bottom. KNOWING YOUR SEWING MACHINE Swing up the spool pin, and then remove 4 the spool cap.
Users Manual - English and Spanish
Page 24
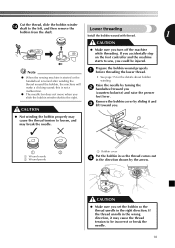
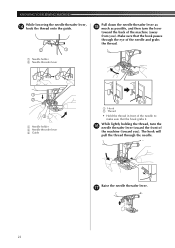
Raise the needle threader lever. KNOWING YOUR SEWING MACHINE While lowering the needle threader lever, d hook the thread onto the guide. 2 1 Pull down the needle threader lever as e much as possible, and then turn the f needle threader lever toward the front of the machine (toward the back of the needle to make sure that... grabs the thread. 1 Needle holder 2 Needle threader lever 1 2 3 1 Needle holder 2 Needle threader lever 3 Guide 1 12 1 Hook 2 Thread • Hold the thread in front of the machine (away from you ).
Raise the needle threader lever. KNOWING YOUR SEWING MACHINE While lowering the needle threader lever, d hook the thread onto the guide. 2 1 Pull down the needle threader lever as e much as possible, and then turn the f needle threader lever toward the front of the machine (toward the back of the needle to make sure that... grabs the thread. 1 Needle holder 2 Needle threader lever 1 2 3 1 Needle holder 2 Needle threader lever 3 Guide 1 12 1 Hook 2 Thread • Hold the thread in front of the machine (away from you ).
Users Manual - English and Spanish
Page 26
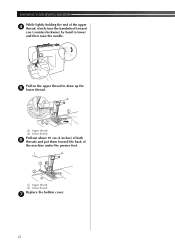
KNOWING YOUR SEWING MACHINE While lightly holding the end of the upper 4 thread, slowly turn the handwheel toward the back of both 6 threads and put them toward you (counterclockwise) by hand to draw up the 5 lower thread. 1 2 1 2 1 Upper thread 2 Lower thread Pull out about 10 cm (4 inches) of the machine under the presser foot. 1 2 1 Upper thread 2 Lower thread Replace the bobbin cover. 7 25 Pull on the upper thread to lower and then raise the needle.
KNOWING YOUR SEWING MACHINE While lightly holding the end of the upper 4 thread, slowly turn the handwheel toward the back of both 6 threads and put them toward you (counterclockwise) by hand to draw up the 5 lower thread. 1 2 1 2 1 Upper thread 2 Lower thread Pull out about 10 cm (4 inches) of the machine under the presser foot. 1 2 1 Upper thread 2 Lower thread Replace the bobbin cover. 7 25 Pull on the upper thread to lower and then raise the needle.
Users Manual - English and Spanish
Page 43
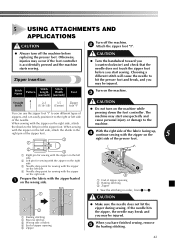
... can use the zipper foot "I " CAUTION ● Do not turn off the machine before you start unexpectedly and of zippers, and can easily position it to the right or left side, attach the shank to 3. When sewing machine. Turn on the machine. 3 Straight 2 2-3 3.5 Zipper Stitch (1/16-1/8) (Center) foot "I " to sew different types of the needle.
... can use the zipper foot "I " CAUTION ● Do not turn off the machine before you start unexpectedly and of zippers, and can easily position it to the right or left side, attach the shank to 3. When sewing machine. Turn on the machine. 3 Straight 2 2-3 3.5 Zipper Stitch (1/16-1/8) (Center) foot "I " to sew different types of the needle.
Users Manual - English and Spanish
Page 48
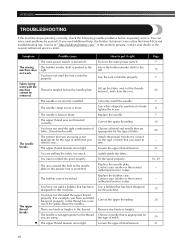
... foot controller properly. If you are using . ▼ The upper thread tension is correct for this machine. Visit us at " http://solutions.brother.com ". Symptom The sewing machine does not work. The needle is loose. The area around the hole in the thread. Replace the ...needle. Contact your retailer or the nearest authorized service center. Use a bobbin that are appropriate for this machine. Page 7 16 7 45 7 8 7 20 ...
... foot controller properly. If you are using . ▼ The upper thread tension is correct for this machine. Visit us at " http://solutions.brother.com ". Symptom The sewing machine does not work. The needle is loose. The area around the hole in the thread. Replace the ...needle. Contact your retailer or the nearest authorized service center. Use a bobbin that are appropriate for this machine. Page 7 16 7 45 7 8 7 20 ...


