
Users Manual - English
Page 8
...to the fabric 126 Setting the fabric in the embroidery frame ...127 Attaching the Embroidery Frame 130 Attaching the embroidery frame ...130 Removing the embroidery frame ...131 Selecting Embroidery Patterns 132 Copyright information ...132 Embroidery pattern types ...132 LCD (liquid crystal display) ...character patterns ...146 Resewing ...147 Thread runs out partway through a design...148 Stopping while embroidering ...148 Saving patterns...150 APPENDIX 151 Care and Maintenance ...152 Cleaning the machine surface ...152 Cleaning the race ...152 Troubleshooting ...154 Error messages...
...to the fabric 126 Setting the fabric in the embroidery frame ...127 Attaching the Embroidery Frame 130 Attaching the embroidery frame ...130 Removing the embroidery frame ...131 Selecting Embroidery Patterns 132 Copyright information ...132 Embroidery pattern types ...132 LCD (liquid crystal display) ...character patterns ...146 Resewing ...147 Thread runs out partway through a design...148 Stopping while embroidering ...148 Saving patterns...150 APPENDIX 151 Care and Maintenance ...152 Cleaning the machine surface ...152 Cleaning the race ...152 Troubleshooting ...154 Error messages...
Users Manual - English
Page 9
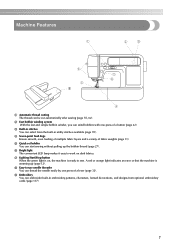
... LED lamp makes it easy to -use needle threader You can select from the built-in embroidery patterns, characters, framed decorations, and designs from optional embroidery cards (page 117). 7 h Easy-to work on , the machine is ready to sew. c Built-in stitches You can thread the needle easily by one press of fabric weights (page...
... LED lamp makes it easy to -use needle threader You can select from the built-in embroidery patterns, characters, framed decorations, and designs from optional embroidery cards (page 117). 7 h Easy-to work on , the machine is ready to sew. c Built-in stitches You can thread the needle easily by one press of fabric weights (page...
Users Manual - English
Page 45
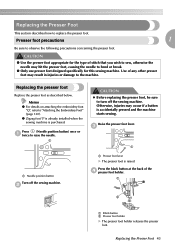
.... Presser foot precautions 1 Be sure to "Attaching the Embroidery Foot" (page 120). z Zigzag foot "J" is already installed when the sewing machine is accidentally pressed and the machine starts sewing. c a a Needle position button Turn off the sewing machine. CAUTION ● Use the presser foot appropriate for the.... a CAUTION z Before replacing the presser foot, be sure to bend or break. ● Only use presser feet designed specifically for this sewing machine. Use of the d presser foot holder. Press the black button at the back of any other presser foot may hit...
.... Presser foot precautions 1 Be sure to "Attaching the Embroidery Foot" (page 120). z Zigzag foot "J" is already installed when the sewing machine is accidentally pressed and the machine starts sewing. c a a Needle position button Turn off the sewing machine. CAUTION ● Use the presser foot appropriate for the.... a CAUTION z Before replacing the presser foot, be sure to bend or break. ● Only use presser feet designed specifically for this sewing machine. Use of the d presser foot holder. Press the black button at the back of any other presser foot may hit...
Users Manual - English
Page 120
... details, refer to prevent poor quality embroidery designs. What to prepare The following is enough bobbin thread. z When embroidering on lightweight or stretch fabrics. For details, refer to "Replacing the needle" (page 41). z Before starting to sew, be sure to the embroidery unit, and use them for embroidery machines. When embroidering on thin materials like organdy...
... details, refer to prevent poor quality embroidery designs. What to prepare The following is enough bobbin thread. z When embroidering on lightweight or stretch fabrics. For details, refer to "Replacing the needle" (page 41). z Before starting to sew, be sure to the embroidery unit, and use them for embroidery machines. When embroidering on thin materials like organdy...

Users Manual - English
Page 128
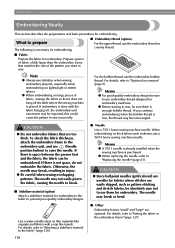
...Always use stabilizer material when sewing embroidery projects. Attach a stabilizer material for thin fabrics or stretch fabrics. To obtain optional accessories or parts, visit [http://www.brother.com/], or [http:// www.brothermall.com] (in the embroidery frame without using stabilizers with ...which cannot be ironed or for embroidery. EMBROIDERY Preparing the Fabric After attaching a stabilizer material to the embroidery fabric, it is larger than a the embroidery frame being used. Attaching a stabilizer material to prevent poor quality embroidery designs. Memo z We recommend the...
...Always use stabilizer material when sewing embroidery projects. Attach a stabilizer material for thin fabrics or stretch fabrics. To obtain optional accessories or parts, visit [http://www.brother.com/], or [http:// www.brothermall.com] (in the embroidery frame without using stabilizers with ...which cannot be ironed or for embroidery. EMBROIDERY Preparing the Fabric After attaching a stabilizer material to the embroidery fabric, it is larger than a the embroidery frame being used. Attaching a stabilizer material to prevent poor quality embroidery designs. Memo z We recommend the...
Users Manual - English
Page 141
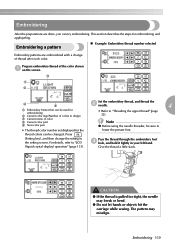
...the setting in the setting screen. c a b d e Set the embroidery thread, and thread the b needle. 4 a Embroidery frames that can be used for embroidering b Current color step/Number of...133). For details, refer to "LCD Pass the thread through the embroidery foot c hole, and hold it lightly in design c Current name of thread after each color. CAUTION ● If ...using the needle threader, be changed. Embroidering a pattern „ Example: Embroidery thread number selected Embroidery patterns are done, you can be sure to "Threading the upper thread" (page ...
...the setting in the setting screen. c a b d e Set the embroidery thread, and thread the b needle. 4 a Embroidery frames that can be used for embroidering b Current color step/Number of...133). For details, refer to "LCD Pass the thread through the embroidery foot c hole, and hold it lightly in design c Current name of thread after each color. CAUTION ● If ...using the needle threader, be changed. Embroidering a pattern „ Example: Embroidery thread number selected Embroidery patterns are done, you can be sure to "Threading the upper thread" (page ...
Users Manual - English
Page 146
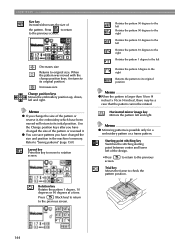
.... Horizontal mirror image key Mirrors the pattern left and right. Use the Change position keys after you have changed the size of the design. •Press screen. Rotates the pattern 90 degrees to the left Rotates the pattern 90 degrees to the right Rotates the pattern 10.../decreases the size of the pattern or reverse it, the embroidery which have been moved will return to its initial position. Decreases size Returns to the previous screen. z You can save patterns you have changed the size and position in the machine's memory. Memo z Mirroring patterns is larger than 10cm (4...
.... Horizontal mirror image key Mirrors the pattern left and right. Use the Change position keys after you have changed the size of the design. •Press screen. Rotates the pattern 90 degrees to the left Rotates the pattern 90 degrees to the right Rotates the pattern 10.../decreases the size of the pattern or reverse it, the embroidery which have been moved will return to its initial position. Decreases size Returns to the previous screen. z You can save patterns you have changed the size and position in the machine's memory. Memo z Mirroring patterns is larger than 10cm (4...
Users Manual - English
Page 148
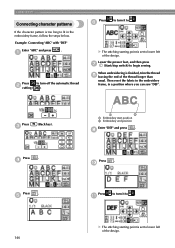
... lower left of the design. i Press . d Press . a Press to turn it to . Lower the presser foot, and then press g (Start/stop switch) to begin sewing. X The stitching starting point is too long to fit in a position where you can sew "DEF". e Press...Then reset the fabric in the embroidery frame, in the embroidery frame, follow the steps below. j Press . EMBROIDERY Connecting character patterns If the character pattern is set to lower left of the design. 146 Press c (Back key). a b a Embroidery start position b Embroidery end position Enter "DEF" and...
... lower left of the design. i Press . d Press . a Press to turn it to . Lower the presser foot, and then press g (Start/stop switch) to begin sewing. X The stitching starting point is too long to fit in a position where you can sew "DEF". e Press...Then reset the fabric in the embroidery frame, in the embroidery frame, follow the steps below. j Press . EMBROIDERY Connecting character patterns If the character pattern is set to lower left of the design. 146 Press c (Back key). a b a Embroidery start position b Embroidery end position Enter "DEF" and...
Users Manual - English
Page 149
Press (Start/stop the a sewing machine. Press (Back one more time to go to the d beginning of "ABC". e Press (Start/stop button) to stop button) to continue the f design. a a Embroidery end position Lower the presser foot, and then press m (Start/Stop button) to the embroidery end position of the mistaken color. Resewing When the wrong upper...
Press (Start/stop the a sewing machine. Press (Back one more time to go to the d beginning of "ABC". e Press (Start/stop button) to stop button) to continue the f design. a a Embroidery end position Lower the presser foot, and then press m (Start/Stop button) to the embroidery end position of the mistaken color. Resewing When the wrong upper...

Users Manual - English
Page 150
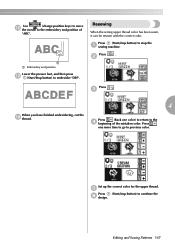
... following screen. a Press . For details, refer to the original setting. EMBROIDERY Thread runs out partway through a design When the upper thread or the bobbin thread runs out while sewing, the sewing machine stops. b Stopping while embroidering If the embroidery is stopped before it . Memo z When the sewing machine is displayed. 148 Press (Start/stop button) to stop the...
... following screen. a Press . For details, refer to the original setting. EMBROIDERY Thread runs out partway through a design When the upper thread or the bobbin thread runs out while sewing, the sewing machine stops. b Stopping while embroidering If the embroidery is stopped before it . Memo z When the sewing machine is displayed. 148 Press (Start/stop button) to stop the...
Users Manual - English
Page 164
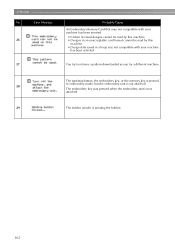
... No Error Message Probable Cause An Embroidery Memory Card that may not compatible with your machine has been inserted. • Certain licensed designs cannot be read by this machine. 26 • Designs in an unacceptable card format cannot be read by this machine. • Design data saved in embroidery mode, but the embroidery unit is not attached. 28 The...
... No Error Message Probable Cause An Embroidery Memory Card that may not compatible with your machine has been inserted. • Certain licensed designs cannot be read by this machine. 26 • Designs in an unacceptable card format cannot be read by this machine. • Design data saved in embroidery mode, but the embroidery unit is not attached. 28 The...


