

Users Manual - English
Page 1
Computerized Embroidery and Sewing Machine Operation Manual Product Code 885-V31/V33 GETTING READY SEWING BASICS UTILITY STITCHES EMBROIDERY APPENDIX
Computerized Embroidery and Sewing Machine Operation Manual Product Code 885-V31/V33 GETTING READY SEWING BASICS UTILITY STITCHES EMBROIDERY APPENDIX

Users Manual - English
Page 3
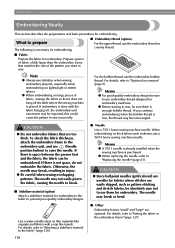
...if it is not working properly, if it by any other part may damage the machine or result in the machine falling, which could cause injuries. • When lifting the sewing machine, be accessed for the correct operation of burns, fire, electric shock, or injury to.... 2 Always unplug the machine from the build up of the electrical outlet. Plug the machine directly into the electrical outlet. To reduce the risk of the various functions. Important Safety Instructions Please read the "Important Safety Instructions", and then study this embroidery and sewing machine.
...if it is not working properly, if it by any other part may damage the machine or result in the machine falling, which could cause injuries. • When lifting the sewing machine, be accessed for the correct operation of burns, fire, electric shock, or injury to.... 2 Always unplug the machine from the build up of the electrical outlet. Plug the machine directly into the electrical outlet. To reduce the risk of the various functions. Important Safety Instructions Please read the "Important Safety Instructions", and then study this embroidery and sewing machine.
Users Manual - English
Page 8
...stabilizer material to the fabric 126 Setting the fabric in the embroidery frame ...127 Attaching the Embroidery Frame 130 Attaching the embroidery frame ...130 Removing the embroidery frame ...131 Selecting Embroidery Patterns 132 Copyright information ...132 Embroidery pattern types ...132 LCD (liquid crystal display) operation ...133...148 Stopping while embroidering ...148 Saving patterns...150 APPENDIX 151 Care and Maintenance ...152 Cleaning the machine surface ...152 Cleaning the race ...152 Troubleshooting ...154 Error messages ...159 Adjusting the LCD ...163 Operation beep...163 Index ......
...stabilizer material to the fabric 126 Setting the fabric in the embroidery frame ...127 Attaching the Embroidery Frame 130 Attaching the embroidery frame ...130 Removing the embroidery frame ...131 Selecting Embroidery Patterns 132 Copyright information ...132 Embroidery pattern types ...132 LCD (liquid crystal display) operation ...133...148 Stopping while embroidering ...148 Saving patterns...150 APPENDIX 151 Care and Maintenance ...152 Cleaning the machine surface ...152 Cleaning the race ...152 Troubleshooting ...154 Error messages ...159 Adjusting the LCD ...163 Operation beep...163 Index ......
Users Manual - English
Page 9
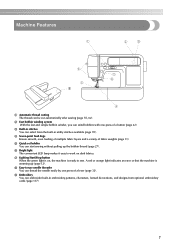
... from optional embroidery cards (page 117). 7 b Fast bobbin winding system With the fast and simple bobbin winder, you can start sewing without pulling up (page 12). f Bright light The convenient LED lamp makes it easy to sew. A red or orange light indicates an error or that the machine is ready ...to work on dark fabrics. c Built-in stitches You can embroider built-in utility stitches available (page 70). g Lighting Start/Stop button When the green light is on, the machine is warming ...
... from optional embroidery cards (page 117). 7 b Fast bobbin winding system With the fast and simple bobbin winder, you can start sewing without pulling up (page 12). f Bright light The convenient LED lamp makes it easy to sew. A red or orange light indicates an error or that the machine is ready ...to work on dark fabrics. c Built-in stitches You can embroider built-in utility stitches available (page 70). g Lighting Start/Stop button When the green light is on, the machine is warming ...
Users Manual - English
Page 11
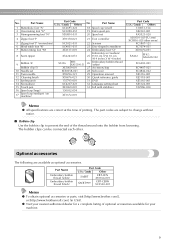
...machine. 9 Optional accessories The following are correct at the time of printing. Part Name Embroidery bobbin thread (white) Embroidery bobbin thread (black) Part Code U.S.A. / Canada Other SAEBT EBT-CEN X81164-001 SAEBT999 EBT-CEBN XC5520-001 Memo z To obtain optional accessories or parts, visit [http://www.brother...XC4237-021 XE3069-001 130012-054 22 Scissors 23 Disc-shaped screwdriver 24 Embroidery foot "Q" Embroidery set (medium) 25 H 10 cm X W 10 cm (H 4 inches X W 4 inches) 26 Embroidery bobbin thread (white) 27 Accessory bag 28 Soft cover 29 Operation manual...
...machine. 9 Optional accessories The following are correct at the time of printing. Part Name Embroidery bobbin thread (white) Embroidery bobbin thread (black) Part Code U.S.A. / Canada Other SAEBT EBT-CEN X81164-001 SAEBT999 EBT-CEBN XC5520-001 Memo z To obtain optional accessories or parts, visit [http://www.brother...XC4237-021 XE3069-001 130012-054 22 Scissors 23 Disc-shaped screwdriver 24 Embroidery foot "Q" Embroidery set (medium) 25 H 10 cm X W 10 cm (H 4 inches X W 4 inches) 26 Embroidery bobbin thread (white) 27 Accessory bag 28 Soft cover 29 Operation manual...

Users Manual - English
Page 12
...c Spool pin (page 23, 32) Place a spool of the machine parts. i Operation buttons (page 12) Use these descriptions to learn the names of thread on this panel to select stitches or embroidery patterns, or check how to use the sewing machine, etc. k Thread cutter (page 56) Pass the threads through ...the thread cutter to operate the machine. l Needle threader lever (page 35) Use the needle threader lever to...
...c Spool pin (page 23, 32) Place a spool of the machine parts. i Operation buttons (page 12) Use these descriptions to learn the names of thread on this panel to select stitches or embroidery patterns, or check how to use the sewing machine, etc. k Thread cutter (page 56) Pass the threads through ...the thread cutter to operate the machine. l Needle threader lever (page 35) Use the needle threader lever to...

Users Manual - English
Page 13
...embroidery card. Memo z Refer to pages 10 through 13 while you (counterclockwise) to raise and lower the needle to sew one stitch. c Needle bar thread guide (page 34) Pass the upper thread through the thread guide disk when using the needle threader to be exchanged. a Handle Carry the sewing machine... by its handle when transporting the machine. i Presser foot holder (page 45) The presser foot is marked with guides for the selected stitching. b ...
...embroidery card. Memo z Refer to pages 10 through 13 while you (counterclockwise) to raise and lower the needle to sew one stitch. c Needle bar thread guide (page 34) Pass the upper thread through the thread guide disk when using the needle threader to be exchanged. a Handle Carry the sewing machine... by its handle when transporting the machine. i Presser foot holder (page 45) The presser foot is marked with guides for the selected stitching. b ...

Users Manual - English
Page 15
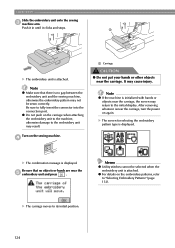
...page when there are items that are not displayed on the LCD with your finger or the touch pen to sew embroidery. g Embroidery key Press this key to get help on the LCD. Operation panel The front operation panel has an LCD ... not displayed on using the sewing machine. f Utility stitch key Press this key to perform operations. into the sewing machine memory. Displays simple explanations of setting upper thread / bobbin winding / setting bobbin thread / needle replacement / embroidery unit attachment / embroidery frame attachment / embroidery foot attachment / presser foot ...
...page when there are items that are not displayed on the LCD with your finger or the touch pen to sew embroidery. g Embroidery key Press this key to get help on the LCD. Operation panel The front operation panel has an LCD ... not displayed on using the sewing machine. f Utility stitch key Press this key to perform operations. into the sewing machine memory. Displays simple explanations of setting upper thread / bobbin winding / setting bobbin thread / needle replacement / embroidery unit attachment / embroidery frame attachment / embroidery foot attachment / presser foot ...

Users Manual - English
Page 20
...reverse/reinforcement l Single/twin needle sewing and needle stop position Memo z A different screen is displayed when the embroidery unit is displayed. 1 l k 2 0 9 3 8 4 7 5 6 a Selected stitch b Presser foot to "Error messages" (page 159) for messages displayed on the front of the sewing machine. When you touch the LCD ...on the LCD (liquid crystal display) on the LCD. 18 z Refer to be used c Stitches d Stitch settings and twin needle sewing e Stitch width f Stitch length g Number of the selected stitch h Number of the LCD, and make operations by directly touching the...
...reverse/reinforcement l Single/twin needle sewing and needle stop position Memo z A different screen is displayed when the embroidery unit is displayed. 1 l k 2 0 9 3 8 4 7 5 6 a Selected stitch b Presser foot to "Error messages" (page 159) for messages displayed on the front of the sewing machine. When you touch the LCD ...on the LCD (liquid crystal display) on the LCD. 18 z Refer to be used c Stitches d Stitch settings and twin needle sewing e Stitch width f Stitch length g Number of the selected stitch h Number of the LCD, and make operations by directly touching the...
Users Manual - English
Page 21
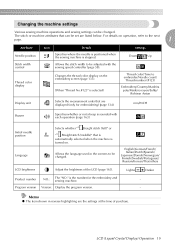
.../Madeira poly/Madeira rayon/Sulky/ Robison Anton Display unit Selects the measurement units that are displayed (only for the embroidery and sewing machine. - Changes the thread color display on operation, refer to be changed . Lighter Darker Product number NO.: The "...at the time of the LCD (page 163). Changing the machine settings Various sewing machine operations and sewing settings can be set are listed below. Program version Version: Display the program version. - For details on the embroidery screen (page 133). mm/INCH Buzzer Specifies whether or not ...
.../Madeira poly/Madeira rayon/Sulky/ Robison Anton Display unit Selects the measurement units that are displayed (only for the embroidery and sewing machine. - Changes the thread color display on operation, refer to be changed . Lighter Darker Product number NO.: The "...at the time of the LCD (page 163). Changing the machine settings Various sewing machine operations and sewing settings can be set are listed below. Program version Version: Display the program version. - For details on the embroidery screen (page 133). mm/INCH Buzzer Specifies whether or not ...

Users Manual - English
Page 23
... / setting bobbin thread / needle replacement / embroidery unit attachment / Example: Upper threading embroidery frame attachment / embroidery foot attachment / presser foot replacement on the LCD display for the selected topic appears. c a b cd After you return to the corresponding page in this Operation Manual. Simple explanations can be displayed. Press (Sewing machine help screen appears. Press the item...
... / setting bobbin thread / needle replacement / embroidery unit attachment / Example: Upper threading embroidery frame attachment / embroidery foot attachment / presser foot replacement on the LCD display for the selected topic appears. c a b cd After you return to the corresponding page in this Operation Manual. Simple explanations can be displayed. Press (Sewing machine help screen appears. Press the item...
Users Manual - English
Page 25
... shaft so b that is not positioned correctly, the thread may become tangled around the spool pin or the machine may be damaged. ● Winding/Installing the Bobbin 23 Memo z For embroidering, use the embroidery bobbin thread. a b a Spool cap b Spool pin CAUTION ● If the spool or the spool cap is inserted... the spool is too small for the bobbin onto e the spool pin. Turn on the bobbin until it snaps into place. Press down on the sewing machine. a Place the spool of spool being used . Slide the spool cap as far as shown, with the rounded side on the slit in the ...
... shaft so b that is not positioned correctly, the thread may become tangled around the spool pin or the machine may be damaged. ● Winding/Installing the Bobbin 23 Memo z For embroidering, use the embroidery bobbin thread. a b a Spool cap b Spool pin CAUTION ● If the spool or the spool cap is inserted... the spool is too small for the bobbin onto e the spool pin. Turn on the bobbin until it snaps into place. Press down on the sewing machine. a Place the spool of spool being used . Slide the spool cap as far as shown, with the rounded side on the slit in the ...
Users Manual - English
Page 42
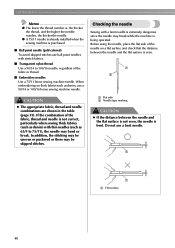
... The lower the thread number is bent. Before using the needle, place the flat side of the fabric or thread. ■ Embroidery needles Use a 75/11 home sewing machine needle. a b a Flat side b Needle type marking CAUTION z If the distance between the needle and the flat surface is ...(gold colored) To avoid skipped stitches use a bent needle. a a a Flat surface 40 z A 75/11 needle is already installed when the sewing machine is even. If the combination of the fabric, thread and needle is being operated. CAUTION z The appropriate fabric, thread and needle combinations are shown...
... The lower the thread number is bent. Before using the needle, place the flat side of the fabric or thread. ■ Embroidery needles Use a 75/11 home sewing machine needle. a b a Flat side b Needle type marking CAUTION z If the distance between the needle and the flat surface is ...(gold colored) To avoid skipped stitches use a bent needle. a a a Flat surface 40 z A 75/11 needle is already installed when the sewing machine is even. If the combination of the fabric, thread and needle is being operated. CAUTION z The appropriate fabric, thread and needle combinations are shown...
Users Manual - English
Page 45
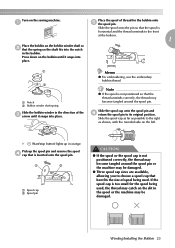
... position button) once or a twice to "Attaching the Embroidery Foot" (page 120). Otherwise, injuries may occur if a button is purchased. c a a Needle position button Turn off the sewing machine. CAUTION ● Use the presser foot appropriate for the type of stitch that you wish to sew, otherwise the needle may result in injuries or damage...
... position button) once or a twice to "Attaching the Embroidery Foot" (page 120). Otherwise, injuries may occur if a button is purchased. c a a Needle position button Turn off the sewing machine. CAUTION ● Use the presser foot appropriate for the type of stitch that you wish to sew, otherwise the needle may result in injuries or damage...
Users Manual - English
Page 47
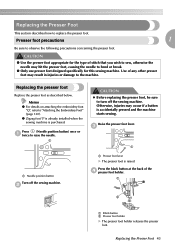
... holder screw d Presser bar X The presser foot is raised. If the screw is loose, the needle may occur if a button is accidentally pressed and the machine starts sewing. embroidery foot, optional free-motion open toe quilting foot "O" and optional walking foot. a b Remove the presser foot. a X The presser foot is removed from the presser...
... holder screw d Presser bar X The presser foot is raised. If the screw is loose, the needle may occur if a button is accidentally pressed and the machine starts sewing. embroidery foot, optional free-motion open toe quilting foot "O" and optional walking foot. a b Remove the presser foot. a X The presser foot is removed from the presser...
Users Manual - English
Page 120
...to raise the needle. z When replacing the needle, refer to sew, be sure there is placed. Note z Always use the embroidery thread or country thread. ■ Fabric Prepare the fabric for embroidery machines. If embroidery is done with a nap like organdy and fabrics with the fabric... hanging off the table where the sewing machine is enough bobbin thread. z Before starting ...
...to raise the needle. z When replacing the needle, refer to sew, be sure there is placed. Note z Always use the embroidery thread or country thread. ■ Fabric Prepare the fabric for embroidery machines. If embroidery is done with a nap like organdy and fabrics with the fabric... hanging off the table where the sewing machine is enough bobbin thread. z Before starting ...
Users Manual - English
Page 122
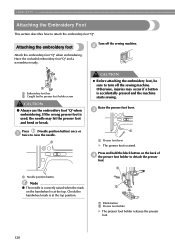
... at the top. Check the handwheel mark is raised. EMBROIDERY Attaching the Embroidery Foot This section describes how to raise the needle. Have the included embroidery foot "Q" and a screwdriver ready. Turn off the sewing machine. If the wrong presser foot is accidentally pressed and the machine starts sewing. a a Needle position button Note z The needle is at the...
... at the top. Check the handwheel mark is raised. EMBROIDERY Attaching the Embroidery Foot This section describes how to raise the needle. Have the included embroidery foot "Q" and a screwdriver ready. Turn off the sewing machine. If the wrong presser foot is accidentally pressed and the machine starts sewing. a a Needle position button Note z The needle is at the...
Users Manual - English
Page 124
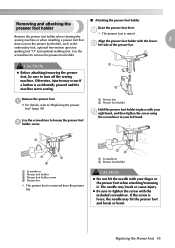
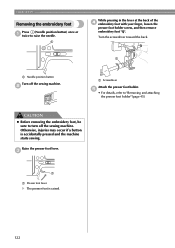
... finger, loosen the presser foot holder screw, and then remove embroidery foot "Q". CAUTION z Before removing the embroidery foot, be sure to turn off the sewing machine. c a a Presser foot lever X The presser foot is accidentally pressed and the machine starts sewing. Raise the presser foot lever. EMBROIDERY Removing the embroidery foot Press (Needle position button) once or a twice to...
... finger, loosen the presser foot holder screw, and then remove embroidery foot "Q". CAUTION z Before removing the embroidery foot, be sure to turn off the sewing machine. c a a Presser foot lever X The presser foot is accidentally pressed and the machine starts sewing. Raise the presser foot lever. EMBROIDERY Removing the embroidery foot Press (Needle position button) once or a twice to...
Users Manual - English
Page 125
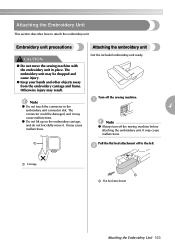
... dropped and cause injury. ● Keep your hands and other objects away from the embroidery carriage and frame. Embroidery unit precautions Attaching the embroidery unit CAUTION ● Do not move it may cause malfunctions. Note z Always turn off the sewing machine. Note z Do not touch the connector in place. It may result. Get the included...
... dropped and cause injury. ● Keep your hands and other objects away from the embroidery carriage and frame. Embroidery unit precautions Attaching the embroidery unit CAUTION ● Do not move it may cause malfunctions. Note z Always turn off the sewing machine. Note z Do not touch the connector in place. It may result. Get the included...
Users Manual - English
Page 126
... is displayed. Note z Make sure that no gap between the embroidery unit and the sewing machine, otherwise the embroidery pattern may return to the embroidery unit may cause injury. Note z If the machine is attached. It may result. Be sure that there is no objects or hands are near the carriage, the screen may not be...
... is displayed. Note z Make sure that no gap between the embroidery unit and the sewing machine, otherwise the embroidery pattern may return to the embroidery unit may cause injury. Note z If the machine is attached. It may result. Be sure that there is no objects or hands are near the carriage, the screen may not be...


