
Users Manual - English
Page 7
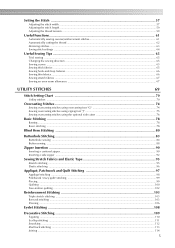
... Adjusting the thread tension ...59 Useful Functions...61 Automatically sewing reverse/reinforcement stitches 61 Automatically cutting the thread ...62 Mirroring stitches ...63 Saving stitch settings ...64 Useful Sewing Tips ...65 Trial sewing ...65 Changing the sewing direction ...65 Sewing curves ...65 Sewing thick fabrics ...65 Sewing hook-and-loop fastener ...66 Sewing thin fabrics...66 Sewing stretch fabrics ...67 Sewing an even seam...
... Adjusting the thread tension ...59 Useful Functions...61 Automatically sewing reverse/reinforcement stitches 61 Automatically cutting the thread ...62 Mirroring stitches ...63 Saving stitch settings ...64 Useful Sewing Tips ...65 Trial sewing ...65 Changing the sewing direction ...65 Sewing curves ...65 Sewing thick fabrics ...65 Sewing hook-and-loop fastener ...66 Sewing thin fabrics...66 Sewing stretch fabrics ...67 Sewing an even seam...
Users Manual - English
Page 8
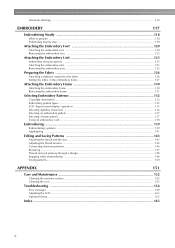
...embroidery pattern ...137 Selecting a frame pattern...137 Using an embroidery card ...138 Embroidering...139 Embroidering a pattern ...139 Appliquéing ...141 Editing and Saving Patterns 143 Adjusting the layout and the size...143 Adjusting the thread tension ...145 Connecting character patterns ...146 Resewing ...147 Thread... runs out partway through a design...148 Stopping while embroidering ...148 Saving patterns...150 APPENDIX 151 Care and Maintenance ...152 Cleaning the machine surface ......
...embroidery pattern ...137 Selecting a frame pattern...137 Using an embroidery card ...138 Embroidering...139 Embroidering a pattern ...139 Appliquéing ...141 Editing and Saving Patterns 143 Adjusting the layout and the size...143 Adjusting the thread tension ...145 Connecting character patterns ...146 Resewing ...147 Thread... runs out partway through a design...148 Stopping while embroidering ...148 Saving patterns...150 APPENDIX 151 Care and Maintenance ...152 Cleaning the machine surface ......

Users Manual - English
Page 12
...various parts of the machine parts. g Embroidery unit connector slot (page 123) Plug in the LCD. m Thread tension dial (page 59, 145) Adjust the upper thread tension with this thread guide when winding the bobbin thread and threading the machine. e LCD (liquid ...thread under this thread guide cover when winding the bobbin thread and threading the machine. l Needle threader lever (page 35) Use the needle threader lever to learn the names of the sewing machine and their functions are described below. Before using the sewing machine, carefully read these buttons to use the sewing machine...
...various parts of the machine parts. g Embroidery unit connector slot (page 123) Plug in the LCD. m Thread tension dial (page 59, 145) Adjust the upper thread tension with this thread guide when winding the bobbin thread and threading the machine. e LCD (liquid ...thread under this thread guide cover when winding the bobbin thread and threading the machine. l Needle threader lever (page 35) Use the needle threader lever to learn the names of the sewing machine and their functions are described below. Before using the sewing machine, carefully read these buttons to use the sewing machine...
Users Manual - English
Page 26
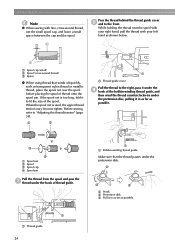
... under the i hook of the bobbin-winding thread guide, and then wind the thread counterclockwise under the hook of thread onto the spool pin. If the spool net is used, the upper thread tension may become tighter. When the spool net is...thread with fine, cross-wound thread, use the small spool cap, and leave a small space between the cap and the spool. a a Thread guide 24 a a Bobbin-winding thread guide Make sure that winds off quickly, such as possible. Before sewing, refer to the front. Pass the thread behind the thread guide cover h and to "Adjusting the thread tension...
... under the i hook of the bobbin-winding thread guide, and then wind the thread counterclockwise under the hook of thread onto the spool pin. If the spool net is used, the upper thread tension may become tighter. When the spool net is...thread with fine, cross-wound thread, use the small spool cap, and leave a small space between the cap and the spool. a a Thread guide 24 a a Bobbin-winding thread guide Make sure that winds off quickly, such as possible. Before sewing, refer to the front. Pass the thread behind the thread guide cover h and to "Adjusting the thread tension...
Users Manual - English
Page 29
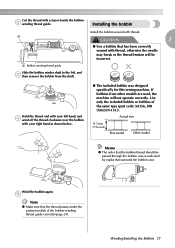
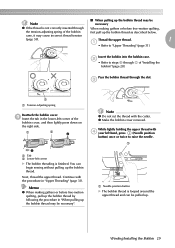
... model Memo z The order that the bobbin thread should be incorrect. Hold the thread end with your right hand as shown below. ● The included bobbin was designed specifically for this sewing machine. e Note z Make sure that the thread passes under the pretension disk of the same ...type (part code: SA156, SFB (XA5539-151)). Winding/Installing the Bobbin 27 Installing the bobbin Install the bobbin wound with thread, otherwise the needle may break or the thread tension will...
... model Memo z The order that the bobbin thread should be incorrect. Hold the thread end with your right hand as shown below. ● The included bobbin was designed specifically for this sewing machine. e Note z Make sure that the thread passes under the pretension disk of the same ...type (part code: SA156, SFB (XA5539-151)). Winding/Installing the Bobbin 27 Installing the bobbin Install the bobbin wound with thread, otherwise the needle may break or the thread tension will...
Users Manual - English
Page 30
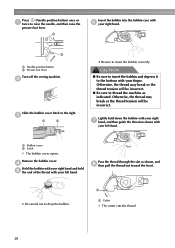
... the end of the thread with f your left hand. Otherwise, the thread may break or the thread tension will be incorrect. a Bobbin cover b Latch X The bobbin cover opens. Remove the bobbin cover. CAUTION ● Be sure to insert the bobbin and depress it to thread the machine as shown with your... the bobbin into the bobbin case with your finger. Pass the thread through the slot as shown, and h then pull the thread out toward the front. • Be careful not to insert the bobbin correctly. b a Needle position button b Presser foot lever Turn off the sewing machine.
... the end of the thread with f your left hand. Otherwise, the thread may break or the thread tension will be incorrect. a Bobbin cover b Latch X The bobbin cover opens. Remove the bobbin cover. CAUTION ● Be sure to insert the bobbin and depress it to thread the machine as shown with your... the bobbin into the bobbin case with your finger. Pass the thread through the slot as shown, and h then pull the thread out toward the front. • Be careful not to insert the bobbin correctly. b a Needle position button b Presser foot lever Turn off the sewing machine.
Users Manual - English
Page 31
...thread the upper thread. Memo z When making gathers or before free-motion quilting, pull up the bobbin thread by following the procedure in "When pulling up the bobbin thread may cause incorrect thread tension... (page 59). b • Refer to steps c through the slot. z Make the bobbin cover removed. i Insert the tab in "Upper Threading" (page 31). While lightly holding the upper thread with the cutter. Pass the bobbin thread... button X The bobbin thread is finished. c a a Tension-adjusting spring Reattach the bobbin cover. a b...
...thread the upper thread. Memo z When making gathers or before free-motion quilting, pull up the bobbin thread by following the procedure in "When pulling up the bobbin thread may cause incorrect thread tension... (page 59). b • Refer to steps c through the slot. z Make the bobbin cover removed. i Insert the tab in "Upper Threading" (page 31). While lightly holding the upper thread with the cutter. Pass the bobbin thread... button X The bobbin thread is finished. c a a Tension-adjusting spring Reattach the bobbin cover. a b...

Users Manual - English
Page 35
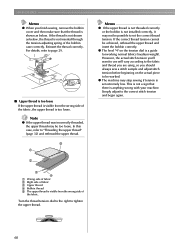
...z Make sure that the presser foot lever is not positioned correctly, the thread may become tangled around the spool pin or the needle may cause incorrect thread tension. Pass the thread behind the thread guide cover. Pass the thread through the guides in the order i shown below . 1 CAUTION ●...; If the spool or the spool cap is raised before passing the thread behind the thread guide cover h and to ...
...z Make sure that the presser foot lever is not positioned correctly, the thread may become tangled around the spool pin or the needle may cause incorrect thread tension. Pass the thread behind the thread guide cover. Pass the thread through the guides in the order i shown below . 1 CAUTION ●...; If the spool or the spool cap is raised before passing the thread behind the thread guide cover h and to ...
Users Manual - English
Page 51
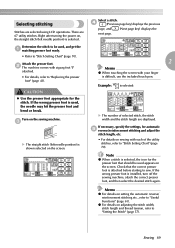
...straight stitch (left needle position) is installed, turn off the sewing machine, attach the correct presser foot, and then select the desired stitch again. Memo z For details on adjusting the stitch width, stitch length and thread tension, refer to "Replacing the presser foot" (page 43). ...z For details on setting the automatic reverse/ reinforcement stitching etc., refer to sew. Select a stitch. Attach the presser foot. b The machine comes with your finger is attached before...
...straight stitch (left needle position) is installed, turn off the sewing machine, attach the correct presser foot, and then select the desired stitch again. Memo z For details on adjusting the stitch width, stitch length and thread tension, refer to "Replacing the presser foot" (page 43). ...z For details on setting the automatic reverse/ reinforcement stitching etc., refer to sew. Select a stitch. Attach the presser foot. b The machine comes with your finger is attached before...
Users Manual - English
Page 61
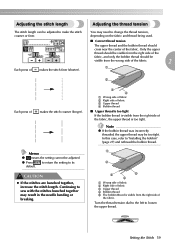
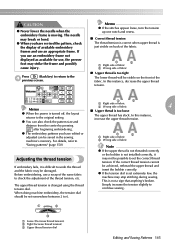
... sew with the stitches bunched together may need to change the thread tension, depending on the fabric and thread being used. ■ Correct thread tension The upper thread and the bobbin thread should be visible from the wrong side of the fabric. 2 a Each press of makes the stitch finer (shorter). In this case, refer to loosen the upper thread...
... sew with the stitches bunched together may need to change the thread tension, depending on the fabric and thread being used. ■ Correct thread tension The upper thread and the bobbin thread should be visible from the wrong side of the fabric. 2 a Each press of makes the stitch finer (shorter). In this case, refer to loosen the upper thread...
Users Manual - English
Page 62
... to use will vary according to set extremely low. For details, refer to "Threading the upper thread" (page 32) and rethread the upper thread. e a Memo z If the upper thread is not threaded correctly or the bobbin is set the correct thread tension. z The machine may stop sewing if tension is not installed correctly, it may be achieved, rethread the upper...
... to use will vary according to set extremely low. For details, refer to "Threading the upper thread" (page 32) and rethread the upper thread. e a Memo z If the upper thread is not threaded correctly or the bobbin is set the correct thread tension. z The machine may stop sewing if tension is not installed correctly, it may be achieved, rethread the upper...
Users Manual - English
Page 67
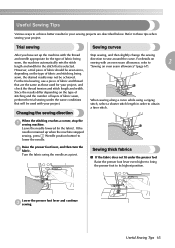
... not fit under the same conditions When sewing along a curve while using the needle as those used with your sewing projects are the same as a pivot. Useful Sewing Tips 65 Refer to these tips when sewing your project, and check the thread tension and stitch length and width. Raise the...of fabric being sewn, the desired results may not be used for your project. Changing the sewing direction When the stitching reaches a corner, stop the a sewing machine. If the needle remained up the machine with an even seam allowance, refer to 2 length and width for the type of fabric...
... not fit under the same conditions When sewing along a curve while using the needle as those used with your sewing projects are the same as a pivot. Useful Sewing Tips 65 Refer to these tips when sewing your project, and check the thread tension and stitch length and width. Raise the...of fabric being sewn, the desired results may not be used for your project. Changing the sewing direction When the stitching reaches a corner, stop the a sewing machine. If the needle remained up the machine with an even seam allowance, refer to 2 length and width for the type of fabric...
Users Manual - English
Page 114
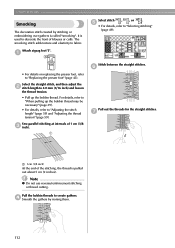
...them. 112 Select the straight stitch, and then adjust the b stitch length to 4.0 mm (3/16 inch) and loosen the thread tension. • Pull up the bobbin thread may be necessary" (page 29). • For details, refer to "Adjusting the stitch length" (page 59) and "Adjusting ...the thread tension" (page 59). g a 1cm (3/8 inch) At the end of blouses or cuffs. It is used to "When pulling up the bobbin thread. a J • For details on replacing the presser foot, refer to "Selecting stitching" (page 49). Sew parallel stitching at intervals of 1 cm (3/8 ...
...them. 112 Select the straight stitch, and then adjust the b stitch length to 4.0 mm (3/16 inch) and loosen the thread tension. • Pull up the bobbin thread may be necessary" (page 29). • For details, refer to "Adjusting the stitch length" (page 59) and "Adjusting ...the thread tension" (page 59). g a 1cm (3/8 inch) At the end of blouses or cuffs. It is used to "When pulling up the bobbin thread. a J • For details on replacing the presser foot, refer to "Selecting stitching" (page 49). Sew parallel stitching at intervals of 1 cm (3/8 ...
Users Manual - English
Page 115
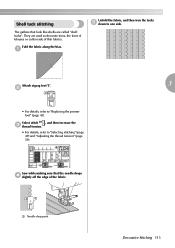
... refer to one side. Select stitch 20 , and then increase the c thread tension. • For details, refer to decorate trims, the front of blouses or cuffs made of the fabric. Fold the fabric along the bias. Sew while making sure that look like shells are used to "Selecting stitching" (...page 49) and "Adjusting the thread tension" (page 59). They are called "shell tucks". Shell tuck stitching The gathers that the...
... refer to one side. Select stitch 20 , and then increase the c thread tension. • For details, refer to decorate trims, the front of blouses or cuffs made of the fabric. Fold the fabric along the bias. Sew while making sure that look like shells are used to "Selecting stitching" (...page 49) and "Adjusting the thread tension" (page 59). They are called "shell tucks". Shell tuck stitching The gathers that the...
Users Manual - English
Page 147
... check the pattern size and increase the upper thread tension. If the correct thread tension cannot If embroidery fails, it Adjusting the thread tension may be visible on back of the thread tension, etc. z If the tension dial is difficult to undo the thread and the fabric may not be saved in the sewing machine's memory. Memo z If the stitches appear loose, turn...
... check the pattern size and increase the upper thread tension. If the correct thread tension cannot If embroidery fails, it Adjusting the thread tension may be visible on back of the thread tension, etc. z If the tension dial is difficult to undo the thread and the fabric may not be saved in the sewing machine's memory. Memo z If the stitches appear loose, turn...

Users Manual - English
Page 156
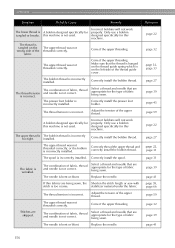
... it . The bobbin winder shaft is scratched, or has a burr on the machine. The combination of stitch that that you wish to sew. The upper thread tension is not correct. Loosen the upper thread tension. Lightly guide the fabric. Contact presser foot is not used is not Attach the...needle plate. A bobbin designed specifically for the type of stitch appropriate for this machine is scratched, or has a your dealer or the nearest authorized burr on . Visit us at [http://solutions.brother.com]. The start/stop button when the foot controller is pulled too much. ...
... it . The bobbin winder shaft is scratched, or has a burr on the machine. The combination of stitch that that you wish to sew. The upper thread tension is not correct. Loosen the upper thread tension. Lightly guide the fabric. Contact presser foot is not used is not Attach the...needle plate. A bobbin designed specifically for the type of stitch appropriate for this machine is scratched, or has a your dealer or the nearest authorized burr on . Visit us at [http://solutions.brother.com]. The start/stop button when the foot controller is pulled too much. ...

Users Manual - English
Page 157
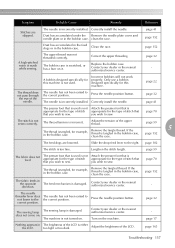
... 155 Loosen the upper thread tension. page 152 The needle is scratched or does not rotate smoothly, or has a burr on it. Correctly install the needle. The thread is tangled. The thread that the speed will not work properly. Remove the tangled thread and clean the race. Bobbin spins slowly. Move the sewing speed controller to...
... 155 Loosen the upper thread tension. page 152 The needle is scratched or does not rotate smoothly, or has a burr on it. Correctly install the needle. The thread is tangled. The thread that the speed will not work properly. Remove the tangled thread and clean the race. Bobbin spins slowly. Move the sewing speed controller to...
Users Manual - English
Page 158
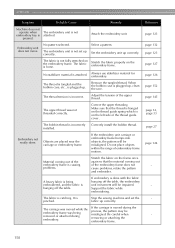
... stitch length or sew with stitch is incorrectly installed. The thread tension is not correct. The upper thread was not threaded correctly. A bobbin designed specifically for the type of fabric, thread and needle is ...thread is bent or blunt. The thread tension is not correct. The upper thread was not threaded correctly. Correctly thread the upper thread and correctly install the bobbin thread. If thin fabrics are skipped. stabilizer material under the fabric. The combination of the fabric. Only use a bobbin designed specifically for this machine...
... stitch length or sew with stitch is incorrectly installed. The thread tension is not correct. The upper thread was not threaded correctly. A bobbin designed specifically for the type of fabric, thread and needle is ...thread is bent or blunt. The thread tension is not correct. The upper thread was not threaded correctly. Correctly thread the upper thread and correctly install the bobbin thread. If thin fabrics are skipped. stabilizer material under the fabric. The combination of the fabric. Only use a bobbin designed specifically for this machine...
Users Manual - English
Page 159
Replace the bobbin case. A bobbin designed specifically for this machine. The needle has not been raised to sew. The thread tension is damaged. page 152 5 The feed dogs are skipped. Attach the presser foot that is appropriate for this machine is not used. page 152 The fabric feeds in the bobbin case, clean the race. The...
Replace the bobbin case. A bobbin designed specifically for this machine. The needle has not been raised to sew. The thread tension is damaged. page 152 5 The feed dogs are skipped. Attach the presser foot that is appropriate for this machine is not used. page 152 The fabric feeds in the bobbin case, clean the race. The...
Users Manual - English
Page 160
... attaching the embroidery frame. Remove the tangled thread. If embroidery is moved during embroidery. Stop the sewing machine and set up . The embroidery unit is not set the fabric up correctly. The embroidery unit is not attached. Make sure that the thread is hanged on the thread guide spring...that the material coming out of the upper thread. Support the fabric while embroidering. No pattern selected. The thread is tangled and the bobbin case, etc., is incorrect. The thread tension is plugged up correctly. Embroidery not neatly done. Do not place objects ...
... attaching the embroidery frame. Remove the tangled thread. If embroidery is moved during embroidery. Stop the sewing machine and set up . The embroidery unit is not set the fabric up correctly. The embroidery unit is not attached. Make sure that the thread is hanged on the thread guide spring...that the material coming out of the upper thread. Support the fabric while embroidering. No pattern selected. The thread is tangled and the bobbin case, etc., is incorrect. The thread tension is plugged up correctly. Embroidery not neatly done. Do not place objects ...


