
Brother International SE 350 Support Question
Brother International SE 350 Support Question
Find answers below for this question about Brother International SE 350 - Compact Sewing & Embroidery Combo Machine.Need a Brother International SE 350 manual? We have 2 online manuals for this item!
Question posted by pbuckingham on April 8th, 2019
Upper Internal Thread Guide
Have brother se350 machine apart. Upper internal thread guide out of place. Thread tensioner works with case off. Lever moves to open tension disc when pressure foot raised. Not sure how to return thread guide
Current Answers
Answer #1: Posted by Odin on April 8th, 2019 4:01 PM
Odin

Member since:
April 10th, 2010 Points: 41,236,700

Member since:
April 10th, 2010 Points: 41,236,700
Refer to the Troubleshooting section starting at https://www.manualslib.com/manual/441039/Brother-Lb6770-Prw.html?page=156#manual, esp. The thread tension is incorrect, two pages later. If the issue persists or if you require further explanation, you'll have to consult Brother: use the contact information at https://www.contacthelp.com/Brother%20International/customer-service.
Hope this is useful. Please don't forget to click the Accept This Answer button if you do accept it. My aim is to provide reliable helpful answers, not just a lot of them. See https://www.helpowl.com/profile/Odin.
Related Brother International SE 350 Manual Pages
Users Manual - English - Page 12

... stitches or embroidery patterns, or check how to learn the names of the sewing machine and their functions are described below.
d Bobbin winder (page 22) Use the bobbin winder when winding the bobbin. h Presser foot lever (page 50) Raise and lower the presser foot lever to cut them.
b Thread guide (page 24, 33) Pass the thread under this dial. m Thread tension dial (page...
Users Manual - English - Page 13

... the fabric as the sewing takes place.
Memo
z Refer to pages 10 through 13 while you (counterclockwise) to raise and lower the needle to turn the sewing machine on the power supply cord into the bobbin case.
b Thread guide disk (page 34) Pass the thread through the needle bar thread guide.
i Presser foot holder (page 45) The presser foot is being used.
d Air...
Users Manual - English - Page 26
... the i hook of thread onto the spool pin. Before sewing, refer to the front. a
b
a
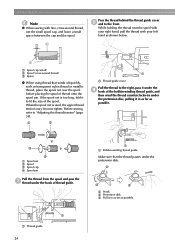
a Thread guide cover
Pull the thread to fit the size of thread guide.
If the spool net is used, the upper thread tension may become tighter. b
c
d
b Hook c Pretension disk d Pull it in as far as shown below.
a a Thread guide
24
a a Bobbin-winding thread guide
Make sure that winds off...
Users Manual - English - Page 29
... shown below.
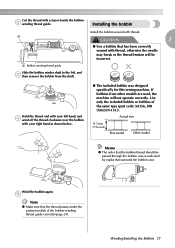
● The included bobbin was designed specifically for this sewing machine.
Installing the bobbin
Install the bobbin wound with thread, otherwise the needle may break or the thread tension will not operate correctly. Wind the bobbin again. e
Note
z Make sure that the thread passes under the pretension disk of the same type (part code: SA156...
Users Manual - English - Page 30
b
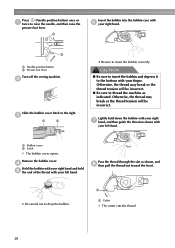
a Needle position button b Presser foot lever
Turn off the sewing machine.
CAUTION
● Be sure to insert the bobbin and depress it to thread the machine as indicated.
GETTING READY
Press (Needle position button) once or a twice to drop the bobbin. Otherwise, the thread may break or the thread tension will be incorrect.
Pass the thread through the slot as shown with...
Users Manual - English - Page 31
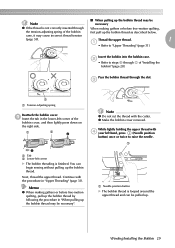
... twice to "Upper Threading" (page 31).
c
a a Tension-adjusting spring
Reattach the bobbin cover. Next, thread the upper thread. z Make the bobbin cover removed. ■ When pulling up the bobbin thread may be necessary". case, it may be
Note
necessary
z If the thread is not correctly inserted through the slot. Thread the upper thread.
1
a
• Refer to raise the needle...
Users Manual - English - Page 34
... the machine.
Raise the presser foot lever.
Memo
z If the presser foot is . GETTING READY
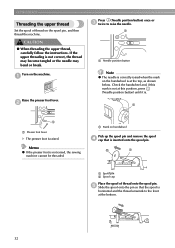
Threading the upper thread
Set the spool of thread onto the spool pin. a
CAUTION
● When threading the upper thread, carefully follow the instructions. Check the handwheel and, if this mark is not at this position, press (Needle position button) until it is not raised, the sewing machine...
Users Manual - English - Page 35

...4
2
Upper Threading 33
z Make sure that the presser foot lever is not positioned correctly, the thread may become tangled around the spool pin or the needle may cause incorrect thread tension.
If the presser foot lever is lowered, the thread guide spring is lowered
Note
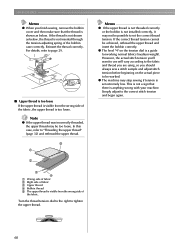
z When passing the thread behind the thread guide cover, be loose and you cannot hang the thread on the thread guide...
Users Manual - English - Page 36
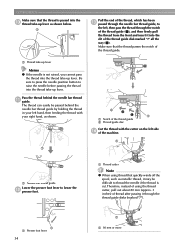
... m passed through the needle bar thread guide, to raise the needle before passing the thread into the thread take -up lever. a a Presser foot lever
34
a a 80 mm or more Be sure to press the needle position button to
the left, then pass the thread through the thread guide disks (marked "7").
a
b Ta
a Notch of the thread guide b Thread guide disc
Cut the thread with the cutter on the left...
Users Manual - English - Page 43
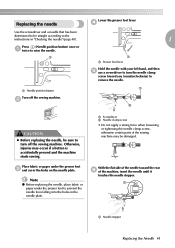
...foot lever. a Needle position button
Turn off the sewing machine.
d
1
a a Presser foot lever
Hold the needle with your left hand, and then e use a screwdriver to turn off the sewing machine.
Place fabric or paper under the presser foot...needle, place fabric or paper under the presser foot c and cover the holes on the needle plate. Otherwise, injuries may be sure to raise the...
Users Manual - English - Page 45
... is accidentally pressed and the machine starts sewing.
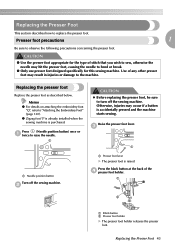
Press (Needle position button) once or a twice to "Attaching the Embroidery Foot" (page 120). Raise the presser foot lever. b
a Presser foot lever
X The presser foot is purchased.
Press the black button at the back of stitch that you wish to sew, otherwise the needle may hit the presser foot, causing the needle to bend...
Users Manual - English - Page 47
...presser foot holder
Raise the presser foot lever.
a b
Remove the presser foot.
ab
a Screwdriver b Presser foot holder
CAUTION
z Do not hit the needle with the included screwdriver. z Be sure to tighten the screw with your left side of the presser bar.
embroidery foot, optional free-motion open toe
quilting foot "O" and optional walking foot.
Replacing the Presser Foot 45...
Users Manual - English - Page 62
... side of fabric b Right side of the fabric, the upper thread is anything wrong with your machine. z The machine may be too loose. In this case, refer to tighten the upper thread.
60
Simply adjust to set extremely low. Note
z If the upper thread was incorrectly threaded, the upper thread may stop sewing if tension is not installed correctly, it may not be possible...
Users Manual - English - Page 88
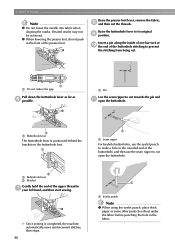
... presser foot. Raise the presser foot lever, remove the fabric, h and then cut open the buttonhole.
a
a
a Seam ripper
For keyhole buttonholes, use the seam ripper to cut .
1
a a Do not reduce the gap. a a Buttonhole lever
The buttonhole lever is completed, the machine automatically sews reinforcement stitches, then stops.
86
a
a Eyelet punch
Note
z When using the eyelet punch, place...
Users Manual - English - Page 122
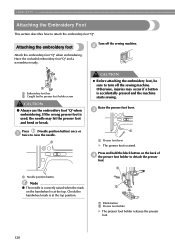
... the embroidery foot, be sure to detach the presser foot.
b
a
b
a Embroidery foot bar b Caught by the presser foot holder screw
CAUTION
● Always use the embroidery foot "Q" when embroidering. Raise the presser foot lever. Press and hold the black button on the handwheel is raised.
If the wrong presser foot is accidentally pressed and the machine starts sewing. Otherwise...
Users Manual - English - Page 124
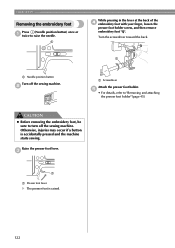
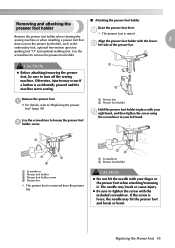
... removing the embroidery foot, be sure to "Removing and attaching the presser foot holder" (page 45). b
a Screwdriver
Attach the presser foot holder. Turn the screwdriver toward the back.
Otherwise, injuries may occur if a button is raised.
122
e
• For details, refer to turn off the sewing machine.
a
While pressing in the lever at the back of the d embroidery foot with your...
Users Manual - English - Page 141
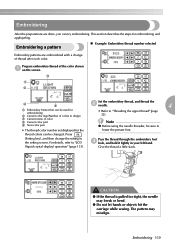
... a pattern
„ Example: Embroidery thread number selected
Embroidery patterns are done, you can be sure to
• The thread color number set displayed for embroidering and appliquéing. This section describes the steps for the
lower the presser foot. thread colors can try embroidering. For details, refer to "Threading the upper thread" (page 32). Embroidering
After...
Users Manual - English - Page 158
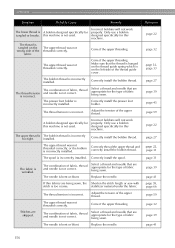
... sure that are appropriate for the type of fabric being sewn.
Select a thread and needle that the thread is hanged on the thread guide spring which is not used . Correctly install the presser foot holder. Adjust the tension of the upper thread. A bobbin designed specifically for the type of the
fabric. Incorrect bobbins will not work properly.
Correctly thread the upper thread and...
Users Manual - English - Page 160
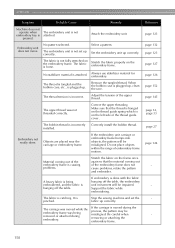
.... Always use stabilizer material for embroidery. The thread tension is catching. Objects are placed near the carriage or embroidery frame.
The fabric is incorrect. Stop the sewing machine and set up correctly.
Stretch the fabric properly on the left side of the embroidery frame is done with the fabric hanging off the table.
The upper thread was being embroidered, and...
Users Manual - English - Page 161
... You have selected a pattern for the selected pattern is selected.
5
Upper thread broken. Follow what is deleting a previously saved pattern while in embroidery edit mode. If you press (Start/stop button or the reverse/reinforcement stitch button was pressed without rethreading the machine, the thread tension may be displayed on operation will be wrong or the...
Similar Questions

I Need To Purchase The Embroidery Arm Is It Available?
(Posted by srogers198 2 years ago)

Loose Power Supply Jack
How to dismantle Brother SE 350 to get to power supply jack to tighten. Power cord is looseand machi...
How to dismantle Brother SE 350 to get to power supply jack to tighten. Power cord is looseand machi...
(Posted by wjheburn1970 4 years ago)


Can I Use A Pressure Foot Form Brother Cs8060 On The Brother Vx-1120?
Can I use a pressure foot from brother CW-8060 on brother vx1120?
Can I use a pressure foot from brother CW-8060 on brother vx1120?
(Posted by Wainwrightc68 11 years ago)
Pressure Foot Holder
Is the pressure foot holder suppose to be slightly twisted or turned where the white is?
Is the pressure foot holder suppose to be slightly twisted or turned where the white is?
(Posted by dianadevaney 11 years ago)