

Users Manual - English
Page 1
Computerized Embroidery and Sewing Machine Operation Manual Product Code 885-V31/V33 GETTING READY SEWING BASICS UTILITY STITCHES EMBROIDERY APPENDIX
Computerized Embroidery and Sewing Machine Operation Manual Product Code 885-V31/V33 GETTING READY SEWING BASICS UTILITY STITCHES EMBROIDERY APPENDIX

Users Manual - English
Page 3
... the various functions. Important Safety Instructions Please read the "Important Safety Instructions", and then study this embroidery and sewing machine. Lifting the sewing machine by its handle. This machine is cut. 3 Never operate this manual, or if you have finished reading this manual, store it where it out of burns, fire, electric shock, or injury to persons. 2 Always...
... the various functions. Important Safety Instructions Please read the "Important Safety Instructions", and then study this embroidery and sewing machine. Lifting the sewing machine by its handle. This machine is cut. 3 Never operate this manual, or if you have finished reading this manual, store it where it out of burns, fire, electric shock, or injury to persons. 2 Always...
Users Manual - English
Page 4
...Do not operate where aerosol (spray) products are subject to change without notice. If the problem persists, please consult your local authorized Brother dealer. Do not use bent or damaged needles. • Keep fingers away from all moving parts. Benzene, thinner, and scouring ... event a malfunction occurs or adjustment is required, first follow the troubleshooting table in the back of this sewing machine on an unstable surface, such as described in this manual. Save these instructions. Use accessories recommended by or near children. • The plastic bag that you ...
...Do not operate where aerosol (spray) products are subject to change without notice. If the problem persists, please consult your local authorized Brother dealer. Do not use bent or damaged needles. • Keep fingers away from all moving parts. Benzene, thinner, and scouring ... event a malfunction occurs or adjustment is required, first follow the troubleshooting table in the back of this sewing machine on an unstable surface, such as described in this manual. Save these instructions. Use accessories recommended by or near children. • The plastic bag that you ...
Users Manual - English
Page 11
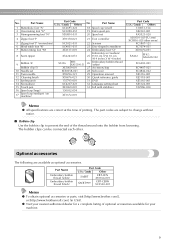
... Embroidery bobbin thread (black) Part Code U.S.A. / Canada Other SAEBT EBT-CEN X81164-001 SAEBT999 EBT-CEBN XC5520-001 Memo z To obtain optional accessories or parts, visit [http://www.brother.com...spool pin 20 Spool net 4 Zipper foot "I" X59370-021 21 Foot controller 5 Zigzag foot "J" (on machine) 6 Blind stitch foot "R" 7 Button fitting foot "M" 8 Seam ripper 9 Bobbin (4) Bobbin clip (3)... 24 Embroidery foot "Q" Embroidery set (medium) 25 H 10 cm X W 10 cm (H 4 inches X W 4 inches) 26 Embroidery bobbin thread (white) 27 Accessory bag 28 Soft cover 29 Operation manual 30 ...
... Embroidery bobbin thread (black) Part Code U.S.A. / Canada Other SAEBT EBT-CEN X81164-001 SAEBT999 EBT-CEBN XC5520-001 Memo z To obtain optional accessories or parts, visit [http://www.brother.com...spool pin 20 Spool net 4 Zipper foot "I" X59370-021 21 Foot controller 5 Zigzag foot "J" (on machine) 6 Blind stitch foot "R" 7 Button fitting foot "M" 8 Seam ripper 9 Bobbin (4) Bobbin clip (3)... 24 Embroidery foot "Q" Embroidery set (medium) 25 H 10 cm X W 10 cm (H 4 inches X W 4 inches) 26 Embroidery bobbin thread (white) 27 Accessory bag 28 Soft cover 29 Operation manual 30 ...

Users Manual - English
Page 23
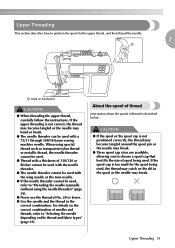
.../ setting bobbin thread / needle replacement / embroidery unit attachment / Example: Upper threading embroidery frame attachment / embroidery foot attachment / presser foot replacement on the sewing machine. X The sewing machine help key) on . c a b ...cd After you return to the item 1 selection screen. X The initial stitch screen appears again. Memo z For details on the LCD display for the selected topic appears. Checking machine operating Press (Next page key) to switch to the corresponding page in this Operation Manual...
.../ setting bobbin thread / needle replacement / embroidery unit attachment / Example: Upper threading embroidery frame attachment / embroidery foot attachment / presser foot replacement on the sewing machine. X The sewing machine help key) on . c a b ...cd After you return to the item 1 selection screen. X The initial stitch screen appears again. Memo z For details on the LCD display for the selected topic appears. Checking machine operating Press (Next page key) to switch to the corresponding page in this Operation Manual...
Users Manual - English
Page 33
... on the correct combination of needles and threads, refer to position the spool for the spool being used with a 75/11 through 100/16 home sewing machine needle. If the upper threading is too small for the upper thread, and then thread the needle. 1 a a Mark on handwheel CAUTION ● ... on the slit in the spool or the needle may break. ● Three spool cap sizes are available, allowing you to "Threading the needle manually (without using special thread such as transparent nylon thread or metallic thread, the needle threader cannot be used. ● Thread with a thickness of ...
... on the correct combination of needles and threads, refer to position the spool for the spool being used with a 75/11 through 100/16 home sewing machine needle. If the upper threading is too small for the upper thread, and then thread the needle. 1 a a Mark on handwheel CAUTION ● ... on the slit in the spool or the needle may break. ● Three spool cap sizes are available, allowing you to "Threading the needle manually (without using special thread such as transparent nylon thread or metallic thread, the needle threader cannot be used. ● Thread with a thickness of ...
Users Manual - English
Page 38
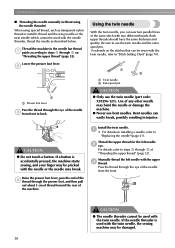
... and quality. Be sure to use the twin needle (part code: X59296-121). If a button is used with the twin needle, the sewing machine may be pricked with the needle or the needle may break. a • For details on "Threading the upper thread" (page 32). ...Install the twin needle. If the needle threader is accidentally pressed, the machine starts sewing, and your finger may bend the needle or damage the machine. ● Never use bent needles. GETTING READY ■ Threading the needle manually (without using the needle threader) When using special thread, such as ...
... and quality. Be sure to use the twin needle (part code: X59296-121). If a button is used with the twin needle, the sewing machine may be pricked with the needle or the needle may break. a • For details on "Threading the upper thread" (page 32). ...Install the twin needle. If the needle threader is accidentally pressed, the machine starts sewing, and your finger may bend the needle or damage the machine. ● Never use bent needles. GETTING READY ■ Threading the needle manually (without using the needle threader) When using special thread, such as ...

Users Manual - English
Page 39
...CAUTION ● The needle threader cannot be used with the twin needle. Then, thread the upper thread. Attach zigzag foot "J". g For details on the sewing machine and select a h stitch. • For stitch selection see "Selecting stitching" (page 49). • See "Stitch Setting Chart" (page 70) for ...to steps g through the needle f bar thread guide, manually thread the right needle. Upper Threading 37 Insert the extra spool pin into the end of the spool. If the needle threader is used with the twin needle, the sewing machine may be damaged. If bunched stitches occur, use a ...
...CAUTION ● The needle threader cannot be used with the twin needle. Then, thread the upper thread. Attach zigzag foot "J". g For details on the sewing machine and select a h stitch. • For stitch selection see "Selecting stitching" (page 49). • See "Stitch Setting Chart" (page 70) for ...to steps g through the needle f bar thread guide, manually thread the right needle. Upper Threading 37 Insert the extra spool pin into the end of the spool. If the needle threader is used with the twin needle, the sewing machine may be damaged. If bunched stitches occur, use a ...
Users Manual - English
Page 72
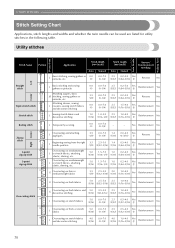
...Zigzag stitch 7 J Overcasting and attaching appliqués 3.5 0.0-7.0 1.4 0.0-4.0 Yes (1/8) (0-1/4) (1/16) (0-3/16) (J) Reverse No 8 J Beginning sewing from the right needle position 3.5 (1/8) 2.5-5.0 1.4 0.3-4.0 Yes (3/32-3/16) (1/16) (1/64-3/16) (J) Reinforcement Yes 9 2-point zigzag stitch ...Foot Presser Foot Stitch Name Pattern Application Stitch Width [mm (inch)] Auto Manual 1 J Basic stitching, sewing gathers or pintucks, etc. 0.0 (0) 0.0-7.0 (0-1/4) Stitch Length [mm (inch)] Auto Manual Reverse/ Reinforcement Stitching 2.5 0.2-5.0 Yes (3/32) (1/64-3/16) (J) ...
...Zigzag stitch 7 J Overcasting and attaching appliqués 3.5 0.0-7.0 1.4 0.0-4.0 Yes (1/8) (0-1/4) (1/16) (0-3/16) (J) Reverse No 8 J Beginning sewing from the right needle position 3.5 (1/8) 2.5-5.0 1.4 0.3-4.0 Yes (3/32-3/16) (1/16) (1/64-3/16) (J) Reinforcement Yes 9 2-point zigzag stitch ...Foot Presser Foot Stitch Name Pattern Application Stitch Width [mm (inch)] Auto Manual 1 J Basic stitching, sewing gathers or pintucks, etc. 0.0 (0) 0.0-7.0 (0-1/4) Stitch Length [mm (inch)] Auto Manual Reverse/ Reinforcement Stitching 2.5 0.2-5.0 Yes (3/32) (1/64-3/16) (J) ...
Users Manual - English
Page 73
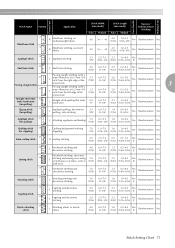
... on mediumweight fabrics R Blind hem stitching on stretch fabrics Stitch Width [mm (inch)] Stitch Length [mm (inch)] Auto Manual Auto Manual Reverse/ Reinforcement Stitching 00 3← - →3 2.0 (1/16) 1.0-3.5 (1/16-1/8) No Reinforcement No 00 3← -...stitching and decorative stitching 4.0 (3/16) 0.0-7.0 (0-1/4) 1.2 0.2-4.0 Yes (1/16) (1/64-3/16) (J) Reinforcement No Patchwork stitching, decorative J stitching and sewing overcasting on both pieces of fabric, such as 5.0 (3/16) 2.5-7.0 (3/32-1/4) 2.5 1.0-4.0 Yes (3/32) (1/16-3/16) (J) Reinforcement No with...
... on mediumweight fabrics R Blind hem stitching on stretch fabrics Stitch Width [mm (inch)] Stitch Length [mm (inch)] Auto Manual Auto Manual Reverse/ Reinforcement Stitching 00 3← - →3 2.0 (1/16) 1.0-3.5 (1/16-1/8) No Reinforcement No 00 3← -...stitching and decorative stitching 4.0 (3/16) 0.0-7.0 (0-1/4) 1.2 0.2-4.0 Yes (1/16) (1/64-3/16) (J) Reinforcement No Patchwork stitching, decorative J stitching and sewing overcasting on both pieces of fabric, such as 5.0 (3/16) 2.5-7.0 (3/32-1/4) 2.5 1.0-4.0 Yes (3/32) (1/16-3/16) (J) Reinforcement No with...
Users Manual - English
Page 74
... Auto 4.0 (3/16) Manual 0.0-7.0 (0-1/4) Stitch Length [mm (inch)] Auto Manual Reverse/ Reinforcement Stitching ...3.0 (1/8) 2.0-4.0 (1/16-3/16) No Reinforcement No 36 J Decorative stitching 4.0 (3/16) 0.0-7.0 (0-1/4) 2.5 1.0-4.0 Yes (3/32) (1/16-3/16) (J) Reinforcement No 37 J Decorative stitching 5.5 (7/32) 0.0-7.0 (0-1/4) 1.6 1.0-4.0 Yes (1/16) (1/16-3/16) (J) Reinforcement No 38 N Decorative stitching and elastic-attaching 5.0 (3/16) 1.5-7.0 (1/16-1/4) 1.0 0.2-4.0 Yes (1/16) (1/64-3/16) (J) Reinforcement No 39 Lace sewing...
... Auto 4.0 (3/16) Manual 0.0-7.0 (0-1/4) Stitch Length [mm (inch)] Auto Manual Reverse/ Reinforcement Stitching ...3.0 (1/8) 2.0-4.0 (1/16-3/16) No Reinforcement No 36 J Decorative stitching 4.0 (3/16) 0.0-7.0 (0-1/4) 2.5 1.0-4.0 Yes (3/32) (1/16-3/16) (J) Reinforcement No 37 J Decorative stitching 5.5 (7/32) 0.0-7.0 (0-1/4) 1.6 1.0-4.0 Yes (1/16) (1/16-3/16) (J) Reinforcement No 38 N Decorative stitching and elastic-attaching 5.0 (3/16) 1.5-7.0 (1/16-1/4) 1.0 0.2-4.0 Yes (1/16) (1/64-3/16) (J) Reinforcement No 39 Lace sewing...
Users Manual - English
Page 75
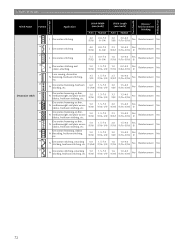
...openings and areas A where the seam easily comes loose 2.0 (1/16) 1.0-3.0 (1/16-1/8) 0.4 (1/64) 0.3-1.0 (1/64-1/16) No Automatic reinforcement No M Button sewing 3.5 2.5-4.5 (1/8) (3/32-3/16) - - ting the fabric 3.5 (1/8) 3.5-5.0 (1/8-3/16) 2.0 (1/16) 1.0-4.0 (1/16-3/16) No Reinforcement No S Overcasting ...A Horizontal buttonholes on thin and mediumweight fabrics Stitch Width [mm (inch)] Stitch Length [mm (inch)] Auto Manual Auto Manual Reverse/ Reinforcement Stitching 5.0 (3/16) 3.0-5.0 (1/8-3/16) 0.5 (1/32) 0.2-1.0 (1/64-1/16) No Automatic reinforcement No...
...openings and areas A where the seam easily comes loose 2.0 (1/16) 1.0-3.0 (1/16-1/8) 0.4 (1/64) 0.3-1.0 (1/64-1/16) No Automatic reinforcement No M Button sewing 3.5 2.5-4.5 (1/8) (3/32-3/16) - - ting the fabric 3.5 (1/8) 3.5-5.0 (1/8-3/16) 2.0 (1/16) 1.0-4.0 (1/16-3/16) No Reinforcement No S Overcasting ...A Horizontal buttonholes on thin and mediumweight fabrics Stitch Width [mm (inch)] Stitch Length [mm (inch)] Auto Manual Auto Manual Reverse/ Reinforcement Stitching 5.0 (3/16) 3.0-5.0 (1/8-3/16) 0.5 (1/32) 0.2-1.0 (1/64-1/16) No Automatic reinforcement No...
Users Manual - English
Page 76
... for sewing overcasting stitch is explained according to the presser foot that fray easily Stitch Width [mm (inch)] Auto Manual Stitch Length [mm (inch)] Auto Manual Presser Foot... 3.5 2.0 (1/8) (1/16) 2.5-5.0 (3/32-3/16) 1.0-4.0 (1/16-3/16) G 5.0 2.5 (3/16) (3/32) 3.5-5.0 (1/8-3/16) CAUTION ● Be sure to turn off the main power before replacing the pressor foot. b • For details, refer to "Replacing the presser foot" (page 43). Otherwise, injuries may occur if (Start/stop button) is accidentally pressed and the machine starts sewing...
... for sewing overcasting stitch is explained according to the presser foot that fray easily Stitch Width [mm (inch)] Auto Manual Stitch Length [mm (inch)] Auto Manual Presser Foot... 3.5 2.0 (1/8) (1/16) 2.5-5.0 (3/32-3/16) 1.0-4.0 (1/16-3/16) G 5.0 2.5 (3/16) (3/32) 3.5-5.0 (1/8-3/16) CAUTION ● Be sure to turn off the main power before replacing the pressor foot. b • For details, refer to "Replacing the presser foot" (page 43). Otherwise, injuries may occur if (Start/stop button) is accidentally pressed and the machine starts sewing...
Users Manual - English
Page 77
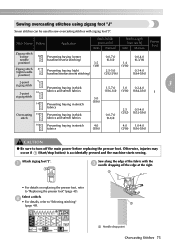
... if (Start/stop button) is accidentally pressed and the machine starts sewing. a Needle drop point Overcasting Stitches 75 a • For details on replacing the presser foot, refer to "Selecting stitching" a (page 49). a J Sew along the edge of the fabric with zigzag foot "J". Select... a stitch. Stitch Name Pattern Application Stitch Width [mm (inch)] Auto Manual Stitch Length [mm (inch)] Auto Manual Presser Foot Zigzag stitch (center 7 needle position) Zigzag ...
... if (Start/stop button) is accidentally pressed and the machine starts sewing. a Needle drop point Overcasting Stitches 75 a • For details on replacing the presser foot, refer to "Selecting stitching" a (page 49). a J Sew along the edge of the fabric with zigzag foot "J". Select... a stitch. Stitch Name Pattern Application Stitch Width [mm (inch)] Auto Manual Stitch Length [mm (inch)] Auto Manual Presser Foot Zigzag stitch (center 7 needle position) Zigzag ...

Users Manual - English
Page 78
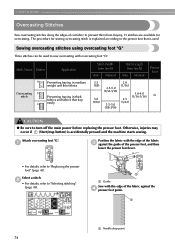
...the side cutter so that side cutter pin c is attached. Remove the presser foot. UTILITY STITCHES Sewing overcasting stitches using the needle threader. Note z Thread the needle manually when using the side cutter, or only attach the side cutter after threading the needle using the ...43). Five stitches can be used to sew overcasting stitches with the notch in presser foot holder b Pin X The side cutter is aligned with the side cutter. Hook the connecting fork of the fabric is accidentally pressed and the machine starts sewing. a • For details on replacing ...
...the side cutter so that side cutter pin c is attached. Remove the presser foot. UTILITY STITCHES Sewing overcasting stitches using the needle threader. Note z Thread the needle manually when using the side cutter, or only attach the side cutter after threading the needle using the ...43). Five stitches can be used to sew overcasting stitches with the notch in presser foot holder b Pin X The side cutter is aligned with the side cutter. Hook the connecting fork of the fabric is accidentally pressed and the machine starts sewing. a • For details on replacing ...
Users Manual - English
Page 80
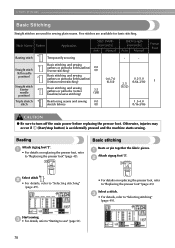
... Name Pattern Application 6 Basting stitch Temporarily securing Stitch Width [mm (inch)] Auto Manual Stitch Length [mm (inch)] Auto Manual - - Otherwise, injuries may occur if (Start/stop button) is accidentally pressed and the machine starts sewing. a Attach zigzag foot "J". c • For details, refer to sew" (page 51). 78 a • For details on replacing the presser foot...
... Name Pattern Application 6 Basting stitch Temporarily securing Stitch Width [mm (inch)] Auto Manual Stitch Length [mm (inch)] Auto Manual - - Otherwise, injuries may occur if (Start/stop button) is accidentally pressed and the machine starts sewing. a Attach zigzag foot "J". c • For details, refer to sew" (page 51). 78 a • For details on replacing the presser foot...

Users Manual - English
Page 82
... to mark on stretch fabrics Stitch Width [mm (inch)] Auto Manual Stitch Length [mm (inch)] Auto Manual Presser Foot 00 3← - →3 2.0 (1/16) 1.0-3.5 (1/16-1/8) R CAUTION ● Be sure to slide onto the arm or the length is accidentally pressed and the machine starts sewing. a Right side of fabric b Bottom side Fold the fabric along...
... to mark on stretch fabrics Stitch Width [mm (inch)] Auto Manual Stitch Length [mm (inch)] Auto Manual Presser Foot 00 3← - →3 2.0 (1/16) 1.0-3.5 (1/16-1/8) R CAUTION ● Be sure to slide onto the arm or the length is accidentally pressed and the machine starts sewing. a Right side of fabric b Bottom side Fold the fabric along...
Users Manual - English
Page 85
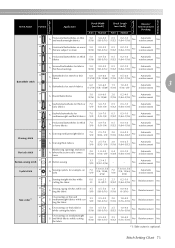
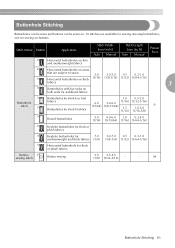
... 56 Keyhole buttonholes for 7.0 3.0-7.0 0.5 0.3-1.0 mediumweight and thick fabrics (1/4) (1/8-1/4) (1/32) (1/64-1/16) 57 Horizontal buttonhole for sewing on areas that are available for sewing one-step buttonholes, one for thick or plush fabrics Button- 61 sewing stitch Button sewing 3.5 2.5-4.5 (1/8) (3/32-3/16) - - Stitch Name Pattern Application 48 Horizontal buttonholes on thin and mediumweight fabrics Stitch Width...
... 56 Keyhole buttonholes for 7.0 3.0-7.0 0.5 0.3-1.0 mediumweight and thick fabrics (1/4) (1/8-1/4) (1/32) (1/64-1/16) 57 Horizontal buttonhole for sewing on areas that are available for sewing one-step buttonholes, one for thick or plush fabrics Button- 61 sewing stitch Button sewing 3.5 2.5-4.5 (1/8) (3/32-3/16) - - Stitch Name Pattern Application 48 Horizontal buttonholes on thin and mediumweight fabrics Stitch Width...

Users Manual - English
Page 92
...of the fabric. 1 • For details on both pieces of the fabric. Inserting a centered zipper Using a basting stitch, continue sewing to the c edge of fabric butted against each other . 2 1 3 a Right side of fabric b Stitching c End of... described below. Stitching is accidentally pressed and the machine starts sewing. Stitch Name Pattern Application Straight stitch (center 3 needle position) Attaching zippers Sewing concealed seams and pintucks Stitch Width [mm (inch)] Auto Manual Stitch Length [mm (inch)] Auto Manual Presser Foot 3.5 0.0-7.0 2.5 0.2-5.0 (1/8) (0-1/4) ...
...of the fabric. 1 • For details on both pieces of the fabric. Inserting a centered zipper Using a basting stitch, continue sewing to the c edge of fabric butted against each other . 2 1 3 a Right side of fabric b Stitching c End of... described below. Stitching is accidentally pressed and the machine starts sewing. Stitch Name Pattern Application Straight stitch (center 3 needle position) Attaching zippers Sewing concealed seams and pintucks Stitch Width [mm (inch)] Auto Manual Stitch Length [mm (inch)] Auto Manual Presser Foot 3.5 0.0-7.0 2.5 0.2-5.0 (1/8) (0-1/4) ...

Users Manual - English
Page 97
... zigzag foot "J". Otherwise, injuries may occur if (Start/stop button) is accidentally pressed and the machine starts sewing. Stitch Name Pattern Application Triple stretch 4 stitch 5 Stretch stitch 2-point zigzag 9 stitch 3-point ... to turn off the main power before replacing the pressor foot. CAUTION ● Be sure to stretch fabrics Stitch Width [mm (inch)] Auto Manual 0.0 0.0-7.0 (0) (0-1/4) Stitch Length [mm (inch)] Auto Manual Presser Foot 2.5 1.5-4.0 (3/32) (1/16-3/16) 1.0 1.0-3.0 2.5 1.0-4.0 (1/16) (1/16-1/8) (3/32) (1/16-3/16) J 5.0 1.5-7.0 (3/16) (1/16-1/4)...
... zigzag foot "J". Otherwise, injuries may occur if (Start/stop button) is accidentally pressed and the machine starts sewing. Stitch Name Pattern Application Triple stretch 4 stitch 5 Stretch stitch 2-point zigzag 9 stitch 3-point ... to turn off the main power before replacing the pressor foot. CAUTION ● Be sure to stretch fabrics Stitch Width [mm (inch)] Auto Manual 0.0 0.0-7.0 (0) (0-1/4) Stitch Length [mm (inch)] Auto Manual Presser Foot 2.5 1.5-4.0 (3/32) (1/16-3/16) 1.0 1.0-3.0 2.5 1.0-4.0 (1/16) (1/16-1/8) (3/32) (1/16-3/16) J 5.0 1.5-7.0 (3/16) (1/16-1/4)...


