
Users Manual - English
Page 3
... ACCESSORIES 1. 2. 3. 4. ABOUT BOBBIN WORK You can create designs, which gives a three-dimensional appearance to be fed through the sewing machine needle and sewing on the wrong side of the fabric, by winding the bobbin with tabs (*See Note.) Screwdriver (small) (X55468-051) CD-ROM (Contains the Operation Manual ...
... ACCESSORIES 1. 2. 3. 4. ABOUT BOBBIN WORK You can create designs, which gives a three-dimensional appearance to be fed through the sewing machine needle and sewing on the wrong side of the fabric, by winding the bobbin with tabs (*See Note.) Screwdriver (small) (X55468-051) CD-ROM (Contains the Operation Manual ...
Operation Manual
Page 1
GETTING READY 1 SEWING BASICS 2 UTILITY STITCHES 3 EMBROIDERY 4 APPENDIX 5 Computerized Embroidery and Sewing Machine Operation Manual Product Code: 885-U01/U04 Be sure to read this document nearby for future reference. We recommend that you keep this document before using the machine.
GETTING READY 1 SEWING BASICS 2 UTILITY STITCHES 3 EMBROIDERY 4 APPENDIX 5 Computerized Embroidery and Sewing Machine Operation Manual Product Code: 885-U01/U04 Be sure to read this document nearby for future reference. We recommend that you keep this document before using the machine.

Operation Manual
Page 3
... is spilled on the unit. Keep ventilation openings of power source you are being sewn may damage the machine or result in this sewing machine on the rating label. Return the machine to the nearest authorized dealer or service center for use if you notice anything unusual, such as an odor... when cleaning, when making any sudden or careless movements, otherwise you may fall, resulting in the country of the electrical outlet. Lifting the sewing machine by its handle. Do not connect it by any opening. • Do not operate where aerosol (spray) products are leaving the...
... is spilled on the unit. Keep ventilation openings of power source you are being sewn may damage the machine or result in this sewing machine on the rating label. Return the machine to the nearest authorized dealer or service center for use if you notice anything unusual, such as an odor... when cleaning, when making any sudden or careless movements, otherwise you may fall, resulting in the country of the electrical outlet. Lifting the sewing machine by its handle. Do not connect it by any opening. • Do not operate where aerosol (spray) products are leaving the...
Operation Manual
Page 4
... detergents to the danger of the operation manual to the needle. If the problem persists, please consult your local authorized Brother dealer. Use accessories recommended by the manufacturer as contained in this sewing machine was supplied in this manual. Special care is required, first follow careful instruction when freehand stitching so that this...
... detergents to the danger of the operation manual to the needle. If the problem persists, please consult your local authorized Brother dealer. Use accessories recommended by the manufacturer as contained in this sewing machine was supplied in this manual. Special care is required, first follow careful instruction when freehand stitching so that this...
Operation Manual
Page 7
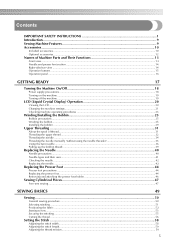
...Sewing Machine Features ...9 Accessories ...10 Included accessories ...10 Optional accessories ...12 Names of Machine Parts and Their Functions 13 Front view ...13 Needle and presser foot section ...14 Right-side/rear view ...14 Operation buttons ...15 Operation panel ...16 GETTING READY 17 Turning the Machine...Removing and attaching the presser foot holder 46 Sewing Cylindrical Pieces 47 Free-arm sewing...47 SEWING BASICS 49 Sewing ...50 General sewing procedure ...50 Selecting stitching ...51 Positioning the fabric ...52 Starting to sew...53 Securing the stitching ...55 Cutting the ...
...Sewing Machine Features ...9 Accessories ...10 Included accessories ...10 Optional accessories ...12 Names of Machine Parts and Their Functions 13 Front view ...13 Needle and presser foot section ...14 Right-side/rear view ...14 Operation buttons ...15 Operation panel ...16 GETTING READY 17 Turning the Machine...Removing and attaching the presser foot holder 46 Sewing Cylindrical Pieces 47 Free-arm sewing...47 SEWING BASICS 49 Sewing ...50 General sewing procedure ...50 Selecting stitching ...51 Positioning the fabric ...52 Starting to sew...53 Securing the stitching ...55 Cutting the ...

Operation Manual
Page 11
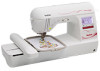
...it can be cut automatically after sewing (page 62). Sewing Machine Features 1 2 4 3 6 5 a Simple bobbin-winding The bobbin can start sewing without pulling up the bobbin thread (page 29). Before using this sewing machine, carefully read the "IMPORTANT SAFETY INSTRUCTIONS" (page 1), and then study this sewing machine. In addition, after you for ...your knee, leaving both hands free to raise and lower the presser foot with thread (page 25). Introduction / Sewing Machine Features 9 c Quick-set bobbin You can quickly and easily be accessed for the correct operation of the various functions.
...it can be cut automatically after sewing (page 62). Sewing Machine Features 1 2 4 3 6 5 a Simple bobbin-winding The bobbin can start sewing without pulling up the bobbin thread (page 29). Before using this sewing machine, carefully read the "IMPORTANT SAFETY INSTRUCTIONS" (page 1), and then study this sewing machine. In addition, after you for ...your knee, leaving both hands free to raise and lower the presser foot with thread (page 25). Introduction / Sewing Machine Features 9 c Quick-set bobbin You can quickly and easily be accessed for the correct operation of the various functions.
Operation Manual
Page 15
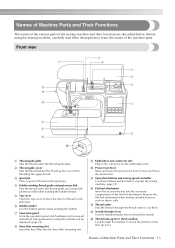
... f Bobbin winder Use the bobbin winder when winding the bobbin. i Embroidery unit connector slot Plug in the connector for using the sewing machine, carefully read these buttons and the slide to place the spool of the flat bed attachment. j Presser foot lever Raise and lower... the presser foot lever to cut them. Names of the sewing machine and their functions are described below. h Knee lifter mounting slot Insert the knee lifter into the accessory compartment of thread on the...
... f Bobbin winder Use the bobbin winder when winding the bobbin. i Embroidery unit connector slot Plug in the connector for using the sewing machine, carefully read these buttons and the slide to place the spool of the flat bed attachment. j Presser foot lever Raise and lower... the presser foot lever to cut them. Names of the sewing machine and their functions are described below. h Knee lifter mounting slot Insert the knee lifter into the accessory compartment of thread on the...
Operation Manual
Page 16
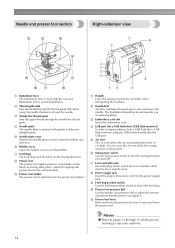
... when using the needle threader to adjust the amount of the foot controller cable into the foot controller jack. a Handle Carry the sewing machine by its handle when transporting the machine. h Power supply jack Insert the plug on the power cord into the USB port. Memo z Refer to pages 13 through 16 ... e Air vent The air vent allows the air surrounding the motor to lower the feed dogs. Do not cover the air vent while the sewing machine is marked with the one-step buttonhole foot to raise and lower the presser foot. Needle and presser foot section Right-side/rear view a ...
... when using the needle threader to adjust the amount of the foot controller cable into the foot controller jack. a Handle Carry the sewing machine by its handle when transporting the machine. h Power supply jack Insert the plug on the power cord into the USB port. Memo z Refer to pages 13 through 16 ... e Air vent The air vent allows the air surrounding the motor to lower the feed dogs. Do not cover the air vent while the sewing machine is marked with the one-step buttonhole foot to raise and lower the presser foot. Needle and presser foot section Right-side/rear view a ...
Operation Manual
Page 17
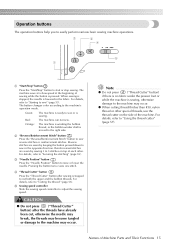
... stitches are sewn by keeping the button pressed down to the machine may occur. c "Needle Position" button Press the "Needle Position" button to easily perform various basic sewing machine operations. CAUTION ● Do not press ("Thread Cutter" button) after sewing is sewing, otherwise damage to sew in the fabric. Operation buttons The operation buttons help you...
... stitches are sewn by keeping the button pressed down to the machine may occur. c "Needle Position" button Press the "Needle Position" button to easily perform various basic sewing machine operations. CAUTION ● Do not press ("Thread Cutter" button) after sewing is sewing, otherwise damage to sew in the fabric. Operation buttons The operation buttons help you...

Operation Manual
Page 18
... stop position, the buzzer sound, and more. h f Utility stitch key Press this key to design a stitch pattern using the sewing machine. Displays simple explanations of setting upper thread / bobbin winding / setting bobbin thread / needle replacement / embroidery unit attachment / embroidery ...return to enter character embroidery, combined stitch patterns, My Custom Stitch patterns, etc into the sewing machine memory. c Previous page key Displays the previous screen when there are items that are displayed. i Sewing machine help on the LCD. a c d b e f i g a LCD (liquid crystal...
... stop position, the buzzer sound, and more. h f Utility stitch key Press this key to design a stitch pattern using the sewing machine. Displays simple explanations of setting upper thread / bobbin winding / setting bobbin thread / needle replacement / embroidery unit attachment / embroidery ...return to enter character embroidery, combined stitch patterns, My Custom Stitch patterns, etc into the sewing machine memory. c Previous page key Displays the previous screen when there are items that are displayed. i Sewing machine help on the LCD. a c d b e f i g a LCD (liquid crystal...

Operation Manual
Page 20
... on the cord may result. ● Do not touch the plug with many other power sources may result. ● When unplugging the machine, always turn the sewing machine on the power cord into an electrical outlet that the plugs on the power cord are firmly inserted into the electrical outlet and the... power supply jack on the machine. ● Do not insert the plug on and off. Otherwise a fire may damage the cord and cause fire...
... on the cord may result. ● Do not touch the plug with many other power sources may result. ● When unplugging the machine, always turn the sewing machine on the power cord into an electrical outlet that the plugs on the power cord are firmly inserted into the electrical outlet and the... power supply jack on the machine. ● Do not insert the plug on and off. Otherwise a fire may damage the cord and cause fire...

Operation Manual
Page 21
...does not fit, contact a qualified electrician to correctly operate the machine. (For U.S.A. When restarting the sewing machine, follow the necessary procedure to install the proper outlet. To reduce the risk of the machine. Make sure that the sewing machine is intended to fit in a polarized outlet only one blade...plug in the outlet, reverse the plug. Grasp the plug when unplugging the power cord. In addition, before transporting the sewing machine to another location, be sure to turn the machine on (set it to " "). 1 a Power supply jack Press the right side of the main power switch c...
...does not fit, contact a qualified electrician to correctly operate the machine. (For U.S.A. When restarting the sewing machine, follow the necessary procedure to install the proper outlet. To reduce the risk of the machine. Make sure that the sewing machine is intended to fit in a polarized outlet only one blade...plug in the outlet, reverse the plug. Grasp the plug when unplugging the power cord. In addition, before transporting the sewing machine to another location, be sure to turn the machine on (set it to " "). 1 a Power supply jack Press the right side of the main power switch c...
Operation Manual
Page 22
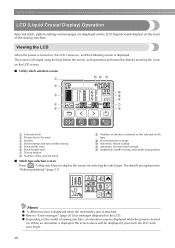
...an animation is attached. z Depending on the model of the sewing machine. The details are displayed on the LCD (liquid crystal display) on the front of sewing machine, an animation may be used c Stitches d Stitch settings and twin needle sewing e Stitch width (mm) f Stitch length (mm) g ... are explained in the selected stitch type j Horizontal mirror image k Automatic thread cutting l Automatic reverse/reinforcement m Single/twin needle sewing and needle stop position ■ Stitch type selection screen Press (Utility stitch key) to display the screen for messages displayed on ...
...an animation is attached. z Depending on the model of the sewing machine. The details are displayed on the LCD (liquid crystal display) on the front of sewing machine, an animation may be used c Stitches d Stitch settings and twin needle sewing e Stitch width (mm) f Stitch length (mm) g ... are explained in the selected stitch type j Horizontal mirror image k Automatic thread cutting l Automatic reverse/reinforcement m Single/twin needle sewing and needle stop position ■ Stitch type selection screen Press (Utility stitch key) to display the screen for messages displayed on ...
Operation Manual
Page 23
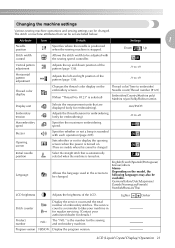
... controller. Program version VERSION: Display the program version. Attribute Icon Details Settings 1 Needle position Specifies where the needle is positioned when the sewing machine is turned on . (There are models where this cannot be changed . Buzzer Opening screen Initial needle position Language Specifies whether or not a ...Thread color display Adjusts the left and right position of the pattern (page 136). LCD (Liquid Crystal Display) Operation 21 Changing the machine settings Various sewing machine operations and sewing settings can be set are listed below. The stitch or...
... controller. Program version VERSION: Display the program version. Attribute Icon Details Settings 1 Needle position Specifies where the needle is positioned when the sewing machine is turned on . (There are models where this cannot be changed . Buzzer Opening screen Initial needle position Language Specifies whether or not a ...Thread color display Adjusts the left and right position of the pattern (page 136). LCD (Liquid Crystal Display) Operation 21 Changing the machine settings Various sewing machine operations and sewing settings can be set are listed below. The stitch or...
Operation Manual
Page 24
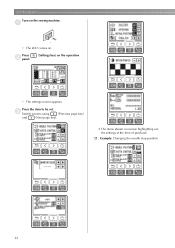
a X The LCD comes on the sewing machine. c Switch screens using (Previous page key) and (Next page key). • The items shown in reverse highlighting are the settings at the time of purchase. † Example: Changing the needle stop position 22 GETTING READY Turn on . Press the item to be set. Press b panel. (Settings key) on the operation X The settings screen appears.
a X The LCD comes on the sewing machine. c Switch screens using (Previous page key) and (Next page key). • The items shown in reverse highlighting are the settings at the time of purchase. † Example: Changing the needle stop position 22 GETTING READY Turn on . Press the item to be set. Press b panel. (Settings key) on the operation X The settings screen appears.

Operation Manual
Page 25
... / embroidery frame attachment / embroidery foot attachment / presser foot replacement on . a Note z Settings that are changed are complete, press d (Back key). X The sewing machine help key) on the sewing machine. Press the item to the item selection screen. LCD (Liquid Crystal Display) Operation 23 c a b cd e h f g a Upper threading b Bobbin winding c...Pressing (Back key), returns you to be displayed. When settings are not lost when the power is turned off. Checking machine operating procedures X The initial screen appears again. X The LCD comes on the LCD.
... / embroidery frame attachment / embroidery foot attachment / presser foot replacement on . a Note z Settings that are changed are complete, press d (Back key). X The sewing machine help key) on the sewing machine. Press the item to the item selection screen. LCD (Liquid Crystal Display) Operation 23 c a b cd e h f g a Upper threading b Bobbin winding c...Pressing (Back key), returns you to be displayed. When settings are not lost when the power is turned off. Checking machine operating procedures X The initial screen appears again. X The LCD comes on the LCD.
Operation Manual
Page 27
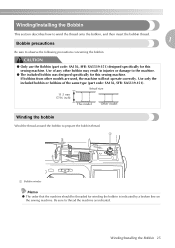
... not operate correctly. Winding/Installing the Bobbin 25 a Bobbin winder Memo z The order that the machine should be threaded for winding the bobbin is indicated by a broken line on the sewing machine. Actual size 11.5 mm (7/16 inch) This model Other model Winding the bobbin Wind the thread ...around the bobbin to thread the machine as indicated. If bobbins from other bobbin may result in injuries or...
... not operate correctly. Winding/Installing the Bobbin 25 a Bobbin winder Memo z The order that the machine should be threaded for winding the bobbin is indicated by a broken line on the sewing machine. Actual size 11.5 mm (7/16 inch) This model Other model Winding the bobbin Wind the thread ...around the bobbin to thread the machine as indicated. If bobbins from other bobbin may result in injuries or...
Operation Manual
Page 28
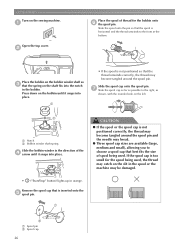
... spool onto the pin so that the spool is horizontal and the thread unwinds to the right, as shown, with the rounded side on the sewing machine. CAUTION ● If the spool or the spool cap is too small for the bobbin onto f the spool pin. Remove the spool cap that is... cap sizes are available (large, medium and small), allowing you to choose a spool cap that the spring on the slit in the spool or the machine may catch on the shaft fits into place. • ("Start/Stop" button) lights up in the bobbin. a Place the spool of spool being used . b Place...
... spool onto the pin so that the spool is horizontal and the thread unwinds to the right, as shown, with the rounded side on the sewing machine. CAUTION ● If the spool or the spool cap is too small for the bobbin onto f the spool pin. Remove the spool cap that is... cap sizes are available (large, medium and small), allowing you to choose a spool cap that the spring on the slit in the spool or the machine may catch on the shaft fits into place. • ("Start/Stop" button) lights up in the bobbin. a Place the spool of spool being used . b Place...

Operation Manual
Page 30
...the foot controller is plugged in bobbin winder seat (with your right hand. CAUTION ● When the bobbin winding becomes slow, stop the machine. Use scissors to cut to a suitable length. Note z Make sure that was pulled out clockwise around the bobbin five or six times ... the right side, the needle will become tangled in , press down on the foot controller. Slide the bobbin winder shaft to stop the machine, otherwise the sewing machine may become wrapped around the bobbin. a "Start/Stop" button • When the bobbin winding becomes slow, press ("Start/Stop" button)...
...the foot controller is plugged in bobbin winder seat (with your right hand. CAUTION ● When the bobbin winding becomes slow, stop the machine. Use scissors to cut to a suitable length. Note z Make sure that was pulled out clockwise around the bobbin five or six times ... the right side, the needle will become tangled in , press down on the foot controller. Slide the bobbin winder shaft to stop the machine, otherwise the sewing machine may become wrapped around the bobbin. a "Start/Stop" button • When the bobbin winding becomes slow, press ("Start/Stop" button)...
Operation Manual
Page 31
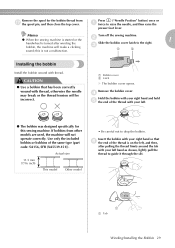
...and then, after winding the Slide the bobbin cover latch to guide it through the slit. 1 a Tab Winding/Installing the Bobbin 29 z When the sewing machine is started or the b 1 handwheel is not a malfunction. CAUTION ● Use a bobbin that f the end of the same type (part ...code: SA156, SFB (XA5539-151)). Remove the bobbin cover. this sewing machine. Memo Turn off the sewing machine. bobbin, the machine will not operate correctly. Insert the bobbin with your right hand so that has been correctly wound with your left . &#...
...and then, after winding the Slide the bobbin cover latch to guide it through the slit. 1 a Tab Winding/Installing the Bobbin 29 z When the sewing machine is started or the b 1 handwheel is not a malfunction. CAUTION ● Use a bobbin that f the end of the same type (part ...code: SA156, SFB (XA5539-151)). Remove the bobbin cover. this sewing machine. Memo Turn off the sewing machine. bobbin, the machine will not operate correctly. Insert the bobbin with your right hand so that has been correctly wound with your left . &#...


