Operation Manual
Page 4
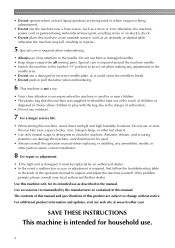
... described in this manual and specifications of . Do not use the machine near children. • The plastic bag that this machine only for household use. 2 Use this machine was supplied in should never be used. • Always consult the operation manual when replacing or installing any adjustments in the back of suffocation. • Do not use a damaged or incorrect needle plate, as a stove or iron; Use accessories recommended by...
... described in this manual and specifications of . Do not use the machine near children. • The plastic bag that this machine only for household use. 2 Use this machine was supplied in should never be used. • Always consult the operation manual when replacing or installing any adjustments in the back of suffocation. • Do not use a damaged or incorrect needle plate, as a stove or iron; Use accessories recommended by...
Operation Manual
Page 9
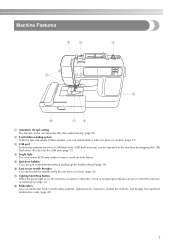
... cut automatically after embroidering (page 59). e Quick-set bobbin You can start embroidering without pulling up (page 12). d Bright light The convenient LED lamp makes it easy to work on , the machine is warming up the bobbin thread (page 34). c USB port Embroidery patterns saved in embroidery patterns, alphanumeric characters, framed decorations, and designs from optional embroidery cards (page 49). 7 g Lighting Start/Stop button When the green light is on dark fabrics. Machine Features a Automatic thread cutting The thread can...
... cut automatically after embroidering (page 59). e Quick-set bobbin You can start embroidering without pulling up (page 12). d Bright light The convenient LED lamp makes it easy to work on , the machine is warming up the bobbin thread (page 34). c USB port Embroidery patterns saved in embroidery patterns, alphanumeric characters, framed decorations, and designs from optional embroidery cards (page 49). 7 g Lighting Start/Stop button When the green light is on dark fabrics. Machine Features a Automatic thread cutting The thread can...

Operation Manual
Page 10
If any item is on machine.) 3 Needle set 4 Cleaning brush 5 Spool cap (large) 6 Spool cap (medium) (on machine) Embroidery set (medium) 15 H 10 cm X W 10 cm (H 4 inches X W 4 inches) 16 Dust cover 17 Operation manual XE1372-001 18 Quick reference guide 130013-124 XA5523-020 XC1807-121 XC1074-051 19 Accessory bag EBT-PE EBT-PEN XC4237-021 Part Code U.S.A. / Canada Others XE3069-001 XD0474-151 SA432 EF62 XE5387...
If any item is on machine.) 3 Needle set 4 Cleaning brush 5 Spool cap (large) 6 Spool cap (medium) (on machine) Embroidery set (medium) 15 H 10 cm X W 10 cm (H 4 inches X W 4 inches) 16 Dust cover 17 Operation manual XE1372-001 18 Quick reference guide 130013-124 XA5523-020 XC1807-121 XC1074-051 19 Accessory bag EBT-PE EBT-PEN XC4237-021 Part Code U.S.A. / Canada Others XE3069-001 XD0474-151 SA432 EF62 XE5387...
Operation Manual
Page 12
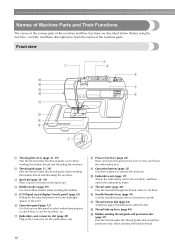
... thread guide cover when winding the bobbin thread and threading the machine. i Operation buttons (page 12) Use these descriptions to raise and lower the embroidery foot. l Needle threader lever (page 41) Use the needle threader lever to operate the machine. Names of Machine Parts and Their Functions The names of the various parts of the machine parts. m Thread tension dial (page 64) Adjust the upper thread tension with this thread guide when winding the bobbin thread and threading the machine. f Operation panel (page 13) Use the keys on the spool pin. h Presser foot lever...
... thread guide cover when winding the bobbin thread and threading the machine. i Operation buttons (page 12) Use these descriptions to raise and lower the embroidery foot. l Needle threader lever (page 41) Use the needle threader lever to operate the machine. Names of Machine Parts and Their Functions The names of the various parts of the machine parts. m Thread tension dial (page 64) Adjust the upper thread tension with this thread guide when winding the bobbin thread and threading the machine. f Operation panel (page 13) Use the keys on the spool pin. h Presser foot lever...

Operation Manual
Page 13
... power supply cord into the bobbin case. b Needle bar thread guide (page 40) Pass the upper thread through the thread guide disk when using the needle threader to raise and lower the needle. Memo z Refer to pages 10 through 13 while you (counterclockwise) to thread the needle. d Needle plate cover (page 78) Remove the needle plate cover to be exchanged. Do not cover the air vent while the machine is lowered, it enters the hole in the needle plate. a Handle Carry the machine...
... power supply cord into the bobbin case. b Needle bar thread guide (page 40) Pass the upper thread through the thread guide disk when using the needle threader to raise and lower the needle. Memo z Refer to pages 10 through 13 while you (counterclockwise) to thread the needle. d Needle plate cover (page 78) Remove the needle plate cover to be exchanged. Do not cover the air vent while the machine is lowered, it enters the hole in the needle plate. a Handle Carry the machine...
Operation Manual
Page 14
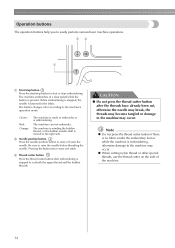
... embroider. The machine is winding the bobbin thread, or the bobbin winder shaft is moved to embroider or is embroidering, otherwise damage to the machine may occur. c Thread cutter button Press the thread cutter button after the threads have already been cut both the upper thread and the bobbin threads. Green: Red: Orange: The machine is stopped to cut , otherwise the needle may break, the threads may become tangled or damage to start or stop embroidering. Operation buttons The operation buttons help...
... embroider. The machine is winding the bobbin thread, or the bobbin winder shaft is moved to embroider or is embroidering, otherwise damage to the machine may occur. c Thread cutter button Press the thread cutter button after the threads have already been cut both the upper thread and the bobbin threads. Green: Red: Orange: The machine is stopped to cut , otherwise the needle may break, the threads may become tangled or damage to start or stop embroidering. Operation buttons The operation buttons help...
Operation Manual
Page 18
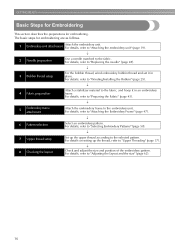
... an embroidery pattern. For details, refer to "Preparing the Fabric" (page 43). p 7 Upper thread setup Set up the thread, refer to "Attaching the embroidery unit" (page 19). GETTING READY Basic Steps for Embroidering This section describes the preparations for embroidering are as follows. 1 Embroidery unit attachment Attach the embroidery unit. For details, refer to "Adjusting the layout and the size" (page 62). 16 p 2 Needle preparation Use a needle matched to "Winding/Installing the Bobbin" (page...
... an embroidery pattern. For details, refer to "Preparing the Fabric" (page 43). p 7 Upper thread setup Set up the thread, refer to "Attaching the embroidery unit" (page 19). GETTING READY Basic Steps for Embroidering This section describes the preparations for embroidering are as follows. 1 Embroidery unit attachment Attach the embroidery unit. For details, refer to "Adjusting the layout and the size" (page 62). 16 p 2 Needle preparation Use a needle matched to "Winding/Installing the Bobbin" (page...
Operation Manual
Page 28
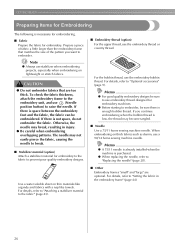
... embroider fabrics that matches the size of the pattern you continue embroidering when the bobbin thread is space between the embroidery foot and the fabric, the fabric can be sure there is enough bobbin thread. z Before starting to "Replacing the needle" (page 28). ■ Other Embroidery frames "small" and "large" are too thick. If you want to the fabric" (page 43). ■ Embroidery thread (option) For the upper thread, use a 90/14 home sewing machine needle...
... embroider fabrics that matches the size of the pattern you continue embroidering when the bobbin thread is space between the embroidery foot and the fabric, the fabric can be sure there is enough bobbin thread. z Before starting to "Replacing the needle" (page 28). ■ Other Embroidery frames "small" and "large" are too thick. If you want to the fabric" (page 43). ■ Embroidery thread (option) For the upper thread, use a 90/14 home sewing machine needle...
Operation Manual
Page 30
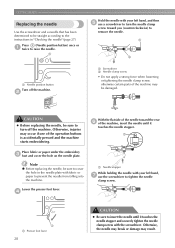
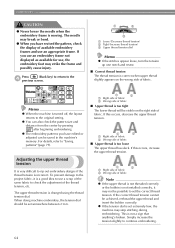
... break or damage may be sure to cover the hole in "Checking the needle" (page 27). CAUTION z Before replacing the needle, be straight according to the instructions in the needle plate with your left hand, and then e use the screwdriver to tighten the needle clamp screw. Otherwise, injuries may occur if one of the operation buttons is accidentally pressed and the machine starts embroidering. d a a Presser foot lever 28 CAUTION z Be sure to insert...
... break or damage may be sure to cover the hole in "Checking the needle" (page 27). CAUTION z Before replacing the needle, be straight according to the instructions in the needle plate with your left hand, and then e use the screwdriver to tighten the needle clamp screw. Otherwise, injuries may occur if one of the operation buttons is accidentally pressed and the machine starts embroidering. d a a Presser foot lever 28 CAUTION z Be sure to insert...
Operation Manual
Page 31
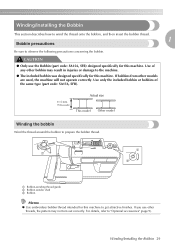
Winding/Installing the Bobbin This section describes how to wind the thread onto the bobbin, and then insert the bobbin thread. 1 Bobbin precautions Be sure to "Optional accessories" (page 9). Use of the same type (part code: SA156, SFB). 11.5 mm (7/16 inch) Actual size This model Other model Winding the bobbin Wind the thread around the bobbin to prepare the bobbin thread. b a c a Bobbin-winding thread guide b Bobbin winder shaft c Bobbin Memo z Use embroidery bobbin thread intended for this machine. If bobbins from other threads, the pattern may result in injuries or...
Winding/Installing the Bobbin This section describes how to wind the thread onto the bobbin, and then insert the bobbin thread. 1 Bobbin precautions Be sure to "Optional accessories" (page 9). Use of the same type (part code: SA156, SFB). 11.5 mm (7/16 inch) Actual size This model Other model Winding the bobbin Wind the thread around the bobbin to prepare the bobbin thread. b a c a Bobbin-winding thread guide b Bobbin winder shaft c Bobbin Memo z Use embroidery bobbin thread intended for this machine. If bobbins from other threads, the pattern may result in injuries or...

Operation Manual
Page 32
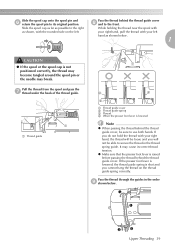
... size of thread for embroidering. Slide the spool cap onto the spool pin and f return the spool pin to the front at the bottom. Press down on the bobbin winder shaft so b that is not positioned correctly, the thread may become tangled around the spool pin or the machine may be damaged. ● 30 Memo z Use the embroidery bobbin thread for the bobbin onto e the spool pin. X (Start/stop button) lights up the spool pin and remove the spool...
... size of thread for embroidering. Slide the spool cap onto the spool pin and f return the spool pin to the front at the bottom. Press down on the bobbin winder shaft so b that is not positioned correctly, the thread may become tangled around the spool pin or the machine may be damaged. ● 30 Memo z Use the embroidery bobbin thread for the bobbin onto e the spool pin. X (Start/stop button) lights up the spool pin and remove the spool...
Operation Manual
Page 41
... may break. z Make sure that the presser foot lever is not positioned correctly, the thread may become tangled around the spool pin or the needle may cause incorrect thread tension. Slide the spool cap as far as shown below . 3 1 4 2 Upper Threading 39 Pass the thread behind the thread guide cover. a a Thread guide a b d c a Thread guide cover b Thread guide spring c Thread d When the presser foot lever is shut and you will not be sure to its original position. If the presser foot lever is lowered, the thread guide spring is lowered Note...
... may break. z Make sure that the presser foot lever is not positioned correctly, the thread may become tangled around the spool pin or the needle may cause incorrect thread tension. Slide the spool cap as far as shown below . 3 1 4 2 Upper Threading 39 Pass the thread behind the thread guide cover. a a Thread guide a b d c a Thread guide cover b Thread guide spring c Thread d When the presser foot lever is shut and you will not be sure to its original position. If the presser foot lever is lowered, the thread guide spring is lowered Note...
Operation Manual
Page 49
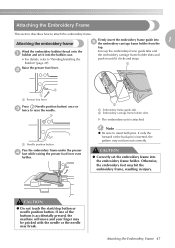
... pin is accidentally pressed, the machine will move and your finger may be pricked with the needle or the needle may break. Wind the embroidery bobbin thread onto the a bobbin and set the embroidery frame into the embroidery frame holder. If one of the buttons is inserted, the pattern may hit the embroidery frame, resulting in until it into 1 e the embroidery carriage frame holder from the top. Bobbin" (page 29). b a a Presser foot lever Press (Needle position button...
... pin is accidentally pressed, the machine will move and your finger may be pricked with the needle or the needle may break. Wind the embroidery bobbin thread onto the a bobbin and set the embroidery frame into the embroidery frame holder. If one of the buttons is inserted, the pattern may hit the embroidery frame, resulting in until it into 1 e the embroidery carriage frame holder from the top. Bobbin" (page 29). b a a Presser foot lever Press (Needle position button...
Operation Manual
Page 61
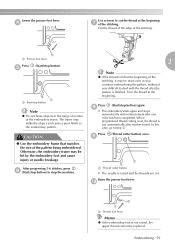
... embroidery foot is not raised, the upper thread cannot be sewn over as you continue embroidering the pattern, making it very difficult to deal with reinforcement after the pattern is raised and the threads are cut automatically after reinforcement. h X The embroidery starts again and stops automatically with the thread after one color has been completed. d Use scissors to the embroidery pattern. a After progressing 5-6 stitches, press f (Start/stop the machine. Lower the presser foot lever...
... embroidery foot is not raised, the upper thread cannot be sewn over as you continue embroidering the pattern, making it very difficult to deal with reinforcement after the pattern is raised and the threads are cut automatically after reinforcement. h X The embroidery starts again and stops automatically with the thread after one color has been completed. d Use scissors to the embroidery pattern. a After progressing 5-6 stitches, press f (Start/stop the machine. Lower the presser foot lever...
Operation Manual
Page 66
... the pattern size and distance from the center by pressing after beginning embroidering. a b a Right side of fabric b Wrong side of available embroidery frames and use , the embroidery foot may break or bend. ● When you have revised the pattern, check the display of fabric ■ Upper thread is incorrect. The upper thread tension is set extremely low, the machine may not be achieved, rethread the upper thread and insert the bobbin correctly...
... the pattern size and distance from the center by pressing after beginning embroidering. a b a Right side of fabric b Wrong side of available embroidery frames and use , the embroidery foot may break or bend. ● When you have revised the pattern, check the display of fabric ■ Upper thread is incorrect. The upper thread tension is set extremely low, the machine may not be achieved, rethread the upper thread and insert the bobbin correctly...
Operation Manual
Page 70
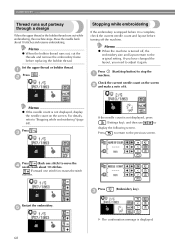
... while embroidering If the embroidery is stopped before it . EMBROIDERY Thread runs out partway through a design When the upper thread or the bobbin thread runs out while embroidering, the machine stops. Move the needle back about 10 stitches. (Forward one stitch) increases the stitch number. Memo z When the bobbin thread runs out, cut the threads and remove the embroidery frame before turning off , the embroidery size and layout return to the original setting. Check...
... while embroidering If the embroidery is stopped before it . EMBROIDERY Thread runs out partway through a design When the upper thread or the bobbin thread runs out while embroidering, the machine stops. Move the needle back about 10 stitches. (Forward one stitch) increases the stitch number. Memo z When the bobbin thread runs out, cut the threads and remove the embroidery frame before turning off , the embroidery size and layout return to the original setting. Check...
Operation Manual
Page 84
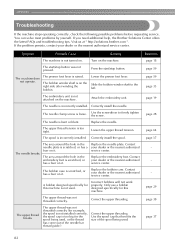
... presser foot lever. The embroidery unit is not used . Use the screwdriver to the left. Loosen the upper thread tension. Replace the embroidery foot. A bobbin designed specifically for example, the spool is not installed correctly, the spool cap is scratched, or has a burr on it. Incorrect bobbins will not work properly. Correct the upper threading. Press the start /stop button. The bobbin winder shaft is incorrectly installed. Replace the needle. The spool is on . The area around the hole in the needle plate...
... presser foot lever. The embroidery unit is not used . Use the screwdriver to the left. Loosen the upper thread tension. Replace the embroidery foot. A bobbin designed specifically for example, the spool is not installed correctly, the spool cap is scratched, or has a burr on it. Incorrect bobbins will not work properly. Correct the upper threading. Press the start /stop button. The bobbin winder shaft is incorrectly installed. Replace the needle. The spool is on . The area around the hole in the needle plate...

Operation Manual
Page 86
... needle is incorrect. A bobbin designed specifically for this machine is scratched, or has a burr on . Press the needle position button. Only use a bobbin designed specifically for this machine. clean the race. The needle has not been raised to the correct position. The needle threader lever does not lower to the correct position. Adjust the tension of the upper thread and the bobbin thread. installed. Correct the upper threading. Replace the bobbin case. The needle is either too light or too dark. Incorrect bobbins will not work properly...
... needle is incorrect. A bobbin designed specifically for this machine is scratched, or has a burr on . Press the needle position button. Only use a bobbin designed specifically for this machine. clean the race. The needle has not been raised to the correct position. The needle threader lever does not lower to the correct position. Adjust the tension of the upper thread and the bobbin thread. installed. Correct the upper threading. Replace the bobbin case. The needle is either too light or too dark. Incorrect bobbins will not work properly...

Operation Manual
Page 87
... fabric properly on the embroidery frame. Correct the upper threading. The fabric is attached. Always use stabilizer material for embroidery. page 38, page 39 The bobbin thread is loose. Correctly install the bobbin thread. Troubleshooting 85 page 50 page 19 The fabric is moved during embroidery. The fabric is incorrectly installed. page 78 The thread tension is causing of the upper thread page 64, and the bobbin thread. Make sure that the thread is hanged on the thread guide spring...
... fabric properly on the embroidery frame. Correct the upper threading. The fabric is attached. Always use stabilizer material for embroidery. page 38, page 39 The bobbin thread is loose. Correctly install the bobbin thread. Troubleshooting 85 page 50 page 19 The fabric is moved during embroidery. The fabric is incorrectly installed. page 78 The thread tension is causing of the upper thread page 64, and the bobbin thread. Make sure that the thread is hanged on the thread guide spring...

Operation Manual
Page 93
... key 13 cleaning bobbin case 78 cleaning brush 8 N cleaning machine surface 78 connecting character patterns 66 country thread 23, 26, 51 needle bar thread guide 11 needle condition 27 needle plate 11 E embroidering 16, 57 needle plate cover 11 needle position button 12 needle replacement 28 embroidering pattern 58 needle set 8 embroidery card 55 embroidery card slot 11, 56 needle threader lever 10 needle threading 37 embroidery character selection 53 embroidery data 70, 72, 75 needles 27 next page key 13 embroidery foot installation 80 embroidery frame...
... key 13 cleaning bobbin case 78 cleaning brush 8 N cleaning machine surface 78 connecting character patterns 66 country thread 23, 26, 51 needle bar thread guide 11 needle condition 27 needle plate 11 E embroidering 16, 57 needle plate cover 11 needle position button 12 needle replacement 28 embroidering pattern 58 needle set 8 embroidery card 55 embroidery card slot 11, 56 needle threader lever 10 needle threading 37 embroidery character selection 53 embroidery data 70, 72, 75 needles 27 next page key 13 embroidery foot installation 80 embroidery frame...


