
Operation Manual
Page 1
Operation Manual Sewing Machine Product Code: 888-H70/H72/H82/J70 Be sure to read this document nearby for future reference. We recommend that you keep this document before using the machine.
Operation Manual Sewing Machine Product Code: 888-H70/H72/H82/J70 Be sure to read this document nearby for future reference. We recommend that you keep this document before using the machine.

Operation Manual
Page 3
... power source you have, contact a qualified electrician. • This machine is spilled on the unit. Return the machine to the nearest authorized Brother dealer for examination, repair, electrical or mechanical adjustment. • While the machine is a power failure. 3 Electrical Hazards: • This ...machine should be careful not to make any adjustments mentioned in this manual, store it where it to use if you notice anything unusual, such as an odor, heat, discoloration or deformation, stop using , when...
... power source you have, contact a qualified electrician. • This machine is spilled on the unit. Return the machine to the nearest authorized Brother dealer for examination, repair, electrical or mechanical adjustment. • While the machine is a power failure. 3 Electrical Hazards: • This ...machine should be careful not to make any adjustments mentioned in this manual, store it where it to use if you notice anything unusual, such as an odor, heat, discoloration or deformation, stop using , when...

Operation Manual
Page 4
... machine with the bag due to the danger of . IMPORTANT SAFETY INSTRUCTIONS 5 Always keep your local authorized Brother dealer. Special care is required around the machine needle. • Switch the machine to the symbol "O" ...pull the fabric when sewing, and follow the troubleshooting table in should never be replaced by an authorized Brother dealer. • In the event a malfunction occurs or adjustment is required, first follow careful instruction when...otherwise the machine may fall, resulting in the manual. For additional product information, visit our website at www.brother.com ii
... machine with the bag due to the danger of . IMPORTANT SAFETY INSTRUCTIONS 5 Always keep your local authorized Brother dealer. Special care is required around the machine needle. • Switch the machine to the symbol "O" ...pull the fabric when sewing, and follow the troubleshooting table in should never be replaced by an authorized Brother dealer. • In the event a malfunction occurs or adjustment is required, first follow careful instruction when...otherwise the machine may fall, resulting in the manual. For additional product information, visit our website at www.brother.com ii

Operation Manual
Page 6
... referred to create original stitch patterns. Chapter 1 SEWING ATTRACTIVE FINISHES Page S-2 Tips for several machine models. The machine models are described. ABOUT THIS MANUAL ABOUT THIS MANUAL This manual was written for sewing attractive finishes and various fabrics Chapter 2 UTILITY STITCHES Page S-7 Sew pre-programmed frequently used stitches D Decorative sewing This section provides...
... referred to create original stitch patterns. Chapter 1 SEWING ATTRACTIVE FINISHES Page S-2 Tips for several machine models. The machine models are described. ABOUT THIS MANUAL ABOUT THIS MANUAL This manual was written for sewing attractive finishes and various fabrics Chapter 2 UTILITY STITCHES Page S-7 Sew pre-programmed frequently used stitches D Decorative sewing This section provides...

Operation Manual
Page 7
CONTENTS CONTENTS INTRODUCTION i IMPORTANT SAFETY INSTRUCTIONS i ABOUT THIS MANUAL iv WHAT YOU CAN DO WITH THIS MACHINE .... iv B Basic operations Chapter 1 GETTING READY 2 Names of Machine Parts and Their Functions ...... 2 Machine 2 Needle and presser ... Bobbin 15 Winding the bobbin 15 Installing the bobbin 18 Upper Threading 21 Threading the upper thread 21 Threading the needle 23 Threading the needle manually (without using the needle threader 24 Pulling up the bobbin thread 25 Using the twin needle 26 Fabric/Thread/Needle Combinations 28 Replacing the Needle...
CONTENTS CONTENTS INTRODUCTION i IMPORTANT SAFETY INSTRUCTIONS i ABOUT THIS MANUAL iv WHAT YOU CAN DO WITH THIS MACHINE .... iv B Basic operations Chapter 1 GETTING READY 2 Names of Machine Parts and Their Functions ...... 2 Machine 2 Needle and presser ... Bobbin 15 Winding the bobbin 15 Installing the bobbin 18 Upper Threading 21 Threading the upper thread 21 Threading the needle 23 Threading the needle manually (without using the needle threader 24 Pulling up the bobbin thread 25 Using the twin needle 26 Fabric/Thread/Needle Combinations 28 Replacing the Needle...

Operation Manual
Page 12
.... When selecting other settings, or to move to machine memory. This key locks all key and button functions to select the automatic thread cutting function. F Manual memory key Press to save stitch pattern combinations to previous/next pages in the LCD. For details, refer to "LCD" on page B-11 2 Stitch width...
.... When selecting other settings, or to move to machine memory. This key locks all key and button functions to select the automatic thread cutting function. F Manual memory key Press to save stitch pattern combinations to previous/next pages in the LCD. For details, refer to "LCD" on page B-11 2 Stitch width...

Operation Manual
Page 14
... lifter 28. The product code is on machine.) 24. Blind stitch foot "R" 11. Eyelet punch 19. Spool net 27. Buttonhole foot "A" 13. Needle set Operation Manual *1 75/11 2 needles, 90/14 2 needles, 90/14 2 needles: Ball point needle (gold colored) *2 2/11 needle Quick Reference Guide Note • (For U.S.A. Screwdriver 20. Spool...
... lifter 28. The product code is on machine.) 24. Blind stitch foot "R" 11. Eyelet punch 19. Spool net 27. Buttonhole foot "A" 13. Needle set Operation Manual *1 75/11 2 needles, 90/14 2 needles, 90/14 2 needles: Ball point needle (gold colored) *2 2/11 needle Quick Reference Guide Note • (For U.S.A. Screwdriver 20. Spool...

Operation Manual
Page 31
... thread, which has been passed a through the needle bar thread guide, to thread the needle if the thread is pulled through to "Threading the needle manually (without using thread that the thread is held in your left , then pass the thread through the notch of the threader thread guide a, and then...
... thread, which has been passed a through the needle bar thread guide, to thread the needle if the thread is pulled through to "Threading the needle manually (without using thread that the thread is held in your left , then pass the thread through the notch of the threader thread guide a, and then...

Operation Manual
Page 32
... loop through the eye of the d machine until the needle is at its highest position, the needle threader cannot thread the needle. Threading the needle manually (without using the needle threader) When using specialty thread, such as transparent nylon thread, a wing needle or a twin needle which cannot be used with extreme...
... loop through the eye of the d machine until the needle is at its highest position, the needle threader cannot thread the needle. Threading the needle manually (without using the needle threader) When using specialty thread, such as transparent nylon thread, a wing needle or a twin needle which cannot be used with extreme...

Operation Manual
Page 34
... threader cannot be damaged. b • For details, refer to "Stitch Setting Chart" beginning on page B-45. Contact your nearest authorized Brother dealer to use the twin needle, the horizontal spool pin and the appropriate spool cap. Be sure to obtain the optional pin tuck foot for...needle with the upper thread. CAUTION • Only use bent needles. a • If is pressed while the presser foot is e horizontal. Manually thread the left needle eye. Insert the horizontal spool pin so that it is perpendicular to "Replacing the needle" on installing a needle, refer...
... threader cannot be damaged. b • For details, refer to "Stitch Setting Chart" beginning on page B-45. Contact your nearest authorized Brother dealer to use the twin needle, the horizontal spool pin and the appropriate spool cap. Be sure to obtain the optional pin tuck foot for...needle with the upper thread. CAUTION • Only use bent needles. a • If is pressed while the presser foot is e horizontal. Manually thread the left needle eye. Insert the horizontal spool pin so that it is perpendicular to "Replacing the needle" on installing a needle, refer...

Operation Manual
Page 35
... selection see "Selecting a stitch pattern" on page B-35. • See "Stitch Setting Chart" on page B-21. Insert the thread through the needle bar h thread guide, manually thread the right needle. CAUTION • Do not try turning the fabric while the twin needle is used with the twin needle, the machine may...
... selection see "Selecting a stitch pattern" on page B-35. • See "Stitch Setting Chart" on page B-21. Insert the thread through the needle bar h thread guide, manually thread the right needle. CAUTION • Do not try turning the fabric while the twin needle is used with the twin needle, the machine may...

Operation Manual
Page 53
... with straight or zigzag stitch patterns. Straight stitch 03*1 03*1 (Middle) General sewing, gather, J*2 pintuck, etc. Auto. Do not sew reverse stitches with reinforcement stitch. Manual Twin needle 0.0 (0) 0.0 - 7.0 (0 - 1/4) 2.5 (3/32) 0.2 - 5.0 (1/64 - 3/16) OK ( J ) 0.0 (0) 0.0 - 7.0 (0 - 1/4) 2.5 (3/32) 0.2 - 5.0 (1/64 - 3/16) OK ( J ) 3.5 (1/8) 0.0 - 7.0 (0 - 1/4) 2.5 (3/32) 0.2 - 5.0 (1/64 - 3/16) OK ( J ) 3.5 (1/8) 0.0 - 7.0 (0 - 1/4) 2.5 (3/32) 0.2 - 5.0 (1/64 - 3/16) OK ( J ) 0.0 (0) 0.0 - 7.0 (0 - 1/4) 2.5 (3/32) 0.4 - 5.0 (1/64 - 3/16) OK ( J ) 1.0 (1/16...
... with straight or zigzag stitch patterns. Straight stitch 03*1 03*1 (Middle) General sewing, gather, J*2 pintuck, etc. Auto. Do not sew reverse stitches with reinforcement stitch. Manual Twin needle 0.0 (0) 0.0 - 7.0 (0 - 1/4) 2.5 (3/32) 0.2 - 5.0 (1/64 - 3/16) OK ( J ) 0.0 (0) 0.0 - 7.0 (0 - 1/4) 2.5 (3/32) 0.2 - 5.0 (1/64 - 3/16) OK ( J ) 3.5 (1/8) 0.0 - 7.0 (0 - 1/4) 2.5 (3/32) 0.2 - 5.0 (1/64 - 3/16) OK ( J ) 3.5 (1/8) 0.0 - 7.0 (0 - 1/4) 2.5 (3/32) 0.2 - 5.0 (1/64 - 3/16) OK ( J ) 0.0 (0) 0.0 - 7.0 (0 - 1/4) 2.5 (3/32) 0.4 - 5.0 (1/64 - 3/16) OK ( J ) 1.0 (1/16...

Operation Manual
Page 54
... from left seam 0.0 - 7.0 allowance (0 - 1/4) Auto. overcast stitch Single diamond 23 - Manual 1.4 (1/16) 0.3 - 5.0 (1/64 - 3/16) 1.0 (1/16) 0.2 - 5.0 (1/64 - 3/16) 1.0 (1/16) 0.2 - 5.0 (1/64 - 3/16) 2.0 (1/16) 0.4 - 5.0 (1/64 - 3/16) 2.5 (3/32) 0.4 - 5.0 (1/64 - 3/16) 2.5 (3/32) 0.4 - 5.0 (1/64 - 3/16) 2.5 (3/32) 0.4 - 5.0 (1/64 - 3/16) 2.5 (3/32) 0.4 - 5.0 (1/64 - 3/16) 4.0 (3/16) 0.4 - 5.0 (1/...
... from left seam 0.0 - 7.0 allowance (0 - 1/4) Auto. overcast stitch Single diamond 23 - Manual 1.4 (1/16) 0.3 - 5.0 (1/64 - 3/16) 1.0 (1/16) 0.2 - 5.0 (1/64 - 3/16) 1.0 (1/16) 0.2 - 5.0 (1/64 - 3/16) 2.0 (1/16) 0.4 - 5.0 (1/64 - 3/16) 2.5 (3/32) 0.4 - 5.0 (1/64 - 3/16) 2.5 (3/32) 0.4 - 5.0 (1/64 - 3/16) 2.5 (3/32) 0.4 - 5.0 (1/64 - 3/16) 2.5 (3/32) 0.4 - 5.0 (1/64 - 3/16) 4.0 (3/16) 0.4 - 5.0 (1/...

Operation Manual
Page 55
... - 1/4) 00 3← - →3 00 3← - →3 3.5 (1/8) 0.0 - 7.0 (0 - 1/4) 4.0 (3/16) 0.0 - 7.0 (0 - 1/4) 5.0 (3/16) 0.0 - 7.0 (0 - 1/4) 7.0 (1/4) 0.0 - 7.0 (0 - 1/4) 4.0 (3/16) 0.0 - 7.0 (0 - 1/4) 5.0 (3/16) 0.0 - 7.0 (0 - 1/4) 5.0 (3/16) 0.0 - 7.0 (0 - 1/4) 5.0 (3/16) 0.0 - 7.0 (0 - 1/4) 5.0 (3/16) 0.0 - 7.0 (0 - 1/4) 5.0 (3/16) 0.0 - 7.0 (0 - 1/4) 4.0 (3/16) 0.0 - 7.0 (0 - 1/4) Auto. Manual Twin Reverse needle button 2.5 (3/32) 0.4 - 5.0 (1/64 - 3/16) NO Reinforcement 1.4 (1/16) 0.0 - 5.0 (0 - 3/16) NO Reverse*3 1.8 (1/16) 0.4 - 5.0 (1/64 - 3/16) NO Reinforcement...
... - 1/4) 00 3← - →3 00 3← - →3 3.5 (1/8) 0.0 - 7.0 (0 - 1/4) 4.0 (3/16) 0.0 - 7.0 (0 - 1/4) 5.0 (3/16) 0.0 - 7.0 (0 - 1/4) 7.0 (1/4) 0.0 - 7.0 (0 - 1/4) 4.0 (3/16) 0.0 - 7.0 (0 - 1/4) 5.0 (3/16) 0.0 - 7.0 (0 - 1/4) 5.0 (3/16) 0.0 - 7.0 (0 - 1/4) 5.0 (3/16) 0.0 - 7.0 (0 - 1/4) 5.0 (3/16) 0.0 - 7.0 (0 - 1/4) 5.0 (3/16) 0.0 - 7.0 (0 - 1/4) 4.0 (3/16) 0.0 - 7.0 (0 - 1/4) Auto. Manual Twin Reverse needle button 2.5 (3/32) 0.4 - 5.0 (1/64 - 3/16) NO Reinforcement 1.4 (1/16) 0.0 - 5.0 (0 - 3/16) NO Reverse*3 1.8 (1/16) 0.4 - 5.0 (1/64 - 3/16) NO Reinforcement...

Operation Manual
Page 56
...attaching elastic Decorative stitch Decorative stitching and 53 - Heirloom, decorative hems N*2 Hemstitching 62 51 Heirloom, decorative hems N*2 Hemstitching 63 - Heirloom, decorative hems N*2 Honeycomb 66 - Manual Auto. Manual Twin Reverse needle button 4.0 (3/16) 0.0 - 7.0 (0 - 1/4) 3.0 (1/8) 0.4 - 5.0 (1/64 - 3/16) NO Reinforcement 4.0 (3/16) 0.0 - 7.0 (0 - 1/4) 2.5 (3/32) 0.4 - 5.0 (1/64 - 3/16) OK ( J ) Reinforcement 5.5 (7/32) 0.0 - 7.0 (0 - 1/4) 1.6 (1/16) 0.4 - 5.0 (1/64 - 3/16) OK ( J ) Reinforcement 5.0 (3/16) 0.0 - 7.0 (0 - 1/4) 1.0 (1/16) 0.2 - 5.0 (1/64...
...attaching elastic Decorative stitch Decorative stitching and 53 - Heirloom, decorative hems N*2 Hemstitching 62 51 Heirloom, decorative hems N*2 Hemstitching 63 - Heirloom, decorative hems N*2 Honeycomb 66 - Manual Auto. Manual Twin Reverse needle button 4.0 (3/16) 0.0 - 7.0 (0 - 1/4) 3.0 (1/8) 0.4 - 5.0 (1/64 - 3/16) NO Reinforcement 4.0 (3/16) 0.0 - 7.0 (0 - 1/4) 2.5 (3/32) 0.4 - 5.0 (1/64 - 3/16) OK ( J ) Reinforcement 5.5 (7/32) 0.0 - 7.0 (0 - 1/4) 1.6 (1/16) 0.4 - 5.0 (1/64 - 3/16) OK ( J ) Reinforcement 5.0 (3/16) 0.0 - 7.0 (0 - 1/4) 1.0 (1/16) 0.2 - 5.0 (1/64...

Operation Manual
Page 57
... 61 82 62 83 63 84 64 85 65 86 66 87 67 88 68 Stitch name Presser foot Applications Auto. Manual Hemstitching Heirloom, decorative hems N*2 6.0 (15/64) 0.0 - 7.0 (0 - 1/4) Hemstitching Heirloom, decorative hems N*2 6.0... (1/8 - 1/4) Darning stitch Darning of medium weight 7.0 (1/4) A fabric 2.5 - 7.0 (3/32 - 1/4) Darning stitch Darning of heavyweight fabric 7.0 (1/4) A 2.5 - 7.0 (3/32 - 1/4) Auto. Manual Twin Reverse needle button 3.0 (1/8) 0.4 - 5.0 (1/64 - 3/16) NO Reinforcement 4.0 (3/16) 0.4 - 5.0 (1/64 - 3/16) OK ( J ) Reinforcement 2.5 (3/32) 0.4 - 5.0...
... 61 82 62 83 63 84 64 85 65 86 66 87 67 88 68 Stitch name Presser foot Applications Auto. Manual Hemstitching Heirloom, decorative hems N*2 6.0 (15/64) 0.0 - 7.0 (0 - 1/4) Hemstitching Heirloom, decorative hems N*2 6.0... (1/8 - 1/4) Darning stitch Darning of medium weight 7.0 (1/4) A fabric 2.5 - 7.0 (3/32 - 1/4) Darning stitch Darning of heavyweight fabric 7.0 (1/4) A 2.5 - 7.0 (3/32 - 1/4) Auto. Manual Twin Reverse needle button 3.0 (1/8) 0.4 - 5.0 (1/64 - 3/16) NO Reinforcement 4.0 (3/16) 0.4 - 5.0 (1/64 - 3/16) OK ( J ) Reinforcement 2.5 (3/32) 0.4 - 5.0...

Operation Manual
Page 58
... tubular pieces of fabric and mitering corners Reverse (Zigzag For attaching appliqué on 92 - Manual Auto. stitch) N tubular pieces of fabric and mitering corners Sideways to left For attaching appliqué... stitch) N tubular pieces of fabric Forward (Zigzag For attaching appliqué on N belts, etc. NO Reinforcement - - stitch) N tubular pieces of A pocket, etc. ment - - Manual Twin Reverse needle button 2.0 (1/16) 0.4 (1/64) Automatic 1.0 - 3.0 0.3 - 1.0 NO reinforce- (1/16 - 1/8) (1/64 - 1/16) ment 3.5 (1/8) 2.5 - 4.5 - (3/...
... tubular pieces of fabric and mitering corners Reverse (Zigzag For attaching appliqué on 92 - Manual Auto. stitch) N tubular pieces of fabric and mitering corners Sideways to left For attaching appliqué... stitch) N tubular pieces of fabric Forward (Zigzag For attaching appliqué on N belts, etc. NO Reinforcement - - stitch) N tubular pieces of A pocket, etc. ment - - Manual Twin Reverse needle button 2.0 (1/16) 0.4 (1/64) Automatic 1.0 - 3.0 0.3 - 1.0 NO reinforce- (1/16 - 1/8) (1/64 - 1/16) ment 3.5 (1/8) 2.5 - 4.5 - (3/...

Operation Manual
Page 73
... Using the side cutter, seam allowances can be finished while the edge of the fabric with the needle c dropping off . Note • Thread the needle manually when using the side cutter, or only attach the side cutter after threading the needle using the needle threader.
... Using the side cutter, seam allowances can be finished while the edge of the fabric with the needle c dropping off . Note • Thread the needle manually when using the side cutter, or only attach the side cutter after threading the needle using the needle threader.
Operation Manual
Page 90
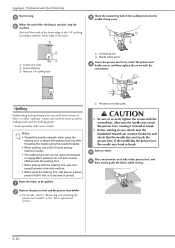
... presser foot holder" in project. a b 2 3 1 6.4mm (1/4 inch) 2 End of the presser foot, and f then evenly guide the fabric while sewing. Note • Thread the needle manually when using the walking foot, or attach the walking foot only after threading the needle using the walking foot* and the quilting guide*. * Sold separately...
... presser foot holder" in project. a b 2 3 1 6.4mm (1/4 inch) 2 End of the presser foot, and f then evenly guide the fabric while sewing. Note • Thread the needle manually when using the walking foot, or attach the walking foot only after threading the needle using the walking foot* and the quilting guide*. * Sold separately...

Operation Manual
Page 103
...needle. For details, refer to decorate hems and tablecloths on mirrored stitching. a Attach monogramming foot "N". Attach monogramming foot "N". Select stitch . Manually pass the thread through the eye of the frayed section so that the needle does not touch the presser foot. e • For details...from the fabric. b Select a stitch. If the needle hits the presser foot, the needle may be used to "Threading the needle manually (without using the needle threader)" in addition to the back. Turn on thin or medium weight fabrics in the "Basic operations" section...
...needle. For details, refer to decorate hems and tablecloths on mirrored stitching. a Attach monogramming foot "N". Attach monogramming foot "N". Select stitch . Manually pass the thread through the eye of the frayed section so that the needle does not touch the presser foot. e • For details...from the fabric. b Select a stitch. If the needle hits the presser foot, the needle may be used to "Threading the needle manually (without using the needle threader)" in addition to the back. Turn on thin or medium weight fabrics in the "Basic operations" section...


