
Raster Command Reference
Page 32
... film. - 27 - 5. Used for both paper and film. Status Raster Command Reference RJ-3000 Media 50 mm x 85 mm 60 mm x 92 mm 76 mm x 44 mm RJ-4200 Media 50 mm x 85 mm 60 mm x 92 mm 80 mm x 115 mm 102 mm x 26 mm 102 mm x 50 mm 102 mm x 76...
... film. - 27 - 5. Used for both paper and film. Status Raster Command Reference RJ-3000 Media 50 mm x 85 mm 60 mm x 92 mm 76 mm x 44 mm RJ-4200 Media 50 mm x 85 mm 60 mm x 92 mm 80 mm x 115 mm 102 mm x 26 mm 102 mm x 50 mm 102 mm x 76...

Raster Command Reference
Page 39
The data outputted with the "Save Paper Size Commands" function of Paper Size Setup. Printing Command Details "Save Paper Size Commands" function of the Brother RJ-XXXX ・Binary file editor. Raster Command Reference ESC i U w Additional media information command ASCII: ESC Hexadecimal: 1B ...binary file editor to the printer the commands outputted with the "Save Paper Size Commands" function of Paper Size Setup will be a binary file. Preparation Install the two listed below. ・Printer driver of Paper Size Setup 1. Note If the media information is the same as when...
The data outputted with the "Save Paper Size Commands" function of Paper Size Setup. Printing Command Details "Save Paper Size Commands" function of the Brother RJ-XXXX ・Binary file editor. Raster Command Reference ESC i U w Additional media information command ASCII: ESC Hexadecimal: 1B ...binary file editor to the printer the commands outputted with the "Save Paper Size Commands" function of Paper Size Setup will be a binary file. Preparation Install the two listed below. ・Printer driver of Paper Size Setup 1. Note If the media information is the same as when...

Raster Command Reference
Page 40
...bytes underlined in the binary file editor. Printing Command Details Click the [Paper Size Setup] button on the [Basic] tab to display the Paper Size Setup dialog box. (Refer to the illustration below.) Click [Save Paper Size Commands] from the [Option] button to the illustration below.) In...specified name. 3. Open the saved file in orange are the command data.(Refer to display a dialog box for creating a file for saving the paper size commands, and then save them in a file with the red box is the additional media information command. Of this when adding media information...
...bytes underlined in the binary file editor. Printing Command Details Click the [Paper Size Setup] button on the [Basic] tab to display the Paper Size Setup dialog box. (Refer to the illustration below.) Click [Save Paper Size Commands] from the [Option] button to the illustration below.) In...specified name. 3. Open the saved file in orange are the command data.(Refer to display a dialog box for creating a file for saving the paper size commands, and then save them in a file with the red box is the additional media information command. Of this when adding media information...

Raster Command Reference
Page 42
Raster Command Reference ESC i d Specify margin amount (feed amount) ASCII: ESC Hexadecimal: 1B i d {n1} {n2} 69 64 {n1} {n2} Description ⚫ Specifies the amount of the margins. ⚫ Margin amount (dots) = n1 + n2*256 ⚫ With die-cut labels, the margin amount at the ends of the printed area is 0. (a) Continuous length tape Paper Tape Print area (b) Die-cut labels Margin amount Cut line Paper Label Print area Margin amount (only "0" is available) Cut line - 37 - 7. Printing Command Details
Raster Command Reference ESC i d Specify margin amount (feed amount) ASCII: ESC Hexadecimal: 1B i d {n1} {n2} 69 64 {n1} {n2} Description ⚫ Specifies the amount of the margins. ⚫ Margin amount (dots) = n1 + n2*256 ⚫ With die-cut labels, the margin amount at the ends of the printed area is 0. (a) Continuous length tape Paper Tape Print area (b) Die-cut labels Margin amount Cut line Paper Label Print area Margin amount (only "0" is available) Cut line - 37 - 7. Printing Command Details
Users Guide
Page 1
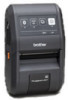
... POWER indicator is lit in a handy place for purchasing the Brother RuggedJet RJ-3050/3050Ai mobile printer. When the rechargeable Li-ion battery is installed in place. Printed in China D00HXL001 Unpacking the RJ-3050/3050Ai Check that the rechargeable Li-ion battery is fully charged,... 15 16 5 4 3 2 1 1 Battery compartment 2 Battery latch 3 Mini-USB port 4 DC connector 5 Cover open lever 6 RD Roll compartment cover 7 Paper outlet 8 Battery indicator 9 STATUS indicator 10 POWER indicator 11 (Power) button (To turn off the printer until it clicks locking the battery in the printer...
... POWER indicator is lit in a handy place for purchasing the Brother RuggedJet RJ-3050/3050Ai mobile printer. When the rechargeable Li-ion battery is installed in place. Printed in China D00HXL001 Unpacking the RJ-3050/3050Ai Check that the rechargeable Li-ion battery is fully charged,... 15 16 5 4 3 2 1 1 Battery compartment 2 Battery latch 3 Mini-USB port 4 DC connector 5 Cover open lever 6 RD Roll compartment cover 7 Paper outlet 8 Battery indicator 9 STATUS indicator 10 POWER indicator 11 (Power) button (To turn off the printer until it clicks locking the battery in the printer...

Users Guide
Page 4
.../product/dev For Frequently Asked Questions (FAQs), Product Support and Technical Questions, and Driver Updates and Utilities: support.brother.com 2 Roller „ Paper Outlet Maintenance If the paper outlet becomes dirty, press and hold the (Feed) button until the POWER indicator starts blinking in advance which items will print. For details, see the...
.../product/dev For Frequently Asked Questions (FAQs), Product Support and Technical Questions, and Driver Updates and Utilities: support.brother.com 2 Roller „ Paper Outlet Maintenance If the paper outlet becomes dirty, press and hold the (Feed) button until the POWER indicator starts blinking in advance which items will print. For details, see the...
Online Users Guide PDF
Page 5
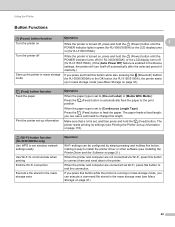
...Turning the Printer On or Off ...10 Inserting the RD Roll...10 When Using RJ-3050/3050Ai or When Not Using the Label Peeler (RJ-3150/3150Ai 11 Cutting Roll Paper ...13 When Using the Label Peeler (RJ-3150/3150Ai Only 13 Printer Driver Settings ...16 After Printing...17 Removing the RD... the Printer Driver ...22 Connecting the Computer and Printer ...24 USB Connection ...24 Bluetooth Connection ...25 Wi-Fi Connection ...26 LCD Display (RJ-3150/3150Ai Only) ...27 Screen ...27 LCD Display Settings...28 2 Using the Printer 39 Operation Panel...39 Button Functions...40 Indicators ...42 ...
...Turning the Printer On or Off ...10 Inserting the RD Roll...10 When Using RJ-3050/3050Ai or When Not Using the Label Peeler (RJ-3150/3150Ai 11 Cutting Roll Paper ...13 When Using the Label Peeler (RJ-3150/3150Ai Only 13 Printer Driver Settings ...16 After Printing...17 Removing the RD... the Printer Driver ...22 Connecting the Computer and Printer ...24 USB Connection ...24 Bluetooth Connection ...25 Wi-Fi Connection ...26 LCD Display (RJ-3150/3150Ai Only) ...27 Screen ...27 LCD Display Settings...28 2 Using the Printer 39 Operation Panel...39 Button Functions...40 Indicators ...42 ...

Online Users Guide PDF
Page 6
... Screen ...80 P-touch Template Settings ...82 P-touch Template ...82 P-touch Template Settings Dialog Box 83 Paper Size Setup...85 Paper Size Setup Dialog Box ...85 Distributing Paper Formats...90 4 Other Functions 91 Mass Storage...91 Description...91 Using the Mass Storage Feature ...91 JPEG... Printing ...92 5 Printing Labels Using P-touch Template (RJ-3150/3150Ai Only) 93 P-touch Template Function...93 Preparation ...94 Specifying ...
... Screen ...80 P-touch Template Settings ...82 P-touch Template ...82 P-touch Template Settings Dialog Box 83 Paper Size Setup...85 Paper Size Setup Dialog Box ...85 Distributing Paper Formats...90 4 Other Functions 91 Mass Storage...91 Description...91 Using the Mass Storage Feature ...91 JPEG... Printing ...92 5 Printing Labels Using P-touch Template (RJ-3150/3150Ai Only) 93 P-touch Template Function...93 Preparation ...94 Specifying ...

Online Users Guide PDF
Page 7
6 Maintaining the Printer 109 Print Head Maintenance ...109 Roller Maintenance...110 Paper Outlet Maintenance ...111 Label Peeler Maintenance (RJ-3150/3150Ai Only 112 7 Reference 113 LED Indicators ...113 Indicator Warnings...115 Printing the Printer Set-up Information 116 8 Troubleshooting 117 Overview...117 9 Technical Information ...
6 Maintaining the Printer 109 Print Head Maintenance ...109 Roller Maintenance...110 Paper Outlet Maintenance ...111 Label Peeler Maintenance (RJ-3150/3150Ai Only 112 7 Reference 113 LED Indicators ...113 Indicator Warnings...115 Printing the Printer Set-up Information 116 8 Troubleshooting 117 Overview...117 9 Technical Information ...

Online Users Guide PDF
Page 11
1 Setting Up the Printer 1 1 General Description 1 Front (RJ-3050/3050Ai) 87 6 9 10 11 12 131415 16 5 4 3 2 1 1 Battery compartment 2 Battery latch 3 Mini-USB port 4 DC connector 5 Cover open lever 6 RD Roll compartment cover 7 Paper outlet 8 Battery indicator 9 STATUS indicator 10 POWER indicator 11 (Power) button (To turn the printer ...on/off) 12 (Feed) button (To feed the paper or print the printer settings) 13 (Wi-Fi) button (To communicate with your wireless devices or wireless access point/router) 14 Wi...
1 Setting Up the Printer 1 1 General Description 1 Front (RJ-3050/3050Ai) 87 6 9 10 11 12 131415 16 5 4 3 2 1 1 Battery compartment 2 Battery latch 3 Mini-USB port 4 DC connector 5 Cover open lever 6 RD Roll compartment cover 7 Paper outlet 8 Battery indicator 9 STATUS indicator 10 POWER indicator 11 (Power) button (To turn the printer ...on/off) 12 (Feed) button (To feed the paper or print the printer settings) 13 (Wi-Fi) button (To communicate with your wireless devices or wireless access point/router) 14 Wi...

Online Users Guide PDF
Page 12
Setting Up the Printer Front (RJ-3150/3150Ai) Back (RJ-3150/3150Ai) 1 10 9 8 11 12 13 14 15 16 17 18 67 5 4 1 23 1 Battery compartment 2 Battery latch 3 USB host port 4 Mini-USB port 5 DC connector 6 Cover open lever 7 Peeler latch 8 RD Roll compartment cover 9 Paper outlet 10 Label peeler 11 LCD display 12 Battery indicator 13 (Power) button (To turn the printer on/off) 14 (Cancel) button 15 Cursor button ( UP/ DOWN) 16 OK button 17 Menu button 18 (Feed) button (To feed the paper or print the printer settings) 1 1 Battery cover (for clock battery) 3
Setting Up the Printer Front (RJ-3150/3150Ai) Back (RJ-3150/3150Ai) 1 10 9 8 11 12 13 14 15 16 17 18 67 5 4 1 23 1 Battery compartment 2 Battery latch 3 USB host port 4 Mini-USB port 5 DC connector 6 Cover open lever 7 Peeler latch 8 RD Roll compartment cover 9 Paper outlet 10 Label peeler 11 LCD display 12 Battery indicator 13 (Power) button (To turn the printer on/off) 14 (Cancel) button 15 Cursor button ( UP/ DOWN) 16 OK button 17 Menu button 18 (Feed) button (To feed the paper or print the printer settings) 1 1 Battery cover (for clock battery) 3

Online Users Guide PDF
Page 19
...RJ-3150/3150Ai Only) on LCD display Note When turning the printer off, do NOT remove the battery until the STATUS indicator goes off (for RJ-3050/3050Ai) or the LCD display turns off (for RJ...-3150/3150Ai). Setting Up the Printer Turning the Printer On or Off 1 1 RJ-3050/ 3050Ai RJ-3150/ 3150Ai On (Press and... Roll 1 Note • The RJ-3150/3150Ai can display graphical loading instructions. Simply open the RD Roll compartment cover and press the [Menu] button. • The RJ-3150/3150Ai is equipped with a ...
...RJ-3150/3150Ai Only) on LCD display Note When turning the printer off, do NOT remove the battery until the STATUS indicator goes off (for RJ-3050/3050Ai) or the LCD display turns off (for RJ...-3150/3150Ai). Setting Up the Printer Turning the Printer On or Off 1 1 RJ-3050/ 3050Ai RJ-3150/ 3150Ai On (Press and... Roll 1 Note • The RJ-3150/3150Ai can display graphical loading instructions. Simply open the RD Roll compartment cover and press the [Menu] button. • The RJ-3150/3150Ai is equipped with a ...

Online Users Guide PDF
Page 22
When Using the Label Peeler (RJ-3150/3150Ai Only) 1 If the label peeler is sharp. http://solutions.brother.com/movie/d532/ 13 Pull one edge of the ejected paper up the label peeler is removed from the printer. To avoid injury, do not touch the tear bar. This is useful when printing large... tear bar is used, printed labels can be cut using the printer's tear bar. Setting Up the Printer Cutting Roll Paper 1 Roll paper can be automatically peeled off their backing paper before they are fed out of the media exit. Note • You can also view information about setting the label ...
When Using the Label Peeler (RJ-3150/3150Ai Only) 1 If the label peeler is sharp. http://solutions.brother.com/movie/d532/ 13 Pull one edge of the ejected paper up the label peeler is removed from the printer. To avoid injury, do not touch the tear bar. This is useful when printing large... tear bar is used, printed labels can be cut using the printer's tear bar. Setting Up the Printer Cutting Roll Paper 1 Roll paper can be automatically peeled off their backing paper before they are fed out of the media exit. Note • You can also view information about setting the label ...

Online Users Guide PDF
Page 24
The backing paper of the labels may not be pulled out. f Push both sides of the ( ) label peeler until no more can...height as the top edge of the RD Roll. e In order to remove any slack in the roll, lightly pull on top of the paper outlet until it . 1 1 1 Media sensor d Close the RD Roll compartment cover. Then, insert the RD Roll so that the ...labels are not pinched by the peeler rollers. Important Make sure that the top edge of the second label is on the paper fed out of the cover. Setting Up the Printer c Peel off . Position the label where the media sensor can be ...
The backing paper of the labels may not be pulled out. f Push both sides of the ( ) label peeler until no more can...height as the top edge of the RD Roll. e In order to remove any slack in the roll, lightly pull on top of the paper outlet until it . 1 1 1 Media sensor d Close the RD Roll compartment cover. Then, insert the RD Roll so that the ...labels are not pinched by the peeler rollers. Important Make sure that the top edge of the second label is on the paper fed out of the cover. Setting Up the Printer c Peel off . Position the label where the media sensor can be ...

Online Users Guide PDF
Page 26
If a label remains in the media exit, the next label will not be adjusted. For details, see Sensor Adjustment Tab on page 74. 17 Note With the label peeler, a sensor detects whether or not the label has been peeled off their backing paper before they are fed out of the sensor can be printed. Be sure to close the dialog box. The detection sensitivity of the media exit. After Printing 1 1 Printed labels can be automatically peeled off , and controls the appropriate operation. Setting Up the Printer c Click [OK] to remove the printed label.
If a label remains in the media exit, the next label will not be adjusted. For details, see Sensor Adjustment Tab on page 74. 17 Note With the label peeler, a sensor detects whether or not the label has been peeled off their backing paper before they are fed out of the sensor can be printed. Be sure to close the dialog box. The detection sensitivity of the media exit. After Printing 1 1 Printed labels can be automatically peeled off , and controls the appropriate operation. Setting Up the Printer c Click [OK] to remove the printed label.

Online Users Guide PDF
Page 28
Do not forcefully tilt the roll guide too far. Otherwise, the roll guide could break. 1 1 1 2 1 Roll release lever Note When you use the label peeler (RJ-3150/3150Ai only), make sure that the backing paper does not become caught when removing the RD Roll. 19 The roll can be removed without changing the position of the roll guide. Setting Up the Printer b While pushing the roll release lever, tilt the roll guide slightly, and then remove the roll.
Do not forcefully tilt the roll guide too far. Otherwise, the roll guide could break. 1 1 1 2 1 Roll release lever Note When you use the label peeler (RJ-3150/3150Ai only), make sure that the backing paper does not become caught when removing the RD Roll. 19 The roll can be removed without changing the position of the roll guide. Setting Up the Printer b While pushing the roll release lever, tilt the roll guide slightly, and then remove the roll.

Online Users Guide PDF
Page 38
... of the reference point (point of some applications. Setting Up the Printer With the buttons on the printer, the following settings can be adjusted for paper media. Menu Settings Title Printer Settings Sub title Print Density Exit Position Print Adjust (X) Print Adjust (Y) Settings -5 -4 -3 -2 -1 0 +1 +2 +3 +4 +5 Tear Peel *.** inch (or *.** mm) *.** inch (or *.** mm...
... of the reference point (point of some applications. Setting Up the Printer With the buttons on the printer, the following settings can be adjusted for paper media. Menu Settings Title Printer Settings Sub title Print Density Exit Position Print Adjust (X) Print Adjust (Y) Settings -5 -4 -3 -2 -1 0 +1 +2 +3 +4 +5 Tear Peel *.** inch (or *.** mm) *.** inch (or *.** mm...
Online Users Guide PDF
Page 49
...) button until the 2 POWER indicator lights in green (for RJ-3050/3050Ai) or the LCD display turns on (for RJ-3150/3150Ai), the printer starts up in mass storage mode (see Mass Storage on page 91). (Feed) button function Feed the paper Print the printer set-up Information on page 116). (Wi-...Fi) button function (RJ-3050/3050Ai only) Use WPS to set to [Continuous Length Tape]: Press the (Feed) button to install the printer...
...) button until the 2 POWER indicator lights in green (for RJ-3050/3050Ai) or the LCD display turns on (for RJ-3150/3150Ai), the printer starts up in mass storage mode (see Mass Storage on page 91). (Feed) button function Feed the paper Print the printer set-up Information on page 116). (Wi-...Fi) button function (RJ-3050/3050Ai only) Use WPS to set to [Continuous Length Tape]: Press the (Feed) button to install the printer...

Online Users Guide PDF
Page 52
...Brother paper. Note In addition to be printed. b Make sure that the printer is powered using either a USB cable, Bluetooth, or Wi-Fi. (See Connecting the Computer and Printer on . These drivers can 2 be downloaded from Computers and Mobile Devices 2 For typical printing, use the following procedure. RJ-3050/3050Ai 2 RJ... Inserting the RD Roll on . Printing from our website (install.brother). Use genuine Brother die-cut labels. a Open the document to printing receipts, RJ-3150/3150Ai can print labels. For RJ-3050/3050Ai, the POWER indicator lights in green. e Connect the printer...
...Brother paper. Note In addition to be printed. b Make sure that the printer is powered using either a USB cable, Bluetooth, or Wi-Fi. (See Connecting the Computer and Printer on . These drivers can 2 be downloaded from Computers and Mobile Devices 2 For typical printing, use the following procedure. RJ-3050/3050Ai 2 RJ... Inserting the RD Roll on . Printing from our website (install.brother). Use genuine Brother die-cut labels. a Open the document to printing receipts, RJ-3150/3150Ai can print labels. For RJ-3050/3050Ai, the POWER indicator lights in green. e Connect the printer...

Online Users Guide PDF
Page 54
... Setup on page 85 and Device Settings on page 67). 2 Printing Labels Stored in the printer driver screen, such as paper size, number of copies, etc. b Select [Template Settings] > [Template Mode] > [On] using the "Printer Setting Tool". The template mode screen is displayed. 1 2 3 4 1...the [Settings] menu, and then press the [OK] button. Using the Printer Printer Driver Options 2 You can configure various settings in the Printer (RJ-3150/3150Ai Only) 2 A label layout transferred to the printer can easily be printed, or the contents can be replaced with the contents scanned using ...
... Setup on page 85 and Device Settings on page 67). 2 Printing Labels Stored in the printer driver screen, such as paper size, number of copies, etc. b Select [Template Settings] > [Template Mode] > [On] using the "Printer Setting Tool". The template mode screen is displayed. 1 2 3 4 1...the [Settings] menu, and then press the [OK] button. Using the Printer Printer Driver Options 2 You can configure various settings in the Printer (RJ-3150/3150Ai Only) 2 A label layout transferred to the printer can easily be printed, or the contents can be replaced with the contents scanned using ...


