

Fly Indexer Instruction Manual - English
Page 3
(1L5[ /INTRODUCTION 0)-NuA atiVA.IN L-ctga h ton:\ li atnIA91-1±Valifiltk ` at
(1L5[ /INTRODUCTION 0)-NuA atiVA.IN L-ctga h ton:\ li atnIA91-1±Valifiltk ` at

Fly Indexer Instruction Manual - English
Page 4
... cloth feeding speed 23 7-2. T.A.rt /CLEANING AND MAINTENANCE 22 7. EL\)/SEWING 22 5-1. *ktr, > 9 opi t , /Using the production counter 22 6. tikhlf- 0)/gAitiff.lAI /Adjusting the cloth feed bar home position 24 7-3. 4 2 5', H}-0) r.1 O:4445 /Adjusting the indexer hole spacing 25 7-3-1. MitraM /STANDARD ADJUSTMENTS 23 7-1. 31. 5. F. )7 ,-0D*UJEli /Using the set collar 26 7-4. 1) 7 l`.A4 L °DICER-At /Adjusting the position of limit switch L 27 7-5. 1) 3, i F 7 4 7 R Gni:NAVA/Adjusting the position of limit switch R 28 RH-9800...
... cloth feeding speed 23 7-2. T.A.rt /CLEANING AND MAINTENANCE 22 7. EL\)/SEWING 22 5-1. *ktr, > 9 opi t , /Using the production counter 22 6. tikhlf- 0)/gAitiff.lAI /Adjusting the cloth feed bar home position 24 7-3. 4 2 5', H}-0) r.1 O:4445 /Adjusting the indexer hole spacing 25 7-3-1. MitraM /STANDARD ADJUSTMENTS 23 7-1. 31. 5. F. )7 ,-0D*UJEli /Using the set collar 26 7-4. 1) 7 l`.A4 L °DICER-At /Adjusting the position of limit switch L 27 7-5. 1) 3, i F 7 4 7 R Gni:NAVA/Adjusting the position of limit switch R 28 RH-9800...

Fly Indexer Instruction Manual - English
Page 5
... 413t.±--±.(oycrat - 9 Ir-t o L'Irrn < ■ if sewing a buttonhole using a non-standard distance between buttonholes 44.45 mm (1 3/4 inch) 44.45 mm (1 3/4 inch) 57.15 mm (21/4 inch) No. MAR Distance between buttonholes 4NIC,)f-t Vertical sewing margin Horizontal sewing margin Mild buttonholes Horizontal feed amount RH-9800-52, 55 1 SPECIFICATIONS 1. 1. still 1. of buttonholes can be programmed up to process additional holes in that case.
... 413t.±--±.(oycrat - 9 Ir-t o L'Irrn < ■ if sewing a buttonhole using a non-standard distance between buttonholes 44.45 mm (1 3/4 inch) 44.45 mm (1 3/4 inch) 57.15 mm (21/4 inch) No. MAR Distance between buttonholes 4NIC,)f-t Vertical sewing margin Horizontal sewing margin Mild buttonholes Horizontal feed amount RH-9800-52, 55 1 SPECIFICATIONS 1. 1. still 1. of buttonholes can be programmed up to process additional holes in that case.

Fly Indexer Instruction Manual - English
Page 11
... be used as a supplement to the machine or thread trimming errors.) El;Ix /CONTENTS 1. 1±t51/SPECIFICATIONS 2. Error code table 21 RH-9800-52, 55 h 4.6')/A 19 /Operating the cloth feed bar without material 16 4-3. 713 75 -/-qatToDifib- /Setting a program 17 4-3. -FL 4U 71-4/.Ift a rk.- /Setting the number of eyelet buttonholes 18 4-3. -FP 4. (7 7 4 ) 6)-b 7 littlff041'1- /Setting the material setting position 18 4-3. -HP a A.mi Lit 4 5 )1, Igto)fitZ /Setting the number of cloth feed plate L 14 4. J-7 .2 -760*g /Installing...
... be used as a supplement to the machine or thread trimming errors.) El;Ix /CONTENTS 1. 1±t51/SPECIFICATIONS 2. Error code table 21 RH-9800-52, 55 h 4.6')/A 19 /Operating the cloth feed bar without material 16 4-3. 713 75 -/-qatToDifib- /Setting a program 17 4-3. -FL 4U 71-4/.Ift a rk.- /Setting the number of eyelet buttonholes 18 4-3. -FP 4. (7 7 4 ) 6)-b 7 littlff041'1- /Setting the material setting position 18 4-3. -HP a A.mi Lit 4 5 )1, Igto)fitZ /Setting the number of cloth feed plate L 14 4. J-7 .2 -760*g /Installing...
Fly Indexer Instruction Manual - English
Page 26
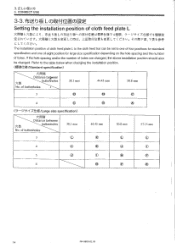
3.1E ti).Z.In 3. CORRECT USE 3-3. I9o_ opffY.1A-fillitrys-ftf±ar 4 WM, - tu-c t o i-' 1391PriLict{c'fiaLt,-AU, /It Lt h b t& L 01131711IEGYRZ Setting the installation position of cloth feed plate L 1 h, In h aLop ig-.
3.1E ti).Z.In 3. CORRECT USE 3-3. I9o_ opffY.1A-fillitrys-ftf±ar 4 WM, - tu-c t o i-' 1391PriLict{c'fiaLt,-AU, /It Lt h b t& L 01131711IEGYRZ Setting the installation position of cloth feed plate L 1 h, In h aLop ig-.
Fly Indexer Instruction Manual - English
Page 43
...) ROLLER LEVER SCREW, PAN M3X14 SETSCREW COLLAR SET SCREW,-SOCKET (CP) M4X5 FEED GUIDE SHAFT BOLT, SOCKET M4X12 FEDD BAR GUIDE, L BOLT, SOCKET M4X8 FEED BASE, R CYLINDER ASSY, 10X5 CYLINDER, 10X5 HOSE NIPPLE, 4M5 BUTTON PRESSER, A FEED BAR GUIDE ASSY, R LIMIT SWITCH ASSY SWITCH (VX) ROLLER LEVER SCREW, PAN M3X14 SCREW, BIND M4X5 CLOTH FEED BAR CLOTH FEED PLATE, L SCREW, FLAT M3X8 SCREW, FLAT M3X8 VERTICAL CLOTH SET GUIDE SCREW, BIND M4X5 HORIZONTAL CLOTH SET GUIDE (L) SPRING SCREW, BIND M3X4 SCREW...
...) ROLLER LEVER SCREW, PAN M3X14 SETSCREW COLLAR SET SCREW,-SOCKET (CP) M4X5 FEED GUIDE SHAFT BOLT, SOCKET M4X12 FEDD BAR GUIDE, L BOLT, SOCKET M4X8 FEED BASE, R CYLINDER ASSY, 10X5 CYLINDER, 10X5 HOSE NIPPLE, 4M5 BUTTON PRESSER, A FEED BAR GUIDE ASSY, R LIMIT SWITCH ASSY SWITCH (VX) ROLLER LEVER SCREW, PAN M3X14 SCREW, BIND M4X5 CLOTH FEED BAR CLOTH FEED PLATE, L SCREW, FLAT M3X8 SCREW, FLAT M3X8 VERTICAL CLOTH SET GUIDE SCREW, BIND M4X5 HORIZONTAL CLOTH SET GUIDE (L) SPRING SCREW, BIND M3X4 SCREW...

Fly Indexer Instruction Manual - English
Page 49
...-4 CYLINDER ROD CYLINDER ROD PIN RETAINING RING, E3 STOPPER BLOCK BOLT, SOCKET M4X16 SWITCH SETTING PLATE BOLT, SOCKET M4X12 LIMIT SWITCH ASSY, L SWITCH (VX) ROLLER LEVER SCREW, PAN M3X14 SET SCREW COLLAR SET SCREW, SOCKET (CP) M4X5 FEED GUIDE SHAFT BOLT, SOCKET M4X12 FEDD BAR GUIDE, L BOLT, SOCKET M4X8 FEED BASE, R-6H CYLINDER ASSY, 10X5 CYLINDER, 10X5 HOSE NIPPLE, 4M5 BUTTON PRESSER, A FEED BAR GUIDE ASSY, R LIMIT SWITCH ASSY...
...-4 CYLINDER ROD CYLINDER ROD PIN RETAINING RING, E3 STOPPER BLOCK BOLT, SOCKET M4X16 SWITCH SETTING PLATE BOLT, SOCKET M4X12 LIMIT SWITCH ASSY, L SWITCH (VX) ROLLER LEVER SCREW, PAN M3X14 SET SCREW COLLAR SET SCREW, SOCKET (CP) M4X5 FEED GUIDE SHAFT BOLT, SOCKET M4X12 FEDD BAR GUIDE, L BOLT, SOCKET M4X8 FEED BASE, R-6H CYLINDER ASSY, 10X5 CYLINDER, 10X5 HOSE NIPPLE, 4M5 BUTTON PRESSER, A FEED BAR GUIDE ASSY, R LIMIT SWITCH ASSY...

Fly Indexer Instruction Manual - English
Page 51
... 1 a -17* I -. giox59 Z 1 i>1):.- 9iox5 1 it 2 t - x I-4M 1 t 9 11 K9-fR 1 fi I ./t-r F59 4 7J-;JUI, h4x12 1 4- 1/ 711r)ii-f FL/Z: 2 79-* - Z4x5 2 4- 9 I .):- Utn)- -( 9 2 7J-t)i, F-4x12 1 Li n77N-)k#N'. CODE Crry E>x-f NAME OF PARTS RM 1 1-1 1-2 1-3 1-4 1-5 1-5-1 1-5-2 1-6 1-7 1-8 1-9 1-10 1-11 1-12 1-13 1-14 1-15 1-15-1 1-15-2 1-15-3 1-16 1-17 1-18 1-19 1-20 1-21 1-22 1-23 1-23-1 1-24 1-25 1-26 1-27 1-28...
... 1 a -17* I -. giox59 Z 1 i>1):.- 9iox5 1 it 2 t - x I-4M 1 t 9 11 K9-fR 1 fi I ./t-r F59 4 7J-;JUI, h4x12 1 4- 1/ 711r)ii-f FL/Z: 2 79-* - Z4x5 2 4- 9 I .):- Utn)- -( 9 2 7J-t)i, F-4x12 1 Li n77N-)k#N'. CODE Crry E>x-f NAME OF PARTS RM 1 1-1 1-2 1-3 1-4 1-5 1-5-1 1-5-2 1-6 1-7 1-8 1-9 1-10 1-11 1-12 1-13 1-14 1-15 1-15-1 1-15-2 1-15-3 1-16 1-17 1-18 1-19 1-20 1-21 1-22 1-23 1-23-1 1-24 1-25 1-26 1-27 1-28...

Fly Indexer Instruction Manual - English
Page 57
IP7 ,)- -f 9 2 7J-*/1. 1-4X12 1 I - CODE QTY a > ..1 -f NAME OF PARTS RM " 5 - fPit -I " " LARGE SIZE " 1 1-41-1 1 1-41-2 548329001 543809001 548334001 542139101 < L1,L2,L5> 1 -f 2.-f -7 -7- -Lsy r) h .,'.-. 1 3 J I .) n 7. ;f -)1,, tik h5X16 1 2S -f7 I's 1 t I .) -1n -Liu 1 -f >5=/# -LL..) r) ,› -;.: 1 3/t7U-19R < L1,L2,L5> FLY INDEXER LS ASSY CLOTH FEED PLATE, R-L1L2 FLY INDEXER (LL) ASSY CLOTH FEED PLATE, R 1-1 1-2 1-3 1-4 1-5 1-5-1 1-5-2 1-6 1-7 1-8 1-9 1-10 1-11 1-12 1-13 1-14 1-15 1-15-1 1-15...
IP7 ,)- -f 9 2 7J-*/1. 1-4X12 1 I - CODE QTY a > ..1 -f NAME OF PARTS RM " 5 - fPit -I " " LARGE SIZE " 1 1-41-1 1 1-41-2 548329001 543809001 548334001 542139101 < L1,L2,L5> 1 -f 2.-f -7 -7- -Lsy r) h .,'.-. 1 3 J I .) n 7. ;f -)1,, tik h5X16 1 2S -f7 I's 1 t I .) -1n -Liu 1 -f >5=/# -LL..) r) ,› -;.: 1 3/t7U-19R < L1,L2,L5> FLY INDEXER LS ASSY CLOTH FEED PLATE, R-L1L2 FLY INDEXER (LL) ASSY CLOTH FEED PLATE, R 1-1 1-2 1-3 1-4 1-5 1-5-1 1-5-2 1-6 1-7 1-8 1-9 1-10 1-11 1-12 1-13 1-14 1-15 1-15-1 1-15...

Instruction Manual - English
Page 4
... the machine. RH-9800 iii The sewing machine should not be used without these devices attached, injury may operate if the start switch is used for the needle on when carrying out some adjustment, be left on the pressure gauge to drop to wear protective goggles when using a work table which use beforehand. If the machine is pressed by mistake, which could result in injury. If the machine develops a problem, contact...
... the machine. RH-9800 iii The sewing machine should not be used without these devices attached, injury may operate if the start switch is used for the needle on when carrying out some adjustment, be left on the pressure gauge to drop to wear protective goggles when using a work table which use beforehand. If the machine is pressed by mistake, which could result in injury. If the machine develops a problem, contact...

Instruction Manual - English
Page 6
... Y correction 25 P3. Adjusting the thread tension 32 7-4. Using a cycle program 36 7-7. Using feed mode 38 7-10.Using manual mode 39 7-11.Changing the cycle program counter 40 7-12.Setting the number of machine operation.......15 5-4. Draining the oil 42 8-3. Adjusting the needle and looper timing 44 9-3. Adjusting the loop stroke 45 9-4. Adjusting the spreader mounting positions......... 47 9-8. INSTALLATION 3 3-1. Table processing diagram 3 3-2. LUBRICATION 12 4-1. Initializing settings 14 5-2. Checking the direction of home position cycles ...... 40 7-13...
... Y correction 25 P3. Adjusting the thread tension 32 7-4. Using a cycle program 36 7-7. Using feed mode 38 7-10.Using manual mode 39 7-11.Changing the cycle program counter 40 7-12.Setting the number of machine operation.......15 5-4. Draining the oil 42 8-3. Adjusting the needle and looper timing 44 9-3. Adjusting the loop stroke 45 9-4. Adjusting the spreader mounting positions......... 47 9-8. INSTALLATION 3 3-1. Table processing diagram 3 3-2. LUBRICATION 12 4-1. Initializing settings 14 5-2. Checking the direction of home position cycles ...... 40 7-13...

Instruction Manual - English
Page 18
..., so that your skin, otherwise inflammation can cause vomiting and diarrhoea. VG10) for the first time, and also after long periods of machine oil into the arm oil tank (1) (until it is pressed by the arrows. 0861Q RH-9800 12 Raise the machine head. 2. Lower the machine head. 4-2. Use only specified Brother oil (Nisseki Mitsubishi Sewing Lube 10 N; When oiling, some oil will get stained with...
..., so that your skin, otherwise inflammation can cause vomiting and diarrhoea. VG10) for the first time, and also after long periods of machine oil into the arm oil tank (1) (until it is pressed by the arrows. 0861Q RH-9800 12 Raise the machine head. 2. Lower the machine head. 4-2. Use only specified Brother oil (Nisseki Mitsubishi Sewing Lube 10 N; When oiling, some oil will get stained with...

Instruction Manual - English
Page 29
.... 2. Press the "Up" button (L) or the "Down" button (K) to set , it will stop flashing. RH-9800 23 If this value may be possible to set the desired offset. * When the setting value is done, it will flash. 4. Press the ENTER button (N) to between the buttonhole length and the tacking length less than 7 mm. 3. Setting the stitch pitch (K) 1144Q (L) (N) 1145Q 1. USING THE OPERATION PANEL AND FRONT...
.... 2. Press the "Up" button (L) or the "Down" button (K) to set , it will stop flashing. RH-9800 23 If this value may be possible to set the desired offset. * When the setting value is done, it will flash. 4. Press the ENTER button (N) to between the buttonhole length and the tacking length less than 7 mm. 3. Setting the stitch pitch (K) 1144Q (L) (N) 1145Q 1. USING THE OPERATION PANEL AND FRONT...
Instruction Manual - English
Page 33
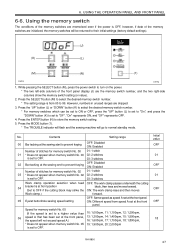
.... 03: 3 stitches Work clamp operation selection when feed OFF: The work clamp rises and then moves Work clamp.) forward. 05 Eyelet buttonhole sewing speed setting OFF: Same speed as speed A set at the front panel. Speed for memory switch No. 02 01: 1 stitch 03 * Does not appear when memory switch No. 02 02: 2 stitches is set to 99. Press the SELECT button (M) to select the desired memory switch number. * The setting range is...
.... 03: 3 stitches Work clamp operation selection when feed OFF: The work clamp rises and then moves Work clamp.) forward. 05 Eyelet buttonhole sewing speed setting OFF: Same speed as speed A set at the front panel. Speed for memory switch No. 02 01: 1 stitch 03 * Does not appear when memory switch No. 02 02: 2 stitches is set to 99. Press the SELECT button (M) to select the desired memory switch number. * The setting range is...

Instruction Manual - English
Page 36
... (1). * All machine operations will stop sewing, press the RESET button (4). * The TROUBLE indicator will switch off , the "E-60" error code will be cleared from the front panel display and the feed bracket will appear on the front panel display at this time. 2. The TROUBLE indicator will illuminate and "E-60" will return to the cloth setting position. Eliminate the cause of the problem. * The machine will...
... (1). * All machine operations will stop sewing, press the RESET button (4). * The TROUBLE indicator will switch off , the "E-60" error code will be cleared from the front panel display and the feed bracket will appear on the front panel display at this time. 2. The TROUBLE indicator will illuminate and "E-60" will return to the cloth setting position. Eliminate the cause of the problem. * The machine will...

Instruction Manual - English
Page 37
... cloth presser will switch off the power switch at this operation, repeat steps 6. Press the power switch (1) to turn the pulley to set the needle to the machine. Sewing will then start switch (9). Refer to the following times, otherwise the machine may result in personal injury or damage to its upper position, and press the RESET button (3). 3. Check the thread tension after sewing. (Refer to the cloth setting position. * If...
... cloth presser will switch off the power switch at this operation, repeat steps 6. Press the power switch (1) to turn the pulley to set the needle to the machine. Sewing will then start switch (9). Refer to the following times, otherwise the machine may result in personal injury or damage to its upper position, and press the RESET button (3). 3. Check the thread tension after sewing. (Refer to the cloth setting position. * If...
Instruction Manual - English
Page 49
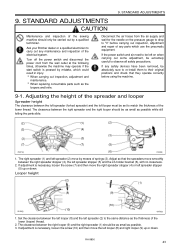
... out inspection, adjustment and repair of any parts which could result in injury. Set the clearance between the right looper (9) and the right spreader (1) should only be absolutely sure to re-install them to "0" before using the machine. 9-1. RH-9800 43 Disconnect the air hoses from the wall outlet at the following times, otherwise the machine may operate if the start switch is...
... out inspection, adjustment and repair of any parts which could result in injury. Set the clearance between the right looper (9) and the right spreader (1) should only be absolutely sure to re-install them to "0" before using the machine. 9-1. RH-9800 43 Disconnect the air hoses from the wall outlet at the following times, otherwise the machine may operate if the start switch is...

Instruction Manual - English
Page 64
.... 43 Needle and needle adjustment is bent. Cause Remedy Page Thread tension control pressure is blunt. Adjust correctly. 47 Looper tip is too strong. CAUTION Turn off the power switch and disconnect the power cord before carrying out troubleshooting, otherwise the machine will operate if the start switch is damaged. Needle groove or needle hole are correctly threaded and that the threads are not smooth. Skipped stitches occur. 11. MACHINE HEAD Problem Thread breaks. Use a differently-size needle...
.... 43 Needle and needle adjustment is bent. Cause Remedy Page Thread tension control pressure is blunt. Adjust correctly. 47 Looper tip is too strong. CAUTION Turn off the power switch and disconnect the power cord before carrying out troubleshooting, otherwise the machine will operate if the start switch is damaged. Needle groove or needle hole are correctly threaded and that the threads are not smooth. Skipped stitches occur. 11. MACHINE HEAD Problem Thread breaks. Use a differently-size needle...

Hand Book - English
Page 12
... parts set, -2 Part code Q'ty S37698-000 1 S37699-000 1 L4: 26 - 30 mm S38575-001 Exchange parts set, L4 L2: 28 - 32 mm S41467-00 Exchange parts set, L5 L3: 32 - 36 mm S41468-001 Exchange parts set, L6 S38584-001 Exchange parts set, -2 L4: 36 - 40 mm S41469-001 Exchange parts set, L7 RH-9800 12/17 2002.10 Option parts Cloth guide Cloth guide, J Movable knife cover Part name Part code...
... parts set, -2 Part code Q'ty S37698-000 1 S37699-000 1 L4: 26 - 30 mm S38575-001 Exchange parts set, L4 L2: 28 - 32 mm S41467-00 Exchange parts set, L5 L3: 32 - 36 mm S41468-001 Exchange parts set, L6 S38584-001 Exchange parts set, -2 L4: 36 - 40 mm S41469-001 Exchange parts set, L7 RH-9800 12/17 2002.10 Option parts Cloth guide Cloth guide, J Movable knife cover Part name Part code...
Hand Book - English
Page 13
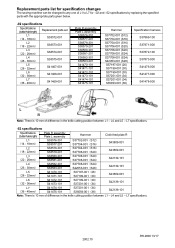
L4 and L5 - L7 specifications. 2002.10 RH-9800 13/17 L7 specifications. -52 specifications Specifications (buttonhole length) Plate R assembly Plate L assembly Hammer Cloth feed plate R L1 (14 - 18mm) S38576-301 S38577-... knife cutting position between L1 - L4 and L5 - Replacement parts list for specification changes The sewing machine can be changed to any one of L1 to L7 for -02 and -52 specifications by replacing the specified parts with the appropriate parts given below. -02 specifications Specifications (buttonhole length) Replacement parts set L1 (...
L4 and L5 - L7 specifications. 2002.10 RH-9800 13/17 L7 specifications. -52 specifications Specifications (buttonhole length) Plate R assembly Plate L assembly Hammer Cloth feed plate R L1 (14 - 18mm) S38576-301 S38577-... knife cutting position between L1 - L4 and L5 - Replacement parts list for specification changes The sewing machine can be changed to any one of L1 to L7 for -02 and -52 specifications by replacing the specified parts with the appropriate parts given below. -02 specifications Specifications (buttonhole length) Replacement parts set L1 (...


