

Fly Indexer Instruction Manual - English
Page 11
... added to the machine head must be used as a supplement to the machine or thread trimming errors.) El;Ix /CONTENTS 1. 1±t51/SPECIFICATIONS 2. Xfi (7 ) 69 -t 7 01)Lth. /Setting the material 12 3-2-1. * (7 7 4 ) 0)-h 7 h fiit /Material setting position 13 3-3. Igk-It(jZ /INSTALLATION 2 2-1. .1. 'Y F a 0 O y .7 / 140- /Installing the air unit and the valve unit 2 2-2. (O*K /... not contained in this manual. tA P) /EL oNfR142fO.60Ta-t. /Setting the installation position of home position start cycles 19 4-4. - = - 20 4-4. Error code table 21 RH-9800-52, 55
... added to the machine head must be used as a supplement to the machine or thread trimming errors.) El;Ix /CONTENTS 1. 1±t51/SPECIFICATIONS 2. Xfi (7 ) 69 -t 7 01)Lth. /Setting the material 12 3-2-1. * (7 7 4 ) 0)-h 7 h fiit /Material setting position 13 3-3. Igk-It(jZ /INSTALLATION 2 2-1. .1. 'Y F a 0 O y .7 / 140- /Installing the air unit and the valve unit 2 2-2. (O*K /... not contained in this manual. tA P) /EL oNfR142fO.60Ta-t. /Setting the installation position of home position start cycles 19 4-4. - = - 20 4-4. Error code table 21 RH-9800-52, 55

Fly Indexer Instruction Manual - English
Page 24
... setting guide (R) 0. CORRECT USE 3-2. (75-f) Ot l--Oi± . /Setting the material • 0 3- •o.o-o OO 9-21 mm 30 - 40 mm (75-0 - )ceLIELAM-c-01,7)., i hoot.Ri~, A -L,e L411-p -Ey Ft- 4 RaLO, RO I -clip to 3. W -r FaL O. L7. Loosen the four screws 0 at left and right, and move ...to adjust. 3. Loosen the two screws 0, and move cloth setting guide (L) 0 and cloth setting guide (R) 0 forward or back to adjust. 12 RH-9800-52. 55 The horizontal sewing margin can be adjusted between 30 - 40 mm. While holding the material between 9 - 21 mm for LS - R...
... setting guide (R) 0. CORRECT USE 3-2. (75-f) Ot l--Oi± . /Setting the material • 0 3- •o.o-o OO 9-21 mm 30 - 40 mm (75-0 - )ceLIELAM-c-01,7)., i hoot.Ri~, A -L,e L411-p -Ey Ft- 4 RaLO, RO I -clip to 3. W -r FaL O. L7. Loosen the four screws 0 at left and right, and move ...to adjust. 3. Loosen the two screws 0, and move cloth setting guide (L) 0 and cloth setting guide (R) 0 forward or back to adjust. 12 RH-9800-52. 55 The horizontal sewing margin can be adjusted between 30 - 40 mm. While holding the material between 9 - 21 mm for LS - R...

Fly Indexer Instruction Manual - English
Page 38
... in this position, and if you want to the previous page.) 4. F t 5 - 00 01( ®19{.19)) 7--cnrim DYE" 44.45mm (13/4') oDt.fr 14/1.-7.a, h '10 7 0 t t 0 ( f.flg) L1-to the previous page.) 2. O H C9 0 O Example: For spacings of different hole intervals. 26 RH-9800-52, 55 t t - 0 (A.-.N19) h c-Thici 0 v.: 4. Use the same setting method if using...
... in this position, and if you want to the previous page.) 4. F t 5 - 00 01( ®19{.19)) 7--cnrim DYE" 44.45mm (13/4') oDt.fr 14/1.-7.a, h '10 7 0 t t 0 ( f.flg) L1-to the previous page.) 2. O H C9 0 O Example: For spacings of different hole intervals. 26 RH-9800-52, 55 t t - 0 (A.-.N19) h c-Thici 0 v.: 4. Use the same setting method if using...

Fly Indexer Instruction Manual - English
Page 42
I , --- 01, 11-60-2 l 1-36 A- 1-42 1-82 1_32-14 1-32-24 1-37 ? 1-75 1-34 1-62 -.--r-- .... ..>i--1.... 4I-6.F.::_.011.5l I 1-60-40-60-1 6 \ N\ '1_60-1-2I I -1_54 1 5° 1-17 1-79 - A, 1-...
I , --- 01, 11-60-2 l 1-36 A- 1-42 1-82 1_32-14 1-32-24 1-37 ? 1-75 1-34 1-62 -.--r-- .... ..>i--1.... 4I-6.F.::_.011.5l I 1-60-40-60-1 6 \ N\ '1_60-1-2I I -1_54 1 5° 1-17 1-79 - A, 1-...

Instruction Manual - English
Page 8
Nm 120 (Schmetz) Built-in accordance with taper RH-9800 2 Specifications DH4-B980RH-9800- L7 specifications in emergency stop function and automatic stopping device which stops the machine when the safety circuit is further divided ... 0796Q Straight buttonhole with the stitch length. 2. speed of 2,000 rpm, measured according to specify the stitch length when ordering. SPECIFICATIONS 2. Upper thread trimmer -00 -01 -02 Lower thread trimmer Long type Short type - - - - * * -02 is activated Main regulator: 0.5 MPa Knife pressure regulator: 0.3 MPa 43.2 l/min. (8 ...
Nm 120 (Schmetz) Built-in accordance with taper RH-9800 2 Specifications DH4-B980RH-9800- L7 specifications in emergency stop function and automatic stopping device which stops the machine when the safety circuit is further divided ... 0796Q Straight buttonhole with the stitch length. 2. speed of 2,000 rpm, measured according to specify the stitch length when ordering. SPECIFICATIONS 2. Upper thread trimmer -00 -01 -02 Lower thread trimmer Long type Short type - - - - * * -02 is activated Main regulator: 0.5 MPa Knife pressure regulator: 0.3 MPa 43.2 l/min. (8 ...

Instruction Manual - English
Page 9
... Note: The thickness of the table should be carried out by two or more than 87 kg. Contact your Brother dealer or a qualified electrician for any moving parts. Do not connect the power cord until installation is complete, ... the illustration below . Thread trimmer Upper thread trimmer Upper and lower thread trimmer Product code 127-980-000-01 127-980-001-01 If using a commercially-available table, process it should be carried out by a qualified technician. The sewing ..., and problems with correct operation may need to the machine head and motor. 3-1. RH-9800 2011Q 3
... Note: The thickness of the table should be carried out by two or more than 87 kg. Contact your Brother dealer or a qualified electrician for any moving parts. Do not connect the power cord until installation is complete, ... the illustration below . Thread trimmer Upper thread trimmer Upper and lower thread trimmer Product code 127-980-000-01 127-980-001-01 If using a commercially-available table, process it should be carried out by a qualified technician. The sewing ..., and problems with correct operation may need to the machine head and motor. 3-1. RH-9800 2011Q 3

Instruction Manual - English
Page 15
... the solenoid valve assembly, using the illustration below as the numbers on each of the air hoses which come out of the sewing machine. < -00,-01 > 0826Q 0827Q Plug 4 Label No. L7. 3-10. Solenoid valve 5 Upper thread trimming 4 Upper thread tightening 3 Lower thread trimming *1 2 Cloth spreading (Sub presser *2) 1 Cloth presser *1 If... damaged or thread trimming errors could result.) * There is not used. *2 The sub presser can only be used for machines with -02 specification. < -02 > 0828Q RH-9800 0829Q 9
... the solenoid valve assembly, using the illustration below as the numbers on each of the air hoses which come out of the sewing machine. < -00,-01 > 0826Q 0827Q Plug 4 Label No. L7. 3-10. Solenoid valve 5 Upper thread trimming 4 Upper thread tightening 3 Lower thread trimming *1 2 Cloth spreading (Sub presser *2) 1 Cloth presser *1 If... damaged or thread trimming errors could result.) * There is not used. *2 The sub presser can only be used for machines with -02 specification. < -02 > 0828Q RH-9800 0829Q 9

Instruction Manual - English
Page 23
5. Threading the lower thread Remove the cloth presser plates (refer to page 13), and then thread the lower thread as shown in the illustration below. CORRECT USE 5-6. For upper thread trimming specifications (-00) 0880Q 0879Q For upper and lower thread trimming specifications (-01, -02) 0881Q 0883Q 0882Q RH-9800 0881Q 17
5. Threading the lower thread Remove the cloth presser plates (refer to page 13), and then thread the lower thread as shown in the illustration below. CORRECT USE 5-6. For upper thread trimming specifications (-00) 0880Q 0879Q For upper and lower thread trimming specifications (-01, -02) 0881Q 0883Q 0882Q RH-9800 0881Q 17

Instruction Manual - English
Page 24
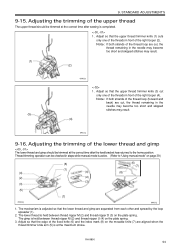
CORRECT USE 5-7. 5. Adjusting the gimp length after trimming (-02)" (Page 54). 5-8. RH-9800 18 The sewing margin can be adjusted to page 13), and then thread the gimp as shown in the illustration below. Threading the gimp Remove ...
CORRECT USE 5-7. 5. Adjusting the gimp length after trimming (-02)" (Page 54). 5-8. RH-9800 18 The sewing margin can be adjusted to page 13), and then thread the gimp as shown in the illustration below. Threading the gimp Remove ...

Instruction Manual - English
Page 28
... of five different shapes in steps of knife. The buttonhole can be set to accept the new buttonhole length setting. * The display will stop flashing. RH-9800 22 The eyelet can be set to accept the new eyelet shape setting. * The display will flash. 3. Press the ENTER button (N) to a length of between...
... of five different shapes in steps of knife. The buttonhole can be set to accept the new buttonhole length setting. * The display will stop flashing. RH-9800 22 The eyelet can be set to accept the new eyelet shape setting. * The display will flash. 3. Press the ENTER button (N) to a length of between...
Instruction Manual - English
Page 33
...button (M) to select the desired memory switch number. * The setting range is OFF, however, if data of stitches for memory switch No. 00 01: 1 stitch 01 * Does not appear when memory switch No. 00 02: 2 stitches is set to OFF. 03: 3 stitches OFF: Disabled 02 Bar tacking at... Number of the front panel display (J) are skipped. 3. "On" represents ON, and "OF" represents OFF. 4. No. Initial value OFF 01 OFF 01 OFF OFF 18 RH-9800 27 USING THE OPERATION PANEL AND FRONT PANEL 6-6. While pressing the SELECT button (M), press the power switch to normal standby mode. However, numbers...
...button (M) to select the desired memory switch number. * The setting range is OFF, however, if data of stitches for memory switch No. 00 01: 1 stitch 01 * Does not appear when memory switch No. 00 02: 2 stitches is set to OFF. 03: 3 stitches OFF: Disabled 02 Bar tacking at... Number of the front panel display (J) are skipped. 3. "On" represents ON, and "OF" represents OFF. 4. No. Initial value OFF 01 OFF 01 OFF OFF 18 RH-9800 27 USING THE OPERATION PANEL AND FRONT PANEL 6-6. While pressing the SELECT button (M), press the power switch to normal standby mode. However, numbers...

Instruction Manual - English
Page 34
..." Time for memory 09 switch No. 08 01: 1 stitch, 02: 2 stitches, 03: 3 stitches, * Does not appear when memory switch No. 08 04: 4 stitches, 05: 5 stitches is set to OFF. 10 No. USING THE OPERATION PANEL AND FRONT PANEL No. RH-9800 28 6. of stitches before pitch change for memory... 24 Setting tacking length to OFF: No change for memory switch No. 08 * Does not appear when memory switch No. 08 is set to OFF. 01: 1 stitch, 02: 2 stitches, 03: 3 stitches, 04: 4 stitches, 05: 5 stitches, 06: 6 stitches, 07: 7 stitches, 08: 8 stitches, 09: 9 stitches 11 Test feeding speed...
..." Time for memory 09 switch No. 08 01: 1 stitch, 02: 2 stitches, 03: 3 stitches, * Does not appear when memory switch No. 08 04: 4 stitches, 05: 5 stitches is set to OFF. 10 No. USING THE OPERATION PANEL AND FRONT PANEL No. RH-9800 28 6. of stitches before pitch change for memory... 24 Setting tacking length to OFF: No change for memory switch No. 08 * Does not appear when memory switch No. 08 is set to OFF. 01: 1 stitch, 02: 2 stitches, 03: 3 stitches, 04: 4 stitches, 05: 5 stitches, 06: 6 stitches, 07: 7 stitches, 08: 8 stitches, 09: 9 stitches 11 Test feeding speed...
Instruction Manual - English
Page 59
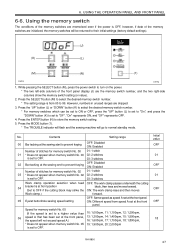
... thread nipper D (3) on the movable knife (7) are cut, the thread remaining in front of the fixed knife (6) and the index mark (8) on the plate spring. RH-9800 53 Adjusting the trimming of the upper thread The upper thread should be trimmed at the correct time after sewing is active. (Refer to the...
... thread nipper D (3) on the movable knife (7) are cut, the thread remaining in front of the fixed knife (6) and the index mark (8) on the plate spring. RH-9800 53 Adjusting the trimming of the upper thread The upper thread should be trimmed at the correct time after sewing is active. (Refer to the...

Hand Book - English
Page 1
...;phase 110, 200, 220, 230, 240 V Three phase 220, 380, 415 V Max. RH−9800 Electronic Eyelet Button Holer Specifications Specifications Main use Sewing speed Buttonhole length Stitch length Stitch width Tacking length... Cloth presser height Stitch shape changing Cut timing selection Starting method Feed method Needle Safety equipment Air pressure Air consumption Noise level Dimensions Work table legs Power supply Weight −00 −01...
...;phase 110, 200, 220, 230, 240 V Three phase 220, 380, 415 V Max. RH−9800 Electronic Eyelet Button Holer Specifications Specifications Main use Sewing speed Buttonhole length Stitch length Stitch width Tacking length... Cloth presser height Stitch shape changing Cut timing selection Starting method Feed method Needle Safety equipment Air pressure Air consumption Noise level Dimensions Work table legs Power supply Weight −00 −01...

Hand Book - English
Page 2
... − L7. *2 The upper thread nipper cannot be used in conjunction with bar tack taper With round bar tack RH-9800 2/17 2002.10 Special lapel cutting device Option *3 Option *3 − Sewing shape Eyelet buttonhole Eyelet buttonhole Eyelet Buttonhole.... *3 The special lapel cutting device can be used only when the feed bracket is set Long Short 00 { − − Option*2 − Option*2 Option Option 01 02 03 04 Standard bar tacking / eyelet buttonhole with taper bar { { { { 05 { { − Option*2 − {*1 Option − − { { ...
... − L7. *2 The upper thread nipper cannot be used in conjunction with bar tack taper With round bar tack RH-9800 2/17 2002.10 Special lapel cutting device Option *3 Option *3 − Sewing shape Eyelet buttonhole Eyelet buttonhole Eyelet Buttonhole.... *3 The special lapel cutting device can be used only when the feed bracket is set Long Short 00 { − − Option*2 − Option*2 Option Option 01 02 03 04 Standard bar tacking / eyelet buttonhole with taper bar { { { { 05 { { − Option*2 − {*1 Option − − { { ...

Hand Book - English
Page 10
Specifications RH-9800-00 RH-9800-01 RH-981A-00 RH-981A-01 Eyelet buttonhole 10 - 50 mm 10 - 38 mm 5 - 50 mm 5 - 38 mm Straight buttonhole 10 - 44 mm 10 - 32 mm 5 - 44 mm 5 - 32 mm RH-9800 10/17 2002.10 Special lapel cutting device *When sewing straight buttonholes, needle rotates 6 mm in front of the tip of the eyelet buttonhole knife, so that the seam length for straight buttonholes will be as shown in the table. *The standard hammers are 5 mm and 7 mm. *The special lapel cutting device can be used only when the feed bracket is set to the front position.
Specifications RH-9800-00 RH-9800-01 RH-981A-00 RH-981A-01 Eyelet buttonhole 10 - 50 mm 10 - 38 mm 5 - 50 mm 5 - 38 mm Straight buttonhole 10 - 44 mm 10 - 32 mm 5 - 44 mm 5 - 32 mm RH-9800 10/17 2002.10 Special lapel cutting device *When sewing straight buttonholes, needle rotates 6 mm in front of the tip of the eyelet buttonhole knife, so that the seam length for straight buttonholes will be as shown in the table. *The standard hammers are 5 mm and 7 mm. *The special lapel cutting device can be used only when the feed bracket is set to the front position.

Hand Book - English
Page 11
....5x16 Valve harness Hammer plate, 7 Bolt, socket M3x5 Bolt, socket M4x8 Cord holder, 6N Screw, pan M4x16 Washer, plain M6 Band, PLT1M Half union, ;KQH04-01S Air tube, 4x2.5-62 Cover, H ;N-rotation Cord holder, 10N Hammer plate, 5 Part name Part code Q'ty S53906-101 1 S53907-001 1 S53908-001 1 S53909-001 1 154965...-001 1 018300-536 2 018400-832 2 146202-000 1 062401-616 1 025060-236 1 S04557-000 3 S04910-000 1 S53939-000 1 S53937-001 1 552907-000 1 S53912-001 1 2002.10 RH-9800 11/17 Ref.
....5x16 Valve harness Hammer plate, 7 Bolt, socket M3x5 Bolt, socket M4x8 Cord holder, 6N Screw, pan M4x16 Washer, plain M6 Band, PLT1M Half union, ;KQH04-01S Air tube, 4x2.5-62 Cover, H ;N-rotation Cord holder, 10N Hammer plate, 5 Part name Part code Q'ty S53906-101 1 S53907-001 1 S53908-001 1 S53909-001 1 154965...-001 1 018300-536 2 018400-832 2 146202-000 1 062401-616 1 025060-236 1 S04557-000 3 S04910-000 1 S53939-000 1 S53937-001 1 552907-000 1 S53912-001 1 2002.10 RH-9800 11/17 Ref.

Hand Book - English
Page 12
... L3: 32 - 36 mm S41468-001 Exchange parts set, L6 S38584-001 Exchange parts set, -2 L4: 36 - 40 mm S41469-001 Exchange parts set, L7 RH-9800 12/17 2002.10 Option parts Cloth guide Cloth guide, J Movable knife cover Part name Part code Q'ty S37870-000 1 Ref. No. 1 2 Movable knife cover...
... L3: 32 - 36 mm S41468-001 Exchange parts set, L6 S38584-001 Exchange parts set, -2 L4: 36 - 40 mm S41469-001 Exchange parts set, L7 RH-9800 12/17 2002.10 Option parts Cloth guide Cloth guide, J Movable knife cover Part name Part code Q'ty S37870-000 1 Ref. No. 1 2 Movable knife cover...

Hand Book - English
Page 14
...;001 S39930−001 S35197−001 S35198−001 S39931−001 S39932−001 −00 & S35453−001 S35452−001 −01 S35200−101 S35199−101 S37679−001 S37680−001 S37677−101 S37678−101 L S37755−001 R S37754−001 L1... S43411-001 L4W For circular stitching work clamp R & L S41336−001 D11 < − 10 mm> S41337−001 D13 < − 12 mm> −00 & −01 <For waist belt presser> RH-9800 14/17 2002.10
...;001 S39930−001 S35197−001 S35198−001 S39931−001 S39932−001 −00 & S35453−001 S35452−001 −01 S35200−101 S35199−101 S37679−001 S37680−001 S37677−101 S37678−101 L S37755−001 R S37754−001 L1... S43411-001 L4W For circular stitching work clamp R & L S41336−001 D11 < − 10 mm> S41337−001 D13 < − 12 mm> −00 & −01 <For waist belt presser> RH-9800 14/17 2002.10

Hand Book - English
Page 15
Gauge parts list Needle plate L S35308−101 (L) R S35309−101 (R) −00 & −01 L S37643−101 (L1L) R S37644−101 (L1R) L1 S35307−101 (SL) S35306−101 (SR) S37683−101 (L−50) S37684−101 (R&#...) L7 For circular stitching needle plate L S41339-001 S41341-001 R S41338-001 S41340-000 D11 < − 10 mm> D13 < − 12 mm> −00 & −01 2002.10 RH-9800 15/17
Gauge parts list Needle plate L S35308−101 (L) R S35309−101 (R) −00 & −01 L S37643−101 (L1L) R S37644−101 (L1R) L1 S35307−101 (SL) S35306−101 (SR) S37683−101 (L−50) S37684−101 (R&#...) L7 For circular stitching needle plate L S41339-001 S41341-001 R S41338-001 S41340-000 D11 < − 10 mm> D13 < − 12 mm> −00 & −01 2002.10 RH-9800 15/17
