Users Guide
Page 12
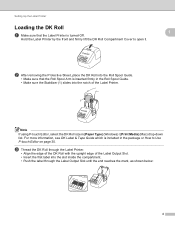
... the compartment. • Push the label through the Label Printer. • Align the edge of the DK Roll with the upright edge of the Label Output Slot. • Insert the first label into the notch of the Label Printer. 1 Note If using P-touch Editor, select the DK Roll size in [Paper Type] (Windows) /... [Print Media] (Mac) drop-down list. Hold the Label Printer by the front and firmly lift...
... the compartment. • Push the label through the Label Printer. • Align the edge of the DK Roll with the upright edge of the Label Output Slot. • Insert the first label into the notch of the Label Printer. 1 Note If using P-touch Editor, select the DK Roll size in [Paper Type] (Windows) /... [Print Media] (Mac) drop-down list. Hold the Label Printer by the front and firmly lift...

Users Guide
Page 36
... From the [Set Width] drop-down list, select the label size. Setup is applied to specify, right-click them, and then click [Settings]. In the Distributed Printing Settings dialog box from step d, select the Label Printers whose setting you want to specify, and then either ...enter the settings manually, and check if the Label Printer can be entered in the Distributed Printing Settings dialog box from step d, select the Label Printer whose settings 5 you want to all selected Label Printers. The same label size setting is completed. In the Distributed Printing ...
... From the [Set Width] drop-down list, select the label size. Setup is applied to specify, right-click them, and then click [Settings]. In the Distributed Printing Settings dialog box from step d, select the Label Printers whose setting you want to specify, and then either ...enter the settings manually, and check if the Label Printer can be entered in the Distributed Printing Settings dialog box from step d, select the Label Printer whose settings 5 you want to all selected Label Printers. The same label size setting is completed. In the Distributed Printing ...
Users Guide
Page 61
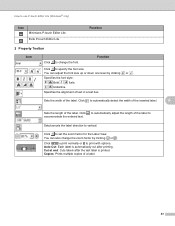
... font style: / Bold / Italic / Underline Specifies the alignment of text in a text box. Sets/cancels the label direction to print with options. You can adjust the font size up or down one level by clicking or . Click to print normally or to vertical. Auto Cut: Each...2 Property Toolbar Icon / Click to automatically adjust the length of the label. Click to automatically detect the width of the inserted label. 8 Sets the length of the label to specify the font size. Copies: Prints multiple copies of the label. Click to use P-touch Editor Lite (Windows® only) Icon ...
... font style: / Bold / Italic / Underline Specifies the alignment of text in a text box. Sets/cancels the label direction to print with options. You can adjust the font size up or down one level by clicking or . Click to print normally or to vertical. Auto Cut: Each...2 Property Toolbar Icon / Click to automatically adjust the length of the label. Click to automatically detect the width of the inserted label. 8 Sets the length of the label to specify the font size. Copies: Prints multiple copies of the label. Click to use P-touch Editor Lite (Windows® only) Icon ...
Users Guide
Page 62
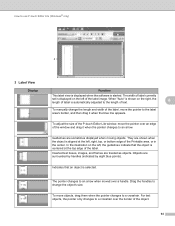
...moving objects. They are surrounded by handles (indicated by eight blue points). Indicates that the object is aligned at the top edge of the label. To adjust the size of the P-touch Editor Lite window, move the pointer over a handle. Drag the handles to change the length and width of the... label, move objects, drag them when the pointer changes to a crosshair. To move the pointer to the label area's border, and then drag it when the...
...moving objects. They are surrounded by handles (indicated by eight blue points). Indicates that the object is aligned at the top edge of the label. To adjust the size of the P-touch Editor Lite window, move the pointer over a handle. Drag the handles to change the length and width of the... label, move objects, drag them when the pointer changes to a crosshair. To move the pointer to the label area's border, and then drag it when the...
Users Guide
Page 77
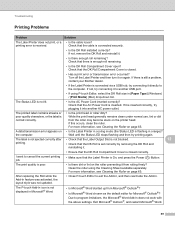
...? Exit Microsoft® Outlook®, and restart Microsoft® Word. 69 Troubleshooting Printing Problems 12 Problem Solution The Label Printer does not print, or a • Is the cable loose? printing error is not lit. • ...information, see Cleaning the Roller on • Is the Label Printer in orange)? I want to the computer. Clean the roller using P-touch Editor, select the DK Roll size in Microsoft® Word. • Is Microsoft® ... on page 65. If there is still a problem, contact your Brother dealer. • If the Label Printer is closed correctly.
...? Exit Microsoft® Outlook®, and restart Microsoft® Word. 69 Troubleshooting Printing Problems 12 Problem Solution The Label Printer does not print, or a • Is the cable loose? printing error is not lit. • ...information, see Cleaning the Roller on • Is the Label Printer in orange)? I want to the computer. Clean the roller using P-touch Editor, select the DK Roll size in Microsoft® Word. • Is Microsoft® ... on page 65. If there is still a problem, contact your Brother dealer. • If the Label Printer is closed correctly.
Users Guide
Page 84
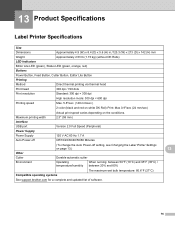
13 Product Specifications 13 Label Printer Specifications 13 Size Dimensions Approximately 4.9 (W) x 8.4 (D) x 5.6 (H) in./125.3 (W) x 213 (D) x 142 (H) mm Weight LED Indicators Approximately 2.53 lb (1.15 kg) (without DK Rolls) Editor Lite LED (green), ...°F (35°C) / temperature/humidity between 20% and 80% The maximum wet bulb temperature: 80.6°F (27°C) Compatible operating systems See support.brother.com for a complete and updated list of software. 76 Maximum printing width Interface 2.3" (58 mm) USB port Power Supply Version 2.0 Full Speed (Peripheral) ...
13 Product Specifications 13 Label Printer Specifications 13 Size Dimensions Approximately 4.9 (W) x 8.4 (D) x 5.6 (H) in./125.3 (W) x 213 (D) x 142 (H) mm Weight LED Indicators Approximately 2.53 lb (1.15 kg) (without DK Rolls) Editor Lite LED (green), ...°F (35°C) / temperature/humidity between 20% and 80% The maximum wet bulb temperature: 80.6°F (27°C) Compatible operating systems See support.brother.com for a complete and updated list of software. 76 Maximum printing width Interface 2.3" (58 mm) USB port Power Supply Version 2.0 Full Speed (Peripheral) ...
iPrint&Label Users Guide - Androidtm
Page 9
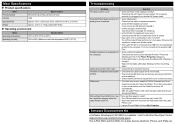
...is closed correctly. There are jammed in the cutter. • Contact Brother Customer Service. Labels are three ways to another AC power outlet. Main Specifications Product specifications Items Printing method Interface Size (W×H×D) Weight Specifications Direct thermal printing via a USB hub,... error is connected securely. • Is the DK Roll installed correctly? If there is still a problem, contact your Brother dealer. • If the Label Printer is not lit. • Is the AC Power Cord inserted correctly? If not, try printing again. The b-...
...is closed correctly. There are jammed in the cutter. • Contact Brother Customer Service. Labels are three ways to another AC power outlet. Main Specifications Product specifications Items Printing method Interface Size (W×H×D) Weight Specifications Direct thermal printing via a USB hub,... error is connected securely. • Is the DK Roll installed correctly? If there is still a problem, contact your Brother dealer. • If the Label Printer is not lit. • Is the AC Power Cord inserted correctly? If not, try printing again. The b-...
Raster Command Reference
Page 4
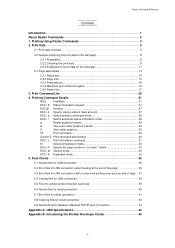
...Normal Flow for the test page 11 2.3 Page data details 13 2.3.1 Resolution ...13 2.3.2 Page size...13 2.3.3 Feed amount ...16 2.3.4 Maximum and minimum lengths 16 2.3.5 Raster line ...17 3. Print...information command 31 M Select compression mode 32 ESC i A Specify the page number in "cut each * labels 33 ESC i M Various mode 34 ESC i K Expanded mode 34 5. Print Command List 20 4....Standard TCP/IP port) Connection 43 Appendix A: USB Specifications 44 Appendix B: Introducing the Brother Developer Center 45 - Printing Command Details 21 NULL Invalidate 21 ESC i S Status ...
...Normal Flow for the test page 11 2.3 Page data details 13 2.3.1 Resolution ...13 2.3.2 Page size...13 2.3.3 Feed amount ...16 2.3.4 Maximum and minimum lengths 16 2.3.5 Raster line ...17 3. Print...information command 31 M Select compression mode 32 ESC i A Specify the page number in "cut each * labels 33 ESC i M Various mode 34 ESC i K Expanded mode 34 5. Print Command List 20 4....Standard TCP/IP port) Connection 43 Appendix A: USB Specifications 44 Appendix B: Introducing the Brother Developer Center 45 - Printing Command Details 21 NULL Invalidate 21 ESC i S Status ...
Raster Command Reference
Page 16
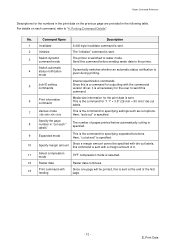
...the command for "1.1" × 3.5" (29 mm × 90 mm)" die-cut labels. 7 Various mode (1Bh+69h+4Dh+00H) This is switched to raster mode. Send this command. 6 Print information command Media size information for the print data is specified. 8 Specify the page number in the following... an automatic status notification is given during printing. 5 Job ID setting commands Internal specification commands Since this is a command for outputting with feeding Since one page will be specified with die-cut labels, this command is sent with a margin amount of 0. 11 Select compression ...
...the command for "1.1" × 3.5" (29 mm × 90 mm)" die-cut labels. 7 Various mode (1Bh+69h+4Dh+00H) This is switched to raster mode. Send this command. 6 Print information command Media size information for the print data is specified. 8 Specify the page number in the following... an automatic status notification is given during printing. 5 Job ID setting commands Internal specification commands Since this is a command for outputting with feeding Since one page will be specified with die-cut labels, this command is sent with a margin amount of 0. 11 Select compression ...
Raster Command Reference
Page 19
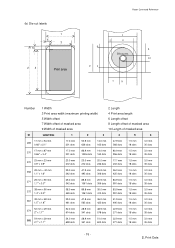
... offset of masked area 9 Width of masked area 2 Length 4 Print area length 6 Length offset 8 Length offset of masked area 10 Length of masked area ID Label Size 1 2 3 4 5 6 17 mm x 54 mm 269 0.66" x 2.1" 17.0 mm 201 dots 53.9 mm 636 dots 14.0 mm 165 dots 47.9 mm 566 dots 1.5 mm 18 dots...
... offset of masked area 9 Width of masked area 2 Length 4 Print area length 6 Length offset 8 Length offset of masked area 10 Length of masked area ID Label Size 1 2 3 4 5 6 17 mm x 54 mm 269 0.66" x 2.1" 17.0 mm 201 dots 53.9 mm 636 dots 14.0 mm 165 dots 47.9 mm 566 dots 1.5 mm 18 dots...
Raster Command Reference
Page 20
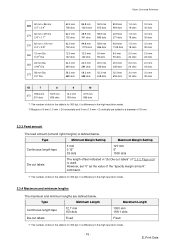
... as the value of the "specify margin amount" command. *1 The number of "2.3.2 Page size" is difference in the table is for 300 dpi; Type Minimum Length Continuous length tape 12.7 mm 150 dots Die-cut labels" of dots in the high-resolution mode. - 16 - 2. Type Minimum Margin Setting Maximum... Margin Setting Continuous length tape 3 mm 0.12" 35 dots 127 mm 5" 1500 dots Die-cut labels The length offset indicated in the table is for 300 dpi; it is difference in the high-resolution mode. *2 Margins of dots in "(b) Die-...
... as the value of the "specify margin amount" command. *1 The number of "2.3.2 Page size" is difference in the table is for 300 dpi; Type Minimum Length Continuous length tape 12.7 mm 150 dots Die-cut labels" of dots in the high-resolution mode. - 16 - 2. Type Minimum Margin Setting Maximum... Margin Setting Continuous length tape 3 mm 0.12" 35 dots 127 mm 5" 1500 dots Die-cut labels The length offset indicated in the table is for 300 dpi; it is difference in the high-resolution mode. *2 Margins of dots in "(b) Die-...
Raster Command Reference
Page 22
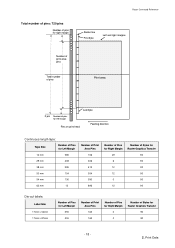
... Total number of pins Print area Last byte 0 pin Number of pins for left margin Pins on print head Feeding direction Continuous length tape: Tape Size Number of Pins for Left Margin 12 mm 585 29 mm 408 38 mm 295 50 mm 154 54 mm 130 62 mm 12 Number... Number of Pins for Right Margin 29 6 12 12 0 12 Number of Bytes for Raster Graphics Transfer 90 90 90 90 90 90 Die-cut labels: Label Size 17mm x 54mm 17mm x 87mm Number of Pins for Left Margin 555 555 Number of Print Area Pins 165 165 Number of Pins for Right Margin...
... Total number of pins Print area Last byte 0 pin Number of pins for left margin Pins on print head Feeding direction Continuous length tape: Tape Size Number of Pins for Left Margin 12 mm 585 29 mm 408 38 mm 295 50 mm 154 54 mm 130 62 mm 12 Number... Number of Pins for Right Margin 29 6 12 12 0 12 Number of Bytes for Raster Graphics Transfer 90 90 90 90 90 90 Die-cut labels: Label Size 17mm x 54mm 17mm x 87mm Number of Pins for Left Margin 555 555 Number of Print Area Pins 165 165 Number of Pins for Right Margin...


