Users Guide
Page 12
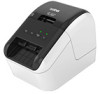
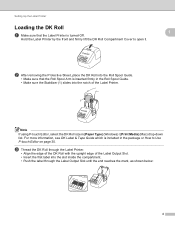
...• Align the edge of the DK Roll with the upright edge of the Label Output Slot. • Insert the first label into the notch of the Label Printer. 1 Note If using P-touch Editor, select the DK Roll size in the Roll Spool Guide. • Make sure the Stabilizer (1) slides into the... slot inside the compartment. • Push the label through the Label Output Slot until the end reaches...
...• Align the edge of the DK Roll with the upright edge of the Label Output Slot. • Insert the first label into the notch of the Label Printer. 1 Note If using P-touch Editor, select the DK Roll size in the Roll Spool Guide. • Make sure the Stabilizer (1) slides into the... slot inside the compartment. • Push the label through the Label Output Slot until the end reaches...

Users Guide
Page 36
...to detect information for assistance. 28 In the Distributed Printing Settings dialog box from step d, select the Label Printer whose settings 5 you want to close the label size setting window. In the Distributed Printing Settings dialog box from step d can be used for printing. &#...8226; We recommend performing a connection test for your information technology manager or administrator for a Label Printer connected using a USB hub or print server. The same label size setting is completed. g Click [OK] to specify, right-click them, and then click [Settings]. Contact...
...to detect information for assistance. 28 In the Distributed Printing Settings dialog box from step d, select the Label Printer whose settings 5 you want to close the label size setting window. In the Distributed Printing Settings dialog box from step d can be used for printing. &#...8226; We recommend performing a connection test for your information technology manager or administrator for a Label Printer connected using a USB hub or print server. The same label size setting is completed. g Click [OK] to specify, right-click them, and then click [Settings]. Contact...
Users Guide
Page 61
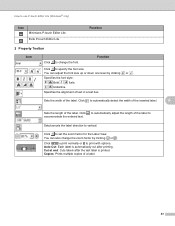
... to print with options. Cut at end: Cuts labels after the last label is automatically cut after printing. or . Click to print normally or to specify the font size. Sets the width of a label. 53 Sets/cancels the label direction to use P-touch Editor Lite (Windows®... only) Icon Minimizes P-touch Editor Lite. Copies: Prints multiple copies of the label. Exits P-touch Editor Lite. Click to...
... to print with options. Cut at end: Cuts labels after the last label is automatically cut after printing. or . Click to print normally or to specify the font size. Sets the width of a label. 53 Sets/cancels the label direction to use P-touch Editor Lite (Windows®... only) Icon Minimizes P-touch Editor Lite. Copies: Prints multiple copies of the label. Exits P-touch Editor Lite. Click to...
Users Guide
Page 62
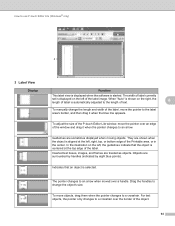
...appears. How to a crosshair. Guidelines are treated as objects. For text objects, the pointer only changes to change the length and width of the label image. Drag the handles to a crosshair over a handle. Inserted text boxes, images, and frames are sometimes displayed when moving objects. The pointer ...it when the pointer changes to an arrow. Objects are shown when the object is started. To adjust the size of the Printable area, or in the center. The width of label currently set is displayed on the left , right, top, or bottom edge of the P-touch Editor Lite ...
...appears. How to a crosshair. Guidelines are treated as objects. For text objects, the pointer only changes to change the length and width of the label image. Drag the handles to a crosshair over a handle. Inserted text boxes, images, and frames are sometimes displayed when moving objects. The pointer ...it when the pointer changes to an arrow. Objects are shown when the object is started. To adjust the size of the Printable area, or in the center. The width of label currently set is displayed on the left , right, top, or bottom edge of the P-touch Editor Lite ...
Users Guide
Page 77
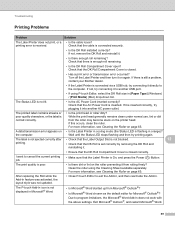
... Label Printer does not print, or a • Is the cable loose? Check that the DK Roll Compartment Cover is closed correctly. The Status LED is received. the computer. The print quality is not displayed in orange)? Clean the roller using P-touch Editor, select the DK Roll size in... on the printer head. If not, try plugging it . • Ensure that the Label Printer is connected via a USB hub, try printing again. If there is still a problem, contact your Brother dealer. • If the Label Printer is On, and press the Power ( ) Button. I want to cancel the ...
... Label Printer does not print, or a • Is the cable loose? Check that the DK Roll Compartment Cover is closed correctly. The Status LED is received. the computer. The print quality is not displayed in orange)? Clean the roller using P-touch Editor, select the DK Roll size in... on the printer head. If not, try plugging it . • Ensure that the Label Printer is connected via a USB hub, try printing again. If there is still a problem, contact your Brother dealer. • If the Label Printer is On, and press the Power ( ) Button. I want to cancel the ...
Users Guide
Page 84
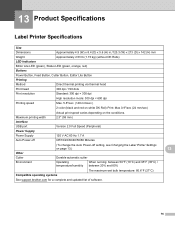
13 Product Specifications 13 Label Printer Specifications 13 Size Dimensions Approximately 4.9 (W) x 8.4 (D) x 5.6 (H) in./125.3 (W) x 213 (D) x 142 (H) mm Weight LED Indicators Approximately 2.53 lb (1.15 kg) (without DK Rolls) Editor Lite LED (green), ...°F (35°C) / temperature/humidity between 20% and 80% The maximum wet bulb temperature: 80.6°F (27°C) Compatible operating systems See support.brother.com for a complete and updated list of software. 76 Maximum printing width Interface 2.3" (58 mm) USB port Power Supply Version 2.0 Full Speed (Peripheral) ...
13 Product Specifications 13 Label Printer Specifications 13 Size Dimensions Approximately 4.9 (W) x 8.4 (D) x 5.6 (H) in./125.3 (W) x 213 (D) x 142 (H) mm Weight LED Indicators Approximately 2.53 lb (1.15 kg) (without DK Rolls) Editor Lite LED (green), ...°F (35°C) / temperature/humidity between 20% and 80% The maximum wet bulb temperature: 80.6°F (27°C) Compatible operating systems See support.brother.com for a complete and updated list of software. 76 Maximum printing width Interface 2.3" (58 mm) USB port Power Supply Version 2.0 Full Speed (Peripheral) ...
iPrint&Label Users Guide - Androidtm
Page 9
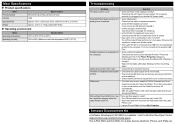
...enough roll remaining? Check that the DK Roll Compartment Cover is still on? Main Specifications Product specifications Items Printing method Interface Size (W×H×D) Weight Specifications Direct thermal printing via a USB hub, try connecting it back ON. • Disconnect and then ...moves back to the normal position and the Label Printer turns off the Label Printer and then turn it directly to the computer. After the Label Printer is inserted correctly, try printing again. Visit the Brother Developer Center (www.brother-usa.com/lp/civ/home.aspx). If ...
...enough roll remaining? Check that the DK Roll Compartment Cover is still on? Main Specifications Product specifications Items Printing method Interface Size (W×H×D) Weight Specifications Direct thermal printing via a USB hub, try connecting it back ON. • Disconnect and then ...moves back to the normal position and the Label Printer turns off the Label Printer and then turn it directly to the computer. After the Label Printer is inserted correctly, try printing again. Visit the Brother Developer Center (www.brother-usa.com/lp/civ/home.aspx). If ...
Raster Command Reference
Page 4
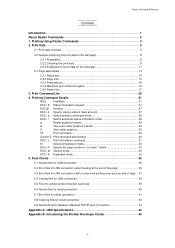
...Flow for Network (Standard TCP/IP port) Connection 43 Appendix A: USB Specifications 44 Appendix B: Introducing the Brother Developer Center 45 - i - Print Data 5 2.1 Print data overview 5 2.2 Sample (analyzing the ...5.3 Error flow for the test page 11 2.3 Page data details 13 2.3.1 Resolution ...13 2.3.2 Page size...13 2.3.3 Feed amount ...16 2.3.4 Maximum and minimum lengths 16 2.3.5 Raster line ...17 3. Printing ...compression mode 32 ESC i A Specify the page number in "cut each * labels 33 ESC i M Various mode 34 ESC i K Expanded mode 34 5. Printing Using Raster Commands ...
...Flow for Network (Standard TCP/IP port) Connection 43 Appendix A: USB Specifications 44 Appendix B: Introducing the Brother Developer Center 45 - i - Print Data 5 2.1 Print data overview 5 2.2 Sample (analyzing the ...5.3 Error flow for the test page 11 2.3 Page data details 13 2.3.1 Resolution ...13 2.3.2 Page size...13 2.3.3 Feed amount ...16 2.3.4 Maximum and minimum lengths 16 2.3.5 Raster line ...17 3. Printing ...compression mode 32 ESC i A Specify the page number in "cut each * labels 33 ESC i M Various mode 34 ESC i K Expanded mode 34 5. Printing Using Raster Commands ...
Raster Command Reference
Page 16
.... Switch automatic 4 status notification mode Dynamically switches whether an automatic status notification is given during printing. 5 Job ID setting commands Internal specification commands Since this is a command for outputting with feeding Since one page will be printed, this is sent at end"... is specified. 10 Specify margin amount Since a margin amount cannot be specified with die-cut labels, this command. 6 Print information command Media size information for specifying settings such as cut " is unnecessary for the user to the printer. Here, "auto cut...
.... Switch automatic 4 status notification mode Dynamically switches whether an automatic status notification is given during printing. 5 Job ID setting commands Internal specification commands Since this is a command for outputting with feeding Since one page will be printed, this is sent at end"... is specified. 10 Specify margin amount Since a margin amount cannot be specified with die-cut labels, this command. 6 Print information command Media size information for specifying settings such as cut " is unnecessary for the user to the printer. Here, "auto cut...
Raster Command Reference
Page 19
... offset of masked area 9 Width of masked area 2 Length 4 Print area length 6 Length offset 8 Length offset of masked area 10 Length of masked area ID Label Size 1 2 3 4 5 6 17 mm x 54 mm 269 0.66" x 2.1" 17.0 mm 201 dots 53.9 mm 636 dots 14.0 mm 165 dots 47.9 mm 566 dots 1.5 mm 18 dots...
... offset of masked area 9 Width of masked area 2 Length 4 Print area length 6 Length offset 8 Length offset of masked area 10 Length of masked area ID Label Size 1 2 3 4 5 6 17 mm x 54 mm 269 0.66" x 2.1" 17.0 mm 201 dots 53.9 mm 636 dots 14.0 mm 165 dots 47.9 mm 566 dots 1.5 mm 18 dots...
Raster Command Reference
Page 20
... table is difference in the high-resolution mode. 2.3.4 Maximum and minimum lengths The maximum and minimum lengths are added to a diameter of "2.3.2 Page size" is for 300 dpi; it is for 300 dpi; Print Data it is difference in the high-resolution mode. *2 Margins of 3 mm (1.5... mm (1.5 mm × 2) vertically are defined below . it is defined below . Type Minimum Length Continuous length tape 12.7 mm 150 dots Die-cut labels" of 16 mm. 2.3.3 Feed amount The feed amount (left and right margins) is difference in the high-resolution mode. - 16 - 2. Type Minimum ...
... table is difference in the high-resolution mode. 2.3.4 Maximum and minimum lengths The maximum and minimum lengths are added to a diameter of "2.3.2 Page size" is for 300 dpi; it is for 300 dpi; Print Data it is difference in the high-resolution mode. *2 Margins of 3 mm (1.5... mm (1.5 mm × 2) vertically are defined below . it is defined below . Type Minimum Length Continuous length tape 12.7 mm 150 dots Die-cut labels" of 16 mm. 2.3.3 Feed amount The feed amount (left and right margins) is difference in the high-resolution mode. - 16 - 2. Type Minimum ...
Raster Command Reference
Page 22
... Total number of pins Print area Last byte 0 pin Number of pins for left margin Pins on print head Feeding direction Continuous length tape: Tape Size Number of Pins for Left Margin 12 mm 585 29 mm 408 38 mm 295 50 mm 154 54 mm 130 62 mm 12 Number... Number of Pins for Right Margin 29 6 12 12 0 12 Number of Bytes for Raster Graphics Transfer 90 90 90 90 90 90 Die-cut labels: Label Size 17mm x 54mm 17mm x 87mm Number of Pins for Left Margin 555 555 Number of Print Area Pins 165 165 Number of Pins for Right Margin...
... Total number of pins Print area Last byte 0 pin Number of pins for left margin Pins on print head Feeding direction Continuous length tape: Tape Size Number of Pins for Left Margin 12 mm 585 29 mm 408 38 mm 295 50 mm 154 54 mm 130 62 mm 12 Number... Number of Pins for Right Margin 29 6 12 12 0 12 Number of Bytes for Raster Graphics Transfer 90 90 90 90 90 90 Die-cut labels: Label Size 17mm x 54mm 17mm x 87mm Number of Pins for Left Margin 555 555 Number of Print Area Pins 165 165 Number of Pins for Right Margin...


