Software Users Manual - English
Page 4
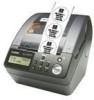
...refer to create/print labels using the printer, such as "the printer") enables you to read before using just the printer (Brother QL650TD only). Software User's Guide (this manual) This manual describes how to create labels using the P-touch Editor software that should read them ...view it is a "PDF manual" contained on a PC connected to the printer. • If you use the printer more efficiently. Symbols Used in the [Manuals] folder on purchasing a Brother QL-series label printer. With the Brother QL-650TD, you can also create and print labels directly from the CD-ROM....
...refer to create/print labels using the printer, such as "the printer") enables you to read before using just the printer (Brother QL650TD only). Software User's Guide (this manual) This manual describes how to create labels using the P-touch Editor software that should read them ...view it is a "PDF manual" contained on a PC connected to the printer. • If you use the printer more efficiently. Symbols Used in the [Manuals] folder on purchasing a Brother QL-series label printer. With the Brother QL-650TD, you can also create and print labels directly from the CD-ROM....
Software Users Manual - English
Page 63
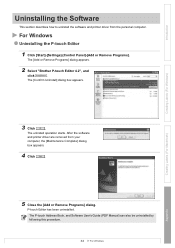
...appears. 2 Select "Brother P-touch Editor 4.2", and click . Creating Labels (For Windows) Creating Labels (For Macintosh) 3 Click . After the software and printer driver are removed from the personal computer. Appendix 5 Close the [Add or Remove Programs] dialog. P-touch Editor has been ...describes how to uninstall the software and printer driver from your computer, the [Maintenance Complete] dialog box appears. 4 Click . The uninstall operation starts. The P-touch Address Book, and Software User's Guide (PDF Manual) can also be uninstalled by following...
...appears. 2 Select "Brother P-touch Editor 4.2", and click . Creating Labels (For Windows) Creating Labels (For Macintosh) 3 Click . After the software and printer driver are removed from the personal computer. Appendix 5 Close the [Add or Remove Programs] dialog. P-touch Editor has been ...describes how to uninstall the software and printer driver from your computer, the [Maintenance Complete] dialog box appears. 4 Click . The uninstall operation starts. The P-touch Address Book, and Software User's Guide (PDF Manual) can also be uninstalled by following...

Users Manual - English and Spanish
Page 8
... Adobe® Acrobat® Reader®. (For Macintosh®, the standard "Preview" program bundled with the printer, by installing it is installed on a personal computer. „Software User's Guide (PDF Manual) It explains how to create labels using the software supplied with the OS can also be used on...to utilize its features. It gives information which should be read this manual before using the printer, such as follows: This symbol indicates information or directions that can be viewed from the P-touch Setup application when it is run from the Start menu if it on the CD-ROM ...
... Adobe® Acrobat® Reader®. (For Macintosh®, the standard "Preview" program bundled with the printer, by installing it is installed on a personal computer. „Software User's Guide (PDF Manual) It explains how to create labels using the software supplied with the OS can also be used on...to utilize its features. It gives information which should be read this manual before using the printer, such as follows: This symbol indicates information or directions that can be viewed from the P-touch Setup application when it is run from the Start menu if it on the CD-ROM ...

Users Manual - English and Spanish
Page 23
...DK Roll Spool STEP along the spool guide of consumable items" shown in Î"Software User's Guide (PDF Manual)". • Be sure to "List of the 4 printer. Thermal recording paper and thermal recording film are available. Setting the DK Roll STEP 2 1 Check that the power is turned OFF ...(check LCD and LED lamp). Thermal recording paper and thermal recording film are available. Maintenance and Troubleshooting Before using the printer 23 Introduction 3 Setting the DK Roll Applicable DK Rolls The usable types of DK Roll for ...
...DK Roll Spool STEP along the spool guide of consumable items" shown in Î"Software User's Guide (PDF Manual)". • Be sure to "List of the 4 printer. Thermal recording paper and thermal recording film are available. Setting the DK Roll STEP 2 1 Check that the power is turned OFF ...(check LCD and LED lamp). Thermal recording paper and thermal recording film are available. Maintenance and Troubleshooting Before using the printer 23 Introduction 3 Setting the DK Roll Applicable DK Rolls The usable types of DK Roll for ...

Users Manual - English and Spanish
Page 28
Label images 2 Prepare the appropriate DK Roll to Î"Software User's Guide (PDF Manual)". For how to install the software, refer to Î"STEP3 Connecting the printer to your PC" in page 29. Select the template Print ÎPage 30 ÎPage 31 After comprehending the flow of printing ...and printing format with the printer is also possible to change the content of creating a label, let's create a label. By installing the included software, it is possible to ...
Label images 2 Prepare the appropriate DK Roll to Î"Software User's Guide (PDF Manual)". For how to install the software, refer to Î"STEP3 Connecting the printer to your PC" in page 29. Select the template Print ÎPage 30 ÎPage 31 After comprehending the flow of printing ...and printing format with the printer is also possible to change the content of creating a label, let's create a label. By installing the included software, it is possible to ...

Users Manual - English and Spanish
Page 30
It is determined, and the screen returns to Time Display mode. For details, refer to Î"Software User's Guide (PDF Manual)". 1 Press ON/OFF button ( ) to turn on available templates, refer to "Type of template" below. When selecting a template which includes a particular message ... The selected template is also possible to create templates with the arrow button ( / ) and press [P07]Msg+D+T the OK button to select. This printer has eight built-in page 23). 1.Selecting a template Select the template of printing [P01]Date Date 2005/7/20 [P02]Time Time 12:34 [P03]...
It is determined, and the screen returns to Time Display mode. For details, refer to Î"Software User's Guide (PDF Manual)". 1 Press ON/OFF button ( ) to turn on available templates, refer to "Type of template" below. When selecting a template which includes a particular message ... The selected template is also possible to create templates with the arrow button ( / ) and press [P07]Msg+D+T the OK button to select. This printer has eight built-in page 23). 1.Selecting a template Select the template of printing [P01]Date Date 2005/7/20 [P02]Time Time 12:34 [P03]...

Users Manual - English and Spanish
Page 35
... "Menu 5" by up or down arrow button ( / ) and press OK button. Menu Copies STEP 4/12 1 Before using the printer Using only this printer (No PC) 3 Select the number (1 to Î"Software User's Guide (PDF Manual)". 1 Press the Menu button in Time Display mode. STEP 3 Menu 5/12 Numbering Connecting to your PC For Macintosh...
... "Menu 5" by up or down arrow button ( / ) and press OK button. Menu Copies STEP 4/12 1 Before using the printer Using only this printer (No PC) 3 Select the number (1 to Î"Software User's Guide (PDF Manual)". 1 Press the Menu button in Time Display mode. STEP 3 Menu 5/12 Numbering Connecting to your PC For Macintosh...

Users Manual - English and Spanish
Page 36
... 2-3/7" (62 mm) in Time Display mode. For details on downloaded templates, refer to Print All Templates? OK to Î"Software User's Guide (PDF Manual)". If the battery is no longer holding a sufficient charge, the clock will need to 2005/01/01 00:00 6 in Î"Setting clock..., the screen returns to print a sample of every template (including downloaded templates) for reference. 36 STEP2 Creating and printing a label using only this printer Printing a list of templates: Menu 6 It is possible to Time Display mode. Menu 7/12 Set Date/Time 3 Set the clock by up or...
... 2-3/7" (62 mm) in Time Display mode. For details on downloaded templates, refer to Print All Templates? OK to Î"Software User's Guide (PDF Manual)". If the battery is no longer holding a sufficient charge, the clock will need to 2005/01/01 00:00 6 in Î"Setting clock..., the screen returns to print a sample of every template (including downloaded templates) for reference. 36 STEP2 Creating and printing a label using only this printer Printing a list of templates: Menu 6 It is possible to Time Display mode. Menu 7/12 Set Date/Time 3 Set the clock by up or...

Users Manual - English and Spanish
Page 39
...touch Transfer Manager. Menu Selection mode is unlocked. LCD Contrast +1 Locking the Menu button STEP To prevent inadvertent changes to your company and checklist. Using only this printer... is displayed 12:34 [P07] 2005/7/20 in Time Display mode. touch Transfer Manager. STEP 4 It will be convenient to the main unit using...of message It is possible to the main unit using the printer 39 Introduction Adjusting the contrast of LCD: Menu 12 1.../12 1 LCD Contrast 3 Select the contrast by P-touch Editor 4.2 to set the name or company name. The setting is saved ...
...touch Transfer Manager. Menu Selection mode is unlocked. LCD Contrast +1 Locking the Menu button STEP To prevent inadvertent changes to your company and checklist. Using only this printer... is displayed 12:34 [P07] 2005/7/20 in Time Display mode. touch Transfer Manager. STEP 4 It will be convenient to the main unit using...of message It is possible to the main unit using the printer 39 Introduction Adjusting the contrast of LCD: Menu 12 1.../12 1 LCD Contrast 3 Select the contrast by P-touch Editor 4.2 to set the name or company name. The setting is saved ...

Users Manual - English and Spanish
Page 41
...43 For Macintosh 1. Software installation ÎPage 47 ÎPage 47 ÎPage 48 STEP 4 Connecting to Î"Software User's Guide (PDF Manual)". Software description 2. STEP 2 For details on installation 3. Notes on installation ÎPage 42 ÎPage 43 STEP 3 3. Software ...description 2. 41 Introduction 3 STEP STEP 1 Connecting the printer to your PC Before using the printer Using only this printer (No PC) By using the software included with this printer, you want, refer to your PC For Macintosh For Windows Maintenance and ...
...43 For Macintosh 1. Software installation ÎPage 47 ÎPage 47 ÎPage 48 STEP 4 Connecting to Î"Software User's Guide (PDF Manual)". Software description 2. STEP 2 For details on installation 3. Notes on installation ÎPage 42 ÎPage 43 STEP 3 3. Software ...description 2. 41 Introduction 3 STEP STEP 1 Connecting the printer to your PC Before using the printer Using only this printer (No PC) By using the software included with this printer, you want, refer to your PC For Macintosh For Windows Maintenance and ...

Users Manual - English and Spanish
Page 42
... of labels such as a downloaded template. Software description The CD-ROM included with this printer contains the following software and printer driver. „P-touch Editor 4.2 It is possible to Î"Software User's Guide (PDF Manual)". 1. The data transferred to print the address label easily. Data can be safely... as address labels and CD/DVD labels. It is also possible to the printer. The following tools will be used as Message of the preset template can be transferred to reference it directly from the CD-ROM. It is also possible to link previously created databases (database...
... of labels such as a downloaded template. Software description The CD-ROM included with this printer contains the following software and printer driver. „P-touch Editor 4.2 It is possible to Î"Software User's Guide (PDF Manual)". 1. The data transferred to print the address label easily. Data can be safely... as address labels and CD/DVD labels. It is also possible to the printer. The following tools will be used as Message of the preset template can be transferred to reference it directly from the CD-ROM. It is also possible to link previously created databases (database...

Users Manual - English and Spanish
Page 43
... Software User's Guide (PDF Manual) can be installed. STEP 2 Using only this time, click [OK] and install it . The following is displayed. 1 Each button enables the following 2 operation. 3 1 Standard Installation 4 P-touch Editor 4.2, P-touch Address Book 1.0, Printer Driver, and User's Guide can be installed as a whole. QL-series Installer starts up and P-touch Setup screen is running...
... Software User's Guide (PDF Manual) can be installed. STEP 2 Using only this time, click [OK] and install it . The following is displayed. 1 Each button enables the following 2 operation. 3 1 Standard Installation 4 P-touch Editor 4.2, P-touch Address Book 1.0, Printer Driver, and User's Guide can be installed as a whole. QL-series Installer starts up and P-touch Setup screen is running...

Users Manual - English and Spanish
Page 45
... it is set -up screen, connect the USB cable and power cord to the printer. As the caution label is displayed. Driver Setup (Brother P-touch) screen is displayed. • It may not be connected STEP 4 correctly. STEP 2... is quitted, and go to your PC For Macintosh For Windows Maintenance and Troubleshooting When connecting the printer to Î"Software User's Guide (PDF Manual)". For details on ." is not set correctly, click [Back] and set the Add-In...of the PC. At that time, connect the printer directly to the USB port of PC. Add-In settings screen is displayed.
... it is set -up screen, connect the USB cable and power cord to the printer. As the caution label is displayed. Driver Setup (Brother P-touch) screen is displayed. • It may not be connected STEP 4 correctly. STEP 2... is quitted, and go to your PC For Macintosh For Windows Maintenance and Troubleshooting When connecting the printer to Î"Software User's Guide (PDF Manual)". For details on ." is not set correctly, click [Back] and set the Add-In...of the PC. At that time, connect the printer directly to the USB port of PC. Add-In settings screen is displayed.

Users Manual - English and Spanish
Page 46
...PC may be displayed by clicking in order of [Start][ALL Programs (Programs)]-[Brother P-Touch]-[Manuals]-[QL-Series User's Guide (English)]. 46 STEP3 Connecting the printer to your PC 11 Select if you do not display the page.", the ...installation continues. 12 Click [Finish]. After the user registration, continue the installation (registration is completed, the message which prompts to Î"Software User's Guide (PDF Manual)". Software User's Guide (PDF...
...PC may be displayed by clicking in order of [Start][ALL Programs (Programs)]-[Brother P-Touch]-[Manuals]-[QL-Series User's Guide (English)]. 46 STEP3 Connecting the printer to your PC 11 Select if you do not display the page.", the ...installation continues. 12 Click [Finish]. After the user registration, continue the installation (registration is completed, the message which prompts to Î"Software User's Guide (PDF Manual)". Software User's Guide (PDF...

Users Manual - English and Spanish
Page 47
...to Î"Software User's Guide (PDF Manual)". If it has been connected to it, pull out the USB cable from included CD-ROM. STEP 1 1. Software description The included CD-ROM contains the following software and printer driver. „P-touch Editor 3.2 It is possible to ...For details on installation 3 • Until the installation of printer driver is completed, do not connect the printer to Macintosh®. Using only this printer driver. The software is available for label. These are contents used for P-touch Editor 3.2 „Clip Art Illustrations which can be allocated ...
...to Î"Software User's Guide (PDF Manual)". If it has been connected to it, pull out the USB cable from included CD-ROM. STEP 1 1. Software description The included CD-ROM contains the following software and printer driver. „P-touch Editor 3.2 It is possible to ...For details on installation 3 • Until the installation of printer driver is completed, do not connect the printer to Macintosh®. Using only this printer driver. The software is available for label. These are contents used for P-touch Editor 3.2 „Clip Art Illustrations which can be allocated ...
Users Manual - English and Spanish
Page 52
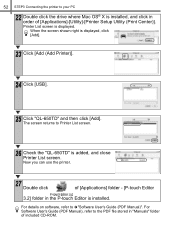
For details on software, refer to Î"Software User's Guide (PDF Manual)". Now you can use the printer. 27 Double click of [Applications] folder - [P-touch Editor 3.2] folder in the P-touch Editor is displayed, click [Add]. 23 Click [Add (Add Printer)]. 24 Click [USB]. 25 Click "QL-650TD" and then click [Add]. When the screen shown right is installed...
For details on software, refer to Î"Software User's Guide (PDF Manual)". Now you can use the printer. 27 Double click of [Applications] folder - [P-touch Editor 3.2] folder in the P-touch Editor is displayed, click [Add]. 23 Click [Add (Add Printer)]. 24 Click [USB]. 25 Click "QL-650TD" and then click [Add]. When the screen shown right is installed...

Users Manual - English and Spanish
Page 56
... not to the up position. For purchasing a replacement cutter unit, refer to Î"Software User's Guide (PDF Manual)". 1 Check that the cutter unit is located to the home position. 2 Turn OFF the power to this printer and pull out the power cord from the wall outlet. 3 Open the DK Roll cover and... pull the roll release lever to touch the blade of cutter. 6 Set the new cutter unit at the prescribed position. At...
... not to the up position. For purchasing a replacement cutter unit, refer to Î"Software User's Guide (PDF Manual)". 1 Check that the cutter unit is located to the home position. 2 Turn OFF the power to this printer and pull out the power cord from the wall outlet. 3 Open the DK Roll cover and... pull the roll release lever to touch the blade of cutter. 6 Set the new cutter unit at the prescribed position. At...


