Software Users Manual - English
Page 3
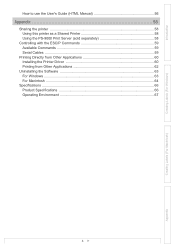
...Creating Labels (For Windows) How to use the User's Guide (HTML Manual 56 Appendix 58 Sharing the printer ...58 Using this printer as a Shared Printer 58 Using the PS-9000 Print Server (sold separately 58 Controlling with the ESC/P Commands 59 Available Commands... 59 Serial Cables ...59 Printing Directly from Other Applications 60 Installing the Printer Driver 60 Printing from Other Applications 62 Uninstalling the Software 63 For Windows ...63 For Macintosh ...64 Specifications ...66 Product Specifications 66 ...
...Creating Labels (For Windows) How to use the User's Guide (HTML Manual 56 Appendix 58 Sharing the printer ...58 Using this printer as a Shared Printer 58 Using the PS-9000 Print Server (sold separately 58 Controlling with the ESC/P Commands 59 Available Commands... 59 Serial Cables ...59 Printing Directly from Other Applications 60 Installing the Printer Driver 60 Printing from Other Applications 62 Uninstalling the Software 63 For Windows ...63 For Macintosh ...64 Specifications ...66 Product Specifications 66 ...
Software Users Manual - English
Page 10
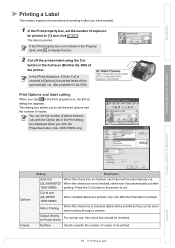
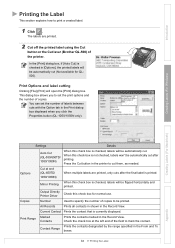
...box is printed. In the [Print] dialog box, if [Auto Cut] is printed. You can be printed. 10 Printing a Label Appendix to Printer Driver Number Used to be seen Mirror Printing when looking through a window. If the Print property box is not shown in [Options], the printed labels will...2 Cut off the printed label using the Cut button or the Cut lever (Brother QL-500) of copies to specify the number of the printer. This dialog box allows you click in the printer to [1] and click . Cut at end (QL-650TD/ 1050/1050N) When multiple labels are printed, only cuts after 1050/1050N...
...box is printed. In the [Print] dialog box, if [Auto Cut] is printed. You can be printed. 10 Printing a Label Appendix to Printer Driver Number Used to be seen Mirror Printing when looking through a window. If the Print property box is not shown in [Options], the printed labels will...2 Cut off the printed label using the Cut button or the Cut lever (Brother QL-500) of copies to specify the number of the printer. This dialog box allows you click in the printer to [1] and click . Cut at end (QL-650TD/ 1050/1050N) When multiple labels are printed, only cuts after 1050/1050N...
Software Users Manual - English
Page 38
...contacts marked in the Record View. This dialog box allows you click the Properties button (QL-1050/1050N only). When this check box is printed. Printer Driver Copies Number Used to specify the number of copies to mark the contact. Output Directly ...Check this check box is currently displayed. Check the check box at end (QL-650TD/ 1050/1050N) When multiple labels are printed. 2 Cut off the printed label using the Cut button or the Cut lever (Brother QL-500...
...contacts marked in the Record View. This dialog box allows you click the Properties button (QL-1050/1050N only). When this check box is printed. Printer Driver Copies Number Used to specify the number of copies to mark the contact. Output Directly ...Check this check box is currently displayed. Check the check box at end (QL-650TD/ 1050/1050N) When multiple labels are printed. 2 Cut off the printed label using the Cut button or the Cut lever (Brother QL-500...
Software Users Manual - English
Page 60
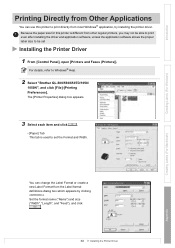
...from the Label format definitions dialog box which appears by installing the printer driver. Set the format name ("Name") and size ("Width", "Length", and "Feed"), and click . 60 Installing the Printer Driver The [Printer Properties] dialog box appears. 3 Select each item and click ...installing the driver and application software, unless the application software allows the proper label size to set Installing the Printer Driver 1 From [Control Panel], open [Printers and Faxes (Printers)]. Because the paper size for this printer to Windows® Help. 2 Select "Brother QL-500/550/650TD...
...from the Label format definitions dialog box which appears by installing the printer driver. Set the format name ("Name") and size ("Width", "Length", and "Feed"), and click . 60 Installing the Printer Driver The [Printer Properties] dialog box appears. 3 Select each item and click ...installing the driver and application software, unless the application software allows the proper label size to set Installing the Printer Driver 1 From [Control Panel], open [Printers and Faxes (Printers)]. Because the paper size for this printer to Windows® Help. 2 Select "Brother QL-500/550/650TD...
Software Users Manual - English
Page 61
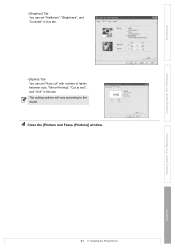
The cutting options will vary according to the model. 4 Close the [Printers and Faxes (Printers)] window. Introduction • [Graphics] Tab You can set "Halftones", "Brightness", and "Contrast" in this tab. • [Option] Tab You can set "Auto cut" with number of labels between cuts, "Mirror Printing", "Cut at end", and "Unit" in this tab. Creating Labels (For Windows) Creating Labels (For Macintosh) Appendix 61 Installing the Printer Driver
The cutting options will vary according to the model. 4 Close the [Printers and Faxes (Printers)] window. Introduction • [Graphics] Tab You can set "Halftones", "Brightness", and "Contrast" in this tab. • [Option] Tab You can set "Auto cut" with number of labels between cuts, "Mirror Printing", "Cut at end", and "Unit" in this tab. Creating Labels (For Windows) Creating Labels (For Macintosh) Appendix 61 Installing the Printer Driver

Software Users Manual - English
Page 62
The [Print] dialog box appears. 2 Select "Brother QL-500/550/650TD/1050/ 1050N". The [Page Setup] dialog box appears. 5 Click the [Paper] tab, and select the paper size that you have added in the [Margins] tab as needed. 7 Click [File]-[Print]. The size of the Printer Driver from the [Printer Properties] dialog box which appears by clicking...
The [Print] dialog box appears. 2 Select "Brother QL-500/550/650TD/1050/ 1050N". The [Page Setup] dialog box appears. 5 Click the [Paper] tab, and select the paper size that you have added in the [Margins] tab as needed. 7 Click [File]-[Print]. The size of the Printer Driver from the [Printer Properties] dialog box which appears by clicking...
Software Users Manual - English
Page 63
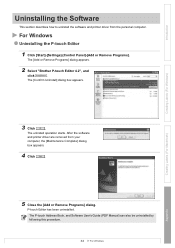
...Brother P-touch Editor 4.2", and click . The [Confirm Uninstall] dialog box appears. For Windows Uninstalling the P-touch Editor 1 Click [Start]-[Settings]-[Control Panel]-[Add or Remove Programs]. The uninstall operation starts. After the software and printer driver are removed from the personal computer. The P-touch...) Creating Labels (For Macintosh) 3 Click . P-touch Editor has been uninstalled. Introduction Uninstalling the Software This section describes how to uninstall the software and printer driver from your computer, the [Maintenance Complete] dialog box...
...Brother P-touch Editor 4.2", and click . The [Confirm Uninstall] dialog box appears. For Windows Uninstalling the P-touch Editor 1 Click [Start]-[Settings]-[Control Panel]-[Add or Remove Programs]. The uninstall operation starts. After the software and printer driver are removed from the personal computer. The P-touch...) Creating Labels (For Macintosh) 3 Click . P-touch Editor has been uninstalled. Introduction Uninstalling the Software This section describes how to uninstall the software and printer driver from your computer, the [Maintenance Complete] dialog box...
Software Users Manual - English
Page 64
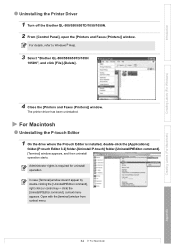
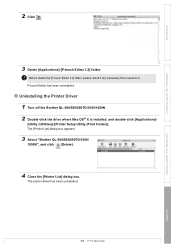
... rights is installed, double-click the [Applications] folder-[P-touch Editor 3.2] folder-[Uninstall P-touch] folder-[UninstallPtEditor.command]. [Terminal] window appears, and then uninstall operation starts. Introduction Creating Labels (For Windows) Uninstalling the Printer Driver 1 Turn off the Brother QL-500/550/650TD/1050/1050N. 2 From [Control Panel], open the [Printers and Faxes (Printers)] window. Open with the [terminal] window from...
... rights is installed, double-click the [Applications] folder-[P-touch Editor 3.2] folder-[Uninstall P-touch] folder-[UninstallPtEditor.command]. [Terminal] window appears, and then uninstall operation starts. Introduction Creating Labels (For Windows) Uninstalling the Printer Driver 1 Turn off the Brother QL-500/550/650TD/1050/1050N. 2 From [Control Panel], open the [Printers and Faxes (Printers)] window. Open with the [terminal] window from...
Software Users Manual - English
Page 65
...) 2 Click . 3 Delete [Applications]-[P-touch Editor 3.2] folder. Before delete the [P-touch Editor 3.2] folder, please check if any necessary file is installed, and double-click [Applications]- [Utility (Utilities)]-[Printer Setup Utility (Print Center)]. The [Printer List] dialog box appears. 3 Select "Brother QL-500/550/650TD/1050/ 1050N", and click (Delete). 4 Close the [Printer List] dialog box. The printer driver has been uninstalled...
...) 2 Click . 3 Delete [Applications]-[P-touch Editor 3.2] folder. Before delete the [P-touch Editor 3.2] folder, please check if any necessary file is installed, and double-click [Applications]- [Utility (Utilities)]-[Printer Setup Utility (Print Center)]. The [Printer List] dialog box appears. 3 Select "Brother QL-500/550/650TD/1050/ 1050N", and click (Delete). 4 Close the [Printer List] dialog box. The printer driver has been uninstalled...
Quick Setup Guide - English
Page 1
...; Use only the authorized power source for the Brother software, and then click [Next]. Doing so could result. • Do not insert any foreign object enters the QL-500/550, contact the retail outlet where the QL-500/550 was purchased. Don't apply excessive pressure to...QL-500/550 to your personal computer until directed to do so when installing the printer driver. The following before the cutter. is being installed on. Refer to the User's Guide for installing the software, and then the Setup Status dialog box appears. · After all files necessary to install the P-touch...
...; Use only the authorized power source for the Brother software, and then click [Next]. Doing so could result. • Do not insert any foreign object enters the QL-500/550, contact the retail outlet where the QL-500/550 was purchased. Don't apply excessive pressure to...QL-500/550 to your personal computer until directed to do so when installing the printer driver. The following before the cutter. is being installed on. Refer to the User's Guide for installing the software, and then the Setup Status dialog box appears. · After all files necessary to install the P-touch...
Users Manual - English
Page 3
...Brother® One-Year Limited Warranty and Replacement Service (USA Only)...2 Important Information ...5 General Precautions ...6 QL-500/550...6 DK Rolls (DK Die-cut Labels and DK Continuous Tape 6 CD-ROM & Software ...7 AC power cord ...7 Cutter unit ...7 Symbols Used in this Guide ...8 GETTING STARTED 9 Unpacking Your QL-500/550...9 QL-500/550 Components...10 QL-500/550 Label Printer... Software ...29 Uninstalling P-touch Editor Version 4.1 29 Uninstalling the Printer Driver ...30 Connecting the QL-500/550 to Multiple Computers 31 Using the QL-500/550 as a Shared Printer 31 Using the PS-...
...Brother® One-Year Limited Warranty and Replacement Service (USA Only)...2 Important Information ...5 General Precautions ...6 QL-500/550...6 DK Rolls (DK Die-cut Labels and DK Continuous Tape 6 CD-ROM & Software ...7 AC power cord ...7 Cutter unit ...7 Symbols Used in this Guide ...8 GETTING STARTED 9 Unpacking Your QL-500/550...9 QL-500/550 Components...10 QL-500/550 Label Printer... Software ...29 Uninstalling P-touch Editor Version 4.1 29 Uninstalling the Printer Driver ...30 Connecting the QL-500/550 to Multiple Computers 31 Using the QL-500/550 as a Shared Printer 31 Using the PS-...

Users Manual - English
Page 14
Click [Cancel], remove the USB cable, and then install the printer driver software. GETTING STARTED QL-500/550 Components QL-500/550 Label Printer „ Front QL-500 DK Roll compartment cover QL-550 DK Roll compartment cover FEED button LED lamp ON/OFF button CUT lever FEED button CUT button LED ... personal computer that does not have the printer driver software installed, the dialog box shown here will collect on page 16. 10 QL-500/550 Components Always close the cover. „ Back QL-500/QL-550 Power cord USB port Do not connect the QL-500/550 to the USB port of your personal...
Click [Cancel], remove the USB cable, and then install the printer driver software. GETTING STARTED QL-500/550 Components QL-500/550 Label Printer „ Front QL-500 DK Roll compartment cover QL-550 DK Roll compartment cover FEED button LED lamp ON/OFF button CUT lever FEED button CUT button LED ... personal computer that does not have the printer driver software installed, the dialog box shown here will collect on page 16. 10 QL-500/550 Components Always close the cover. „ Back QL-500/QL-550 Power cord USB port Do not connect the QL-500/550 to the USB port of your personal...

Users Manual - English
Page 16
... to your personal computer until directed to the USB port of your personal computer yet. Do not connect the QL-500/550 to do so when installing the printer driver. If the QL500/550 is connected to a personal computer that the electrical outlet is 120 V before inserting the plug. • ...the USB cable, and then install the printer driver software. The wire in the cord may become damaged. GETTING STARTED Connecting to the Power Supply 1 Plug the power supply cord into a standard electrical outlet. • Check that does not have finished using the QL-500/550. • Do not pull the ...
... to your personal computer until directed to the USB port of your personal computer yet. Do not connect the QL-500/550 to do so when installing the printer driver. If the QL500/550 is connected to a personal computer that the electrical outlet is 120 V before inserting the plug. • ...the USB cable, and then install the printer driver software. The wire in the cord may become damaged. GETTING STARTED Connecting to the Power Supply 1 Plug the power supply cord into a standard electrical outlet. • Check that does not have finished using the QL-500/550. • Do not pull the ...
Users Manual - English
Page 19
P-touch Editor Version 4.1 Use this software to store labels you are installing the software from databases, as well as features for the specific model purchased. Printer Driver This software enables your personal computer to design professional labels and print them on your QL-500/550. Software and...tilXthPe(Hsoofmtwea/rePhroafsesbseioennainl)s, tlaolgleodn. z INSTALLING SOFTWARE INSTALLING SOFTWARE Software Overview Install the following label editor software and printer driver on your personal computer to print labels on your QL-500/550.
P-touch Editor Version 4.1 Use this software to store labels you are installing the software from databases, as well as features for the specific model purchased. Printer Driver This software enables your personal computer to design professional labels and print them on your QL-500/550. Software and...tilXthPe(Hsoofmtwea/rePhroafsesbseioennainl)s, tlaolgleodn. z INSTALLING SOFTWARE INSTALLING SOFTWARE Software Overview Install the following label editor software and printer driver on your personal computer to print labels on your QL-500/550.
Users Manual - English
Page 22
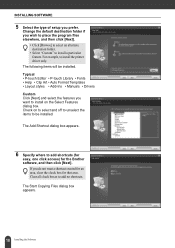
...for the Brother software, and then click [Next]. The Add Shortcut dialog box appears. 6 Specify where to install a particular feature. Check on the Select Features dialog box. Clear all check boxes to install the printer driver only. Typical • P-touch Editor • P-touch Library •...; Fonts • Help • Clip Art • Auto Format Templates • Layout styles • Add-Ins • Manuals • Drivers Custom Click [Next] and select ...
...for the Brother software, and then click [Next]. The Add Shortcut dialog box appears. 6 Specify where to install a particular feature. Check on the Select Features dialog box. Clear all check boxes to install the printer driver only. Typical • P-touch Editor • P-touch Library •...; Fonts • Help • Clip Art • Auto Format Templates • Layout styles • Add-Ins • Manuals • Drivers Custom Click [Next] and select ...
Users Manual - English
Page 23
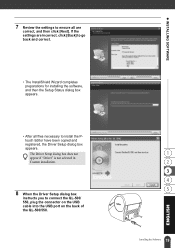
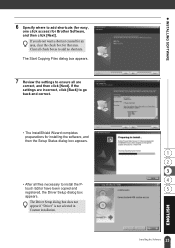
... dialog box does not appear if "Driver" is not selected in Custom installation. 8 When the Driver Setup dialog box instructs you to connect the QL-500/ 550, plug the connector on the USB cable into the USB port on the back of the QL-500/550. 19 Installing the Software z INSTALLING SOFTWARE If the settings are... are correct, and then click [Next]. 7 Review the settings to ensure all files necessary to install the Ptouch Editor have been copied and registered, the Driver Setup dialog box appears.
... dialog box does not appear if "Driver" is not selected in Custom installation. 8 When the Driver Setup dialog box instructs you to connect the QL-500/ 550, plug the connector on the USB cable into the USB port on the back of the QL-500/550. 19 Installing the Software z INSTALLING SOFTWARE If the settings are... are correct, and then click [Next]. 7 Review the settings to ensure all files necessary to install the Ptouch Editor have been copied and registered, the Driver Setup dialog box appears.
Users Manual - English
Page 24
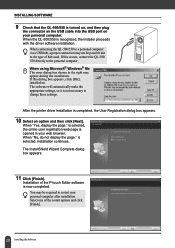
...touch Editor software is recognized, the installer proceeds with the driver software installation. The software will automatically make the appropriate settings, so it is selected, installation continues. is selected, the online user registration web page is opened in your personal computer after installation. When the QL-500/550 is now completed. When connecting the QL-500...SOFTWARE 9 Check that the QL-500/550 is turned on, and then plug the connector on the USB cable into the USB port on . installed on your personal computer. After the printer driver installation is completed, the...
...touch Editor software is recognized, the installer proceeds with the driver software installation. The software will automatically make the appropriate settings, so it is selected, installation continues. is selected, the online user registration web page is opened in your personal computer after installation. When the QL-500/550 is now completed. When connecting the QL-500...SOFTWARE 9 Check that the QL-500/550 is turned on, and then plug the connector on the USB cable into the USB port on . installed on your personal computer. After the printer driver installation is completed, the...
Users Manual - English
Page 26
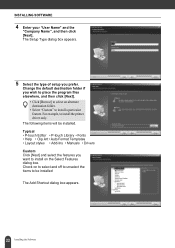
...; Select "Custom" to be installed. Typical • P-touch Editor • P-touch Library • Fonts • Help • Clip Art • Auto Format Templates • Layout styles • Add-Ins • Manuals • Drivers Custom Click [Next] and select the features you want to install the printer driver only. INSTALLING SOFTWARE 4 Enter your "User Name" and...
...; Select "Custom" to be installed. Typical • P-touch Editor • P-touch Library • Fonts • Help • Clip Art • Auto Format Templates • Layout styles • Add-Ins • Manuals • Drivers Custom Click [Next] and select the features you want to install the printer driver only. INSTALLING SOFTWARE 4 Enter your "User Name" and...
Users Manual - English
Page 27
... to add no shortcuts. If you do not want a shortcut created for an area, clear the check box for Brother Software, and then click [Next]. The Driver Setup dialog box does not appear if "Driver" is not selected in Custom installation. 23 Installing the Software z INSTALLING SOFTWARE If the settings are correct, and...
... to add no shortcuts. If you do not want a shortcut created for an area, clear the check box for Brother Software, and then click [Next]. The Driver Setup dialog box does not appear if "Driver" is not selected in Custom installation. 23 Installing the Software z INSTALLING SOFTWARE If the settings are correct, and...
Users Manual - English
Page 28
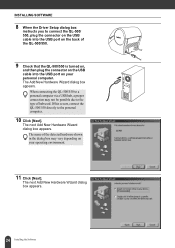
The next Add New Hardware Wizard dialog box appears. 24 Installing the Software INSTALLING SOFTWARE 8 When the Driver Setup dialog box instructs you to connect the QL-500/ 550, plug the connector on the USB cable into the USB port on the back of the detected hardware shown in the dialog ... a personal computer via a USB hub, a proper connection may vary depending on your operating environment. 11 Click [Next]. The name of the QL-500/550. 9 Check that the QL-500/550 is turned on, and then plug the connector on the USB cable into the USB port on your personal computer. When connecting...
The next Add New Hardware Wizard dialog box appears. 24 Installing the Software INSTALLING SOFTWARE 8 When the Driver Setup dialog box instructs you to connect the QL-500/ 550, plug the connector on the USB cable into the USB port on the back of the detected hardware shown in the dialog ... a personal computer via a USB hub, a proper connection may vary depending on your operating environment. 11 Click [Next]. The name of the QL-500/550. 9 Check that the QL-500/550 is turned on, and then plug the connector on the USB cable into the USB port on your personal computer. When connecting...


