
Quick Setup Guide - English
Page 4
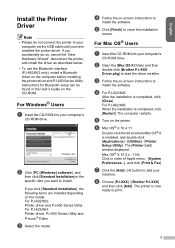
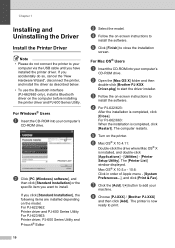
... (Windows) software], and then click [Standard Installation] or the specific item you click [Standard Installation], the following items are installed depending on the model. For Windows® Users a Insert the CD-ROM into your computer's CD-ROM drive. e Turn on the printer. Instructions for Bluetooth setup can be found in order of Apple menu - [System Preferences...], and click [Print & Fax]. Install the Printer Driver Note • Please do so, cancel the "New...
... (Windows) software], and then click [Standard Installation] or the specific item you click [Standard Installation], the following items are installed depending on the model. For Windows® Users a Insert the CD-ROM into your computer's CD-ROM drive. e Turn on the printer. Instructions for Bluetooth setup can be found in order of Apple menu - [System Preferences...], and click [Print & Fax]. Install the Printer Driver Note • Please do so, cancel the "New...
Quick Setup Guide - English
Page 5
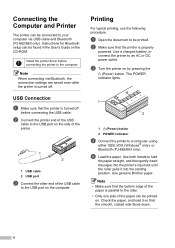
... printing, use the following procedure. Use genuine Brother paper. Note • Make sure that the printer is turned off before connecting the printer to hold the paper straight, and then gently insert the paper into the starting position. Instructions for Bluetooth setup can be printed. USB Connection a Make sure that the smooth, coated side faces down. 4 c Turn the printer on the computer. Install the printer driver before connecting the USB cable. a Open the document to the USB port on by pressing the (Power) button...
... printing, use the following procedure. Use genuine Brother paper. Note • Make sure that the printer is turned off before connecting the printer to hold the paper straight, and then gently insert the paper into the starting position. Instructions for Bluetooth setup can be printed. USB Connection a Make sure that the smooth, coated side faces down. 4 c Turn the printer on the computer. Install the printer driver before connecting the USB cable. a Open the document to the USB port on by pressing the (Power) button...
Software Users Manual - English
Page 4
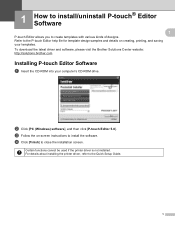
..., printing, and saving your computer's CD-ROM drive. 1 How to install/uninstall P-touch® Editor Software 1 1 P-touch Editor allows you to the Quick Setup Guide. 1 Refer to the P-touch Editor help file for template design samples and details on -screen instructions to close the installation screen. Certain functions cannot be used if the printer driver is not installed. To download the latest driver and software, please visit the Brother...
..., printing, and saving your computer's CD-ROM drive. 1 How to install/uninstall P-touch® Editor Software 1 1 P-touch Editor allows you to the Quick Setup Guide. 1 Refer to the P-touch Editor help file for template design samples and details on -screen instructions to close the installation screen. Certain functions cannot be used if the printer driver is not installed. To download the latest driver and software, please visit the Brother...
User Guide
Page 3
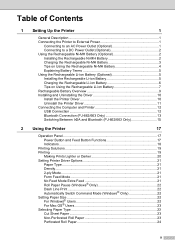
... 2 Using the Printer 17 Operation Panel 17 Power Button and Feed Button Functions 17 Indicators ...18 Printing Solutions 19 Printing ...19 Making Prints Lighter or Darker 20 Setting Printer Driver Options 21 Paper Type ...21 Density...21 2-ply Mode...21 Form Feed Mode 21 No Feed Mode Extra Feed 21 Roll Paper Pause (Windows® Only 22 Dash Line Print 22 Automatically Switch Command Mode (Windows® Only 22 Setting Paper Size 22 For Windows® Users 22 For Mac OS® Users 23 Selecting Paper Type 23 Cut Sheet Paper...
... 2 Using the Printer 17 Operation Panel 17 Power Button and Feed Button Functions 17 Indicators ...18 Printing Solutions 19 Printing ...19 Making Prints Lighter or Darker 20 Setting Printer Driver Options 21 Paper Type ...21 Density...21 2-ply Mode...21 Form Feed Mode 21 No Feed Mode Extra Feed 21 Roll Paper Pause (Windows® Only 22 Dash Line Print 22 Automatically Switch Command Mode (Windows® Only 22 Setting Paper Size 22 For Windows® Users 22 For Mac OS® Users 23 Selecting Paper Type 23 Cut Sheet Paper...
User Guide
Page 4
... PJ-600 Series Utility 27 How to Use PJ-600 Series Utility 28 Parameters ...29 4 Other Function 39 JPEG Printing ...39 5 Maintaining the Printer 40 Cleaning the Platen Roller 40 Cleaning the Printer's Exterior 41 6 Reference 42 Indicators ...42 Indicator Warnings 44 Printing a Printer Report 46 7 Troubleshooting 47 Overview ...47 Paper Problems 48 Printed Image Problems 48 Pages Don't Print 49 Pages Are Partially Printed 50 8 Technical Information 51 Product Specifications (PJ-622...
... PJ-600 Series Utility 27 How to Use PJ-600 Series Utility 28 Parameters ...29 4 Other Function 39 JPEG Printing ...39 5 Maintaining the Printer 40 Cleaning the Platen Roller 40 Cleaning the Printer's Exterior 41 6 Reference 42 Indicators ...42 Indicator Warnings 44 Printing a Printer Report 46 7 Troubleshooting 47 Overview ...47 Paper Problems 48 Printed Image Problems 48 Pages Don't Print 49 Pages Are Partially Printed 50 8 Technical Information 51 Product Specifications (PJ-622...
User Guide
Page 14
... [Print & Fax]. h Choose [PJ-XXX] / [Brother PJ-XXX] and then click [Add]. b Click [PC (Windows) software], and then click [Standard Installation] or the specific item you have installed the printer driver. f Mac OS® X 10.4.11: Double-click the drive where Mac OS® X is completed, click [Close]. e Click [Finish] to install the software. g Click the [Add] / [+] button to install the software. d For PJ-622/623: After the installation is installed, and double-click...
... [Print & Fax]. h Choose [PJ-XXX] / [Brother PJ-XXX] and then click [Add]. b Click [PC (Windows) software], and then click [Standard Installation] or the specific item you have installed the printer driver. f Mac OS® X 10.4.11: Double-click the drive where Mac OS® X is completed, click [Close]. e Click [Finish] to install the software. g Click the [Add] / [+] button to install the software. d For PJ-622/623: After the installation is installed, and double-click...
User Guide
Page 15
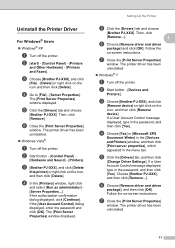
...Windows Vista® a Turn off the printer. The [Print Server Properties] window displayed. d Choose [Fax] or [Microsoft XPS Document Writer] in the [Devices and Printers] window, and then click [Print server properties], which appeared in the password, and then click [Yes]. If a User Account Control message displayed, type in the menu bar. g Close the [Print Server Properties] window. d Go to [File] - [Server Properties]. Setting Up the Printer e Click the [Drivers] tab and choose [Brother PJ-XXX]. Then, click [Remove]. b Start button - [Control Panel...
...Windows Vista® a Turn off the printer. The [Print Server Properties] window displayed. d Choose [Fax] or [Microsoft XPS Document Writer] in the [Devices and Printers] window, and then click [Print server properties], which appeared in the password, and then click [Yes]. If a User Account Control message displayed, type in the menu bar. g Close the [Print Server Properties] window. d Go to [File] - [Server Properties]. Setting Up the Printer e Click the [Drivers] tab and choose [Brother PJ-XXX]. Then, click [Remove]. b Start button - [Control Panel...

User Guide
Page 16
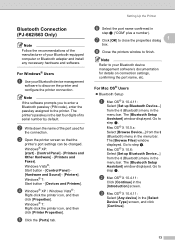
... the USB cable to the USB port on the side of the printer. 1 2 1 USB cable 2 USB port c Connect the other end of Apple menu - [System Preferences...], and click [Print & Fax]. Connecting the Computer and Printer 1 The printer can be connected to your computer via Bluetooth, the connection settings are saved even after the printer is turned off before connecting the printer to the USB port on the computer. 12 The [Printer List] window displayed. The printer driver has been uninstalled. Install the printer driver before connecting the USB cable. USB Connection 1 a Make...
... the USB cable to the USB port on the side of the printer. 1 2 1 USB cable 2 USB port c Connect the other end of Apple menu - [System Preferences...], and click [Print & Fax]. Connecting the Computer and Printer 1 The printer can be connected to your computer via Bluetooth, the connection settings are saved even after the printer is turned off before connecting the printer to the USB port on the computer. 12 The [Printer List] window displayed. The printer driver has been uninstalled. Install the printer driver before connecting the USB cable. USB Connection 1 a Make...
User Guide
Page 17
... serial number by default. Windows Vista®: Start button - [Control Panel] [Hardware and Sound] - [Printers]. For Mac OS® Users 1 Bluetooth Setup a Mac OS® X 10.4.11: Select [Set up Bluetooth Device...] from the (Bluetooth) menu in the menu bar. Go to the printer. c Mac OS® X 10.4.11: Select [Any device] in the menu bar. The printer's passkey is the last four digits of the port used for details on connection settings, confirming the port...
... serial number by default. Windows Vista®: Start button - [Control Panel] [Hardware and Sound] - [Printers]. For Mac OS® Users 1 Bluetooth Setup a Mac OS® X 10.4.11: Select [Set up Bluetooth Device...] from the (Bluetooth) menu in the menu bar. Go to the printer. c Mac OS® X 10.4.11: Select [Any device] in the menu bar. The printer's passkey is the last four digits of the port used for details on connection settings, confirming the port...
User Guide
Page 22
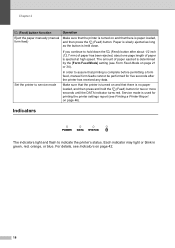
... (Feed) button. For details, see Form Feed Mode on page 21 or 34). Service mode is held down the (Feed) button after the printer has received any data. Indicators 2 The indicators light and flash to hold the (Feed) button for printing the printer settings report (see Printing a Printer Report on page 42. 18 Each indicator may light or blink in green, red, orange, or blue. Chapter 2 (Feed) button function Eject the paper manually (manual form feed) Operation Make sure that the printer is turned on...
... (Feed) button. For details, see Form Feed Mode on page 21 or 34). Service mode is held down the (Feed) button after the printer has received any data. Indicators 2 The indicators light and flash to hold the (Feed) button for printing the printer settings report (see Printing a Printer Report on page 42. 18 Each indicator may light or blink in green, red, orange, or blue. Chapter 2 (Feed) button function Eject the paper manually (manual form feed) Operation Make sure that the printer is turned on...
User Guide
Page 24
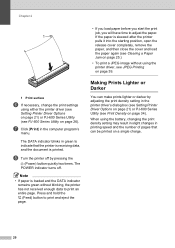
... be printed on a single charge. 20 h Turn the printer off . The DATA indicator blinks in green to indicate that can make prints lighter or darker by pressing the (Power) button quickly two times. Press and hold the (Feed) button to print and eject the page. • If you load paper before you start the print job, you will have time to print an entire page. When using either the printer driver (see Setting Printer Driver Options on page 21...
... be printed on a single charge. 20 h Turn the printer off . The DATA indicator blinks in green to indicate that can make prints lighter or darker by pressing the (Power) button quickly two times. Press and hold the (Feed) button to print and eject the page. • If you load paper before you start the print job, you will have time to print an entire page. When using either the printer driver (see Setting Printer Driver Options on page 21...
User Guide
Page 25
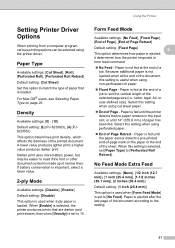
... power, but may be selected using non-perforated roll paper. Fixed Page - Using the Printer Form Feed Mode 2 Available settings: [No Feed], [Fixed Page], [End of Page], [End of narrow lines. Because additional paper is useful when using the printer driver. Select this setting when using cut sheet paper. End of paper that are darker (and print slower) than when [Density] is fed at the end of the selected page size (i.e., letter, legal, A4, or user-defined size). Paper Type...
... power, but may be selected using non-perforated roll paper. Fixed Page - Using the Printer Form Feed Mode 2 Available settings: [No Feed], [Fixed Page], [End of Page], [End of narrow lines. Because additional paper is useful when using the printer driver. Select this setting when using cut sheet paper. End of paper that are darker (and print slower) than when [Density] is fed at the end of the selected page size (i.e., letter, legal, A4, or user-defined size). Paper Type...
User Guide
Page 27
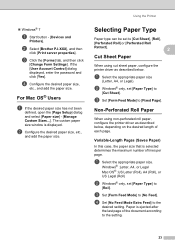
...) b Windows® only, set [Paper Type] to the setting. 23 Paper is ejected after the last page of lines per page. b Select [Brother PJ-XXX], and then click [Print server properties]. For Mac OS® Users 2 a If the desired paper size has not been defined, open the [Page Setup] dialog and select [Paper size] - [Manage Custom Sizes...]. Non-Perforated Roll Paper 2 When using cut sheet paper, configure the printer driver as described below . c Set [Form Feed Mode] to [Fixed Page]. c Set [Form Feed Mode] to [No Feed]. Variable...
...) b Windows® only, set [Paper Type] to the setting. 23 Paper is ejected after the last page of lines per page. b Select [Brother PJ-XXX], and then click [Print server properties]. For Mac OS® Users 2 a If the desired paper size has not been defined, open the [Page Setup] dialog and select [Paper size] - [Manage Custom Sizes...]. Non-Perforated Roll Paper 2 When using cut sheet paper, configure the printer driver as described below . c Set [Form Feed Mode] to [Fixed Page]. c Set [Form Feed Mode] to [No Feed]. Variable...

User Guide
Page 28
... Feed Mode] to [No Feed]. b Windows® only, set [Paper Type] to [Roll]. Tips on . c Set [Form Feed Mode] to [End of Page] or [End of the document according to zero (0). Usage and Handling Instructions 2 When loading paper, make sure that the top and bottom margins specified within the computer program are set to the setting. If you use genuine Brother thermal paper, which has been specifically designed and tested for any paper size...
... Feed Mode] to [No Feed]. b Windows® only, set [Paper Type] to [Roll]. Tips on . c Set [Form Feed Mode] to [End of Page] or [End of the document according to zero (0). Usage and Handling Instructions 2 When loading paper, make sure that the top and bottom margins specified within the computer program are set to the setting. If you use genuine Brother thermal paper, which has been specifically designed and tested for any paper size...

User Guide
Page 31
... ] - [Control Panel] - [Add or Remove Programs]. The [Uninstall or change a program] window displayed. Windows Vista® / Windows® 7: Choose [Brother PJ-600 Series Utility], and click [Uninstall]. The Windows® version of the two versions differs. c Click [Yes]. When the [User Account Control] dialog box displayed, click [Allow]. PJ-600 Series Utility Using PJ-600 Series Utility 3 Before Using PJ-600 Series Utility 3 Connect the printer to an AC or DC power...
... ] - [Control Panel] - [Add or Remove Programs]. The [Uninstall or change a program] window displayed. Windows Vista® / Windows® 7: Choose [Brother PJ-600 Series Utility], and click [Uninstall]. The Windows® version of the two versions differs. c Click [Yes]. When the [User Account Control] dialog box displayed, click [Allow]. PJ-600 Series Utility Using PJ-600 Series Utility 3 Before Using PJ-600 Series Utility 3 Connect the printer to an AC or DC power...
User Guide
Page 36
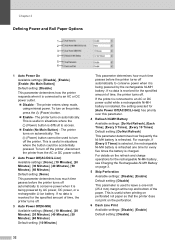
... to conserve power when it is connected to an AC or DC power outlet. Disable - To turn on automatically. The printer turns on the perforation. 6 Dash Line Print Available settings: [Disable], [Enable] Default setting: [Disable] 32 For details on the refresh and charge operations for the specified amount of the paper. The (Power) button cannot be accidentally pressed. Chapter 3 Defining Power and Roll Paper Options 3 1 2 3 4 5 6 1 Auto Power On Available settings: [Disable], [Enable], [Enable (No Main Button)] Default setting: [Disable] This...
... to conserve power when it is connected to an AC or DC power outlet. Disable - To turn on automatically. The printer turns on the perforation. 6 Dash Line Print Available settings: [Disable], [Enable] Default setting: [Disable] 32 For details on the refresh and charge operations for the specified amount of the paper. The (Power) button cannot be accidentally pressed. Chapter 3 Defining Power and Roll Paper Options 3 1 2 3 4 5 6 1 Auto Power On Available settings: [Disable], [Enable], [Enable (No Main Button)] Default setting: [Disable] This...

User Guide
Page 38
... changed in the printer driver's dialog box, that setting has priority. 2 Form Feed Mode Available settings: [No Feed], [Fixed Page], [End of Page], [End of Page Retract] Default setting: [Fixed Page] This parameter determines how paper is made up of a job. Paper is fed until the paper sensor detects a pre-printed end-of the selected page size (i.e., letter, legal, A4, or user-defined size). When using non-perforated roll paper. Fixed Page - By default, the print head advances to the next line...
... changed in the printer driver's dialog box, that setting has priority. 2 Form Feed Mode Available settings: [No Feed], [Fixed Page], [End of Page], [End of Page Retract] Default setting: [Fixed Page] This parameter determines how paper is made up of a job. Paper is fed until the paper sensor detects a pre-printed end-of the selected page size (i.e., letter, legal, A4, or user-defined size). When using non-perforated roll paper. Fixed Page - By default, the print head advances to the next line...
User Guide
Page 43
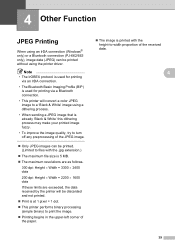
... Printing 4 When using the printer driver. Note • The IrOBEX protocol is used for printing via an IrDA connection. • The Bluetooth Basic Imaging Profile (BIP) is used for printing via a Bluetooth connection. • This printer will convert a color JPEG image to a 'Black & White' image using a dithering process. • When sending a JPEG image that is already 'Black & White' this dithering process may make your printed image fuzzy. • To improve the image quality, try to turn off...
... Printing 4 When using the printer driver. Note • The IrOBEX protocol is used for printing via an IrDA connection. • The Bluetooth Basic Imaging Profile (BIP) is used for printing via a Bluetooth connection. • This printer will convert a color JPEG image to a 'Black & White' image using a dithering process. • When sending a JPEG image that is already 'Black & White' this dithering process may make your printed image fuzzy. • To improve the image quality, try to turn off...
User Guide
Page 52
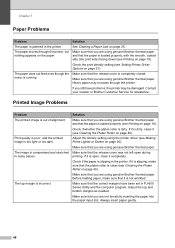
... are using genuine Brother thermal paper. Chapter 7 Paper Problems 7 Problem The paper is jammed in the printer The paper moves through the printer. If you are using genuine Brother thermal paper and that the paper is loaded properly, with the smooth, coated side (the print side) facing down (see Cleaning the Platen Roller on page 21). Make sure that the platen roller is not wrinkled. If it is clean (see Printing on page 19). Check the print density setting (see Cleaning...
... are using genuine Brother thermal paper. Chapter 7 Paper Problems 7 Problem The paper is jammed in the printer The paper moves through the printer. If you are using genuine Brother thermal paper and that the paper is loaded properly, with the smooth, coated side (the print side) facing down (see Cleaning the Platen Roller on page 21). Make sure that the platen roller is not wrinkled. If it is clean (see Printing on page 19). Check the print density setting (see Cleaning...
User Guide
Page 53
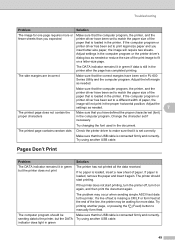
... the line, the printer may occur when sending simple ASCII text data to the printer. Make sure that the USB cable is connected firmly and correctly. Adjust the settings as needed . 7 The printed page does not contain the proper characters Make sure that you have defined the proper character set if necessary. Try printing another page, or pressing the (Feed) button to make sure that it on a letter-size page. Troubleshooting Problem Solution The image for...
... the line, the printer may occur when sending simple ASCII text data to the printer. Make sure that the USB cable is connected firmly and correctly. Adjust the settings as needed . 7 The printed page does not contain the proper characters Make sure that you have defined the proper character set if necessary. Try printing another page, or pressing the (Feed) button to make sure that it on a letter-size page. Troubleshooting Problem Solution The image for...


