
Users Manual - English
Page 3
... ...8 Form Feed Modes 8 Selecting Media ...9 Cut Sheet Paper 9 Non-Perforated Roll Paper 9 Perforated Roll Paper 10 Windows Advanced Features Using PocketJet 3 Utility (Configuration Utility) ...... 10 Windows-Specific Operating System Features 11 Connecting to a DC Supply (Optional 2 Using the...16 Installing the PocketJet 3 Utility 16 Using the PocketJet 3 Utility 17 Menu Bar...18 Configuration Options (Dropdown Menu Selections 20 Printer Commands (Function Buttons 31 Installing the Battery (Optional 34 Removing the Battery 36 Charging the Battery 37 Stopping the...
... ...8 Form Feed Modes 8 Selecting Media ...9 Cut Sheet Paper 9 Non-Perforated Roll Paper 9 Perforated Roll Paper 10 Windows Advanced Features Using PocketJet 3 Utility (Configuration Utility) ...... 10 Windows-Specific Operating System Features 11 Connecting to a DC Supply (Optional 2 Using the...16 Installing the PocketJet 3 Utility 16 Using the PocketJet 3 Utility 17 Menu Bar...18 Configuration Options (Dropdown Menu Selections 20 Printer Commands (Function Buttons 31 Installing the Battery (Optional 34 Removing the Battery 36 Charging the Battery 37 Stopping the...

Users Manual - English
Page 5
Connecting the printer to the printer as shown in Figure 2. 2. Plug the AC power cord into a nearby AC power outlet (100~240 VAC, 50-60 Hz). Please purchase appropriate adapter. Connect the AC adapter to an AC power outlet NOTE: AC power cord and AC Adapter are optional. Chapter 1 - Connect the AC power cord to charge the battery (See "Charging the Battery", page 37). 1. Setting Up the Printer Connecting to an AC Outlet (Optional) Connect the printer to a nearby AC power outlet to run it on AC power or to the AC adapter. 3. Figure 2. Page 1
Connecting the printer to the printer as shown in Figure 2. 2. Plug the AC power cord into a nearby AC power outlet (100~240 VAC, 50-60 Hz). Please purchase appropriate adapter. Connect the AC adapter to an AC power outlet NOTE: AC power cord and AC Adapter are optional. Chapter 1 - Connect the AC power cord to charge the battery (See "Charging the Battery", page 37). 1. Setting Up the Printer Connecting to an AC Outlet (Optional) Connect the printer to a nearby AC power outlet to run it on AC power or to the AC adapter. 3. Figure 2. Page 1
Users Manual - English
Page 6
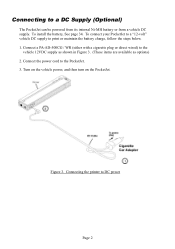
...AD-500CG / WR (either with a cigarette plug or direct wired) to print or maintain the battery charge, follow the steps below. 1. Turn on the vehicle power, and then turn on the PocketJet. Figure 3. To connect your PocketJet to a "12-volt" vehicle DC supply to the vehicle 12VDC supply as shown in Figure ...3. (These items are available as options) 2. Connect the power cord to DC power Page 2 Connecting the printer to the PocketJet. 3. Connecting to a DC Supply (Optional) The PocketJet can be powered from its internal Ni-MH battery or from a vehicle DC supply.
...AD-500CG / WR (either with a cigarette plug or direct wired) to print or maintain the battery charge, follow the steps below. 1. Turn on the vehicle power, and then turn on the PocketJet. Figure 3. To connect your PocketJet to a "12-volt" vehicle DC supply to the vehicle 12VDC supply as shown in Figure ...3. (These items are available as options) 2. Connect the power cord to DC power Page 2 Connecting the printer to the PocketJet. 3. Connecting to a DC Supply (Optional) The PocketJet can be powered from its internal Ni-MH battery or from a vehicle DC supply.

Users Manual - English
Page 7
... Form Feed: With power ON and paper inserted, press and hold for two or more seconds until the POWER indicator begins to blink. Charge the Battery: With the printer off, push the main switch and hold it down for five seconds after the printer has received any data. See Figure...
... Form Feed: With power ON and paper inserted, press and hold for two or more seconds until the POWER indicator begins to blink. Charge the Battery: With the printer off, push the main switch and hold it down for five seconds after the printer has received any data. See Figure...
Users Manual - English
Page 8
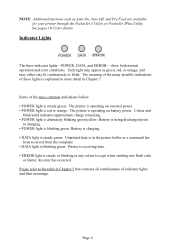
...lit continuously or blink. Page 4 Colour and blink/solid indicates approximate charge remaining. • POWER light is alternately blinking green/yellow: Battery is being discharged prior to the table in any colour (except when sending new flash code or fonts): An error has occurred... normal operation and error conditions. Some of indicator lights and their meanings. See pages 16-33 for your printer through the PocketJet 3 Utility or PocketJet 3Plus Utility. The meaning of the many possible indications of these lights is explained in more common indications follow: • ...
...lit continuously or blink. Page 4 Colour and blink/solid indicates approximate charge remaining. • POWER light is alternately blinking green/yellow: Battery is being discharged prior to the table in any colour (except when sending new flash code or fonts): An error has occurred... normal operation and error conditions. Some of indicator lights and their meanings. See pages 16-33 for your printer through the PocketJet 3 Utility or PocketJet 3Plus Utility. The meaning of the many possible indications of these lights is explained in more common indications follow: • ...
Users Manual - English
Page 18
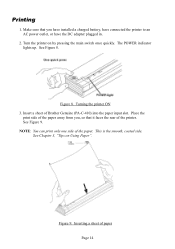
...See Figure 8. Figure 8. Turning the printer ON 3. See Figure 9. Place the print side of the paper away from you, so that you have installed a charged battery, have connected the printer to an AC power outlet, or have the DC adapter plugged in. 2. This is the smooth, coated side. Inserting a sheet of... Brother Genuine (PA-C-410) into the paper input slot. Make sure that it faces the rear of the paper. Figure 9. See Chapter 3, "Tips on by ...
...See Figure 8. Figure 8. Turning the printer ON 3. See Figure 9. Place the print side of the paper away from you, so that you have installed a charged battery, have connected the printer to an AC power outlet, or have the DC adapter plugged in. 2. This is the smooth, coated side. Inserting a sheet of... Brother Genuine (PA-C-410) into the paper input slot. Make sure that it faces the rear of the paper. Figure 9. See Chapter 3, "Tips on by ...

Users Manual - English
Page 19
... Features", on (without blinking), the printer has received insufficient data to indicate that can make prints lighter or darker by using the PocketJet 3 Utility. NOTE: If a battery is powering the printer and the Auto-Off Timer feature is receiving data from any software application. If you are not using a driver...
... Features", on (without blinking), the printer has received insufficient data to indicate that can make prints lighter or darker by using the PocketJet 3 Utility. NOTE: If a battery is powering the printer and the Auto-Off Timer feature is receiving data from any software application. If you are not using a driver...

Users Manual - English
Page 21
...battery is freshly charged. • Assure that the Printer Driver has been installed and is functional. • Connect the supplied USB cable between the printer and host computer, or align the computer and printer Infrared ports. • From the Start Menu, select Programs, select "Brother" and "Brother PocketJet 3" or "PocketJet... 3Plus", and then select "PocketJet 3 Utility (or PocketJet 3Plus Utility)". Clicking on the 'Test Page' button will appear as default. Using the PocketJet 3 Utility : • ...
...battery is freshly charged. • Assure that the Printer Driver has been installed and is functional. • Connect the supplied USB cable between the printer and host computer, or align the computer and printer Infrared ports. • From the Start Menu, select Programs, select "Brother" and "Brother PocketJet 3" or "PocketJet... 3Plus", and then select "PocketJet 3 Utility (or PocketJet 3Plus Utility)". Clicking on the 'Test Page' button will appear as default. Using the PocketJet 3 Utility : • ...
Users Manual - English
Page 25
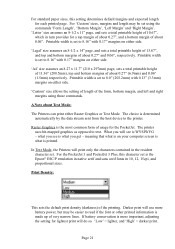
...in the resident character set. The printer uses bit-mapped graphics as opposed to the printer. For the PocketJet 3 and PocketJet 3 Plus, this setting determines default margins and expected length for the PocketJet. Printable width is on either side. 'A4' size assumes an 8.27 x 11.7" (210 x...lines. For standard paper sizes, this character set is determined automatically by the data stream sent from the host device to text. If battery conservation is more battery power, but may be easier to 8.16" with 0.13" (3.3mm) margins on either side. 'Legal' size assumes an 8-1/2...
...in the resident character set. The printer uses bit-mapped graphics as opposed to the printer. For the PocketJet 3 and PocketJet 3 Plus, this setting determines default margins and expected length for the PocketJet. Printable width is on either side. 'A4' size assumes an 8.27 x 11.7" (210 x...lines. For standard paper sizes, this character set is determined automatically by the data stream sent from the host device to text. If battery conservation is more battery power, but may be easier to 8.16" with 0.13" (3.3mm) margins on either side. 'Legal' size assumes an 8-1/2...
Users Manual - English
Page 27
... be useful in the paper input slot area, the printer will normally advance the paper a short distance. Auto-Off: When the printer is running on battery power, you may find that this is inconvenient as an external power source is difficult or unavailable. Pre-Feed: When the printer... paper users who leave paper loaded while powering the printer up as soon as it will turn off . power source is connected to conserve the battery. If no data is set to 'Enabled-No Main Switch', the printer will likely wish to shut off . You may wish to have the printer...
... be useful in the paper input slot area, the printer will normally advance the paper a short distance. Auto-Off: When the printer is running on battery power, you may find that this is inconvenient as an external power source is difficult or unavailable. Pre-Feed: When the printer... paper users who leave paper loaded while powering the printer up as soon as it will turn off . power source is connected to conserve the battery. If no data is set to 'Enabled-No Main Switch', the printer will likely wish to shut off . You may wish to have the printer...
Users Manual - English
Page 38
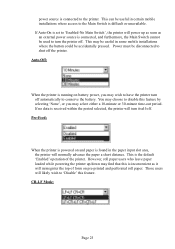
Gently push the battery connector into the terminal Page 34 Push the cover away from the AC adapter receptacle. See Figure 10. Opening the Battery Cover 2. See Figure 11. Pushing the battery connector into the terminal on the inside of the printer's battery compartment. Figure 10. Swing the cover open and remove it. 3. Open the printer's battery cover by pressing the cover latch. Installing the Battery (Optional) 1. Figure 11.
Gently push the battery connector into the terminal Page 34 Push the cover away from the AC adapter receptacle. See Figure 10. Opening the Battery Cover 2. See Figure 11. Pushing the battery connector into the terminal on the inside of the printer's battery compartment. Figure 10. Swing the cover open and remove it. 3. Open the printer's battery cover by pressing the cover latch. Installing the Battery (Optional) 1. Figure 11.

Users Manual - English
Page 39
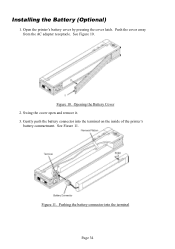
.... 6. See Figure 12. Then you may accidentally insert the battery on to the inside of the battery compartment opposite the AC adapter receptacle. While holding onto the ribbon, tilt the battery and place it . Page 35 Placing the battery inside the battery compartment. Grasp the battery removal ribbon, which is attached to the ribbon, you won...
.... 6. See Figure 12. Then you may accidentally insert the battery on to the inside of the battery compartment opposite the AC adapter receptacle. While holding onto the ribbon, tilt the battery and place it . Page 35 Placing the battery inside the battery compartment. Grasp the battery removal ribbon, which is attached to the ribbon, you won...
Users Manual - English
Page 40
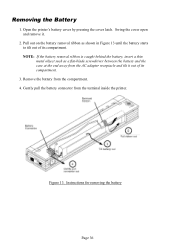
...the AC adapter receptacle and tilt it . 2. Remove the battery from the terminal inside the printer. NOTE: If the battery removal ribbon is caught behind the battery, insert a thin metal object such as shown in Figure 13 until the battery starts to tilt out of its compartment. Figure 13. ...Instructions for removing the battery Page 36 Swing the cover open and ...
...the AC adapter receptacle and tilt it . 2. Remove the battery from the terminal inside the printer. NOTE: If the battery removal ribbon is caught behind the battery, insert a thin metal object such as shown in Figure 13 until the battery starts to tilt out of its compartment. Figure 13. ...Instructions for removing the battery Page 36 Swing the cover open and ...
Users Manual - English
Page 41
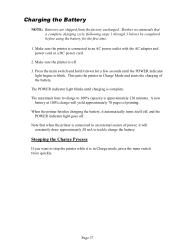
...press the main switch twice quickly. The maximum time to charge to blink. When the printer finishes charging the battery, it is off . A new battery at 100% charge will constantly draw approximately 20 mA to stop the printer while it automatically turns itself off, and... and hold it will yield approximately 70 pages of the battery. Note that a complete charging cycle (following steps 1 through 3 below) be completed before using the battery for a few seconds until charging is approximately 120 minutes. Brother recommends that when the printer is connected to an external ...
...press the main switch twice quickly. The maximum time to charge to blink. When the printer finishes charging the battery, it is off . A new battery at 100% charge will constantly draw approximately 20 mA to stop the printer while it automatically turns itself off, and... and hold it will yield approximately 70 pages of the battery. Note that a complete charging cycle (following steps 1 through 3 below) be completed before using the battery for a few seconds until charging is approximately 120 minutes. Brother recommends that when the printer is connected to an external ...

Users Manual - English
Page 42
Use the density adjustment from the driver dialog on Using the Battery Darker prints discharge the battery faster than lighter prints do. Page 38 Tips on your computer or use the Set-Up Utility to adjust lightness and darkness. See "Accessing Advanced Software Features" on page 7.
Use the density adjustment from the driver dialog on Using the Battery Darker prints discharge the battery faster than lighter prints do. Page 38 Tips on your computer or use the Set-Up Utility to adjust lightness and darkness. See "Accessing Advanced Software Features" on page 7.
Users Manual - English
Page 53
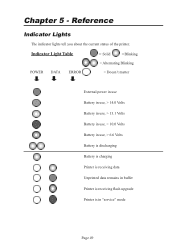
Indicator Light Table = Solid =Blinking = Alternating Blinking POWER DATA ERROR = Doesn't matter External power in use Battery in use, > 14.0 Volts Battery in use, > 13.1 Volts Battery in use, > 10.0 Volts Battery in use, > 6.6 Volts Battery is discharging Battery is charging Printer is receiving data Unprinted data remains in buffer Printer is receiving flash upgrade Printer is in "service" mode Page 49 Reference Indicator Lights The indicator lights tell you about the current status of the printer. Chapter 5 -
Indicator Light Table = Solid =Blinking = Alternating Blinking POWER DATA ERROR = Doesn't matter External power in use Battery in use, > 14.0 Volts Battery in use, > 13.1 Volts Battery in use, > 10.0 Volts Battery in use, > 6.6 Volts Battery is discharging Battery is charging Printer is receiving data Unprinted data remains in buffer Printer is receiving flash upgrade Printer is in "service" mode Page 49 Reference Indicator Lights The indicator lights tell you about the current status of the printer. Chapter 5 -

Users Manual - English
Page 54
...properly and that there are using a DC adapter, make sure it is "live". POWER DATA ERROR Bad checksum of flash data No battery found when charging Time-Out when charging Low Thermal Head temperature High Thermal Head temperature Data Receive Error Indicator Light Warnings The POWER indicator light... does not light The printer is receiving no broken wires at the battery or connector. If you are no power. Page 50 Make sure the AC power outlet is connected properly. See page 34, "Installing ...
...properly and that there are using a DC adapter, make sure it is "live". POWER DATA ERROR Bad checksum of flash data No battery found when charging Time-Out when charging Low Thermal Head temperature High Thermal Head temperature Data Receive Error Indicator Light Warnings The POWER indicator light... does not light The printer is receiving no broken wires at the battery or connector. If you are no power. Page 50 Make sure the AC power outlet is connected properly. See page 34, "Installing ...
Users Manual - English
Page 55
...the printer should be printed. Data Receive Error Data is allowed for example, background on Excel graphs or PowerPoint documents) and make sure that the battery should be returned for reliable printing (less than 0°C (32°F)). Page 51 Low Thermal Head Temperature The temperature of "black space" being... received but errors are causing the printer to request that too much time was required to bring the battery up to be replaced. If allowed to become even hotter, the thermal head would begin imaging the paper in areas not intended to a...
...the printer should be printed. Data Receive Error Data is allowed for example, background on Excel graphs or PowerPoint documents) and make sure that the battery should be returned for reliable printing (less than 0°C (32°F)). Page 51 Low Thermal Head Temperature The temperature of "black space" being... received but errors are causing the printer to request that too much time was required to bring the battery up to be replaced. If allowed to become even hotter, the thermal head would begin imaging the paper in areas not intended to a...
Users Manual - English
Page 57
Page 53 Chapter 6 - Troubleshooting Overview If you have difficulty getting your printer to work properly, first check to make sure you have done the following tasks correctly (See Chapter 1, "Setting Up the Printer"). • Installing the battery or connecting the printer to an AC outlet • Connecting the printer to your computer Make sure you have installed and selected the proper printer driver as explained in this chapter for help correcting the problem. Look through the troubleshooting tips in Chapter 2, "Using the Printer".
Page 53 Chapter 6 - Troubleshooting Overview If you have difficulty getting your printer to work properly, first check to make sure you have done the following tasks correctly (See Chapter 1, "Setting Up the Printer"). • Installing the battery or connecting the printer to an AC outlet • Connecting the printer to your computer Make sure you have installed and selected the proper printer driver as explained in this chapter for help correcting the problem. Look through the troubleshooting tips in Chapter 2, "Using the Printer".
Users Manual - English
Page 62
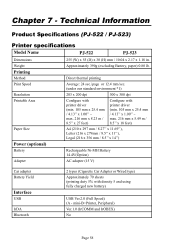
... Size A4 (210 x 297 mm / 8.27'' x 11.69''), Letter (216 x 279mm / 8.5'' x 11''), Legal (216 x 356 mm / 8.5'' x 14'') Power (optional) Battery Rechargeable Ni-MH Battery 14.4V(Option) Adapter AC adapter (15 V) Car adapter Battery Yield Interface USB IrDA Bluetooth 2 types (Cigarette Car Adapter or Wired type) Approximately 70 sheets (printing duty 5% with density...
... Size A4 (210 x 297 mm / 8.27'' x 11.69''), Letter (216 x 279mm / 8.5'' x 11''), Legal (216 x 356 mm / 8.5'' x 14'') Power (optional) Battery Rechargeable Ni-MH Battery 14.4V(Option) Adapter AC adapter (15 V) Car adapter Battery Yield Interface USB IrDA Bluetooth 2 types (Cigarette Car Adapter or Wired type) Approximately 70 sheets (printing duty 5% with density...


