
Users Manual - English
Page 2
... P-touch labeler PT-2730. Important • The enclosed interface cable should be determined by turning the equipment off and on, the user is encouraged to try to ensure compliance with Part 15 of the FCC Rules. INTRODUCTION Thank you for using and keep in a residential installation. Federal Communications Commission (FCC) Declaration of Conformity (For USA Only) Responsible Party : Brother International Corporation...
... P-touch labeler PT-2730. Important • The enclosed interface cable should be determined by turning the equipment off and on, the user is encouraged to try to ensure compliance with Part 15 of the FCC Rules. INTRODUCTION Thank you for using and keep in a residential installation. Federal Communications Commission (FCC) Declaration of Conformity (For USA Only) Responsible Party : Brother International Corporation...

Users Manual - English
Page 5
... reported the problem to Brother or an Authorized Service Center within five (5) business days; (ii) the problems with the instructions provided by the limited warranty; (iii) the proper packaging instructions are dealing directly with Brother, Brother will send to you a replacement Machine with the understanding that you provide a valid major credit card number. The decision as to whether to repair or replace the Machine and...
... reported the problem to Brother or an Authorized Service Center within five (5) business days; (ii) the problems with the instructions provided by the limited warranty; (iii) the proper packaging instructions are dealing directly with Brother, Brother will send to you a replacement Machine with the understanding that you provide a valid major credit card number. The decision as to whether to repair or replace the Machine and...
Users Manual - English
Page 9
...48 Creating a Bar Code Label 49 Setting Bar Code Parameters 50 Entering Bar Code Data 51 Editing and Deleting a Bar Code 52 LABEL PRINTING 53 Label Preview...53 Printing a Label ...53 Printing a Single Copy 54 Printing Multiple Copies 54 Auto-numbering Labels 55 Mirror Printing ...56 1 Tape Cutting Options 57 Adjusting the Label Length 58 2 Attaching Labels...59 Printing from the Label Collection 59 3 Printing a label from the Label Collection Stored in the Machine 59 Downloading a new Label Collection Category 4 (Windows® only ) ...63 Downloading a Label Collection...
...48 Creating a Bar Code Label 49 Setting Bar Code Parameters 50 Entering Bar Code Data 51 Editing and Deleting a Bar Code 52 LABEL PRINTING 53 Label Preview...53 Printing a Label ...53 Printing a Single Copy 54 Printing Multiple Copies 54 Auto-numbering Labels 55 Mirror Printing ...56 1 Tape Cutting Options 57 Adjusting the Label Length 58 2 Attaching Labels...59 Printing from the Label Collection 59 3 Printing a label from the Label Collection Stored in the Machine 59 Downloading a new Label Collection Category 4 (Windows® only ) ...63 Downloading a Label Collection...
Users Manual - English
Page 11
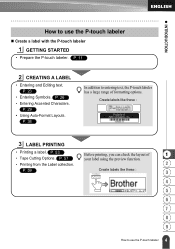
... • Using Auto-Format Layouts. P. 57 your label using the preview function. • Printing from the Label collection. 2 P. 59 Create labels like these : 3 4 5 6 7 8 9 4 How to use the P-touch labeler „ Create a label with the P-touch labeler 1 GETTING STARTED • Prepare the P-touch labeler. P. 26 • Entering Accented Characters. P. 11 2 CREATING A LABEL • Entering and Editing text. P. 38 In addition to use the P-touch labeler z INTRODUCTION How to entering text, the P-touch labeler has a large range of 1 • Tape Cutting Options...
... • Using Auto-Format Layouts. P. 57 your label using the preview function. • Printing from the Label collection. 2 P. 59 Create labels like these : 3 4 5 6 7 8 9 4 How to use the P-touch labeler „ Create a label with the P-touch labeler 1 GETTING STARTED • Prepare the P-touch labeler. P. 26 • Entering Accented Characters. P. 11 2 CREATING A LABEL • Entering and Editing text. P. 38 In addition to use the P-touch labeler z INTRODUCTION How to entering text, the P-touch labeler has a large range of 1 • Tape Cutting Options...
Users Manual - English
Page 12
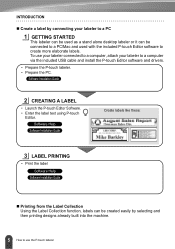
... be used as a stand alone desktop labeler or it can be created easily by connecting your labeler to a computer via the included USB cable and install the P-touch Editor software and drivers. • Prepare the P-touch labeler. • Prepare the PC. INTRODUCTION „ Create a label by selecting and then printing designs already built into the machine. 5 How to create more elaborate labels. To use the P-touch labeler Software Installation Guide 2 CREATING A LABEL • Launch the P-touch Editor Software. • Enter the label text using P-touch Editor.
... be used as a stand alone desktop labeler or it can be created easily by connecting your labeler to a computer via the included USB cable and install the P-touch Editor software and drivers. • Prepare the P-touch labeler. • Prepare the PC. INTRODUCTION „ Create a label by selecting and then printing designs already built into the machine. 5 How to create more elaborate labels. To use the P-touch labeler Software Installation Guide 2 CREATING A LABEL • Launch the P-touch Editor Software. • Enter the label text using P-touch Editor.
Users Manual - English
Page 16
... use the USB cable supplied with this User's Guide carefully before using an empty tape cassette or without a tape cassette set in the P-touch labeler. Otherwise the tape cassette or printer may be transferred to other or use a darkcolored label. • Any data stored in memory will be lost due to failure or repair of the label may unpeel or become irremovable, the color of the P-touch labeler, or if the battery expires. • When power...
... use the USB cable supplied with this User's Guide carefully before using an empty tape cassette or without a tape cassette set in the P-touch labeler. Otherwise the tape cassette or printer may be transferred to other or use a darkcolored label. • Any data stored in memory will be lost due to failure or repair of the label may unpeel or become irremovable, the color of the P-touch labeler, or if the battery expires. • When power...

Users Manual - English
Page 21
... the display to be selected and printed. • Displays a preview of the label. 3 • Feeds 0.92" (23 mm) of text entry screen and clock display. 9. Label Collection Enables label collections to change clock settings. Power 6. Print Turns the P-touch labeler on and off. • Prints the current label design onto 2. File 7 Enables frequently used in combination with the Shift 1 • Use the and keys to change the display patterns 6 of blank tape and then automatically cuts the tape 4 when used labels...
... the display to be selected and printed. • Displays a preview of the label. 3 • Feeds 0.92" (23 mm) of text entry screen and clock display. 9. Label Collection Enables label collections to change clock settings. Power 6. Print Turns the P-touch labeler on and off. • Prints the current label design onto 2. File 7 Enables frequently used in combination with the Shift 1 • Use the and keys to change the display patterns 6 of blank tape and then automatically cuts the tape 4 when used labels...

Users Manual - English
Page 26
... tape and ink ribbon do not catch on . Tape exit slot 4 Close the tape compartment cover. Use the tape cassette as quickly as possible after connection to remove any slack in a cool dark location, away from direct sunlight and high temperature, high humidity, or dusty locations. Turning Power On/Off Press the Power key to turn the P-touch labeler on the print head. With AC adapter With battery zAuto Power-Off Timez P-touch labeler...
... tape and ink ribbon do not catch on . Tape exit slot 4 Close the tape compartment cover. Use the tape cassette as quickly as possible after connection to remove any slack in a cool dark location, away from direct sunlight and high temperature, high humidity, or dusty locations. Turning Power On/Off Press the Power key to turn the P-touch labeler on the print head. With AC adapter With battery zAuto Power-Off Timez P-touch labeler...
Users Manual - English
Page 36
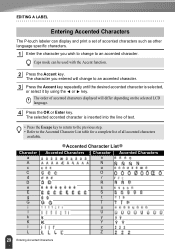
... accented characters displayed will change to the Accented Character List table for a complete list of accented characters such as other language specific characters. 1 Enter the character you entered will differ depending on the selected LCD language. 4 Press the OK or Enter key. The selected accented character is selected, or select it by using the or key. Character a A c C d D e E g G i I k K l L zAccented Character Listz Accented Characters Character n N o O r R s S t T u U y Y z Z Accented Characters 29 Entering Accented Characters Caps mode can display and print a set...
... accented characters displayed will change to the Accented Character List table for a complete list of accented characters such as other language specific characters. 1 Enter the character you entered will differ depending on the selected LCD language. 4 Press the OK or Enter key. The selected accented character is selected, or select it by using the or key. Character a A c C d D e E g G i I k K l L zAccented Character Listz Accented Characters Character n N o O r R s S t T u U y Y z Z Accented Characters 29 Entering Accented Characters Caps mode can display and print a set...

Users Manual - English
Page 37
...; Press the Space key to set the selected attribute to the default value. • Refer to the Setting Options table for a list of all available settings. • Small characters may be applied to all lines of character attributes (font, size, width, style, line and alignment) for each line. The current settings are applied (e.g. z EDITING A LABEL Setting Character Attributes Setting Character Attributes by using the or key. Next, press the Text key while...
...; Press the Space key to set the selected attribute to the default value. • Refer to the Setting Options table for a list of all available settings. • Small characters may be applied to all lines of character attributes (font, size, width, style, line and alignment) for each line. The current settings are applied (e.g. z EDITING A LABEL Setting Character Attributes Setting Character Attributes by using the or key. Next, press the Text key while...

Users Manual - English
Page 41
... Space key to set to a specific length, you can select the way of x1/2 setting. (If further size reduction is selected, the text width will be reduced to the size of reducing the text size to fit within the label length. When "Text Width" is required to fit the text into the selected label length, the total text size will be modified after reducing the text width to x1/2 setting.) 1 Press the Setup key to display the Setup...
... Space key to set to a specific length, you can select the way of x1/2 setting. (If further size reduction is selected, the text width will be reduced to the size of reducing the text size to fit within the label length. When "Text Width" is required to fit the text into the selected label length, the total text size will be modified after reducing the text width to x1/2 setting.) 1 Press the Setup key to display the Setup...

Users Manual - English
Page 46
... and Bar Code Setup screens, press the Space key to change the text data or style settings. • Select "Save" to store the label in a file memory. • Select "Cancel" to exit the Auto-Format function. • Select "Print Options" to set to print the label. is displayed when the OK or Enter key is pressed. Press the Escape key or any other key to clear the error message, and insert a tape cassette of...
... and Bar Code Setup screens, press the Space key to change the text data or style settings. • Select "Save" to store the label in a file memory. • Select "Cancel" to exit the Auto-Format function. • Select "Print Options" to set to print the label. is displayed when the OK or Enter key is pressed. Press the Escape key or any other key to clear the error message, and insert a tape cassette of...

Users Manual - English
Page 49
... print the label. 6 • Select "Edit" to change the text data or style settings. 7 • Select "Save" to store the label in a file memory. • Select "Cancel" to exit the Auto-Format function. 8 • Select "Change Layout" to use a different layout. • Select "Print Options" to set a value for each text field. The Style screen is displayed. 4 Select a block layout using the or key. 3 Press the OK or Enter key. Press the Space...
... print the label. 6 • Select "Edit" to change the text data or style settings. 7 • Select "Save" to store the label in a file memory. • Select "Cancel" to exit the Auto-Format function. 8 • Select "Change Layout" to use a different layout. • Select "Print Options" to set a value for each text field. The Style screen is displayed. 4 Select a block layout using the or key. 3 Press the OK or Enter key. Press the Space...

Users Manual - English
Page 63
... of five characters. • Letters and numbers increase as underscores "_" in the auto-numbering sequence are being printed. 6 7 • Press the Escape key to return to the previous step. 8 • Text should be used to adjust the spacing between characters or to control the number of copies resets the value to 1, the default. • Auto-numbering can create labels with the mirror printing 9 function. 56 Printing a Label When a bar code contains an auto- is displayed 5 4 Press...
... of five characters. • Letters and numbers increase as underscores "_" in the auto-numbering sequence are being printed. 6 7 • Press the Escape key to return to the previous step. 8 • Text should be used to adjust the spacing between characters or to control the number of copies resets the value to 1, the default. • Auto-numbering can create labels with the mirror printing 9 function. 56 Printing a Label When a bar code contains an auto- is displayed 5 4 Press...
Users Manual - English
Page 66
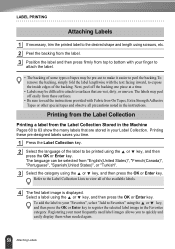
... a time. • Labels may be pre-cut to make it easier to peel the backing.To remove the backing, simply fold the label lengthwise with Fabric Iron-On Tapes, Extra Strength Adhesive Tapes or other special tapes and observe all of the available labels. 4 The first label image is displayed. LABEL PRINTING Attaching Labels 1 If necessary, trim the printed label to the desired shape and length using scissors, etc...
... a time. • Labels may be pre-cut to make it easier to peel the backing.To remove the backing, simply fold the label lengthwise with Fabric Iron-On Tapes, Extra Strength Adhesive Tapes or other special tapes and observe all of the available labels. 4 The first label image is displayed. LABEL PRINTING Attaching Labels 1 If necessary, trim the printed label to the desired shape and length using scissors, etc...
Users Manual - English
Page 70
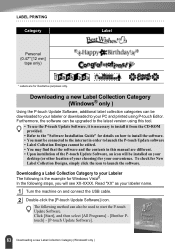
... only. Click [Start], and then select [All Programs] - [Brother Ptouch] - [P-touch Update Software]. 63 Downloading a new Label Collection Category (Windows® only ) Downloading a Label Collection Category to your labeler name. 1 Turn the machine on and connect the USB cable. 2 Double-click the [P-touch Update Software] icon. Furthermore, the software can be upgraded to the latest version using P-touch Editor. The following method can be downloaded to your labeler or downloaded to launch the P-touch Update software • Label Collection Designs cannot be edited...
... only. Click [Start], and then select [All Programs] - [Brother Ptouch] - [P-touch Update Software]. 63 Downloading a new Label Collection Category (Windows® only ) Downloading a Label Collection Category to your labeler name. 1 Turn the machine on and connect the USB cable. 2 Double-click the [P-touch Update Software] icon. Furthermore, the software can be upgraded to the latest version using P-touch Editor. The following method can be downloaded to your labeler or downloaded to launch the P-touch Update software • Label Collection Designs cannot be edited...

Users Manual - English
Page 77
.... Always remove the batteries and disconnect the AC adapter before releasing the other organic solvent. These may deform the 3 case or damage the appearance of your P-touch labeler. 4 Cleaning the Print Head 5 Streaks or poor quality characters on a regular basis to factory settings (Downloaded data is 6 dirty. z MAINTAINING YOUR P-TOUCH LABELER MAINTAINING YOUR P-TOUCH LABELER Resetting the P-touch Labeler You can reset the internal memory of your P-touch labeler when you reset the P-touch labeler. Resetting data to maintain...
.... Always remove the batteries and disconnect the AC adapter before releasing the other organic solvent. These may deform the 3 case or damage the appearance of your P-touch labeler. 4 Cleaning the Print Head 5 Streaks or poor quality characters on a regular basis to factory settings (Downloaded data is 6 dirty. z MAINTAINING YOUR P-TOUCH LABELER MAINTAINING YOUR P-TOUCH LABELER Resetting the P-touch Labeler You can reset the internal memory of your P-touch labeler when you reset the P-touch labeler. Resetting data to maintain...
Users Manual - English
Page 79
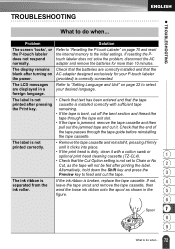
... print head is dirty, clean it . The LCD messages are correctly installed and that the batteries are displayed in the 5 figure. 6 Spool 7 8 9 72 What to do when... If resetting the Ptouch labeler does not solve the problem, disconnect the AC adapter and remove the batteries for your desired language. The display remains Check that the blank after turning on page 70 and reset the internal memory to feed and cut it with sufficient tape...
... print head is dirty, clean it . The LCD messages are correctly installed and that the batteries are displayed in the 5 figure. 6 Spool 7 8 9 72 What to do when... If resetting the Ptouch labeler does not solve the problem, disconnect the AC adapter and remove the batteries for your desired language. The display remains Check that the blank after turning on page 70 and reset the internal memory to feed and cut it with sufficient tape...

Users Manual - English
Page 82
... length of the label to be printed using the text entered is selected. Install an 0.70" (18 mm) tape cassette. Limit the number of text. Max 5 Blocks * There are more than 39.37" (1 m). Insert 18mm Tape Cassette! * Insert 0.47" Tape Cassette! * An 0.47" (12 mm) tape cassette is not installed when an Auto-Format for 0.70" (18 mm) tape is longer than one , or replace with a larger width tape cassette. TROUBLESHOOTING Message Cause/Remedy Tape Width Limit! Insert 24mm Tape Cassette! * Insert...
... length of the label to be printed using the text entered is selected. Install an 0.70" (18 mm) tape cassette. Limit the number of text. Max 5 Blocks * There are more than 39.37" (1 m). Insert 18mm Tape Cassette! * Insert 0.47" Tape Cassette! * An 0.47" (12 mm) tape cassette is not installed when an Auto-Format for 0.70" (18 mm) tape is longer than one , or replace with a larger width tape cassette. TROUBLESHOOTING Message Cause/Remedy Tape Width Limit! Insert 24mm Tape Cassette! * Insert...
Software Installation Guide - English
Page 1
...; Help. Choose "Brother PT-XXXX", and then click [Remove...]. Follow the on the Macintosh. The printer names in it may be downloaded and new label designs added to start button Click [Start]-[All Programs]-[Brother P-touch]-[P-touch Editor 5.0]. Start up the Macintosh, and insert the CD-ROM into the CD-ROM drive. The installation of software is mentioned in this guide has a Software License Agreement specific to register the product online...
...; Help. Choose "Brother PT-XXXX", and then click [Remove...]. Follow the on the Macintosh. The printer names in it may be downloaded and new label designs added to start button Click [Start]-[All Programs]-[Brother P-touch]-[P-touch Editor 5.0]. Start up the Macintosh, and insert the CD-ROM into the CD-ROM drive. The installation of software is mentioned in this guide has a Software License Agreement specific to register the product online...


