

Accessory Catalog
Page 3
...heirloom sewing or home decoration can then be easily created with a compact yet powerful sewing and quilting machine. Once you the best in automatic machine embroidery. if you have made Brother the most requested in sewing, quilting, embroidery and even crafting capability! D...XL5130, XL5500, XL5600, XL5700 J : ULT2001, 2002D, 2003D K: PC8500/D, PC8200, PC6500 L : PE300s, 400D M: PC2800, 3000, 6000, CS8072 N: PS2200, 2300, 2500 O: PS1000, 1250,1800, 1950, 2100 P : LS1520, 1717, LS2000 series, VX1400/1500 series E CS6000i/T, HS2000, HS1000, BC1000, EX660, CS100T, ES2000...
...heirloom sewing or home decoration can then be easily created with a compact yet powerful sewing and quilting machine. Once you the best in automatic machine embroidery. if you have made Brother the most requested in sewing, quilting, embroidery and even crafting capability! D...XL5130, XL5500, XL5600, XL5700 J : ULT2001, 2002D, 2003D K: PC8500/D, PC8200, PC6500 L : PE300s, 400D M: PC2800, 3000, 6000, CS8072 N: PS2200, 2300, 2500 O: PS1000, 1250,1800, 1950, 2100 P : LS1520, 1717, LS2000 series, VX1400/1500 series E CS6000i/T, HS2000, HS1000, BC1000, EX660, CS100T, ES2000...

Users Manual - English
Page 3
...-rewireable BS plug then please read the following code: Blue Brown Neutral Live Always replace the fuse cover. Connecting Plugs and Main Power / Sewing Light Switch ( Model PS-2500, PS-2400, PS-2300 STAR140E, STAR130E, STAR120E ) 2 1 With alternative plugs an approved fuse must be destroyed as follows: The wire which is marked...be connected to BS 1362, i.e. FOR USERS IN UK, EIRE, MALTA AND CYPRUS ONLY. If the plug fitted is not suitable for the power point in the United Kingdom) Main supply (AC 230/240V~, 50Hz) DO NOT cut off the mains plug from the main leads must be...
...-rewireable BS plug then please read the following code: Blue Brown Neutral Live Always replace the fuse cover. Connecting Plugs and Main Power / Sewing Light Switch ( Model PS-2500, PS-2400, PS-2300 STAR140E, STAR130E, STAR120E ) 2 1 With alternative plugs an approved fuse must be destroyed as follows: The wire which is marked...be connected to BS 1362, i.e. FOR USERS IN UK, EIRE, MALTA AND CYPRUS ONLY. If the plug fitted is not suitable for the power point in the United Kingdom) Main supply (AC 230/240V~, 50Hz) DO NOT cut off the mains plug from the main leads must be...

Users Manual - English
Page 4
Connect the power cord or three-prong plug into a wall outlet. Connect the electrical supply plug into the machine. 2. When leaving the sewing machine unattended, the main switch of the machine must be switched off When servicing the sewing machine, or when removing covers or changing lamps, the machine or the electrical set must be disconnected from the supply by removing the plug from the socket outlet. Turn on or off the switch for the main power and sewlight. 1 Turn on 2 Turn off or the plug must be removed from the socket outlet. (Model PS-2200, STAR110) 1 2 1.
Connect the power cord or three-prong plug into a wall outlet. Connect the electrical supply plug into the machine. 2. When leaving the sewing machine unattended, the main switch of the machine must be switched off When servicing the sewing machine, or when removing covers or changing lamps, the machine or the electrical set must be disconnected from the supply by removing the plug from the socket outlet. Turn on or off the switch for the main power and sewlight. 1 Turn on 2 Turn off or the plug must be removed from the socket outlet. (Model PS-2200, STAR110) 1 2 1.
Users Manual - English
Page 5
TABLE OF CONTENTS KNOWING YOUR SEWING MACHINE Principal parts ...1 Principal parts ...3 Accessories ...5 OPTIONAL ACCESSORIES ...6 OPERATING YOUR SEWING MACHINE ...7 Connecting Plugs ...7 Main Power and Sewing Light Switches ...8 Foot Controller ...8 Replacing the Needle ...9 Checking the Needle ...9 Changing the Presser Foot ...10 Extension Table (Accessories) ...10 VARIOUS CONTROLS ...11 Pattern ...
TABLE OF CONTENTS KNOWING YOUR SEWING MACHINE Principal parts ...1 Principal parts ...3 Accessories ...5 OPTIONAL ACCESSORIES ...6 OPERATING YOUR SEWING MACHINE ...7 Connecting Plugs ...7 Main Power and Sewing Light Switches ...8 Foot Controller ...8 Replacing the Needle ...9 Checking the Needle ...9 Changing the Presser Foot ...10 Extension Table (Accessories) ...10 VARIOUS CONTROLS ...11 Pattern ...

Users Manual - English
Page 14
... is placed on the foot controller when the machine is increased, the machine's speed will increase. KNOWING YOUR SEWING MACHINE Main Power and Sewing Light Switches This switch turns the main power and sewing light on or off. 1 Turn on (toward the "I" mark) 2 Turn off (toward the "O" mark) Interruptor principal y de luz...
... is placed on the foot controller when the machine is increased, the machine's speed will increase. KNOWING YOUR SEWING MACHINE Main Power and Sewing Light Switches This switch turns the main power and sewing light on or off. 1 Turn on (toward the "I" mark) 2 Turn off (toward the "O" mark) Interruptor principal y de luz...

Users Manual - English
Page 74
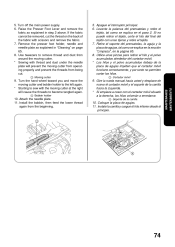
... máquina, tal como se indica en la fig. A. 3. Retire la cubierta de la máquina tal como se indica en la fig. B) 5. Remove the power supply plug from the machine as shown in fig. A Model PS-2500, PS-2400, PS-2300 STAR140E, STAR130E, STAR120E 1 Bulb 2 Pull out 3 Push in fig.
... máquina, tal como se indica en la fig. A. 3. Retire la cubierta de la máquina tal como se indica en la fig. B) 5. Remove the power supply plug from the machine as shown in fig. A Model PS-2500, PS-2400, PS-2300 STAR140E, STAR130E, STAR120E 1 Bulb 2 Pull out 3 Push in fig.
Users Manual - English
Page 80
... prensatelas, la aguja y la placa de agujas, tal como se explica en la sección "Limpieza", en la página 65. 8. Turn off the main power supply. 6. Install the bobbin, then feed the lower thread again from being cut the thread on page 65. 8. Coloque la placa de agujas. 11. 5.
... prensatelas, la aguja y la placa de agujas, tal como se explica en la sección "Limpieza", en la página 65. 8. Turn off the main power supply. 6. Install the bobbin, then feed the lower thread again from being cut the thread on page 65. 8. Coloque la placa de agujas. 11. 5.
Users Manual - English
Page 84
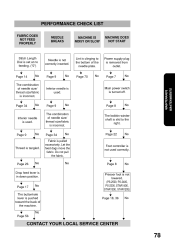
.../fabric is pushed toward the back of the needle plate. M Page 17 No M Presser foot is not lowered. (PS-2500, PS-2400, PS-2300, STAR140E, STAR130E, STAR120E) Page 18, 36 M The buttonhole lever is incorrect. Main power switch is not correctly inserted. PERFORMANCE CHECK LIST FABRIC DOES NOT FEED PROPERLY NEEDLE BREAKS MACHINE IS NOISY... size/ thread size/fabric is clinging to the right. M Lint is incorrect. M The bobbin winder shaft is removed from outlet. Do not pull the fabric. M Power supply plug is slid to the bottom of the machine.
.../fabric is pushed toward the back of the needle plate. M Page 17 No M Presser foot is not lowered. (PS-2500, PS-2400, PS-2300, STAR140E, STAR130E, STAR120E) Page 18, 36 M The buttonhole lever is incorrect. Main power switch is not correctly inserted. PERFORMANCE CHECK LIST FABRIC DOES NOT FEED PROPERLY NEEDLE BREAKS MACHINE IS NOISY... size/ thread size/fabric is clinging to the right. M Lint is incorrect. M The bobbin winder shaft is removed from outlet. Do not pull the fabric. M Power supply plug is slid to the bottom of the machine.


