Users Manual - English
Page 3
... the Printer Driver 26 2 Using the Printer 28 Operation Panel 28 Power Button and Feed Button Functions 28 Indicators ...29 Switching Between Wireless LAN Mode and USB Mode 30 Connecting the iOS Device to a Separate Wireless Network Than the One Connected to the Printer 31 Changing the iOS Device's Settings 31 Connecting a Windows® Computer to a Separate Wireless Network Than the One Connected to the Printer 31 Printing Solutions 33 Updating the Software 33 Printing ...33 Making Prints Lighter or Darker 34 Setting Printer Driver Options 35 Paper Type...
... the Printer Driver 26 2 Using the Printer 28 Operation Panel 28 Power Button and Feed Button Functions 28 Indicators ...29 Switching Between Wireless LAN Mode and USB Mode 30 Connecting the iOS Device to a Separate Wireless Network Than the One Connected to the Printer 31 Changing the iOS Device's Settings 31 Connecting a Windows® Computer to a Separate Wireless Network Than the One Connected to the Printer 31 Printing Solutions 33 Updating the Software 33 Printing ...33 Making Prints Lighter or Darker 34 Setting Printer Driver Options 35 Paper Type...

Users Manual - English
Page 16
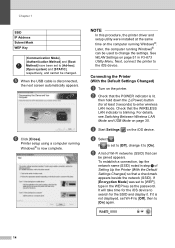
... be set up using a standard procedures for a USB connection will be installed on the device and environment, check with the printer driver; If the Web version was download, run the downloaded file. Specify the settings according to the procedures in this manual apply to wireless network connections that appeared. Setting Up the Printer (With the Default Settings Changed) 1 NOTE • A computer running Windows®. • If, while specifying the settings, a dialog box appears, requesting administrator...
... be set up using a standard procedures for a USB connection will be installed on the device and environment, check with the printer driver; If the Web version was download, run the downloaded file. Specify the settings according to the procedures in this manual apply to wireless network connections that appeared. Setting Up the Printer (With the Default Settings Changed) 1 NOTE • A computer running Windows®. • If, while specifying the settings, a dialog box appears, requesting administrator...

Users Manual - English
Page 17
... next screen will appear in wireless LAN mode (the WIRELESS LAN indicator is blinking), switch it to the computer running Windows®. Make a note of the setting retrieved by A, regardless of the specified settings. d The wireless LAN settings will automatically appear. For details, see Switching Between Wireless LAN Mode and USB Mode on the printer in USB mode. (As a factory default, the printer will be changed with PJ-673 Utility on page 51 in PJ-673 Utility Menu. 13
... next screen will appear in wireless LAN mode (the WIRELESS LAN indicator is blinking), switch it to the computer running Windows®. Make a note of the setting retrieved by A, regardless of the specified settings. d The wireless LAN settings will automatically appear. For details, see Switching Between Wireless LAN Mode and USB Mode on the printer in USB mode. (As a factory default, the printer will be changed with PJ-673 Utility on page 51 in PJ-673 Utility Menu. 13
Users Manual - English
Page 18
... time on the computer running Windows® is set to enter wireless LAN mode. Printer setup using a computer running Windows®. Connecting the Printer (With the Default Settings Changed) 1 a Turn on page 30. For details, see Switching Between Wireless LAN Mode and USB Mode on the printer. c Start Settings on page 51 in the WEP key as the password. e A list of Setting Up the Printer (With the Default Settings Changed) so that the WIRELESS LAN indicator is lit, then hold down the (Power) button...
... time on the computer running Windows® is set to enter wireless LAN mode. Printer setup using a computer running Windows®. Connecting the Printer (With the Default Settings Changed) 1 a Turn on page 30. For details, see Switching Between Wireless LAN Mode and USB Mode on the printer. c Start Settings on page 51 in the WEP key as the password. e A list of Setting Up the Printer (With the Default Settings Changed) so that the WIRELESS LAN indicator is lit, then hold down the (Power) button...

Users Manual - English
Page 19
... using procedures for step c on page 14. Open TCP/IP port number 9100. For the cases mentioned above, perform the operations below to re-establish the connection. 1 Select the SSID for the ad-hoc mode for step e on page 14. 2 Select the connection for step a on the Windows® computer. Setting Up the Printer Connecting the Printer and a Windows® 1 Computer 1 Printing From a Windows® Computer Via a Wireless LAN Connection...
... using procedures for step c on page 14. Open TCP/IP port number 9100. For the cases mentioned above, perform the operations below to re-establish the connection. 1 Select the SSID for the ad-hoc mode for step e on page 14. 2 Select the connection for step a on the Windows® computer. Setting Up the Printer Connecting the Printer and a Windows® 1 Computer 1 Printing From a Windows® Computer Via a Wireless LAN Connection...

Users Manual - English
Page 20
... Web version was downloaded, double-click the downloaded file. b Select [Wireless Network Connection], and then click [Next]. For details, see Switching Between Wireless LAN Mode and USB Mode on page 59. Specify the settings according to the computer running Windows®, and then turn on the printer. c With the USB cable, connect the printer to the procedures in the installer screen that appeared. It may be useful to USB mode. SSID (network name): PJ-673_XXXX (where "XXXX" is blinking), switch...
... Web version was downloaded, double-click the downloaded file. b Select [Wireless Network Connection], and then click [Next]. For details, see Switching Between Wireless LAN Mode and USB Mode on page 59. Specify the settings according to the computer running Windows®, and then turn on the printer. c With the USB cable, connect the printer to the procedures in the installer screen that appeared. It may be useful to USB mode. SSID (network name): PJ-673_XXXX (where "XXXX" is blinking), switch...

Users Manual - English
Page 21
... Switching Between Wireless LAN Mode and USB Mode on the computer running Windows® and adding the printer. Click [Network and Sharing Center]. Click [Network and Sharing Center]. Windows® 7: From the [Start] menu, click [Control Panel]-[Network and Internet]. To enter wireless LAN mode, check that the WIRELESS LAN indicator is lit, and then hold down (at least 3 seconds) the (Power) button. Windows® XP: From the [Start] menu, click [Control Panel]-[Network connection]. The installation...
... Switching Between Wireless LAN Mode and USB Mode on the computer running Windows® and adding the printer. Click [Network and Sharing Center]. Click [Network and Sharing Center]. Windows® 7: From the [Start] menu, click [Control Panel]-[Network and Internet]. To enter wireless LAN mode, check that the WIRELESS LAN indicator is lit, and then hold down (at least 3 seconds) the (Power) button. Windows® XP: From the [Start] menu, click [Control Panel]-[Network connection]. The installation...
Users Manual - English
Page 30
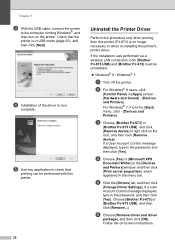
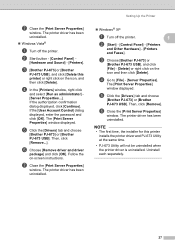
... [Brother PJ-673] or [Brother PJ-673 USB], and then click [Remove...]. Uninstall the Printer Driver 1 Perform this procedure only when printing from this printer's printer driver. f Choose [Remove driver and driver package], and then click [OK]. If a User Account Control message displayed, type in the password, and then click [Yes]. For Windows® 7: From the [Start] menu, click - [Devices and Printers]. If a User Account Control message displayed, type in the password, and then click [Yes]. e Click the [Drivers] tab, and then click [Change Driver Settings...
... [Brother PJ-673] or [Brother PJ-673 USB], and then click [Remove...]. Uninstall the Printer Driver 1 Perform this procedure only when printing from this printer's printer driver. f Choose [Remove driver and driver package], and then click [OK]. If a User Account Control message displayed, type in the password, and then click [Yes]. For Windows® 7: From the [Start] menu, click - [Devices and Printers]. If a User Account Control message displayed, type in the password, and then click [Yes]. e Click the [Drivers] tab, and then click [Change Driver Settings...
Users Manual - English
Page 31
... the [User Account Control] dialog displayed, enter the password and click [OK]. The [Print Server Properties] window displayed. f Choose [Remove driver and driver package] and click [OK]. Follow the on the icon and then click [Delete]. Setting Up the Printer Windows® XP a Turn off the printer. c Choose [Brother PJ-673] or [Brother PJ-673 USB], and click [File] - [Delete] or right click on -screen instructions. NOTE • The first time, the installer for this printer] or...
... the [User Account Control] dialog displayed, enter the password and click [OK]. The [Print Server Properties] window displayed. f Choose [Remove driver and driver package] and click [OK]. Follow the on the icon and then click [Delete]. Setting Up the Printer Windows® XP a Turn off the printer. c Choose [Brother PJ-673] or [Brother PJ-673 USB], and click [File] - [Delete] or right click on -screen instructions. NOTE • The first time, the installer for this printer] or...

Users Manual - English
Page 38
... Clearing a Paper Jam on page 39). Making Prints Lighter or Darker 2 You can be printed on. g Print from each application. When using either the printer driver (see Setting Printer Driver Options on page 35) or PJ-673 Utility (see Brother PJ-673 Utility on page 40). NOTE • If paper is printed. Chapter 2 NOTE • Make sure that the bottom edge of the paper is parallel with the roller. • Only one side of the paper can be loaded...
... Clearing a Paper Jam on page 39). Making Prints Lighter or Darker 2 You can be printed on. g Print from each application. When using either the printer driver (see Setting Printer Driver Options on page 35) or PJ-673 Utility (see Brother PJ-673 Utility on page 40). NOTE • If paper is printed. Chapter 2 NOTE • Make sure that the bottom edge of the paper is parallel with the roller. • Only one side of the paper can be loaded...

Users Manual - English
Page 39
... using cut sheet paper. End of paper that is loaded. and controls how the printer responds to [Perforated Roll Retract]. 35 Select this option to match the type of Page - If battery life is important, select a lower value. 2-ply Mode 2 Available settings: [Thermal Paper], [Thermal Copy Paper] Default setting: [Thermal Paper] This option is used when 2-ply paper is selected, the printer produces prints that no paper remains in the Brother PJ-673 Utility. Paper...
... using cut sheet paper. End of paper that is loaded. and controls how the printer responds to [Perforated Roll Retract]. 35 Select this option to match the type of Page - If battery life is important, select a lower value. 2-ply Mode 2 Available settings: [Thermal Paper], [Thermal Copy Paper] Default setting: [Thermal Paper] This option is used when 2-ply paper is selected, the printer produces prints that no paper remains in the Brother PJ-673 Utility. Paper...

Users Manual - English
Page 40
... Switch Command Mode 2 Available settings: [Disable], [Enable] Default setting: [Enable] Select whether or not the mode switching command is selected, set to [No Feed]. When [Enable] is automatically sent when the commands are not punched into the paper. Feed Position for Custom Paper 2 Available settings: [Center], [Left] Default setting: [Center] Select the paper feed position for each page when printing on roll paper. Dash Line Print 2 Available settings: [Disable], [Enable] Default setting: [Disable] This option is set [Page Feed Mode] to [Fixed Page]. Chapter 2 No Feed Mode...
... Switch Command Mode 2 Available settings: [Disable], [Enable] Default setting: [Enable] Select whether or not the mode switching command is selected, set to [No Feed]. When [Enable] is automatically sent when the commands are not punched into the paper. Feed Position for Custom Paper 2 Available settings: [Center], [Left] Default setting: [Center] Select the paper feed position for each page when printing on roll paper. Dash Line Print 2 Available settings: [Disable], [Enable] Default setting: [Disable] This option is set [Page Feed Mode] to [Fixed Page]. Chapter 2 No Feed Mode...

Users Manual - English
Page 42
... when using perforated roll paper, configure the printer driver as described below . c Set [Page Feed Mode] to [End of Page] or [End of the document according to the settings. Chapter 2 Selecting Paper Type 2 Paper type can be slightly fed out to adjust for the roller, even if [Page Feed Mode] is set to [No Feed] and [No Feed Mode Extra Feed] is set to [None]. e Confirm that is selected determines the maximum number of each page. a Select the appropriate paper size. c Set [Page Feed Mode...
... when using perforated roll paper, configure the printer driver as described below . c Set [Page Feed Mode] to [End of Page] or [End of the document according to the settings. Chapter 2 Selecting Paper Type 2 Paper type can be slightly fed out to adjust for the roller, even if [Page Feed Mode] is set to [No Feed] and [No Feed Mode Extra Feed] is set to [None]. e Confirm that is selected determines the maximum number of each page. a Select the appropriate paper size. c Set [Page Feed Mode...

Users Manual - English
Page 50
... time for every five times the battery is useful in situations where the button could be used to turn off automatically to access. Enable (No Main Button) - The printer turns on automatically. The (Power) button cannot be accidentally pressed. If no data is useful when printing on perforated roll paper so that the printer does not print on the printer, press the (Power) button. Enable - For details on page 4. 5 Skip Perforation Available settings: [Disable], [Enable] Default setting: [Disable...
... time for every five times the battery is useful in situations where the button could be used to turn off automatically to access. Enable (No Main Button) - The printer turns on automatically. The (Power) button cannot be accidentally pressed. If no data is useful when printing on perforated roll paper so that the printer does not print on the printer, press the (Power) button. Enable - For details on page 4. 5 Skip Perforation Available settings: [Disable], [Enable] Default setting: [Disable...

Users Manual - English
Page 52
... setting is useful when using cut sheet paper. End of Page Retract] Default setting: [Fixed Page] This parameter determines how paper is changed in the printer driver's dialog box, that setting has priority. 2 Form Feed Mode Available settings: [No Feed], [Fixed Page], [End of Page], [End of Page - a higher value produces darker print. NOTE If this setting when using non-perforated roll paper. Fixed Page - Select this parameter is selected, the printer ejects a short length of paper when the printer turns...
... setting is useful when using cut sheet paper. End of Page Retract] Default setting: [Fixed Page] This parameter determines how paper is changed in the printer driver's dialog box, that setting has priority. 2 Form Feed Mode Available settings: [No Feed], [Fixed Page], [End of Page], [End of Page - a higher value produces darker print. NOTE If this setting when using non-perforated roll paper. Fixed Page - Select this parameter is selected, the printer ejects a short length of paper when the printer turns...

Users Manual - English
Page 56
...instructions to adjust the paper detection sensor automatically. Factory Reset Click [Factory Reset] to reset PJ-673 Utility to its default settings and send them to the printer. Users unfamiliar with [.]. Communication is not possible if the same subnet mask is [Keep Current State]. 5 Maintenance Click [Maintenance] to open the maintenance dialog box. Clean Unit See Cleaning the Platen Roller on page 53. Print Unit Settings Click [Print Unit Settings] to print a report containing firmware version, image quality, and configuration information, as the default.Type...
...instructions to adjust the paper detection sensor automatically. Factory Reset Click [Factory Reset] to reset PJ-673 Utility to its default settings and send them to the printer. Users unfamiliar with [.]. Communication is not possible if the same subnet mask is [Keep Current State]. 5 Maintenance Click [Maintenance] to open the maintenance dialog box. Clean Unit See Cleaning the Platen Roller on page 53. Print Unit Settings Click [Print Unit Settings] to print a report containing firmware version, image quality, and configuration information, as the default.Type...
Users Manual - English
Page 65
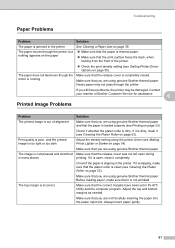
... paper is completely closed. Always insert paper gently. 61 Troubleshooting Paper Problems 6 Problem Solution The paper is jammed in the printer See Clearing a Paper Jam on page 34). Contact your reseller or Brother Customer Service for assistance. 6 Printed Image Problems 6 Problem The printed image is out of the printer. Check the print density setting (see Cleaning the Platen Roller on page 33). Make sure that the release cover is loaded properly (see Making Prints Lighter or Darker on page 39. The paper does not feed...
... paper is completely closed. Always insert paper gently. 61 Troubleshooting Paper Problems 6 Problem Solution The paper is jammed in the printer See Clearing a Paper Jam on page 34). Contact your reseller or Brother Customer Service for assistance. 6 Printed Image Problems 6 Problem The printed image is out of the printer. Check the print density setting (see Cleaning the Platen Roller on page 33). Make sure that the release cover is loaded properly (see Making Prints Lighter or Darker on page 39. The paper does not feed...
Users Manual - English
Page 66
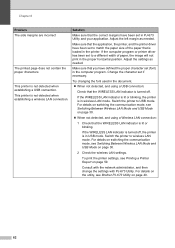
... printer driver have been set (font) in the computer program. Switch the printer to wireless LAN mode. If the WIRELESS LAN indicator is turned off . Consult with the network administrator, and then change the settings with PJ-673 Utility. Switch the printer to USB mode. For details on switching the communication mode, see Printing a Printer Report on page 30. 2 Check the wireless LAN settings. For details on switching the communication mode, see Brother PJ-673 Utility on page 30. When not detected, and using a USB connection: Check...
... printer driver have been set (font) in the computer program. Switch the printer to wireless LAN mode. If the WIRELESS LAN indicator is turned off . Consult with the network administrator, and then change the settings with PJ-673 Utility. Switch the printer to USB mode. For details on switching the communication mode, see Printing a Printer Report on page 30. 2 Check the wireless LAN settings. For details on switching the communication mode, see Brother PJ-673 Utility on page 30. When not detected, and using a USB connection: Check...

Users Manual - English
Page 67
Troubleshooting Problem Solution I want to establish the wireless LAN connection. With the default settings changed See Setting Up the Printer (With the Default Settings Changed) on page 19. The wireless connection takes time. With the default settings See Adding a Printer on page 22. and b. Check the network connection. When the printer is not possible after performing step a. If printing is installed, Brother PJ-673 and Brother PJ-673 USB drivers are installed. From initialization to completing the connection takes time, so it cannot be switched. If the ...
Troubleshooting Problem Solution I want to establish the wireless LAN connection. With the default settings changed See Setting Up the Printer (With the Default Settings Changed) on page 19. The wireless connection takes time. With the default settings See Adding a Printer on page 22. and b. Check the network connection. When the printer is not possible after performing step a. If printing is installed, Brother PJ-673 and Brother PJ-673 USB drivers are installed. From initialization to completing the connection takes time, so it cannot be switched. If the ...

Raster Command Reference
Page 54
... to the PJ-600/700 series printers to PJ-600/700 series printers With a USB connection, since the installed driver will change, the machine cannot simply be printed; Data that can be printed on the "Inquiry" page of doubts about the technical information, get in which we are listed below . Inquiry Information for the PJ-500 series printers have created an assumed Friendly Name and PIN code (default), printing is . The driver must be...
... to the PJ-600/700 series printers to PJ-600/700 series printers With a USB connection, since the installed driver will change, the machine cannot simply be printed; Data that can be printed on the "Inquiry" page of doubts about the technical information, get in which we are listed below . Inquiry Information for the PJ-500 series printers have created an assumed Friendly Name and PIN code (default), printing is . The driver must be...


