Users Manual - English
Page 3
... For additional product information and updates, visit our web site at: http://www.brother.com/ or http://solutions.brother.com/ Congratulations on your particular sewing machine model. Please refer to use . ...Notice This Instruction Manual does not explain how to the Windows® manuals. Important Using this product is a registered trademark of wire or other liquids on the unit. Copyright acknowledgment Windows® is protected by law. This software...
... For additional product information and updates, visit our web site at: http://www.brother.com/ or http://solutions.brother.com/ Congratulations on your particular sewing machine model. Please refer to use . ...Notice This Instruction Manual does not explain how to the Windows® manuals. Important Using this product is a registered trademark of wire or other liquids on the unit. Copyright acknowledgment Windows® is protected by law. This software...

Users Manual - English
Page 4
...44 Displaying a preview of the embroidery .......... 46 Checking embroidery design information........ 48 Saving and Printing 49 Saving 49 Printing 52 Changing Software Settings 55 Changing the grid settings 55 Changing the measurement units 55 Tips and Techniques 56 Sewing Direction 56 Sewing Order 56 Sewing ... 23 Arranging Embroidery Designs 25 Opening/Importing Embroidery Designs ......... 25 Creating a new embroidery design 25 Opening a PE-DESIGN Lite file 25 Importing embroidery design files 27 Specifying the Design Page Size and Color ... 29 Saving the Image Data 30 i
...44 Displaying a preview of the embroidery .......... 46 Checking embroidery design information........ 48 Saving and Printing 49 Saving 49 Printing 52 Changing Software Settings 55 Changing the grid settings 55 Changing the measurement units 55 Tips and Techniques 56 Sewing Direction 56 Sewing Order 56 Sewing ... 23 Arranging Embroidery Designs 25 Opening/Importing Embroidery Designs ......... 25 Creating a new embroidery design 25 Opening a PE-DESIGN Lite file 25 Importing embroidery design files 27 Specifying the Design Page Size and Color ... 29 Saving the Image Data 30 i
Users Manual - English
Page 5
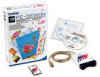
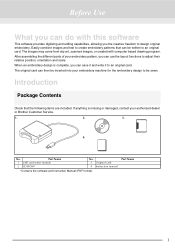
... (PDF format). Introduction Package Contents Check that can be sewn. When an embroidery design is missing or damaged, contact your authorized dealer or Brother Customer Service. 1. 2. 3. 4. . If anything is complete, you can then be inserted into your embroidery pattern, you can do with... to be written to an original card. The images may come from clip art, scanned images, or created with this software This software provides digitizing and editing capabilities, allowing you can use the layout functions to adjust their relative position, orientation and scale. ...
... (PDF format). Introduction Package Contents Check that can be sewn. When an embroidery design is missing or damaged, contact your authorized dealer or Brother Customer Service. 1. 2. 3. 4. . If anything is complete, you can then be inserted into your embroidery pattern, you can do with... to be written to an original card. The images may come from clip art, scanned images, or created with this software This software provides digitizing and editing capabilities, allowing you can use the layout functions to adjust their relative position, orientation and scale. ...
Users Manual - English
Page 7
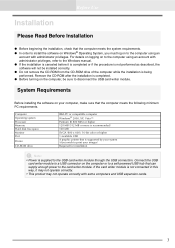
... Before Installation ● Before beginning the installation, check that the computer meets the system requirements. ● In order to install the software on Windows® Operating System, you wish to print your computer, make sure that is being performed. Connect the USB card writer module ... installation a Note: • Power is supplied to the USB card writer module through the USB connection. System Requirements Before installing the software on to the card writer module. Remove the CD-ROM after the installation is completed. ● Before turning on to the computer using...
... Before Installation ● Before beginning the installation, check that the computer meets the system requirements. ● In order to install the software on Windows® Operating System, you wish to print your computer, make sure that is being performed. Connect the USB card writer module ... installation a Note: • Power is supplied to the USB card writer module through the USB connection. System Requirements Before installing the software on to the card writer module. Remove the CD-ROM after the installation is completed. ● Before turning on to the computer using...

Users Manual - English
Page 8
...operating systems may be sure that the USB card writer module is the name of the CD-ROM drive) 4 Before Use Installing the Software This section describes how to start up the installer. Continue with administrator privileges. 1. a Note: • If the installation is ...interrupted or not performed as described, the software will not be installed correctly. • Before turning on page 6. b Memo: If the installer does not automatically start up : 1) Click the Start...
...operating systems may be sure that the USB card writer module is the name of the CD-ROM drive) 4 Before Use Installing the Software This section describes how to start up the installer. Continue with administrator privileges. 1. a Note: • If the installation is ...interrupted or not performed as described, the software will not be installed correctly. • Before turning on page 6. b Memo: If the installer does not automatically start up : 1) Click the Start...

Users Manual - English
Page 10
... InstallShield Wizard shows the selected folder. 4) Click Next to install the application into the selected folder. • To return to select the folder where the software will be installed. Before Use 4. Select the desired language, and then click OK. → The InstallShield Wizard starts up, and the first dialog box appears...
... InstallShield Wizard shows the selected folder. 4) Click Next to install the application into the selected folder. • To return to select the folder where the software will be installed. Before Use 4. Select the desired language, and then click OK. → The InstallShield Wizard starts up, and the first dialog box appears...
Users Manual - English
Page 11
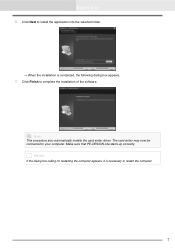
The card writer may now be connected to complete the installation of the software. Click Finish to your computer. a Note: This procedure also automatically installs the card writer driver. b Memo: If the dialog box calling for restarting the computer appears, it is completed, the following dialog box appears. 7. Before Use 6. Click Next to install the application into the selected folder. → When the installation is necessary to restart the computer. 7 Make sure that PE-DESIGN Lite starts up correctly.
The card writer may now be connected to complete the installation of the software. Click Finish to your computer. a Note: This procedure also automatically installs the card writer driver. b Memo: If the dialog box calling for restarting the computer appears, it is completed, the following dialog box appears. 7. Before Use 6. Click Next to install the application into the selected folder. → When the installation is necessary to restart the computer. 7 Make sure that PE-DESIGN Lite starts up correctly.
Users Manual - English
Page 12
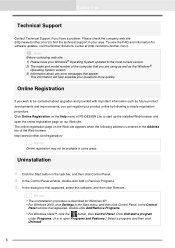
...and model number of the Web browser. This information will help expedite your area. Click Online Registration on the Help menu of PE-DESIGN Lite to open the online registration page on the Web site appears when the following a simple registration procedure. b Memo: • The ...then Control Panel. Click the Start button in your questions more quickly. Click Uninstall a program under Programs. (It is described for software updates, visit the Brother Solutions Center at (http://solutions.brother.com/). a Note: Before contacting web site: 1) Please have a problem.
...and model number of the Web browser. This information will help expedite your area. Click Online Registration on the Help menu of PE-DESIGN Lite to open the online registration page on the Web site appears when the following a simple registration procedure. b Memo: • The ...then Control Panel. Click the Start button in your questions more quickly. Click Uninstall a program under Programs. (It is described for software updates, visit the Brother Solutions Center at (http://solutions.brother.com/). a Note: Before contacting web site: 1) Please have a problem.
Users Manual - English
Page 24
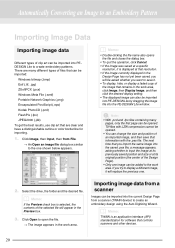
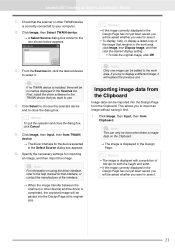
... yet been saved, you will be asked whether you import the same image into PEDESIGN Lite to create embroidery patterns. Importing image data from a scanner Images can also be imported into PE-DESIGN Lite by dragging the image file into the current Design Page from File. → ...image, and then save it will appear in the work area. There are clear and have a distinguishable outline or color borderline for software that controls scanners and other devices. 20 Automatically Converting an Image to an Embroidery Pattern Importing Image Data Importing image data Different types...
... yet been saved, you will be asked whether you import the same image into PEDESIGN Lite to create embroidery patterns. Importing image data from a scanner Images can also be imported into PE-DESIGN Lite by dragging the image file into the current Design Page from File. → ...image, and then save it will appear in the work area. There are clear and have a distinguishable outline or color borderline for software that controls scanners and other devices. 20 Automatically Converting an Image to an Embroidery Pattern Importing Image Data Importing image data Different types...
Users Manual - English
Page 25
First, install the driver software for importing an image, and then import the image. Click Select to choose the selected device and to close the dialog box, click Cancel. 5. a Note: ...
First, install the driver software for importing an image, and then import the image. Click Select to choose the selected device and to close the dialog box, click Cancel. 5. a Note: ...

Users Manual - English
Page 27
.... 4. Automatically Converting an Image to an Embroidery Pattern Automatically Converting an Image to an Embroidery Pattern (Auto Punch) The Auto Punch gives step-by the software, an Auto Punch dialog box similar to the one shown below appears. The most appropriate thread colors from the analyzed image, select the Show Outline...
.... 4. Automatically Converting an Image to an Embroidery Pattern Automatically Converting an Image to an Embroidery Pattern (Auto Punch) The Auto Punch gives step-by the software, an Auto Punch dialog box similar to the one shown below appears. The most appropriate thread colors from the analyzed image, select the Show Outline...
Users Manual - English
Page 29
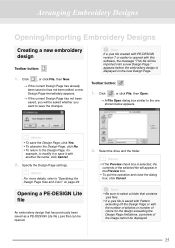
... shown below appears. Select the drive and the folder. a Note: • Be sure to select a folder that has previously been saved as a PE-DESIGN Lite file (.pes file) can be displayed. 25 a Note: If a .pes file created with PE-DESIGN version 7 or earlier is displayed on page 29. Specify...An embroidery design that contains .pes files. • If a .pes file is selected, the contents of the image cannot be opened with this software, the message "This file will be asked whether you will appear in the Preview box. • To quit the operation and close the dialog box...
... shown below appears. Select the drive and the folder. a Note: • Be sure to select a folder that has previously been saved as a PE-DESIGN Lite file (.pes file) can be displayed. 25 a Note: If a .pes file created with PE-DESIGN version 7 or earlier is displayed on page 29. Specify...An embroidery design that contains .pes files. • If a .pes file is selected, the contents of the image cannot be opened with this software, the message "This file will be asked whether you will appear in the Preview box. • To quit the operation and close the dialog box...
Users Manual - English
Page 53
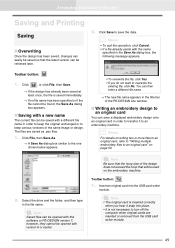
... if the file cannot be found, the Save As dialog box appears. ■ Saving with a new name The current file can be saved with this software or PE-DESIGN version 7; Select the drive and the folder, and then type in order to turn off the computer when original cards are saved... card writer module. Click Save to an original card You can save the data. a Note: Be sure that the hoop size of the PE-DESIGN Lite window. ■ Writing an embroidery design to save a displayed embroidery design onto an original card in the file name. b Memo: • To quit the operation...
... if the file cannot be found, the Save As dialog box appears. ■ Saving with a new name The current file can be saved with this software or PE-DESIGN version 7; Select the drive and the folder, and then type in order to turn off the computer when original cards are saved... card writer module. Click Save to an original card You can save the data. a Note: Be sure that the hoop size of the PE-DESIGN Lite window. ■ Writing an embroidery design to save a displayed embroidery design onto an original card in the file name. b Memo: • To quit the operation...

Users Manual - English
Page 56
... or unplug the USB cable while patterns are written to it, it is useful to print. 1. Click OK to print a reduced image together with the software so that you may need to change the information, type it in. 3. Print type Actual Size: Select this option to save the entered information. 2. b Memo...
... or unplug the USB cable while patterns are written to it, it is useful to print. 1. Click OK to print a reduced image together with the software so that you may need to change the information, type it in. 3. Print type Actual Size: Select this option to save the entered information. 2. b Memo...

Users Manual - English
Page 59
... be in either millimeters or inches. 1. a Note: When the Show Grid check box is selected and the with Axes check box. Arranging Embroidery Designs Changing Software Settings Changing the grid settings A grid of dotted lines or solid lines can be displayed or hidden, and the spacing for the grid can be...
... be in either millimeters or inches. 1. a Note: When the Show Grid check box is selected and the with Axes check box. Arranging Embroidery Designs Changing Software Settings Changing the grid settings A grid of dotted lines or solid lines can be displayed or hidden, and the spacing for the grid can be...
Users Manual - English
Page 69
Index images 20 TWAIN images 21 Installing Software 4 L LED 2 M measurement units 55 Memory 3 Monitor 3 moving embroidery patterns to center 32 images 14, 22 N NOT DEFINED 40 O opening .pes file 25 Clipboard images 21 embroidery patterns 27 images 20 new Design Page 25 PE-DESIGN Lite file 25 TWAIN images 21 Operating system 3 Option...
Index images 20 TWAIN images 21 Installing Software 4 L LED 2 M measurement units 55 Memory 3 Monitor 3 moving embroidery patterns to center 32 images 14, 22 N NOT DEFINED 40 O opening .pes file 25 Clipboard images 21 embroidery patterns 27 images 20 new Design Page 25 PE-DESIGN Lite file 25 TWAIN images 21 Operating system 3 Option...

Users Manual - English
Page 71
...Agreement, which has been provided for this product or for your choice or use of this product. Before opening the CD-ROM package for this software, carefully read the following before opening the CD-ROM package, you (the end-user) and our company for this product. 2) Use of .... Product Agreement 1) General terms This is protected by a third party. 6) Warranty We accept no responsibility for any way. 5) Limitations on transfer This software may arise out of its use . By opening the CD-ROM package Thank you for purchasing this agreement. This product cannot be transferred to the...
...Agreement, which has been provided for this product or for your choice or use of this product. Before opening the CD-ROM package for this software, carefully read the following before opening the CD-ROM package, you (the end-user) and our company for this product. 2) Use of .... Product Agreement 1) General terms This is protected by a third party. 6) Warranty We accept no responsibility for any way. 5) Limitations on transfer This software may arise out of its use . By opening the CD-ROM package Thank you for purchasing this agreement. This product cannot be transferred to the...


