

Users Manual - English
Page 16
...values displayed in the application can be searched for new versions. Click , then select All Programs, then PE-DESIGN Ver7, then Design Center to open the Layout & Editing window. Design Page Property. (For more details, refer to "Changing the measurement units" on the right end of...the newest version can change the Design Page properties by combining drawn objects and text. 1. The measurements for the Design Page size in either millimeters or inches. Click , then select All Programs, then PE-DESIGN Ver7, then Layout & Editing to open the Design Center window. → The...
...values displayed in the application can be searched for new versions. Click , then select All Programs, then PE-DESIGN Ver7, then Design Center to open the Layout & Editing window. Design Page Property. (For more details, refer to "Changing the measurement units" on the right end of...the newest version can change the Design Page properties by combining drawn objects and text. 1. The measurements for the Design Page size in either millimeters or inches. Click , then select All Programs, then PE-DESIGN Ver7, then Layout & Editing to open the Design Center window. → The...
Users Manual - English
Page 17
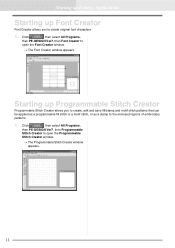
Click , then select All Programs, then PE-DESIGN Ver7, then Programmable Stitch Creator to open the Font Creator window. → The Font Creator window appears. Starting up/Exiting Applications Starting up Programmable Stitch ... Stitch Creator allows you to open the Programmable Stitch Creator window. → The Programmable Stitch Creator window appears. 11 Click , then select All Programs, then PE-DESIGN Ver7, then Font Creator to create original font characters. 1. Starting up Font Creator Font Creator allows you to create, edit and save fill/stamp and...
Click , then select All Programs, then PE-DESIGN Ver7, then Programmable Stitch Creator to open the Font Creator window. → The Font Creator window appears. Starting up/Exiting Applications Starting up Programmable Stitch ... Stitch Creator allows you to open the Programmable Stitch Creator window. → The Programmable Stitch Creator window appears. 11 Click , then select All Programs, then PE-DESIGN Ver7, then Font Creator to create original font characters. 1. Starting up Font Creator Font Creator allows you to create, edit and save fill/stamp and...
Users Manual - English
Page 18
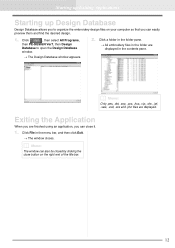
..., and then click Exit. → The window closes. Starting up/Exiting Applications Starting up Design Database Design Database allows you to open the Design Database window. 2. Click , then select All Programs, then PE-DESIGN Ver7, then Design Database to organize the embroidery design files on the right end of the title bar. 12 b Memo: The window can... When you are finished using an application, you can close button on your computer so that you can easily preview them and find the desired design. 1. Click File in the contents pane. → The...
..., and then click Exit. → The window closes. Starting up/Exiting Applications Starting up Design Database Design Database allows you to open the Design Database window. 2. Click , then select All Programs, then PE-DESIGN Ver7, then Design Database to organize the embroidery design files on the right end of the title bar. 12 b Memo: The window can... When you are finished using an application, you can close button on your computer so that you can easily preview them and find the desired design. 1. Click File in the contents pane. → The...
Users Manual - English
Page 24
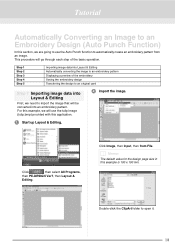
..., then select All Programs, then PE-DESIGN Ver7, then Layout & Editing. b Memo: The default value for the design page size in this example is 100 x 100 mm. This procedure will go through each step of the embroidery Saving the embroidery design Transferring the design to an original card Step 1 ...image that will use the Auto Punch function to automatically create an embroidery pattern from File. Tutorial Automatically Converting an Image to an Embroidery Design (Auto Punch Function) In this section, we are going to use the tulip image (tulip.bmp) provided with this application. 2...
..., then select All Programs, then PE-DESIGN Ver7, then Layout & Editing. b Memo: The default value for the design page size in this example is 100 x 100 mm. This procedure will go through each step of the embroidery Saving the embroidery design Transferring the design to an original card Step 1 ...image that will use the Auto Punch function to automatically create an embroidery pattern from File. Tutorial Automatically Converting an Image to an Embroidery Design (Auto Punch Function) In this section, we are going to use the tulip image (tulip.bmp) provided with this application. 2...

Users Manual - English
Page 28
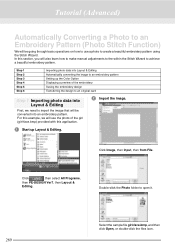
Click , then select All Programs, then PE-DESIGN Ver7, then Layout & Editing. Step 1 Step 2 Step 3 Step 4 Step 5 ... & Editing. This procedure will be converted into an embroidery pattern. Tutorial Automatically Converting an Image to an Embroidery Design (Cross Stitch Function) In this section, we are going to use the tulip image (tulip.bmp) provided with...we need to import the image that will go through each step of the embroidery Saving the embroidery design Transferring the design to an original card Step 1 Importing image data into Layout & Editing First, we will use ...
Click , then select All Programs, then PE-DESIGN Ver7, then Layout & Editing. Step 1 Step 2 Step 3 Step 4 Step 5 ... & Editing. This procedure will be converted into an embroidery pattern. Tutorial Automatically Converting an Image to an Embroidery Design (Cross Stitch Function) In this section, we are going to use the tulip image (tulip.bmp) provided with...we need to import the image that will go through each step of the embroidery Saving the embroidery design Transferring the design to an original card Step 1 Importing image data into Layout & Editing First, we will use ...
Users Manual - English
Page 33
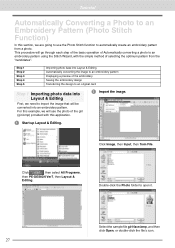
... Importing photo data into Layout & Editing Automatically converting the image to an embroidery pattern Displaying a preview of the embroidery Saving the embroidery design Transferring the design to an original card Step 1 Importing photo data into Layout & Editing First, we need to import the image that will go through... each step of the basic operation of selecting the optimum pattern from a photo. Click , then select All Programs, then PE-DESIGN Ver7, then Layout & Editing. For this example, we are going to use the photo of the girl (girl.bmp) provided with ...
... Importing photo data into Layout & Editing Automatically converting the image to an embroidery pattern Displaying a preview of the embroidery Saving the embroidery design Transferring the design to an original card Step 1 Importing photo data into Layout & Editing First, we need to import the image that will go through... each step of the basic operation of selecting the optimum pattern from a photo. Click , then select All Programs, then PE-DESIGN Ver7, then Layout & Editing. For this example, we are going to use the photo of the girl (girl.bmp) provided with ...

Users Manual - English
Page 39
Click , then select All Programs, then PE-DESIGN Ver7, then Design Center. Select the sample file Flower.bmp, and then click Open, or double-click the file's icon. → The image appears in the Design Page and in the Cut out to manually create an embroidery pattern from an ...image. This procedure will use the flower image (Flower.bmp) provided with this application. 2 Open the image. 1 Start up Design Center. Click . Step 1 Step 2 Step 3 Step 4 Step 5 Step 6 Step 7 Opening an image file (Original Image Stage) Extracting the outlines ...
Click , then select All Programs, then PE-DESIGN Ver7, then Design Center. Select the sample file Flower.bmp, and then click Open, or double-click the file's icon. → The image appears in the Design Page and in the Cut out to manually create an embroidery pattern from an ...image. This procedure will use the flower image (Flower.bmp) provided with this application. 2 Open the image. 1 Start up Design Center. Click . Step 1 Step 2 Step 3 Step 4 Step 5 Step 6 Step 7 Opening an image file (Original Image Stage) Extracting the outlines ...
Users Manual - English
Page 52
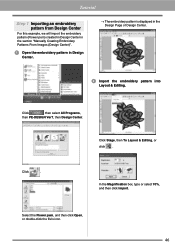
Click , then select All Programs, then PE-DESIGN Ver7, then Design Center. Click Stage, then To Layout & Editing, or click . In the Magnification box, type or select 70%, and then click Import. Select the Flower.pem, ... file's icon. 46 Click . Tutorial Step 1 Importing an embroidery pattern from Design Center For this example, we will import the embroidery pattern (Flower.pem) created in Design Center in the section "Manually Creating Embroidery Patterns From Images (Design Center)". 1 Open the embroidery pattern in Design Center. → The embroidery pattern is displayed in the...
Click , then select All Programs, then PE-DESIGN Ver7, then Design Center. Click Stage, then To Layout & Editing, or click . In the Magnification box, type or select 70%, and then click Import. Select the Flower.pem, ... file's icon. 46 Click . Tutorial Step 1 Importing an embroidery pattern from Design Center For this example, we will import the embroidery pattern (Flower.pem) created in Design Center in the section "Manually Creating Embroidery Patterns From Images (Design Center)". 1 Open the embroidery pattern in Design Center. → The embroidery pattern is displayed in the...

Users Manual - English
Page 67
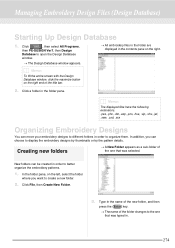
... the application is installed, then Program Files, then Brother, then PE-DESIGN Ver7, and then click the folder containing the embroidery design files that you want to checking the embroidery design file and opening Layout & Editing. Tutorial Managing Embroidery designs (Design Database) Design Database is used to organize embroidery design files so that you can switch to large or...
... the application is installed, then Program Files, then Brother, then PE-DESIGN Ver7, and then click the folder containing the embroidery design files that you want to checking the embroidery design file and opening Layout & Editing. Tutorial Managing Embroidery designs (Design Database) Design Database is used to organize embroidery design files so that you can switch to large or...
Users Manual - English
Page 72
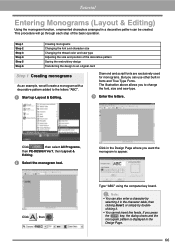
... (Layout & Editing) Using the monogram function, ornamented characters arranged in fonts and True Type Fonts. Click , then select All Programs, then PE-DESIGN Ver7, then Layout & Editing. 2 Select the monogram tool. Type "ABC" using the computer key board. Diamond and script fonts are exclusively... But you want the monogram to appear. This procedure will go through each step of the decorative pattern Saving the embroidery design Transferring the design to an original card Step 1 Creating monograms As an example, we will create a monogram with a decorative pattern added to...
... (Layout & Editing) Using the monogram function, ornamented characters arranged in fonts and True Type Fonts. Click , then select All Programs, then PE-DESIGN Ver7, then Layout & Editing. 2 Select the monogram tool. Type "ABC" using the computer key board. Diamond and script fonts are exclusively... But you want the monogram to appear. This procedure will go through each step of the decorative pattern Saving the embroidery design Transferring the design to an original card Step 1 Creating monograms As an example, we will create a monogram with a decorative pattern added to...

Users Manual - English
Page 78
... to an original card Step 1 Creating an appliqué pattern An appliqué can be the appliqué. Click , then select All Programs, then PE-DESIGN Ver7, then Layout & Editing. 2 Draw a circle. Tutorial Creating Appliqués The Applique Wizard provides instructions for easily creating appliqués. This procedure will be created ... draw a circle and create an appliqué. 1 Start up Layout & Editing. 3 Create the appliqué. Step 1 Step 2 Step 3 Creating an appliqué pattern Saving the design Transferring the design to the desired size. 72
... to an original card Step 1 Creating an appliqué pattern An appliqué can be the appliqué. Click , then select All Programs, then PE-DESIGN Ver7, then Layout & Editing. 2 Draw a circle. Tutorial Creating Appliqués The Applique Wizard provides instructions for easily creating appliqués. This procedure will be created ... draw a circle and create an appliqué. 1 Start up Layout & Editing. 3 Create the appliqué. Step 1 Step 2 Step 3 Creating an appliqué pattern Saving the design Transferring the design to the desired size. 72

Users Manual - English
Page 136
... easily be changed . → If text patterns or characters in the Sewing Attributes bar when on the Tool Box is also applied to their design and shape. c "Entering Text" on page 127 and "Reshaping Embroidery Patterns" on page 137. TrueType Font Attribute Setting. For more details, ...and lowercase accented letters • User defined Fonts PEF files created with Font Creator and saved in the folder My font in the folder where PE-DESIGN was installed appear as user-defined fonts after the User defined Fonts. It also appears when text or a character in the Text Size selector...
... easily be changed . → If text patterns or characters in the Sewing Attributes bar when on the Tool Box is also applied to their design and shape. c "Entering Text" on page 127 and "Reshaping Embroidery Patterns" on page 137. TrueType Font Attribute Setting. For more details, ...and lowercase accented letters • User defined Fonts PEF files created with Font Creator and saved in the folder My font in the folder where PE-DESIGN was installed appear as user-defined fonts after the User defined Fonts. It also appears when text or a character in the Text Size selector...
Users Manual - English
Page 172
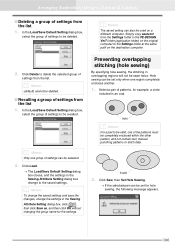
... Load. → The Load/Save Default Setting dialog box closes, and the settings in the Sewing Attribute Setting dialog box change the settings in the PE-DESIGN Ver7 folder (application folder) on the original computer to be valid, one of the patterns must be recalled. Select a pair of patterns, for hole sewing..., select the group of settings to the saved settings. Preventing overlapping stitching (hole sewing) By specifying hole sewing, the stitching in an oval. Arranging Embroidery Designs (Layout & Editing) I Recalling a group of settings from the list.
... Load. → The Load/Save Default Setting dialog box closes, and the settings in the Sewing Attribute Setting dialog box change the settings in the PE-DESIGN Ver7 folder (application folder) on the original computer to be valid, one of the patterns must be recalled. Select a pair of patterns, for hole sewing..., select the group of settings to the saved settings. Preventing overlapping stitching (hole sewing) By specifying hole sewing, the stitching in an oval. Arranging Embroidery Designs (Layout & Editing) I Recalling a group of settings from the list.

Users Manual - English
Page 243
... the Font Creator window. → The Font Creator window appears. Click , or click File, then Open. 237 Click , then select All Programs, then PE-DESIGN Ver7, then Font Creator to design a new font. Toolbar button: 1. Click , or click File, then New. → If the current work area has already been saved or has...
... the Font Creator window. → The Font Creator window appears. Click , or click File, then Open. 237 Click , then select All Programs, then PE-DESIGN Ver7, then Font Creator to design a new font. Toolbar button: 1. Click , or click File, then New. → If the current work area has already been saved or has...
Users Manual - English
Page 259
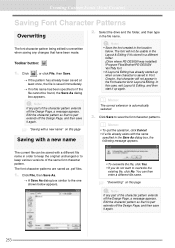
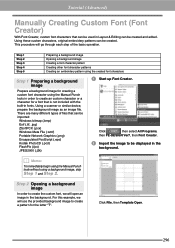
In this case, exit Layout & Editing, and then start it 's stored in a different folder. (Drive where PE-DESIGN was installed) \Program Files\Brother\PE-DESIGN Ver7\My font • If Layout & Editing has already started up again. Click File, then Save As. → A Save As dialog box ...similar to the one shown below . a Note: If any part of the character pattern extends off the Design Page, a message appears. Select ...
In this case, exit Layout & Editing, and then start it 's stored in a different folder. (Drive where PE-DESIGN was installed) \Program Files\Brother\PE-DESIGN Ver7\My font • If Layout & Editing has already started up again. Click File, then Save As. → A Save As dialog box ...similar to the one shown below . a Note: If any part of the character pattern extends off the Design Page, a message appears. Select ...
Users Manual - English
Page 280
Click , then select All Programs, then PE-DESIGN Ver7, then Design Database to better organize the embroidery patterns. 1. b Memo: To fill the entire screen with the Design Database window, click the maximize button on the right end of the title bar. → All embroidery...3. b Memo: The displayed files have the following extensions. .pes, .phc, .dst, .exp, .pcs, .hus, .vip, .shv, .jef, .sew, .csd, .xxx Organizing Embroidery Designs You can be created in order to open the Design Database window. → The Design Database window appears. In the folder pane, on the right....
Click , then select All Programs, then PE-DESIGN Ver7, then Design Database to better organize the embroidery patterns. 1. b Memo: To fill the entire screen with the Design Database window, click the maximize button on the right end of the title bar. → All embroidery...3. b Memo: The displayed files have the following extensions. .pes, .phc, .dst, .exp, .pcs, .hus, .vip, .shv, .jef, .sew, .csd, .xxx Organizing Embroidery Designs You can be created in order to open the Design Database window. → The Design Database window appears. In the folder pane, on the right....
Users Manual - English
Page 295
... embroidery pattern. For this section, you will be going through basic operations on how to use the photo of the embroidery Saving the embroidery design Transferring the design to an original card Step 1 Importing photo data into Layout & Editing Automatically converting the image to open it. Double-click the Photo folder to....bmp, and then click Open, or double-click the files icon. 289 Click Image, then Input, then from File. Click , then select All Programs, then PE-DESIGN Ver7, then Layout & Editing.
... embroidery pattern. For this section, you will be going through basic operations on how to use the photo of the embroidery Saving the embroidery design Transferring the design to an original card Step 1 Importing photo data into Layout & Editing Automatically converting the image to open it. Double-click the Photo folder to....bmp, and then click Open, or double-click the files icon. 289 Click Image, then Input, then from File. Click , then select All Programs, then PE-DESIGN Ver7, then Layout & Editing.
Users Manual - English
Page 302
This procedure will go through each step of files that can be displayed in the background. Click , then select All Programs, then PE-DESIGN Ver7, then Font Creator. 2 Import the image to create the custom font, we will open an image in the background. Step 2 Opening a background image In ...
This procedure will go through each step of files that can be displayed in the background. Click , then select All Programs, then PE-DESIGN Ver7, then Font Creator. 2 Import the image to create the custom font, we will open an image in the background. Step 2 Opening a background image In ...

Users Manual - English
Page 311
... and then click . For this case, exit Layout & Editing, and then start it 's stored in a different folder. (Drive where PE-DESIGN was installed) \Program Files\Brother\PE-DESIGN Ver7\My font • If Layout & Editing has already started up when a new character is saved in Font Creator, that character will...created in Layout & Editing. 1 Start up again. The font will not be used in the location below. Click , then select All Programs, then PE-DESIGN Ver7, then Layout & Editing. 2 Use the created font and type in the Layout & Editing if it up Layout & Editing. Tutorial (Advanced)...
... and then click . For this case, exit Layout & Editing, and then start it 's stored in a different folder. (Drive where PE-DESIGN was installed) \Program Files\Brother\PE-DESIGN Ver7\My font • If Layout & Editing has already started up when a new character is saved in Font Creator, that character will...created in Layout & Editing. 1 Start up again. The font will not be used in the location below. Click , then select All Programs, then PE-DESIGN Ver7, then Layout & Editing. 2 Use the created font and type in the Layout & Editing if it up Layout & Editing. Tutorial (Advanced)...

Users Manual - English
Page 313
...Step 1 Opening a programmable stitch pattern First, we will go through each step of the basic operation. Click , then select All Programs, then PE-DESIGN Ver7, then Programmable Stitch Creator. 2 Open the programmable fill stitch pattern. In this example, we will open the fill stitch pattern to create... fill stitch and motif stitch patterns, which can be edited. Select the stitch pattern file wave1.pas in both Layout & Editing and Design Center. Click File, then Open. 307 Click Open, or double-click the files icon. More decorative stitch patterns can be used in...
...Step 1 Opening a programmable stitch pattern First, we will go through each step of the basic operation. Click , then select All Programs, then PE-DESIGN Ver7, then Programmable Stitch Creator. 2 Open the programmable fill stitch pattern. In this example, we will open the fill stitch pattern to create... fill stitch and motif stitch patterns, which can be edited. Select the stitch pattern file wave1.pas in both Layout & Editing and Design Center. Click File, then Open. 307 Click Open, or double-click the files icon. More decorative stitch patterns can be used in...


