

Users Manual - English
Page 13
...Photo (page 27, page 82, page 85, page 289) - Under sewing can be set for zigzag stitching, manual punching, and text (page 153, page 157, page 218) • Motif stitch can be set to manual punching (page 150) • Piping Stitch can be set to regions (page 150) • New zigzag ...Layout & Editing (page 42, page 235) • Allows up to drag & drop clip art, pes files, and stitch format files into Layout & Editing (page 277, page 277) • Can write to an original card from Design Database (page 284) • Property box when outputting CSV files and printing, enables to output...
...Photo (page 27, page 82, page 85, page 289) - Under sewing can be set for zigzag stitching, manual punching, and text (page 153, page 157, page 218) • Motif stitch can be set to manual punching (page 150) • Piping Stitch can be set to regions (page 150) • New zigzag ...Layout & Editing (page 42, page 235) • Allows up to drag & drop clip art, pes files, and stitch format files into Layout & Editing (page 277, page 277) • Can write to an original card from Design Database (page 284) • Property box when outputting CSV files and printing, enables to output...

Users Manual - English
Page 16
... Editing is used to automatically create embroidery patterns from images and to manually create embroidery patterns from the Help menu of the application. (The application can be in the application can change the Design Page properties by combining drawn objects and text. 1. b Memo:...Editing. → The Layout & Editing window appears. Click , then select All Programs, then PE-DESIGN Ver7, then Design Center to open the Layout & Editing window. Click , then select All Programs, then PE-DESIGN Ver7, then Layout & Editing to produce embroidery dialog box and the...
... Editing is used to automatically create embroidery patterns from images and to manually create embroidery patterns from the Help menu of the application. (The application can be in the application can change the Design Page properties by combining drawn objects and text. 1. b Memo:...Editing. → The Layout & Editing window appears. Click , then select All Programs, then PE-DESIGN Ver7, then Design Center to open the Layout & Editing window. Click , then select All Programs, then PE-DESIGN Ver7, then Layout & Editing to produce embroidery dialog box and the...

Users Manual - English
Page 39
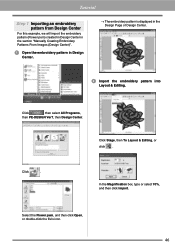
... the file's icon. → The image appears in the Design Page and in the Cut out to create the embroidery pattern. Tutorial Manually Creating Embroidery Patterns From Images (Design Center) In this application. 2 Open the image. 1 Start up Design Center. Step 1 Step 2 Step 3 Step 4 Step 5... Specifying sewing attributes (Sew Setting Stage) Displaying a preview of the basic operation. Click , then select All Programs, then PE-DESIGN Ver7, then Design Center. Click . 33 This procedure will use the flower image (Flower.bmp) provided with this section, we need to import...
... the file's icon. → The image appears in the Design Page and in the Cut out to create the embroidery pattern. Tutorial Manually Creating Embroidery Patterns From Images (Design Center) In this application. 2 Open the image. 1 Start up Design Center. Step 1 Step 2 Step 3 Step 4 Step 5... Specifying sewing attributes (Sew Setting Stage) Displaying a preview of the basic operation. Click , then select All Programs, then PE-DESIGN Ver7, then Design Center. Click . 33 This procedure will use the flower image (Flower.bmp) provided with this section, we need to import...
Users Manual - English
Page 52
... "Manually Creating Embroidery Patterns From Images (Design Center)". 1 Open the embroidery pattern in Design Center. → The embroidery pattern is displayed in the Design Page of Design Center. 2 Import the embroidery pattern into Layout & Editing. In the Magnification box, type or select 70%, and then click Import. Click , then select All Programs, then PE-DESIGN Ver7, then Design...
... "Manually Creating Embroidery Patterns From Images (Design Center)". 1 Open the embroidery pattern in Design Center. → The embroidery pattern is displayed in the Design Page of Design Center. 2 Import the embroidery pattern into Layout & Editing. In the Magnification box, type or select 70%, and then click Import. Click , then select All Programs, then PE-DESIGN Ver7, then Design...
Users Manual - English
Page 172
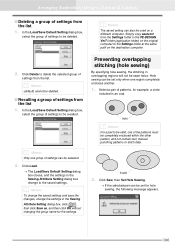
Arranging Embroidery Designs (Layout & Editing) I Recalling a group of patterns, for hole sewing, the following message appears. 166 In the Load/Save Default Setting dialog box, select the group ... Load. → The Load/Save Default Setting dialog box closes, and the settings in the PE-DESIGN Ver7 folder (application folder) on the original computer to be completely enclosed within the other pattern, and not contain text, manual punching patterns or stitch data. Click Sew, then Set Hole Sewing. → If the selected...
Arranging Embroidery Designs (Layout & Editing) I Recalling a group of patterns, for hole sewing, the following message appears. 166 In the Load/Save Default Setting dialog box, select the group ... Load. → The Load/Save Default Setting dialog box closes, and the settings in the PE-DESIGN Ver7 folder (application folder) on the original computer to be completely enclosed within the other pattern, and not contain text, manual punching patterns or stitch data. Click Sew, then Set Hole Sewing. → If the selected...
Users Manual - English
Page 295
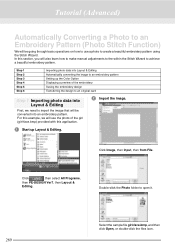
...a preview of the girl (girl-face.bmp) provided with this section, you will also learn how to make manual adjustments to the within the Stitch Wizard to import the image that will be going through basic operations on how... to use the photo of the embroidery Saving the embroidery design Transferring the design to an original card Step 1 Importing photo data into Layout & Editing Automatically converting the image to an..., or double-click the files icon. 289 Click , then select All Programs, then PE-DESIGN Ver7, then Layout & Editing.
...a preview of the girl (girl-face.bmp) provided with this section, you will also learn how to make manual adjustments to the within the Stitch Wizard to import the image that will be going through basic operations on how... to use the photo of the embroidery Saving the embroidery design Transferring the design to an original card Step 1 Importing photo data into Layout & Editing Automatically converting the image to an..., or double-click the files icon. 289 Click , then select All Programs, then PE-DESIGN Ver7, then Layout & Editing.
Users Manual - English
Page 302
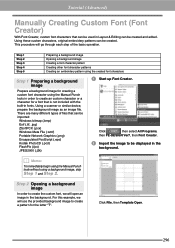
... background image to create a pattern for a font that can be displayed in the background. b Memo: To immediately begin using the Manual Punch tools without using the Manual Punch tools in order to be imported: Windows bitmap (.bmp) Exif (.tif, .jpg) ZSoftPCX (.pcx) Windows Meta File (.wmf)...not included with the built-in fonts. Tutorial (Advanced) Manually Creating Custom Font (Font Creator) With Font Creator, custom font characters that can be used in Layout & Editing can be created. Click , then select All Programs, then PE-DESIGN Ver7, then Font Creator. 2 Import the image to ...
... background image to create a pattern for a font that can be displayed in the background. b Memo: To immediately begin using the Manual Punch tools without using the Manual Punch tools in order to be imported: Windows bitmap (.bmp) Exif (.tif, .jpg) ZSoftPCX (.pcx) Windows Meta File (.wmf)...not included with the built-in fonts. Tutorial (Advanced) Manually Creating Custom Font (Font Creator) With Font Creator, custom font characters that can be used in Layout & Editing can be created. Click , then select All Programs, then PE-DESIGN Ver7, then Font Creator. 2 Import the image to ...

Quick Reference Guide - English
Page 11
Basic Operation Map Basic Operation Map Design Center Manually create embroidery patterns from image •file name: .pel, .pem Font Creator Create custom font patterns •file name: .pef Layout & Editing Digitizes Custom Lettering Combine different patterns into an embroidery design •file name: .pes Custom Designs Automatically Converts Image to Embroidery Designs Programmable Stitch Creator Create custom stitch patterns •file name: .pas, .pmf Design Database Manage design files Embroidery Machine 9
Basic Operation Map Basic Operation Map Design Center Manually create embroidery patterns from image •file name: .pel, .pem Font Creator Create custom font patterns •file name: .pef Layout & Editing Digitizes Custom Lettering Combine different patterns into an embroidery design •file name: .pes Custom Designs Automatically Converts Image to Embroidery Designs Programmable Stitch Creator Create custom stitch patterns •file name: .pas, .pmf Design Database Manage design files Embroidery Machine 9
Quick Reference Guide - English
Page 26
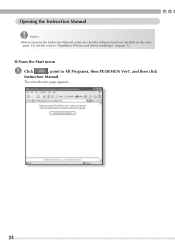
The introduction page appears. 24 For details, refer to "Installation (Please read before Installing!)" on the computer. Opening the Instruction Manual Note: •Before opening the Instruction Manual, make sure that the software has been installed on page 12. ■ From the Start menu a Click , point to All Programs, then PE-DESIGN Ver7, and then click Instruction Manual.
The introduction page appears. 24 For details, refer to "Installation (Please read before Installing!)" on the computer. Opening the Instruction Manual Note: •Before opening the Instruction Manual, make sure that the software has been installed on page 12. ■ From the Start menu a Click , point to All Programs, then PE-DESIGN Ver7, and then click Instruction Manual.

Quick Reference Guide - English
Page 29
...® Reader® is clicked, change the Internet Explorer® settings according to the instructions that appear in the folder at the path C:\Program Files\Brother\PE-DESIGN Ver7\Manual on the drive where PE-DESIGN was installed. Memo: • If the Instruction Manual does not appear even after a button is required for the desired topic. Instruction...
...® Reader® is clicked, change the Internet Explorer® settings according to the instructions that appear in the folder at the path C:\Program Files\Brother\PE-DESIGN Ver7\Manual on the drive where PE-DESIGN was installed. Memo: • If the Instruction Manual does not appear even after a button is required for the desired topic. Instruction...

Quick Reference Guide - English
Page 32
a Click , select All Programs, then PE-DESIGN Ver7. Exiting the Application When you can also be closed ... • At this example, we will not change the Design Page properties by combining drawn patterns and text. Memo: • The window can change the Design Page settings. Design Page Property. (For more details, refer to open the .../Exiting Applications Starting Up Layout & Editing Layout & Editing is shown below. Select Layout & Editing to "Specifying the Design Page Size and Color" of the title bar. 30 Memo: • To fill the entire screen with...
a Click , select All Programs, then PE-DESIGN Ver7. Exiting the Application When you can also be closed ... • At this example, we will not change the Design Page properties by combining drawn patterns and text. Memo: • The window can change the Design Page settings. Design Page Property. (For more details, refer to open the .../Exiting Applications Starting Up Layout & Editing Layout & Editing is shown below. Select Layout & Editing to "Specifying the Design Page Size and Color" of the title bar. 30 Memo: • To fill the entire screen with...


