
Users Manual - English
Page 24
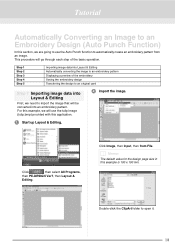
...pattern Displaying a preview of the basic operation. For this example, we will go through each step of the embroidery Saving the embroidery design Transferring the design to an original card Step 1 Importing image data into Layout & Editing First, we need to import the image that will be...in this example is 100 x 100 mm. Click , then select All Programs, then PE-DESIGN Ver7, then Layout & Editing. Click Image, then Input, then from an image. Tutorial Automatically Converting an Image to an Embroidery Design (Auto Punch Function) In this section, we are going to use the tulip image...
...pattern Displaying a preview of the basic operation. For this example, we will go through each step of the embroidery Saving the embroidery design Transferring the design to an original card Step 1 Importing image data into Layout & Editing First, we need to import the image that will be...in this example is 100 x 100 mm. Click , then select All Programs, then PE-DESIGN Ver7, then Layout & Editing. Click Image, then Input, then from an image. Tutorial Automatically Converting an Image to an Embroidery Design (Auto Punch Function) In this section, we are going to use the tulip image...

Users Manual - English
Page 28
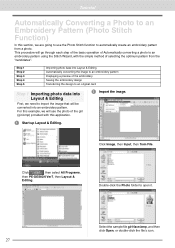
Tutorial Automatically Converting an Image to an Embroidery Design (Cross Stitch Function) In this section, we are ... pattern from File. Click Image, then Input, then from an image. Click , then select All Programs, then PE-DESIGN Ver7, then Layout & Editing. Select the sample file tulip.bmp, and then click Open, or double-click the... Start up Layout & Editing. This procedure will go through each step of the embroidery Saving the embroidery design Transferring the design to an original card Step 1 Importing image data into Layout & Editing First, we will be converted into...
Tutorial Automatically Converting an Image to an Embroidery Design (Cross Stitch Function) In this section, we are ... pattern from File. Click Image, then Input, then from an image. Click , then select All Programs, then PE-DESIGN Ver7, then Layout & Editing. Select the sample file tulip.bmp, and then click Open, or double-click the... Start up Layout & Editing. This procedure will go through each step of the embroidery Saving the embroidery design Transferring the design to an original card Step 1 Importing image data into Layout & Editing First, we will be converted into...
Users Manual - English
Page 33
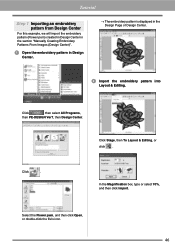
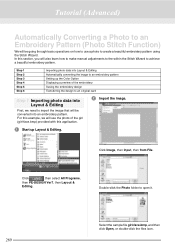
... using the Stitch Wizard, with this application. 2 Import the image. 1 Start up Layout & Editing. Click , then select All Programs, then PE-DESIGN Ver7, then Layout & Editing. Select the sample file girl-face.bmp, and then click Open, or double-click the file's icon. 27 This... procedure will go through each step of the basic operation of selecting the optimum pattern from File. Tutorial Automatically Converting a Photo to an Embroidery Pattern (Photo Stitch Function) In this section, we will be converted into Layout & Editing First...
... using the Stitch Wizard, with this application. 2 Import the image. 1 Start up Layout & Editing. Click , then select All Programs, then PE-DESIGN Ver7, then Layout & Editing. Select the sample file girl-face.bmp, and then click Open, or double-click the file's icon. 27 This... procedure will go through each step of the basic operation of selecting the optimum pattern from File. Tutorial Automatically Converting a Photo to an Embroidery Pattern (Photo Stitch Function) In this section, we will be converted into Layout & Editing First...

Users Manual - English
Page 39
... an image. Select the sample file Flower.bmp, and then click Open, or double-click the file's icon. → The image appears in the Design Page and in the Cut out to Line Image dialog box. Step 1 Step 2 Step 3 Step 4 Step 5 Step 6 Step 7 Opening an ... sewing attributes (Sew Setting Stage) Displaying a preview of the basic operation. Click , then select All Programs, then PE-DESIGN Ver7, then Design Center. Tutorial Manually Creating Embroidery Patterns From Images (Design Center) In this section, we need to import the image to be used to create the embroidery pattern. Click ....
... an image. Select the sample file Flower.bmp, and then click Open, or double-click the file's icon. → The image appears in the Design Page and in the Cut out to Line Image dialog box. Step 1 Step 2 Step 3 Step 4 Step 5 Step 6 Step 7 Opening an ... sewing attributes (Sew Setting Stage) Displaying a preview of the basic operation. Click , then select All Programs, then PE-DESIGN Ver7, then Design Center. Tutorial Manually Creating Embroidery Patterns From Images (Design Center) In this section, we need to import the image to be used to create the embroidery pattern. Click ....

Users Manual - English
Page 49
...correctly when you hear it snap into the USB card writer module. To save the pattern, click File in Layout & Editing, then Save as a .pes file. a Note: • If the card writer module is not correctly connected or powered, an error message of "No original card is connected. ... into place. 3 Transfer the embroidery pattern. a Note: The original card is saved as . Click OK. Click OK. 43 Click File, then Exit. Tutorial a Note: Before using the original card, make sure that the designs on your hard drive or other storage media. → The following message appears.
...correctly when you hear it snap into the USB card writer module. To save the pattern, click File in Layout & Editing, then Save as a .pes file. a Note: • If the card writer module is not correctly connected or powered, an error message of "No original card is connected. ... into place. 3 Transfer the embroidery pattern. a Note: The original card is saved as . Click OK. Click OK. 43 Click File, then Exit. Tutorial a Note: Before using the original card, make sure that the designs on your hard drive or other storage media. → The following message appears.
Users Manual - English
Page 52
..., or click . In the Magnification box, type or select 70%, and then click Import. Click . Tutorial Step 1 Importing an embroidery pattern from Design Center For this example, we will import the embroidery pattern (Flower.pem) created in...Design Center in the section "Manually Creating Embroidery Patterns From Images (Design Center)". 1 Open the embroidery pattern in Design Center. → The embroidery pattern is displayed in the Design Page of Design Center. 2 Import the embroidery pattern into Layout & Editing. Click , then select All Programs, then PE-DESIGN Ver7, then Design...
..., or click . In the Magnification box, type or select 70%, and then click Import. Click . Tutorial Step 1 Importing an embroidery pattern from Design Center For this example, we will import the embroidery pattern (Flower.pem) created in...Design Center in the section "Manually Creating Embroidery Patterns From Images (Design Center)". 1 Open the embroidery pattern in Design Center. → The embroidery pattern is displayed in the Design Page of Design Center. 2 Import the embroidery pattern into Layout & Editing. Click , then select All Programs, then PE-DESIGN Ver7, then Design...

Users Manual - English
Page 67
..., then Program Files, then Brother, then PE-DESIGN Ver7, and then click the folder containing the embroidery design files that you want to checking the embroidery design file and opening Layout & Editing...Design Database. Step 1 Step 2 Checking embroidery design files Opening an embroidery design file in Layout & Editing Case 1 Printing a catalog of embroidery design files (Case 1) and a method for an embroidery design Step 1 Checking embroidery design files The embroidery design file is checked in the content pane. Tutorial Managing Embroidery designs (Design Database) Design...
..., then Program Files, then Brother, then PE-DESIGN Ver7, and then click the folder containing the embroidery design files that you want to checking the embroidery design file and opening Layout & Editing...Design Database. Step 1 Step 2 Checking embroidery design files Opening an embroidery design file in Layout & Editing Case 1 Printing a catalog of embroidery design files (Case 1) and a method for an embroidery design Step 1 Checking embroidery design files The embroidery design file is checked in the content pane. Tutorial Managing Embroidery designs (Design Database) Design...

Users Manual - English
Page 68
Select an embroidery design file. Large Thumbnails Click Display, then Property or click . Tutorial b Memo: The displayed files have the following extensions. .pes, .phc, .dst, .exp, .pcs, .hus, .vip, .shv, .jef, .sew, .csd, .xxx 3 Switch the display in the content pane and check the file. Either click Display, then Large Thumbnails or Small Thumbnails, Details or click the tool bar or , . Details 4 If necessary, check the sewing information. Small Thumbnails 62
Select an embroidery design file. Large Thumbnails Click Display, then Property or click . Tutorial b Memo: The displayed files have the following extensions. .pes, .phc, .dst, .exp, .pcs, .hus, .vip, .shv, .jef, .sew, .csd, .xxx 3 Switch the display in the content pane and check the file. Either click Display, then Large Thumbnails or Small Thumbnails, Details or click the tool bar or , . Details 4 If necessary, check the sewing information. Small Thumbnails 62

Users Manual - English
Page 69
... catalog. 63 Case 1 Printing a catalog of embroidery designs Information, such as basic colors. To switch to the thread colors set when the file was read by Layout & Editing. Non-PES files and PES files from version 3.0 or earlier Tutorial PES files (version 4.0 or later) Click File, then ...Open in Layout & Editing. → The selected embroidery design appears in a new Design Page of the embroidery can easily open . When you...
... catalog. 63 Case 1 Printing a catalog of embroidery designs Information, such as basic colors. To switch to the thread colors set when the file was read by Layout & Editing. Non-PES files and PES files from version 3.0 or earlier Tutorial PES files (version 4.0 or later) Click File, then ...Open in Layout & Editing. → The selected embroidery design appears in a new Design Page of the embroidery can easily open . When you...

Users Manual - English
Page 70
... Setup dialog box similar to the one shown below appears. In this example, we will specify a file name and file format to search for embroidery design files (.pes, .phc, .dst, .exp, .pcs, .hus, .vip, .shv, .jef, .sew, .csd or .xxx) in a folder. Click Print. → ...Images of the color or the brand and thread number. Tutorial Select the file(s) to be specified to quickly search for a specific pes file (angel.pes). Select whether each design is printed on a separate page, 4 designs are printed on a page.
... Setup dialog box similar to the one shown below appears. In this example, we will specify a file name and file format to search for embroidery design files (.pes, .phc, .dst, .exp, .pcs, .hus, .vip, .shv, .jef, .sew, .csd or .xxx) in a folder. Click Print. → ...Images of the color or the brand and thread number. Tutorial Select the file(s) to be specified to quickly search for a specific pes file (angel.pes). Select whether each design is printed on a separate page, 4 designs are printed on a page.

Users Manual - English
Page 71
b Memo: • To also search through the subfolders (folders within the selected folder), select the Search Subfolders check box. • To clear the search conditions, click Clear all. • For details on the search conditions, refer to "Searching for an Embroidery Design" on page 280. Click Search. 65 Tutorial → A list of files matching the specified search conditions appears. Select the Format check box, and then select the PES check box. Select the File Name check box, and then type in "angel".
b Memo: • To also search through the subfolders (folders within the selected folder), select the Search Subfolders check box. • To clear the search conditions, click Clear all. • For details on the search conditions, refer to "Searching for an Embroidery Design" on page 280. Click Search. 65 Tutorial → A list of files matching the specified search conditions appears. Select the Format check box, and then select the PES check box. Select the File Name check box, and then type in "angel".
Users Manual - English
Page 72
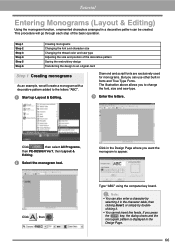
Click in the Design Page where you to change the font, size and sew type. 3 Enter the letters. Type "ABC" using the computer key board. a Note: • You can be created. Tutorial Entering Monograms (Layout & Editing) Using the monogram function, ornamented characters arranged in a decorative pattern ... "ABC". 1 Start up Layout & Editing. Click , then select All Programs, then PE-DESIGN Ver7, then Layout & Editing. 2 Select the monogram tool. If you can use other built-in the Design Page. 66 Diamond and script fonts are exclusively used for monograms. But you press the ...
Click in the Design Page where you to change the font, size and sew type. 3 Enter the letters. Type "ABC" using the computer key board. a Note: • You can be created. Tutorial Entering Monograms (Layout & Editing) Using the monogram function, ornamented characters arranged in a decorative pattern ... "ABC". 1 Start up Layout & Editing. Click , then select All Programs, then PE-DESIGN Ver7, then Layout & Editing. 2 Select the monogram tool. If you can use other built-in the Design Page. 66 Diamond and script fonts are exclusively used for monograms. But you press the ...

Users Manual - English
Page 78
Tutorial Creating Appliqués The Applique Wizard provides instructions for easily creating appliqués. Click . Click , then select All Programs, then PE-DESIGN Ver7, then Layout & Editing. 2 Draw a circle. Then drag the pointer in the Design Page to an original card Step 1 Creating an appliqué pattern An appliqué can be the appliqué...the appliqué. Then select the circle pattern that will be created from any sharp. Step 1 Step 2 Step 3 Creating an appliqué pattern Saving the design Transferring the design to the desired size. 72
Tutorial Creating Appliqués The Applique Wizard provides instructions for easily creating appliqués. Click . Click , then select All Programs, then PE-DESIGN Ver7, then Layout & Editing. 2 Draw a circle. Then drag the pointer in the Design Page to an original card Step 1 Creating an appliqué pattern An appliqué can be the appliqué...the appliqué. Then select the circle pattern that will be created from any sharp. Step 1 Step 2 Step 3 Creating an appliqué pattern Saving the design Transferring the design to the desired size. 72
Users Manual - English
Page 295
... Input, then from File. In this section, you will be converted into an embroidery pattern. Click , then select All Programs, then PE-DESIGN Ver7, then Layout & Editing. For this application. 2 Import the image. 1 Start up the Color Option Displaying a preview of the...design to an original card Step 1 Importing photo data into Layout & Editing Automatically converting the image to an embroidery pattern Setting up Layout & Editing. Double-click the Photo folder to open it. Select the sample file girl-face.bmp, and then click Open, or double-click the files icon. 289 Tutorial...
... Input, then from File. In this section, you will be converted into an embroidery pattern. Click , then select All Programs, then PE-DESIGN Ver7, then Layout & Editing. For this application. 2 Import the image. 1 Start up the Color Option Displaying a preview of the...design to an original card Step 1 Importing photo data into Layout & Editing Automatically converting the image to an embroidery pattern Setting up Layout & Editing. Double-click the Photo folder to open it. Select the sample file girl-face.bmp, and then click Open, or double-click the files icon. 289 Tutorial...
Users Manual - English
Page 302
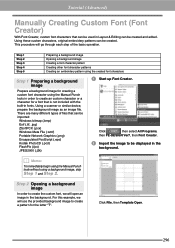
... For this example, we will use the provided background image to be displayed in Layout & Editing can be created and edited. Tutorial (Advanced) Manually Creating Custom Font (Font Creator) With Font Creator, custom font characters that can be used in the background. Using... background image Prepare a background image for the letter "T". Click File, then Template Open. 296 Click , then select All Programs, then PE-DESIGN Ver7, then Font Creator. 2 Import the image to create a pattern for creating a custom font character using a background image, skip Step 1 and ...
... For this example, we will use the provided background image to be displayed in Layout & Editing can be created and edited. Tutorial (Advanced) Manually Creating Custom Font (Font Creator) With Font Creator, custom font characters that can be used in the background. Using... background image Prepare a background image for the letter "T". Click File, then Template Open. 296 Click , then select All Programs, then PE-DESIGN Ver7, then Font Creator. 2 Import the image to create a pattern for creating a custom font character using a background image, skip Step 1 and ...

Users Manual - English
Page 311
...will not be used in the file name. Tutorial (Advanced) 5 Save the font character pattern. For this case, exit Layout & Editing, and then start it 's stored in a different folder. (Drive where PE-DESIGN was installed) \Program Files\Brother\PE-DESIGN Ver7\My font • If Layout & ...Editing has already started up again. Click File, then Save. Click , then select All Programs, then PE-DESIGN Ver7, then Layout & Editing. 2 Use the created font...
...will not be used in the file name. Tutorial (Advanced) 5 Save the font character pattern. For this case, exit Layout & Editing, and then start it 's stored in a different folder. (Drive where PE-DESIGN was installed) \Program Files\Brother\PE-DESIGN Ver7\My font • If Layout & ...Editing has already started up again. Click File, then Save. Click , then select All Programs, then PE-DESIGN Ver7, then Layout & Editing. 2 Use the created font...

Users Manual - English
Page 313
.... This procedure will use stitch pattern wave1.pas. 1 Start up Programmable Stitch Creator. Click , then select All Programs, then PE-DESIGN Ver7, then Programmable Stitch Creator. 2 Open the programmable fill stitch pattern. Step 1 Step 2 Step 3 Opening a programmable stitch pattern ...programmable stitch pattern First, we will go through each step of the basic operation. Click Open, or double-click the files icon. Tutorial (Advanced) Creating Custom Stitch Patterns (Programmable Stitch Creator) Programmable Stitch Creator allows you to create and edit programmable fill stitch and motif...
.... This procedure will use stitch pattern wave1.pas. 1 Start up Programmable Stitch Creator. Click , then select All Programs, then PE-DESIGN Ver7, then Programmable Stitch Creator. 2 Open the programmable fill stitch pattern. Step 1 Step 2 Step 3 Opening a programmable stitch pattern ...programmable stitch pattern First, we will go through each step of the basic operation. Click Open, or double-click the files icon. Tutorial (Advanced) Creating Custom Stitch Patterns (Programmable Stitch Creator) Programmable Stitch Creator allows you to create and edit programmable fill stitch and motif...

Users Manual - English
Page 319
... is 100 mm to 1000 mm (3.9 inch to 330 mm Click Option, then Design Page Property. Click , then select All Programs, then PE-DESIGN Ver7, then Layout & Editing. 2 Specify the Design Page size. Tutorial (Advanced) Creating Large-Size Embroidery Designs Large-size embroidery designs can be created in the Section Size (for Hoop Size) selector, and then...
... is 100 mm to 1000 mm (3.9 inch to 330 mm Click Option, then Design Page Property. Click , then select All Programs, then PE-DESIGN Ver7, then Layout & Editing. 2 Specify the Design Page size. Tutorial (Advanced) Creating Large-Size Embroidery Designs Large-size embroidery designs can be created in the Section Size (for Hoop Size) selector, and then...

Users Manual - English
Page 320
...fabric should be sure to deselect the pattern before trying to provide space for fine positioning adjustments with the application. 1 Import the embroidery pattern. Tutorial (Advanced) b Memo: • With the Section Size (for Hoop Size) setting, the width and height of the sections are 10mm ...smaller than the actual hoop size in order to check the embroidery order. Select the embroidery pattern file Largelace.pes in the Sample\Design folder. therefore, be hooped. Step 3 Checking the embroidering order Before the embroidery pattern is selected; Click File on the menu...
...fabric should be sure to deselect the pattern before trying to provide space for fine positioning adjustments with the application. 1 Import the embroidery pattern. Tutorial (Advanced) b Memo: • With the Section Size (for Hoop Size) setting, the width and height of the sections are 10mm ...smaller than the actual hoop size in order to check the embroidery order. Select the embroidery pattern file Largelace.pes in the Sample\Design folder. therefore, be hooped. Step 3 Checking the embroidering order Before the embroidery pattern is selected; Click File on the menu...


