Users Manual - English
Page 1
GETTING READY EMBROIDERY APPENDIX Computerized Embroidery Machine Operation Manual
GETTING READY EMBROIDERY APPENDIX Computerized Embroidery Machine Operation Manual
Users Manual - English
Page 2
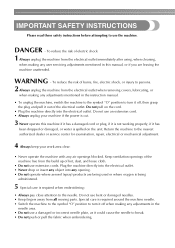
... or damaged, or water is required when embroidering: • Always pay close attention to the needle. Special care is required around the machine needle. • Switch the machine to the symbol "O" position to turn it off when making any adjustments in the instruction manual. • To unplug the... turn it off, then grasp the plug and pull it out of burns, fire, electric shock, or injury to persons. 2 Always unplug the machine from the electrical outlet when removing covers, lubricating, or when making any object into the electrical outlet. To reduce the risk of the electrical outlet...
... or damaged, or water is required when embroidering: • Always pay close attention to the needle. Special care is required around the machine needle. • Switch the machine to the symbol "O" position to turn it off when making any adjustments in the instruction manual. • To unplug the... turn it off, then grasp the plug and pull it out of burns, fire, electric shock, or injury to persons. 2 Always unplug the machine from the electrical outlet when removing covers, lubricating, or when making any object into the electrical outlet. To reduce the risk of the electrical outlet...
Users Manual - English
Page 3
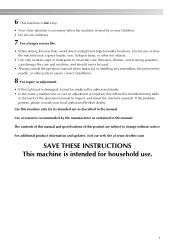
... to clean the case. If the problem persists, please consult your local authorized Brother dealer. For additional product information and updates, visit our web site at www.brother.com SAVE THESE INSTRUCTIONS This machine is intended for its intended use as contained in the manual. Use this... machine only for household use outdoors. 7 For a longer service life: • When storing this machine, avoid direct sunlight and high humidity ...
... to clean the case. If the problem persists, please consult your local authorized Brother dealer. For additional product information and updates, visit our web site at www.brother.com SAVE THESE INSTRUCTIONS This machine is intended for its intended use as contained in the manual. Use this... machine only for household use outdoors. 7 For a longer service life: • When storing this machine, avoid direct sunlight and high humidity ...

Users Manual - English
Page 5
... ...5 Accessories ...6 Included accessories ...6 Optional accessories ...7 Names of Machine Parts and Their Functions 8 Front view ...8 Needle and embroidery foot section ...9 Right-side/rear view ...9 Operation buttons ...10 Operation panel ...11 ......15 Removing the embroidery unit ...16 Turning the Machine On/Off 18 Power supply precautions ...18 Turning on the machine ...19 Turning off the machine ...19 LCD (Liquid Crystal Display) Operation 20 Viewing the LCD...20 Changing the machine settings ...21 Checking machine operating procedures ...23 Winding/Installing the Bobbin 24 Bobbin...
... ...5 Accessories ...6 Included accessories ...6 Optional accessories ...7 Names of Machine Parts and Their Functions 8 Front view ...8 Needle and embroidery foot section ...9 Right-side/rear view ...9 Operation buttons ...10 Operation panel ...11 ......15 Removing the embroidery unit ...16 Turning the Machine On/Off 18 Power supply precautions ...18 Turning on the machine ...19 Turning off the machine ...19 LCD (Liquid Crystal Display) Operation 20 Viewing the LCD...20 Changing the machine settings ...21 Checking machine operating procedures ...23 Winding/Installing the Bobbin 24 Bobbin...

Users Manual - English
Page 6
... Bobbin Case Adjustment 68 Correct tension...68 Bobbin thread is loose...68 Bobbin thread is tight ...68 APPENDIX 69 Care and Maintenance ...70 Cleaning the machine surface ...70 Cleaning the race ...70 Attaching the Embroidery Foot 72 Attaching the embroidery Foot "Q" ...72 Troubleshooting ...74 Error messages ...78 Adjusting the LCD ...81...
... Bobbin Case Adjustment 68 Correct tension...68 Bobbin thread is loose...68 Bobbin thread is tight ...68 APPENDIX 69 Care and Maintenance ...70 Cleaning the machine surface ...70 Cleaning the race ...70 Attaching the Embroidery Foot 72 Attaching the embroidery Foot "Q" ...72 Troubleshooting ...74 Error messages ...78 Adjusting the LCD ...81...

Users Manual - English
Page 7
d Embroidery You can start embroiderying without pulling up the bobbin thread (page 28). Machine Features 1 23 4 a Simple bobbin-winding The bobbin can quickly and easily be cut automatically after you for the correct operation of the ... designs from optional embroidery cards (page 39). 5 Introduction Thank you have finished reading this embroidery machine. c Automatic thread cutting The thread can quickly be accessed for future reference. Before using the machine, carefully read the "IMPORTANT SAFETY INSTRUCTIONS", and then study this manual for purchasing this manual, store...
d Embroidery You can start embroiderying without pulling up the bobbin thread (page 28). Machine Features 1 23 4 a Simple bobbin-winding The bobbin can quickly and easily be cut automatically after you for the correct operation of the ... designs from optional embroidery cards (page 39). 5 Introduction Thank you have finished reading this embroidery machine. c Automatic thread cutting The thread can quickly be accessed for future reference. Before using the machine, carefully read the "IMPORTANT SAFETY INSTRUCTIONS", and then study this manual for purchasing this manual, store...
Users Manual - English
Page 8
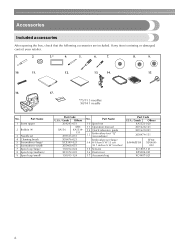
... EF84: XD0600- 002 XC1807-121 XZ5004-021 XC4487-021 6 Part Name 10 Spool net 11 Operation manual 12 Quick reference guide 13 Embroidery foot "Q" (on machine) Embroidery set 4 Cleaning brush 5 Screwdriver (large) 6 Screwdriver (small) 7 Spool cap (large) 8 Spool cap (medium) 9 Spool cap (small) Part Code U.S.A. / Canada Others X54243-051 SA156 SFB...
... EF84: XD0600- 002 XC1807-121 XZ5004-021 XC4487-021 6 Part Name 10 Spool net 11 Operation manual 12 Quick reference guide 13 Embroidery foot "Q" (on machine) Embroidery set 4 Cleaning brush 5 Screwdriver (large) 6 Screwdriver (small) 7 Spool cap (large) 8 Spool cap (medium) 9 Spool cap (small) Part Code U.S.A. / Canada Others X54243-051 SA156 SFB...
Users Manual - English
Page 9
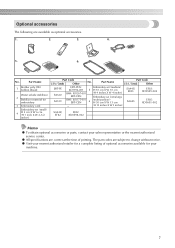
... are correct at the time of optional accessories available for your sales representative or the nearest authorized service center. Part Name 1 Brother poly #90 bobbin thread Water solude stabilizer 2 Stabilizer material for a complete listing of printing. z Visit your nearest authorized retailer...EF83: XD0599-002 EF85: XD0601-002 SA442/ EF82 EF82: XD0598-002 Memo z To obtain optional accessories or parts, contact your machine. 7 Part Name Part Code U.S.A. / Canada Other EBT-PE SA520 SA519 EBT-PEN: Embroidery set (medium) XC5996-001 5 H 10 cm X W 10 cm BM4: X81267-001 (H ...
... are correct at the time of optional accessories available for your sales representative or the nearest authorized service center. Part Name 1 Brother poly #90 bobbin thread Water solude stabilizer 2 Stabilizer material for a complete listing of printing. z Visit your nearest authorized retailer...EF83: XD0599-002 EF85: XD0601-002 SA442/ EF82 EF82: XD0598-002 Memo z To obtain optional accessories or parts, contact your machine. 7 Part Name Part Code U.S.A. / Canada Other EBT-PE SA520 SA519 EBT-PEN: Embroidery set (medium) XC5996-001 5 H 10 cm X W 10 cm BM4: X81267-001 (H ...

Users Manual - English
Page 10
...embroidery unit to thread the needle. m Needle threader lever Use the needle threader lever to the machine, and then attach the embroidery frame. e Top cover Open the top cover to place the spool of the machine parts. g Operation panel From the operation panel, patterns can be selected and edited, and ...Raise and lower the presser foot lever to raise and lower the presser foot j Operation buttons Use these descriptions to cut them. Names of Machine Parts and Their Functions The names of the various parts of the take -up lever check window Look through the thread cutter to learn the...
...embroidery unit to thread the needle. m Needle threader lever Use the needle threader lever to the machine, and then attach the embroidery frame. e Top cover Open the top cover to place the spool of the machine parts. g Operation panel From the operation panel, patterns can be selected and edited, and ...Raise and lower the presser foot lever to raise and lower the presser foot j Operation buttons Use these descriptions to cut them. Names of Machine Parts and Their Functions The names of the various parts of the take -up lever check window Look through the thread cutter to learn the...

Users Manual - English
Page 11
...f Main power switch Use the main power switch to be exchanged. a Handle Carry the machine by its handle when transporting the machine. Do not cover the air vent while the machine is lowered, it enters the hole in the needle plate. d Air vent The air... vent allows the air surrounding the motor to turn the machine on the power supply cord into the bobbin case. d Needle plate cover Remove the needle plate cover to raise and lower...disk Pass the thread through the thread guide disk when using the needle threader to use your machine. 9
...f Main power switch Use the main power switch to be exchanged. a Handle Carry the machine by its handle when transporting the machine. Do not cover the air vent while the machine is lowered, it enters the hole in the needle plate. d Air vent The air... vent allows the air surrounding the motor to turn the machine on the power supply cord into the bobbin case. d Needle plate cover Remove the needle plate cover to raise and lower...disk Pass the thread through the thread guide disk when using the needle threader to use your machine. 9
Users Manual - English
Page 12
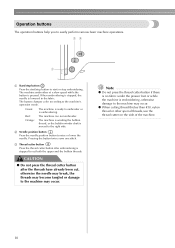
...threads may become tangled or damage to embroider or is lowered in the fabric. The button changes color according to easily perform various basic machine operations. Pressing the button twice sews one stitch. c Thread cutter button Press the thread cutter button after the threads have already been ... z When cutting thread thicker than #30, nylon thread or other special threads, use the thread cutter on the side of the machine. 10 Orange: The machine is winding the bobbin thread, or the bobbin winder shaft is embroidering, otherwise damage to the right side. Note z Do not ...
...threads may become tangled or damage to embroider or is lowered in the fabric. The button changes color according to easily perform various basic machine operations. Pressing the button twice sews one stitch. c Thread cutter button Press the thread cutter button after the threads have already been ... z When cutting thread thicker than #30, nylon thread or other special threads, use the thread cutter on the side of the machine. 10 Orange: The machine is winding the bobbin thread, or the bobbin winder shaft is embroidering, otherwise damage to the right side. Note z Do not ...
Users Manual - English
Page 13
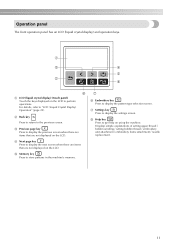
a c d e b h f a LCD (liquid crystal display) (touch panel) Touch the keys displayed on using the machine. g f Embroidery key Press to display the settings screen. h Help key Press to get help on the LCD to display the previous screen when there ... / bobbin winding / setting bobbin thread / embroidery unit attachment / embroidery frame attachment / needle replacement. 11 b Back key Press to return to store patterns in the machine's memory. e Memory key Press to the previous screen. For details, refer to display the next screen when there are items that are not displayed on...
a c d e b h f a LCD (liquid crystal display) (touch panel) Touch the keys displayed on using the machine. g f Embroidery key Press to display the settings screen. h Help key Press to get help on the LCD to display the previous screen when there ... / bobbin winding / setting bobbin thread / embroidery unit attachment / embroidery frame attachment / needle replacement. 11 b Back key Press to return to store patterns in the machine's memory. e Memory key Press to the previous screen. For details, refer to display the next screen when there are items that are not displayed on...

Users Manual - English
Page 15
... embroidery unit 15 Removing the embroidery unit 16 Turning the Machine On/Off 18 Power supply precautions 18 Turning on the machine 19 Turning off the machine 19 LCD (Liquid Crystal Display) Operation 20 Viewing the LCD 20 Changing the machine settings 21 Checking machine operating procedures 23 Winding/Installing the Bobbin 24 Bobbin precautions...
... embroidery unit 15 Removing the embroidery unit 16 Turning the Machine On/Off 18 Power supply precautions 18 Turning on the machine 19 Turning off the machine 19 LCD (Liquid Crystal Display) Operation 20 Viewing the LCD 20 Changing the machine settings 21 Checking machine operating procedures 23 Winding/Installing the Bobbin 24 Bobbin precautions...

Users Manual - English
Page 16
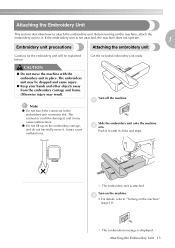
... Step The basic steps for embroidery are as follows. 1 Attaching the embroidery unit Attach the embroidery unit. (If the embroidery unit is not attached, the machine does not operate.) For details, refer to "Attaching the embroidery unit" (page 15). ↓ 2 Checking the needle Use a needle matched to "Selecting Embroidery Patterns" (page...
... Step The basic steps for embroidery are as follows. 1 Attaching the embroidery unit Attach the embroidery unit. (If the embroidery unit is not attached, the machine does not operate.) For details, refer to "Attaching the embroidery unit" (page 15). ↓ 2 Checking the needle Use a needle matched to "Selecting Embroidery Patterns" (page...
Users Manual - English
Page 17
...Otherwise injury may cause malfunctions. Turn on the embroidery carriage, and do not forcefully move the machine with the embroidery unit in place. If the embroidery unit is not attached, the machine does not operate. 1 Embroidery unit precautions Attaching the embroidery unit Cautions for the embroidery unit ...objects away from the embroidery carriage and frame. The connector could be damaged, and it . a Slide the embroidery unit onto the machine b arm. The embroidery unit may cause malfunctions. CAUTION ● Do not move it may be explained below. z Do not lift up on ...
...Otherwise injury may cause malfunctions. Turn on the embroidery carriage, and do not forcefully move the machine with the embroidery unit in place. If the embroidery unit is not attached, the machine does not operate. 1 Embroidery unit precautions Attaching the embroidery unit Cautions for the embroidery unit ...objects away from the embroidery carriage and frame. The connector could be damaged, and it . a Slide the embroidery unit onto the machine b arm. The embroidery unit may cause malfunctions. CAUTION ● Do not move it may be explained below. z Do not lift up on ...
Users Manual - English
Page 18
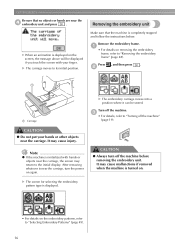
Make sure that no objects or hands are near the carriage, the screen may cause malfunctions if removed when the machine is turned on again. b a a Carriage X The embroidery carriage moves into a position where it can be displayed if you touch the screen with hands ...or objects near the d embroidery unit and press . c • For details, refer to "Turning off the machine before removing the embroidery unit. CAUTION ● Always turn the power on . Removing the embroidery unit • When an animation is displayed on the screen...
Make sure that no objects or hands are near the carriage, the screen may cause malfunctions if removed when the machine is turned on again. b a a Carriage X The embroidery carriage moves into a position where it can be displayed if you touch the screen with hands ...or objects near the d embroidery unit and press . c • For details, refer to "Turning off the machine before removing the embroidery unit. CAUTION ● Always turn the power on . Removing the embroidery unit • When an animation is displayed on the screen...
Users Manual - English
Page 19
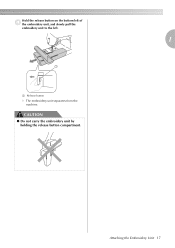
Hold the release button on the bottom left of d the embroidery unit, and slowly pull the embroidery unit to the left. 1 a a Release button X The embroidery unit separates from the machine. Attaching the Embroidery Unit 17 CAUTION ● Do not carry the embroidery unit by holding the release button compartment.
Hold the release button on the bottom left of d the embroidery unit, and slowly pull the embroidery unit to the left. 1 a a Release button X The embroidery unit separates from the machine. Attaching the Embroidery Unit 17 CAUTION ● Do not carry the embroidery unit by holding the release button compartment.
Users Manual - English
Page 20
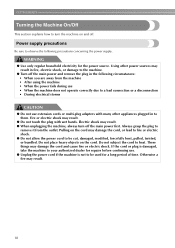
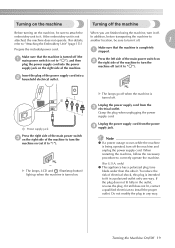
...9679; Do not touch the plug with many other power sources may damage the cord and cause fire or electric shock. GETTING READY Turning the Machine On/Off This section explains how to turn off . Fire or electric shock may result. 18 WARNING ● Use only regular household electricity... for repairs before continuing use • When the machine does not operate correctly due to heat. Do not place heavy objects on and off the main power first. Pulling on the cord may result...
...9679; Do not touch the plug with many other power sources may damage the cord and cause fire or electric shock. GETTING READY Turning the Machine On/Off This section explains how to turn off . Fire or electric shock may result. 18 WARNING ● Use only regular household electricity... for repairs before continuing use • When the machine does not operate correctly due to heat. Do not place heavy objects on and off the main power first. Pulling on the cord may result...
Users Manual - English
Page 21
... refer to "Attaching the Embroidery Unit" (page 15).) Prepare the included power cord. Make sure that the machine is turned on b the right side of the machine. X The lamps go off when the machine is being operated, turn off . Grasp the plug when unplugging the power supply cord. Make sure that the.... Do not modify the plug in the outlet, reverse the plug. If the embroidery unit is intended to "|"). embroidery unit to correctly operate the machine. (For U.S.A. Insert the plug of the power supply cord into the power supply jack on (set it . If the plug does not fit ...
... refer to "Attaching the Embroidery Unit" (page 15).) Prepare the included power cord. Make sure that the machine is turned on b the right side of the machine. X The lamps go off when the machine is being operated, turn off . Grasp the plug when unplugging the power supply cord. Make sure that the.... Do not modify the plug in the outlet, reverse the plug. If the embroidery unit is intended to "|"). embroidery unit to correctly operate the machine. (For U.S.A. Insert the plug of the power supply cord into the power supply jack on (set it . If the plug does not fit ...
Users Manual - English
Page 22
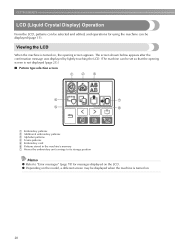
...the embroidery unit carriage to its storage position Memo z Refer to "Error messages" (page 78) for using the machine can be displayed (page 11). Viewing the LCD When the machine is turned on the LCD. The screen shown below appears after the confirmation message was displayed by lightly touching the LCD.... (The machine can be set so that the opening screen appears. GETTING READY LCD (Liquid Crystal Display) Operation From the LCD, patterns can be selected ...
...the embroidery unit carriage to its storage position Memo z Refer to "Error messages" (page 78) for using the machine can be displayed (page 11). Viewing the LCD When the machine is turned on the LCD. The screen shown below appears after the confirmation message was displayed by lightly touching the LCD.... (The machine can be set so that the opening screen appears. GETTING READY LCD (Liquid Crystal Display) Operation From the LCD, patterns can be selected ...


