Users Manual - English
Page 1
GETTING READY EMBROIDERY APPENDIX Computerized Embroidery Machine Operation Manual
GETTING READY EMBROIDERY APPENDIX Computerized Embroidery Machine Operation Manual
Users Manual - English
Page 2
... dealer or service center for examination, repair, electrical or mechanical adjustment. 4 Always keep your machine if the power is cut. 3 Never operate this manual, or if you are being used or where oxygen is being administered. 5 Special care is required around the machine needle. • Switch...the build up of the machine free from the electrical outlet when removing covers, lubricating, or when making any opening. • Do not operate where aerosol (spray) products are leaving the machine unattended. Keep ventilation openings of lint, dust, and loose cloth. • Do not use...
... dealer or service center for examination, repair, electrical or mechanical adjustment. 4 Always keep your machine if the power is cut. 3 Never operate this manual, or if you are being used or where oxygen is being administered. 5 Special care is required around the machine needle. • Switch...the build up of the machine free from the electrical outlet when removing covers, lubricating, or when making any opening. • Do not operate where aerosol (spray) products are leaving the machine unattended. Keep ventilation openings of lint, dust, and loose cloth. • Do not use...
Users Manual - English
Page 3
...subject to clean the case. For additional product information and updates, visit our web site at www.brother.com SAVE THESE INSTRUCTIONS This machine is used . • Always consult the operation manual when replacing or installing any assemblies, the presser feet, needle, or other hot objects. •...near a space heater, iron, halogen lamp, or other parts to inspect and adjust the machine yourself. The contents of this manual and specifications of the operation manual to assure correct installation. 8 For repair or adjustment: • If the Light unit is damaged, it must be used...
...subject to clean the case. For additional product information and updates, visit our web site at www.brother.com SAVE THESE INSTRUCTIONS This machine is used . • Always consult the operation manual when replacing or installing any assemblies, the presser feet, needle, or other hot objects. •...near a space heater, iron, halogen lamp, or other parts to inspect and adjust the machine yourself. The contents of this manual and specifications of the operation manual to assure correct installation. 8 For repair or adjustment: • If the Light unit is damaged, it must be used...

Users Manual - English
Page 5
... Names of Machine Parts and Their Functions 8 Front view ...8 Needle and embroidery foot section ...9 Right-side/rear view ...9 Operation buttons ...10 Operation panel ...11 GETTING READY 13 Embroidery Step by Step 14 Attaching the Embroidery Unit 15 Embroidery unit precautions ...15 Attaching the embroidery... operating procedures ...23 Winding/Installing the Bobbin 24 Bobbin precautions ...24 Winding the bobbin ...24 Installing the bobbin ...28 Upper Threading ...30 About the spool of thread ...30 Threading the upper thread ...30 Threading the needle ...32 Threading the needle manually...
... Names of Machine Parts and Their Functions 8 Front view ...8 Needle and embroidery foot section ...9 Right-side/rear view ...9 Operation buttons ...10 Operation panel ...11 GETTING READY 13 Embroidery Step by Step 14 Attaching the Embroidery Unit 15 Embroidery unit precautions ...15 Attaching the embroidery... operating procedures ...23 Winding/Installing the Bobbin 24 Bobbin precautions ...24 Winding the bobbin ...24 Installing the bobbin ...28 Upper Threading ...30 About the spool of thread ...30 Threading the upper thread ...30 Threading the needle ...32 Threading the needle manually...

Users Manual - English
Page 7
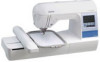
c Automatic thread cutting The thread can be cut automatically after you for purchasing this manual, store it where it can quickly be accessed for the correct operation of the various functions. Machine Features 1 23 4 a Simple bobbin-winding The bobbin can start embroiderying without pulling ...easily be wound with thread (page 24). Before using the machine, carefully read the "IMPORTANT SAFETY INSTRUCTIONS", and then study this manual for future reference. In addition, after embroidering (page 51). d Embroidery You can embroider built-in embroidery patterns, characters, framed ...
c Automatic thread cutting The thread can be cut automatically after you for purchasing this manual, store it where it can quickly be accessed for the correct operation of the various functions. Machine Features 1 23 4 a Simple bobbin-winding The bobbin can start embroiderying without pulling ...easily be wound with thread (page 24). Before using the machine, carefully read the "IMPORTANT SAFETY INSTRUCTIONS", and then study this manual for future reference. In addition, after embroidering (page 51). d Embroidery You can embroider built-in embroidery patterns, characters, framed ...
Users Manual - English
Page 8
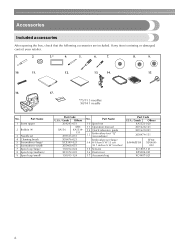
Part Name 10 Spool net 11 Operation manual 12 Quick reference guide 13 Embroidery foot "Q" (on machine) Embroidery set 4 Cleaning brush 5 Screwdriver (large) 6 Screwdriver (small) 7 Spool cap (large) 8 Spool cap (medium) 9 Spool cap (...
Part Name 10 Spool net 11 Operation manual 12 Quick reference guide 13 Embroidery foot "Q" (on machine) Embroidery set 4 Cleaning brush 5 Screwdriver (large) 6 Screwdriver (small) 7 Spool cap (large) 8 Spool cap (medium) 9 Spool cap (...

Users Manual - English
Page 15
... 18 Turning on the machine 19 Turning off the machine 19 LCD (Liquid Crystal Display) Operation 20 Viewing the LCD 20 Changing the machine settings 21 Checking machine operating procedures 23 Winding/Installing the Bobbin 24 Bobbin precautions 24 Winding the bobbin 24 Installing the ...bobbin 28 Upper Threading ...30 About the spool of thread 30 Threading the upper thread 30 Threading the needle 32 Threading the needle manually (without using ...
... 18 Turning on the machine 19 Turning off the machine 19 LCD (Liquid Crystal Display) Operation 20 Viewing the LCD 20 Changing the machine settings 21 Checking machine operating procedures 23 Winding/Installing the Bobbin 24 Bobbin precautions 24 Winding the bobbin 24 Installing the ...bobbin 28 Upper Threading ...30 About the spool of thread 30 Threading the upper thread 30 Threading the needle 32 Threading the needle manually (without using ...
Users Manual - English
Page 25
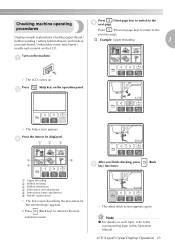
a X The LCD comes on each topic, refer to the corresponding page in this Operation Manual. c 1 2 3 4 6 After you finish checking, press (Back 5 e key) two times. Note z For details on . Turn on the operation panel. Press b (Help key) on the machine. Press the item to the item selection screen... topic appears. • Press (Back key) to return to be displayed. X The initial stitch screen appears again. Checking machine operating Press (Next page key) to switch to the previous page. procedures Press (Previous page key) to return to the d next ...
a X The LCD comes on each topic, refer to the corresponding page in this Operation Manual. c 1 2 3 4 6 After you finish checking, press (Back 5 e key) two times. Note z For details on . Turn on the operation panel. Press b (Help key) on the machine. Press the item to the item selection screen... topic appears. • Press (Back key) to return to be displayed. X The initial stitch screen appears again. Checking machine operating Press (Next page key) to switch to the previous page. procedures Press (Previous page key) to return to the d next ...
Users Manual - English
Page 85
... 28 bobbin winder 8 LCD button 51 , LCD operation 20 50 3 bobbin winding 24 bobbin winding thread guide 8 M Brother poly #90 bobbin thread 7 buzzer 82 machine settings 21 , main power switch 9 19 C characters 52 maintenance 70 manual needle threading 34 , memory key 11 63 cleaning...needle set 6 needle threader 32 needle threader lever 8 needle threading 32 next page key 11 O , operation beep 81 82 , operation buttons 8 10 , operation keys 11 50 , operation panel 8 11 optional accessories 7 P pattern type selection screen 20 power supply 18 power supply jack ...
... 28 bobbin winder 8 LCD button 51 , LCD operation 20 50 3 bobbin winding 24 bobbin winding thread guide 8 M Brother poly #90 bobbin thread 7 buzzer 82 machine settings 21 , main power switch 9 19 C characters 52 maintenance 70 manual needle threading 34 , memory key 11 63 cleaning...needle set 6 needle threader 32 needle threader lever 8 needle threading 32 next page key 11 O , operation beep 81 82 , operation buttons 8 10 , operation keys 11 50 , operation panel 8 11 optional accessories 7 P pattern type selection screen 20 power supply 18 power supply jack ...
USB GUIDE - Multi
Page 3
...the name contains special characters, the file will recognize embroidery data. • Save the patterns in file names. This applies to the Operation Manual. We recommend using our data design systems or sewing machines may break when sewing with this machine. If embroidery data is rotated 90 ...data other than our original patterns, the thread or needle may cause the embroidery machine to rotate the pattern 90 degrees. • .pes files saved with this machine. CAUTION ● When using embroidery data other than that embroidery data cannot be within the 18 cm ...
...the name contains special characters, the file will recognize embroidery data. • Save the patterns in file names. This applies to the Operation Manual. We recommend using our data design systems or sewing machines may break when sewing with this machine. If embroidery data is rotated 90 ...data other than our original patterns, the thread or needle may cause the embroidery machine to rotate the pattern 90 degrees. • .pes files saved with this machine. CAUTION ● When using embroidery data other than that embroidery data cannot be within the 18 cm ...
USB GUIDE - Multi
Page 6
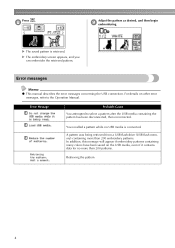
... on the USB media, even if it contains data for no USB media is retrieved. Error Message Probable Cause You attempted to the Operation Manual. A pattern was being retrieved from a USB flash drive (USB flash memory) containing more than 200 embroidery patterns. Retrieving the pattern..., refer to select a pattern after the USB media containing the pattern has been disconnected, then reconnected. Error messages Memo z This manual describes the error messages concerning the USB connection. h Adjust the pattern as desired, and then begin i embroidering. You recalled a ...
... on the USB media, even if it contains data for no USB media is retrieved. Error Message Probable Cause You attempted to the Operation Manual. A pattern was being retrieved from a USB flash drive (USB flash memory) containing more than 200 embroidery patterns. Retrieving the pattern..., refer to select a pattern after the USB media containing the pattern has been disconnected, then reconnected. Error messages Memo z This manual describes the error messages concerning the USB connection. h Adjust the pattern as desired, and then begin i embroidering. You recalled a ...


