Users Manual - English
Page 2
...cause the needle to persons. 2 Always unplug the machine from the electrical outlet immediately after using, when cleaning, when making any adjustments in this machine if it has a damaged cord or plug, if it is required when embroidering: • Always pay close attention to the nearest ...authorized dealer or service center for examination, repair, electrical or mechanical adjustment. 4 Always keep your machine if the power is spilled on the cord. • Plug the machine directly into any user ...
...cause the needle to persons. 2 Always unplug the machine from the electrical outlet immediately after using, when cleaning, when making any adjustments in this machine if it has a damaged cord or plug, if it is required when embroidering: • Always pay close attention to the nearest ...authorized dealer or service center for examination, repair, electrical or mechanical adjustment. 4 Always keep your machine if the power is spilled on the cord. • Plug the machine directly into any user ...

Users Manual - English
Page 5
... embroidery unit ...16 Turning the Machine On/Off 18 Power supply precautions ...18 Turning on the machine ...19 Turning off the machine ...19 LCD (Liquid Crystal Display) Operation 20 Viewing the LCD...20 Changing the machine settings ...21 Checking machine operating procedures ...23 Winding/Installing ... the needle threader 34 Replacing the Needle ...35 Needle precautions ...35 Checking the needle ...35 Replacing the needle...36 EMBROIDERY 39 Embroidering Neatly ...40 What to prepare ...40 Preparing the Fabric ...42 Attaching a stabilizer material to the fabric ...42 Setting the fabric...
... embroidery unit ...16 Turning the Machine On/Off 18 Power supply precautions ...18 Turning on the machine ...19 Turning off the machine ...19 LCD (Liquid Crystal Display) Operation 20 Viewing the LCD...20 Changing the machine settings ...21 Checking machine operating procedures ...23 Winding/Installing ... the needle threader 34 Replacing the Needle ...35 Needle precautions ...35 Checking the needle ...35 Replacing the needle...36 EMBROIDERY 39 Embroidering Neatly ...40 What to prepare ...40 Preparing the Fabric ...42 Attaching a stabilizer material to the fabric ...42 Setting the fabric...

Users Manual - English
Page 6
... ...61 Storing patterns ...63 Adjusting the thread tension ...64 Resewing ...65 Thread runs out partway through a design...65 Stopping while embroidering ...66 Bobbin Case Adjustment 68 Correct tension...68 Bobbin thread is loose...68 Bobbin thread is tight ...68 APPENDIX 69 Care and ...Maintenance ...70 Cleaning the machine surface ...70 Cleaning the race ...70 Attaching the Embroidery Foot 72 Attaching the embroidery Foot "Q" ...72 Troubleshooting ...74 Error messages ...
... ...61 Storing patterns ...63 Adjusting the thread tension ...64 Resewing ...65 Thread runs out partway through a design...65 Stopping while embroidering ...66 Bobbin Case Adjustment 68 Correct tension...68 Bobbin thread is loose...68 Bobbin thread is tight ...68 APPENDIX 69 Care and ...Maintenance ...70 Cleaning the machine surface ...70 Cleaning the race ...70 Attaching the Embroidery Foot 72 Attaching the embroidery Foot "Q" ...72 Troubleshooting ...74 Error messages ...

Users Manual - English
Page 7
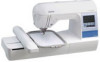
... of the various functions. d Embroidery You can start embroiderying without pulling up the bobbin thread (page 28). Before using the machine, carefully read the "IMPORTANT SAFETY INSTRUCTIONS", and then study this manual for purchasing this manual, store it where it can be... wound with thread (page 24). In addition, after embroidering (page 51). c Automatic thread cutting The thread can quickly be accessed for future reference. b Quick-set bobbin You can embroider built-in embroidery patterns, characters, framed decorations, and designs from optional embroidery...
... of the various functions. d Embroidery You can start embroiderying without pulling up the bobbin thread (page 28). Before using the machine, carefully read the "IMPORTANT SAFETY INSTRUCTIONS", and then study this manual for purchasing this manual, store it where it can be... wound with thread (page 24). In addition, after embroidering (page 51). c Automatic thread cutting The thread can quickly be accessed for future reference. b Quick-set bobbin You can embroider built-in embroidery patterns, characters, framed decorations, and designs from optional embroidery...

Users Manual - English
Page 11
... foot section Right-side/rear view a Thread guide disk Pass the thread through the thread guide disk when using the needle threader to turn the machine on the power supply cord into the bobbin case. c Needle plate When the needle is used . e Bobbin cover/bobbin case Remove the bobbin cover..., and then insert the bobbin into the power supply jack. Do not cover the air vent while the machine is being used for embroidering. Memo z Refer to pages 8 through the needle bar thread guide. b Needle bar thread guide Pass the upper thread through 11 while you...
... foot section Right-side/rear view a Thread guide disk Pass the thread through the thread guide disk when using the needle threader to turn the machine on the power supply cord into the bobbin case. c Needle plate When the needle is used . e Bobbin cover/bobbin case Remove the bobbin cover..., and then insert the bobbin into the power supply jack. Do not cover the air vent while the machine is being used for embroidering. Memo z Refer to pages 8 through the needle bar thread guide. b Needle bar thread guide Pass the upper thread through 11 while you...
Users Manual - English
Page 12
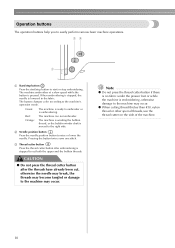
... a slow speed while the button is lowered in the fabric. The button changes color according to easily perform various basic machine operations. Red: The machine can not embroider. Pressing the button twice sews one stitch. z When cutting thread thicker than #30, nylon thread or other special threads, use the thread cutter on the...
... a slow speed while the button is lowered in the fabric. The button changes color according to easily perform various basic machine operations. Red: The machine can not embroider. Pressing the button twice sews one stitch. z When cutting thread thicker than #30, nylon thread or other special threads, use the thread cutter on the...

Users Manual - English
Page 15
... embroidery unit 15 Removing the embroidery unit 16 Turning the Machine On/Off 18 Power supply precautions 18 Turning on the machine 19 Turning off the machine 19 LCD (Liquid Crystal Display) Operation 20 Viewing the LCD 20 Changing the machine settings 21 Checking machine operating procedures 23 Winding/Installing the Bobbin 24 Bobbin precautions... needle threader 34 Replacing the Needle 35 Needle precautions 35 Checking the needle 35 Replacing the needle 36 1 GETTING READY The various preparations to start embroidering are described in this chapter.
... embroidery unit 15 Removing the embroidery unit 16 Turning the Machine On/Off 18 Power supply precautions 18 Turning on the machine 19 Turning off the machine 19 LCD (Liquid Crystal Display) Operation 20 Viewing the LCD 20 Changing the machine settings 21 Checking machine operating procedures 23 Winding/Installing the Bobbin 24 Bobbin precautions... needle threader 34 Replacing the Needle 35 Needle precautions 35 Checking the needle 35 Replacing the needle 36 1 GETTING READY The various preparations to start embroidering are described in this chapter.
Users Manual - English
Page 23
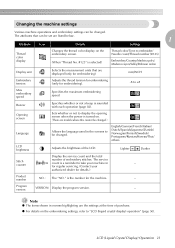
...stitches. is sounded with each operation (page 82). LCD (Liquid Crystal Display) Operation 21 authorized dealer for embroidering). -8 to take your machine in the screens to "LCD (liquid crystal display) operation" (page 50). mm/INCH Embroidery tension Adjusts the thread...to display the opening screen when the power is a reminder to +8 Max embroidery speed Specifies the maximum embroidering speed. Changing the machine settings Various machine operations and embroidery settings can be set are listed below. 1 Attribute Icon Details Settings Thread color display ...
...stitches. is sounded with each operation (page 82). LCD (Liquid Crystal Display) Operation 21 authorized dealer for embroidering). -8 to take your machine in the screens to "LCD (liquid crystal display) operation" (page 50). mm/INCH Embroidery tension Adjusts the thread...to display the opening screen when the power is a reminder to +8 Max embroidery speed Specifies the maximum embroidering speed. Changing the machine settings Various machine operations and embroidery settings can be set are listed below. 1 Attribute Icon Details Settings Thread color display ...
Users Manual - English
Page 24
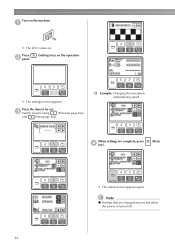
Press b panel. (Settings key) on the machine. Note z Settings that are changed are complete, press d key). (Back X The initial screen appears again. GETTING READY Turn on the operation X The settings screen appears. c Switch screens using (Previous page key) and (Next page key). † Example: Changing the maximum embroidering speed When settings are not lost when the power is turned off. 22 a X The LCD comes on. Press the item to be set.
Press b panel. (Settings key) on the machine. Note z Settings that are changed are complete, press d key). (Back X The initial screen appears again. GETTING READY Turn on the operation X The settings screen appears. c Switch screens using (Previous page key) and (Next page key). † Example: Changing the maximum embroidering speed When settings are not lost when the power is turned off. 22 a X The LCD comes on. Press the item to be set.
Users Manual - English
Page 36
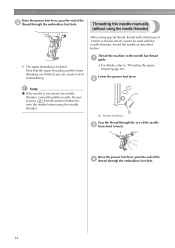
... Raise the presser foot lever, pass the end of the d thread through the embroidery foot hole. 34 Thread the machine to the needle bar thread a guide. • For details, refer to start embroidering. When using the needle threader. 1 a Pressor foot lever Pass the thread through the eye of 130/20 or thicker...
... Raise the presser foot lever, pass the end of the d thread through the embroidery foot hole. 34 Thread the machine to the needle bar thread a guide. • For details, refer to start embroidering. When using the needle threader. 1 a Pressor foot lever Pass the thread through the eye of 130/20 or thicker...
Users Manual - English
Page 37
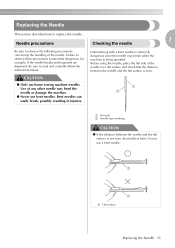
Replacing the Needle This section describes how to read and carefully follow the instructions below. Do not use home sewing machine needles. Before using the needle, place the flat side of the needle. Be sure to replace the needle. Needle precautions 1 ... to observe these precautions is extremely dangerous, for example, if the needle breaks and fragments are dispersed. Embroidering with a bent needle is extremely dangerous since the needle may bend the needle or damage the machine. ● Never use bent needles. CAUTION ● Only use a bent needle. 1 1 a Flat ...
Replacing the Needle This section describes how to read and carefully follow the instructions below. Do not use home sewing machine needles. Before using the needle, place the flat side of the needle. Be sure to replace the needle. Needle precautions 1 ... to observe these precautions is extremely dangerous, for example, if the needle breaks and fragments are dispersed. Embroidering with a bent needle is extremely dangerous since the needle may bend the needle or damage the machine. ● Never use bent needles. CAUTION ● Only use a bent needle. 1 1 a Flat ...
Users Manual - English
Page 38
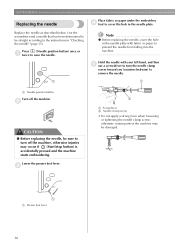
... • Do not apply a strong force when loosening or tightening the needle clamp screw, otherwise certain parts of the machine may occur if (Start/stop button) is accidentally pressed and the machine starts embroidering. GETTING READY Replacing the needle Place fabric or paper under the embroidery d foot to cover the hole in "Checking...
... • Do not apply a strong force when loosening or tightening the needle clamp screw, otherwise certain parts of the machine may occur if (Start/stop button) is accidentally pressed and the machine starts embroidering. GETTING READY Replacing the needle Place fabric or paper under the embroidery d foot to cover the hole in "Checking...

Users Manual - English
Page 42
... thread, use (Needle position button) to raise the needle. The needle may result in injury. ● Be careful when embroidering overlapping patterns. Not using a stabilizer may not easily pierce the fabric, causing the needle to the embroidery unit, and use...accessories" (page 7). What to prepare The following is necessary for embroidering. ■ Stabilizer material Attach a stabilizer material for embroidery machines. We recommend stabilizer material for embroidering. CAUTION ● Do not embroider fabrics that matches the size of fabric a little larger than the...
... thread, use (Needle position button) to raise the needle. The needle may result in injury. ● Be careful when embroidering overlapping patterns. Not using a stabilizer may not easily pierce the fabric, causing the needle to the embroidery unit, and use...accessories" (page 7). What to prepare The following is necessary for embroidering. ■ Stabilizer material Attach a stabilizer material for embroidery machines. We recommend stabilizer material for embroidering. CAUTION ● Do not embroider fabrics that matches the size of fabric a little larger than the...
Users Manual - English
Page 43
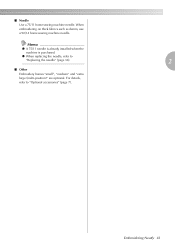
When embroidering on thick fabrics such as denim, use a 90/14 home sewing machine needle. z When replacing the needle, refer to "Optional accessories" (page 7). Memo z A 75/11 needle is already installed when the machine is purchased. For details, refer to "Replacing the needle" (page 36). 2 ■ Other Embroidery frames "small", "medium" and "extra large (multi-position)" are optional. Embroidering Neatly 41 ■ Needle Use a 75/11 home sewing machine needle.
When embroidering on thick fabrics such as denim, use a 90/14 home sewing machine needle. z When replacing the needle, refer to "Optional accessories" (page 7). Memo z A 75/11 needle is already installed when the machine is purchased. For details, refer to "Replacing the needle" (page 36). 2 ■ Other Embroidery frames "small", "medium" and "extra large (multi-position)" are optional. Embroidering Neatly 41 ■ Needle Use a 75/11 home sewing machine needle.

Users Manual - English
Page 51
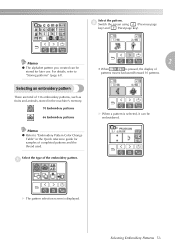
... 54). 2 infringement of copyright law and is strictly prohibited. ■ Embroidery card (sold separately)" (page 55). ■ Patterns stored in the machine's memory Patterns, such as squares and circles, can be combined with 12 stitch types. Embroidery pattern types • For details, refer to "Using an... embroidery An embroidery pattern can be selected from an embroidery card can be embroidered. Patterns consisting of up to 12 patterns or 512 KB can be stored in the machine's memory to be stored. • For details, refer to "Storing patterns" (page 63...
... 54). 2 infringement of copyright law and is strictly prohibited. ■ Embroidery card (sold separately)" (page 55). ■ Patterns stored in the machine's memory Patterns, such as squares and circles, can be combined with 12 stitch types. Embroidery pattern types • For details, refer to "Using an... embroidery An embroidery pattern can be selected from an embroidery card can be embroidered. Patterns consisting of up to 12 patterns or 512 KB can be stored in the machine's memory to be stored. • For details, refer to "Storing patterns" (page 63...
Users Manual - English
Page 53
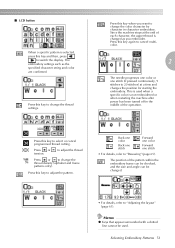
... of the pattern within the embroidery frame can be checked, and the size and angle can be used when a specific color is not embroidered or when restarting the machine after power has been turned off in character embroidery. Press this key to select or cancel programmed thread cutting. Press this key to...
... of the pattern within the embroidery frame can be checked, and the size and angle can be used when a specific color is not embroidered or when restarting the machine after power has been turned off in character embroidery. Press this key to select or cancel programmed thread cutting. Press this key to...
Users Manual - English
Page 55
X The pattern selection screen is pressed, the display of the embroidery pattern. X When a pattern is selected, it can be embroidered. Memo z The alphabet pattern you created can be stored for samples of completed patterns and the thread used. a 2 • When / ... Quick reference guide for later use. Selecting an embroidery pattern There are total of 136 embroidery patterns, such as fruits and animals, stored in the machine's memory. 70 Embroidery patterns 66 Embroidery patterns Memo z Refer to "Storing patterns" (page 63). b Switch the screen using (Previous page key...
X The pattern selection screen is pressed, the display of the embroidery pattern. X When a pattern is selected, it can be embroidered. Memo z The alphabet pattern you created can be stored for samples of completed patterns and the thread used. a 2 • When / ... Quick reference guide for later use. Selecting an embroidery pattern There are total of 136 embroidery patterns, such as fruits and animals, stored in the machine's memory. 70 Embroidery patterns 66 Embroidery patterns Memo z Refer to "Storing patterns" (page 63). b Switch the screen using (Previous page key...
Users Manual - English
Page 57
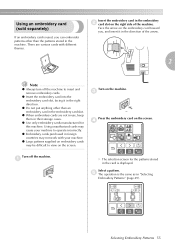
...card into the embroidery card slot, facing it in the card is used, you can embroider patterns other than the patterns stored in the machine. z When embroidery cards are various cards with your machine to view on the right side of the arrow. 2 Note z Always turn off the... slot on the screen. Turn on the screen. Insert the embroidery card in the embroidery card slot. Using unauthorized cards may cause your machine. z Embroidery cards purchased in "Selecting Embroidery Patterns" (page 49). e The operation is the same as in foreign countries may be difficult...
...card into the embroidery card slot, facing it in the card is used, you can embroider patterns other than the patterns stored in the machine. z When embroidery cards are various cards with your machine to view on the right side of the arrow. 2 Note z Always turn off the... slot on the screen. Turn on the screen. Insert the embroidery card in the embroidery card slot. Using unauthorized cards may cause your machine. z Embroidery cards purchased in "Selecting Embroidery Patterns" (page 49). e The operation is the same as in foreign countries may be difficult...

Users Manual - English
Page 58
This section describes the steps for use with this machine. See the explanation of the needle and thread being used. z Do not leave objects in the bobbin. z When embroidering on large garments (especially jackets or other than those listed above, the pattern may strike the object ... below. Otherwise, the embroidery unit cannot move freely, and the pattern may not yield optimum results. Embroidering attractive finishes There are done, you use with this machine. Use embroidery bobbin thread intended for use threads other heavy fabrics), do not let the fabric hang ...
This section describes the steps for use with this machine. See the explanation of the needle and thread being used. z Do not leave objects in the bobbin. z When embroidering on large garments (especially jackets or other than those listed above, the pattern may strike the object ... below. Otherwise, the embroidery unit cannot move freely, and the pattern may not yield optimum results. Embroidering attractive finishes There are done, you use with this machine. Use embroidery bobbin thread intended for use threads other heavy fabrics), do not let the fabric hang ...

Accessory Catalog
Page 34
..., 2500D, 1500D, 1200 series, PC and ULT series machines and the PE-400D and Innov-is 500D. Brother Embroidery Accessories PacesetterTM Polyester Threads 65 Brother Country Yarn Embroidery Threads Metallic Threads For the best embroidery results, use these embroidery threads especially designed for Brother sewing and embroidering machines. 61 Color Thread Set with Wooden Rack ETKSP999 PacesetterTM...
..., 2500D, 1500D, 1200 series, PC and ULT series machines and the PE-400D and Innov-is 500D. Brother Embroidery Accessories PacesetterTM Polyester Threads 65 Brother Country Yarn Embroidery Threads Metallic Threads For the best embroidery results, use these embroidery threads especially designed for Brother sewing and embroidering machines. 61 Color Thread Set with Wooden Rack ETKSP999 PacesetterTM...


