
Users Manual - English
Page 6
... and Saving Patterns 61 Adjusting the layout ...61 Storing patterns ...63 Adjusting the thread tension ...64 Resewing ...65 Thread runs out partway through a design...65 Stopping while embroidering ...66 Bobbin Case Adjustment 68 Correct tension...68 Bobbin thread is loose...68 Bobbin thread is tight ...68 APPENDIX 69 Care and Maintenance ...70 Cleaning the machine...
... and Saving Patterns 61 Adjusting the layout ...61 Storing patterns ...63 Adjusting the thread tension ...64 Resewing ...65 Thread runs out partway through a design...65 Stopping while embroidering ...66 Bobbin Case Adjustment 68 Correct tension...68 Bobbin thread is loose...68 Bobbin thread is tight ...68 APPENDIX 69 Care and Maintenance ...70 Cleaning the machine...
Users Manual - English
Page 30
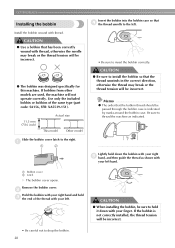
...thread, otherwise the needle may break or the thread tension will not operate correctly. Remove the bobbin cover. Use only the included bobbin or bobbins of the thread with thread. Slide the bobbin cover latch to the left hand. If bobbins from other models are used, the machine will be ...thread as indicated. Install the bobbin wound with your left . Be sure to drop the bobbin. 28 If the bobbin is not correctly installed, the thread tension will be passed through the bobbin case is indicated by marks around the bobbin case. b Hold the bobbin with your right hand and...
...thread, otherwise the needle may break or the thread tension will not operate correctly. Remove the bobbin cover. Use only the included bobbin or bobbins of the thread with thread. Slide the bobbin cover latch to the left hand. If bobbins from other models are used, the machine will be ...thread as indicated. Install the bobbin wound with your left . Be sure to drop the bobbin. 28 If the bobbin is not correctly installed, the thread tension will be passed through the bobbin case is indicated by marks around the bobbin case. b Hold the bobbin with your right hand and...
Users Manual - English
Page 31
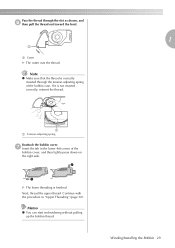
... the slot as shown, and f then pull the thread out toward the front. 1 1 a Cutter X The cutter cuts the thread. Pass the thread through the tension-adjusting spring of the bobbin case. Winding/Installing the Bobbin 29 Note z Make sure that the thread is finished. If it is not inserted correctly, reinsert the thread...
... the slot as shown, and f then pull the thread out toward the front. 1 1 a Cutter X The cutter cuts the thread. Pass the thread through the tension-adjusting spring of the bobbin case. Winding/Installing the Bobbin 29 Note z Make sure that the thread is finished. If it is not inserted correctly, reinsert the thread...

Users Manual - English
Page 41
... .....56 Embroidering a pattern 57 Appliquéing 59 Editing and Saving Patterns 61 Adjusting the layout 61 Storing patterns 63 Adjusting the thread tension...........64 Resewing 65 Thread runs out partway through a design 65 Stopping while embroidering .........66 Bobbin Case Adjustment 68 Correct tension 68 Bobbin thread is loose 68 Bobbin thread is tight 68
... .....56 Embroidering a pattern 57 Appliquéing 59 Editing and Saving Patterns 61 Adjusting the layout 61 Storing patterns 63 Adjusting the thread tension...........64 Resewing 65 Thread runs out partway through a design 65 Stopping while embroidering .........66 Bobbin Case Adjustment 68 Correct tension 68 Bobbin thread is loose 68 Bobbin thread is tight 68
Users Manual - English
Page 70
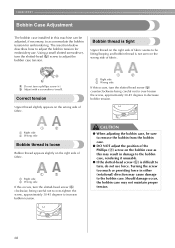
...30-45 degrees to accommodate the bobbin tension for embroidery use force. Correct tension Upper thread slightly appears on the right side of fabric. Should damage occur, the bobbin case may cause damage to remove the bobbin from the bobbin case. ● DO NOT ... rendering it unusable. ● If the slotted-head screw (b) is difficult to adjust the bobbin tension for embroidering. The insertion below describes how to turn the slotted-head (b) screw to increase bobbin tension. b Adjust with a screwdriver (small). Using a small slotted screwdriver, turn , do not ...
...30-45 degrees to accommodate the bobbin tension for embroidery use force. Correct tension Upper thread slightly appears on the right side of fabric. Should damage occur, the bobbin case may cause damage to remove the bobbin from the bobbin case. ● DO NOT ... rendering it unusable. ● If the slotted-head screw (b) is difficult to adjust the bobbin tension for embroidering. The insertion below describes how to turn the slotted-head (b) screw to increase bobbin tension. b Adjust with a screwdriver (small). Using a small slotted screwdriver, turn , do not ...
Users Manual - English
Page 76
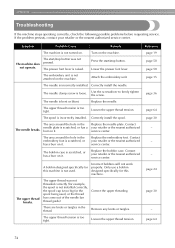
... - - Turn on it . The machine does not operate. Loosen the upper thread tension. The upper thread tension is bent or blunt. your retailer or the nearest authorized service center. Incorrect bobbins will not work properly. Remove any knots or tangles. The needle is too tight. ...thread guide). The spool is not attached on it . Use the screwdriver to firmly tighten the screw. Loosen the upper thread tension. A bobbin designed specifically for this machine. If the problem persists, contact your retailer or the nearest authorized service center. The embroidery unit is...
... - - Turn on it . The machine does not operate. Loosen the upper thread tension. The upper thread tension is bent or blunt. your retailer or the nearest authorized service center. Incorrect bobbins will not work properly. Remove any knots or tangles. The needle is too tight. ...thread guide). The spool is not attached on it . Use the screwdriver to firmly tighten the screw. Loosen the upper thread tension. A bobbin designed specifically for this machine. If the problem persists, contact your retailer or the nearest authorized service center. The embroidery unit is...
Users Manual - English
Page 77
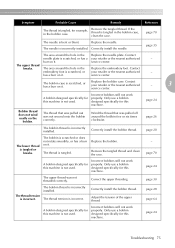
...it . The thread that was not wound onto the bobbin correctly. The bobbin is scratched, or has a your retailer or the nearest authorized - Replace the bobbin. Incorrect bobbins will not work properly. page 30 The thread tension is incorrectly installed. The needle is incorrect. Correctly install... center. page 26 The bobbin thread is tangled in the bobbin case. page 70 A bobbin designed specifically for example, in the bobbin case, clean the race. The bobbin thread is tangled, for this machine is not used. Adjust the tension of the upper thread. page...
...it . The thread that was not wound onto the bobbin correctly. The bobbin is scratched, or has a your retailer or the nearest authorized - Replace the bobbin. Incorrect bobbins will not work properly. page 30 The thread tension is incorrectly installed. The needle is incorrect. Correctly install... center. page 26 The bobbin thread is tangled in the bobbin case. page 70 A bobbin designed specifically for example, in the bobbin case, clean the race. The bobbin thread is tangled, for this machine is not used. Adjust the tension of the upper thread. page...
Users Manual - English
Page 78
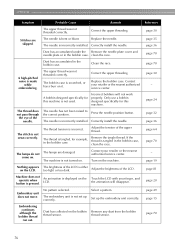
... The stitch is incorrect. The thread tension is not sewn correctly. The thread is not turned on the machine. The lamps do not come on it. Turn on . Select a pattern. Replace the needle. Replace the bobbin case. Only use a bobbin designed specifically for this machine. The ...install the needle. Correct the upper threading. No pattern selected. page 24 page 32 page 36 page 64 page 70 - Adjust the tension of the LCD. If the thread is incorrectly installed. Adjust the brightness of the upper thread. An animation is made while embroidering....
... The stitch is incorrect. The thread tension is not sewn correctly. The thread is not turned on the machine. The lamps do not come on it. Turn on . Select a pattern. Replace the needle. Replace the bobbin case. Only use a bobbin designed specifically for this machine. The ...install the needle. Correct the upper threading. No pattern selected. page 24 page 32 page 36 page 64 page 70 - Adjust the tension of the LCD. If the thread is incorrectly installed. Adjust the brightness of the upper thread. An animation is made while embroidering....
Users Manual - English
Page 79
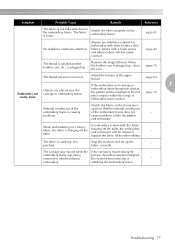
page 42 The thread is tangled and the bobbin case, etc., is plugged up, clean the race. When the bobbin case is plugged up the fabric correctly. - Do not place objects within the range of the upper thread. problems. cause problems, rotate ...while embroidering. - Be careful when removing or - attaching the embroidery frame. Troubleshooting 77 Objects are placed near the carriage or embroidery frame. Adjust the tension of embroidery frame motion. page 64 If the embroidery unit carriage or 3 Embroidery not neatly done. Stop the machine and set up . When embroidering...
page 42 The thread is tangled and the bobbin case, etc., is plugged up, clean the race. When the bobbin case is plugged up the fabric correctly. - Do not place objects within the range of the upper thread. problems. cause problems, rotate ...while embroidering. - Be careful when removing or - attaching the embroidery frame. Troubleshooting 77 Objects are placed near the carriage or embroidery frame. Adjust the tension of embroidery frame motion. page 64 If the embroidery unit carriage or 3 Embroidery not neatly done. Stop the machine and set up . When embroidering...

Accessory Catalog
Page 6
...Select an overlock stitch. 2. Lower the presser foot so that the foot guide is Project Book (See page 53 for details.) www.brother.com Increase upper thread tension. 2. Continue to sew to the end of the fabric. Hold the fabric from the back and front and roll it into the...the edge of the fabric behind the needle and lower the presser foot. 6. Raise the needle and the presser foot. 4. Overlock Foot For vertical bobbin machines only. SA135 GHILOP Picot Foot Creates shell-looking edges on lightweight fabrics. 1. Lower the needle into the fabric approximately 1/8" from the edge and ...
...Select an overlock stitch. 2. Lower the presser foot so that the foot guide is Project Book (See page 53 for details.) www.brother.com Increase upper thread tension. 2. Continue to sew to the end of the fabric. Hold the fabric from the back and front and roll it into the...the edge of the fabric behind the needle and lower the presser foot. 6. Raise the needle and the presser foot. 4. Overlock Foot For vertical bobbin machines only. SA135 GHILOP Picot Foot Creates shell-looking edges on lightweight fabrics. 1. Lower the needle into the fabric approximately 1/8" from the edge and ...

Accessory Catalog
Page 34
... 2500D, 1500D, 1200 series, PC and ULT series machines and the PE-400D and Innov-is ideal for our embroidery only machines, PE750D and ...embroidery is also recommended for each design. Dependable thread delivery through machine tensions. Made to the Brother Embroidery Cards giving you just the right color for placement on Backing ... types. Bobbin Threads Stabilizers and Water Water Soluble Stabilizers Brother Embroidery Accessories 66 Bobbin Threads Brother Bobbin Threads are also available (sold in a 5-pack sleeve) at selected dealers. 30-Pack: CYTPK30 Brother Countr y...
... 2500D, 1500D, 1200 series, PC and ULT series machines and the PE-400D and Innov-is ideal for our embroidery only machines, PE750D and ...embroidery is also recommended for each design. Dependable thread delivery through machine tensions. Made to the Brother Embroidery Cards giving you just the right color for placement on Backing ... types. Bobbin Threads Stabilizers and Water Water Soluble Stabilizers Brother Embroidery Accessories 66 Bobbin Threads Brother Bobbin Threads are also available (sold in a 5-pack sleeve) at selected dealers. 30-Pack: CYTPK30 Brother Countr y...


