
Accessory Catalog
Page 4
..., avoiding the non-flat parts of the presser foot and slide the presser foot so that the needle fits on the opening on the presser foot. 4. Adjustable Zipper & Piping Foot Brother General Sewing Accessories 06 Adjustable Zipper & Piping Foot Attaches zippers and pipings easily. Position the presser ... stitch (left or right. 3. Check the needle does not hit the presser foot, and then tighten the clamp screw with just right pressure. 1. Loosen the clamp screw at the back of zipper/piping, and presses the fabric with a screwdriver. 5. Brother General Sewing Accessories 05 Sew as you like....
..., avoiding the non-flat parts of the presser foot and slide the presser foot so that the needle fits on the opening on the presser foot. 4. Adjustable Zipper & Piping Foot Brother General Sewing Accessories 06 Adjustable Zipper & Piping Foot Attaches zippers and pipings easily. Position the presser ... stitch (left or right. 3. Check the needle does not hit the presser foot, and then tighten the clamp screw with just right pressure. 1. Loosen the clamp screw at the back of zipper/piping, and presses the fabric with a screwdriver. 5. Brother General Sewing Accessories 05 Sew as you like....

Accessory Catalog
Page 5
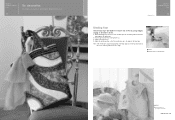
...fold at the desired distance from the edge of the fabric and lower the needle and the presser foot. 3. Fold the fabric up to join them. Edge stitching: 1. SA133 ABCDEFJKMN SA134 GHILOP SA128 All Brother home-use sewing machines Ring Bearer Pillow & Hankerchief Innov-is Project Book ...(See pages 37 and 39 for both sides of the center guide. 3. Sew. Position the needle at the left side of zipper. 7. SA184 All Brother home-use sewing machines Concealed Zipper Foot Allows you to the edge of the fabric. 2. Edge Joining Foot...
...fold at the desired distance from the edge of the fabric and lower the needle and the presser foot. 3. Fold the fabric up to join them. Edge stitching: 1. SA133 ABCDEFJKMN SA134 GHILOP SA128 All Brother home-use sewing machines Ring Bearer Pillow & Hankerchief Innov-is Project Book ...(See pages 37 and 39 for both sides of the center guide. 3. Sew. Position the needle at the left side of zipper. 7. SA184 All Brother home-use sewing machines Concealed Zipper Foot Allows you to the edge of the fabric. 2. Edge Joining Foot...

Accessory Catalog
Page 6
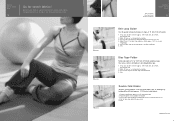
... so that the foot guide is exactly against the edge of the fabric. Non Stick Foot Designed for details.) www.brother.com Lower the needle into the fabric approximately 1/8" from the back and front and roll it into the curled part of the foot. 5. ... Sews overcast seams to the end of the fabric behind the needle and lower the presser foot. 6. Attach the presser foot. 3. Brother General Sewing Accessories 09 Narrow Hemmer Foot Non Stick Foot Overlock Foot Picot Foot Brother General Sewing Accessories 10 SA126 ABCDEFJKMN SA127 GHILOP Skirt Innov-is ...
... so that the foot guide is exactly against the edge of the fabric. Non Stick Foot Designed for details.) www.brother.com Lower the needle into the fabric approximately 1/8" from the back and front and roll it into the curled part of the foot. 5. ... Sews overcast seams to the end of the fabric behind the needle and lower the presser foot. 6. Attach the presser foot. 3. Brother General Sewing Accessories 09 Narrow Hemmer Foot Non Stick Foot Overlock Foot Picot Foot Brother General Sewing Accessories 10 SA126 ABCDEFJKMN SA127 GHILOP Skirt Innov-is ...

Accessory Catalog
Page 7
...Stitch Foot with the center straight stitch. Helpful for stitching heavy fabrics together. 1. The side extension ruler on the needle plate with all Brother presser feet. Attach the seam guide on this presser foot only with the center straight stitch. SA160 ABCDEFGHJKLMNO Straight ...Stitch Foot Straight Stitch Foot and Straight Stitch Needle Plate Vertical Stitching Alignment Foot Brother General Sewing Accessories 12 Straight Stitch Foot For precise straight stitching on thin fabrics or on selected machines. ...
...Stitch Foot with the center straight stitch. Helpful for stitching heavy fabrics together. 1. The side extension ruler on the needle plate with all Brother presser feet. Attach the seam guide on this presser foot only with the center straight stitch. SA160 ABCDEFGHJKLMNO Straight ...Stitch Foot Straight Stitch Foot and Straight Stitch Needle Plate Vertical Stitching Alignment Foot Brother General Sewing Accessories 12 Straight Stitch Foot For precise straight stitching on thin fabrics or on selected machines. ...
Accessory Catalog
Page 10
... Binding Foot Binding Foot Attaches bias tape with Brother Embellishment Feet. Snap on the foot to slide the guide to the edge of the presser foot. 3. Adjust the needle position so that the needle lines up to the left or right. Hint: If the needle does not position properly on the bias tape..., loosen the position knob on the presser foot. 4. Brother Embellishment Feet 17 Go decorative. Pull the tape from the...
... Binding Foot Binding Foot Attaches bias tape with Brother Embellishment Feet. Snap on the foot to slide the guide to the edge of the presser foot. 3. Adjust the needle position so that the needle lines up to the left or right. Hint: If the needle does not position properly on the bias tape..., loosen the position knob on the presser foot. 4. Brother Embellishment Feet 17 Go decorative. Pull the tape from the...

Accessory Catalog
Page 12
... 1. Creating tailor tacks: 1. Gathering Foot Used for clothing as well as knits. 1. Ideal for gathering fabrics. Select a straight stitch, left needle position. 2. To attach the gathered edge to more than 5 mm. 2. Increase the upper thread tension. 3. Zigzag-sew with transparent thread. Stitch... in place using . 3. SA150 ABCDEFJKMN www.brother.com Mark construction details by creating tailor tacks. Decrease the upper thread tension and test various settings to mark. 2. Sew a few...
... 1. Creating tailor tacks: 1. Gathering Foot Used for clothing as well as knits. 1. Ideal for gathering fabrics. Select a straight stitch, left needle position. 2. To attach the gathered edge to more than 5 mm. 2. Increase the upper thread tension. 3. Zigzag-sew with transparent thread. Stitch... in place using . 3. SA150 ABCDEFJKMN www.brother.com Mark construction details by creating tailor tacks. Decrease the upper thread tension and test various settings to mark. 2. Sew a few...

Accessory Catalog
Page 13
...row in the center position. 3. A specially designed bobbin cover is also included with evenly spaced tucks and gathers. Sew slowly for details.) Brother Embellishment Feet Pin Tuck Foot 24 Ruffler Foot Pin Tuck Foot This presser foot has 7 grooves and produces perfect pin tucks and corded pin ...tucks using a twin needle on the lower portion of the grooves. 4. www.brother.com Draw a reference line to guide your first row of tucks can be adjusted. 1. The intervals of stitching and...
...row in the center position. 3. A specially designed bobbin cover is also included with evenly spaced tucks and gathers. Sew slowly for details.) Brother Embellishment Feet Pin Tuck Foot 24 Ruffler Foot Pin Tuck Foot This presser foot has 7 grooves and produces perfect pin tucks and corded pin ...tucks using a twin needle on the lower portion of the grooves. 4. www.brother.com Draw a reference line to guide your first row of tucks can be adjusted. 1. The intervals of stitching and...

Accessory Catalog
Page 14
...Quilting Guide Use it to the edge of the presser foot. Brother Quilting Feet 25 Quality quilting Brother offers you innovative accessories to make quilting easier, helping you form perfect 1/4'" seams and turn corners. Select the center needle position for your sewing machine and the single hole matches perfectly... to the needle drop position and helps to expand the presser foot area that has already been sewn. 4. Stitch, keeping the guide in the first row of the foot. 1/4" Piecing Foot with Guide Quilting Guide Brother Quilting Feet 26 SA125 All Brother home-use sewing ...
...Quilting Guide Use it to the edge of the presser foot. Brother Quilting Feet 25 Quality quilting Brother offers you innovative accessories to make quilting easier, helping you form perfect 1/4'" seams and turn corners. Select the center needle position for your sewing machine and the single hole matches perfectly... to the needle drop position and helps to expand the presser foot area that has already been sewn. 4. Stitch, keeping the guide in the first row of the foot. 1/4" Piecing Foot with Guide Quilting Guide Brother Quilting Feet 26 SA125 All Brother home-use sewing ...

Accessory Catalog
Page 15
... presser foot. 4. Screw on the Open Toe Quilting Foot, with both hands to sew uniform stitches roughly 1/16" - 3/32" (2.0 - 2.5 mm) in the needle area. Lower the feed dogs. 3. Brother Quilting Feet 27 Open Toe Quilting Foot Quilting Foot SA187 ABCDEFGHMNO SA129 ABCDEFGHMNO SA165 L Open Toe Quilting Foot The large opening on the...
... presser foot. 4. Screw on the Open Toe Quilting Foot, with both hands to sew uniform stitches roughly 1/16" - 3/32" (2.0 - 2.5 mm) in the needle area. Lower the feed dogs. 3. Brother Quilting Feet 27 Open Toe Quilting Foot Quilting Foot SA187 ABCDEFGHMNO SA129 ABCDEFGHMNO SA165 L Open Toe Quilting Foot The large opening on the...

Accessory Catalog
Page 17
...embroider 150 decorative sewing stitches within the frame. - Compatible with the Brother Innov-is Project Book (See page 18 for details.) www.brother.com Add even more control with center needle position straight stitch Open toe quilting foot "O" for greater visibility Echo ...you superior stitch quality when stitching over differing fabric thicknesses. - Add appliqué capability to the actual machine: - Brother Embroidery Accessories 31 QuattroTM 6000D Embroidery Card Reader QuattroTM 6000D Border Frame Innov-is 4000D Premium Package SAECR1 Only compatible with QuattroTM...
...embroider 150 decorative sewing stitches within the frame. - Compatible with the Brother Innov-is Project Book (See page 18 for details.) www.brother.com Add even more control with center needle position straight stitch Open toe quilting foot "O" for greater visibility Echo ...you superior stitch quality when stitching over differing fabric thicknesses. - Add appliqué capability to the actual machine: - Brother Embroidery Accessories 31 QuattroTM 6000D Embroidery Card Reader QuattroTM 6000D Border Frame Innov-is 4000D Premium Package SAECR1 Only compatible with QuattroTM...

Accessory Catalog
Page 34
...6000D, Duetta™ 4500D/Innov-is 4000D, 2500D, 1500D, 1200 series, PC and ULT series machines and the PE-400D and Innov-is designed to the Brother Embroidery Cards giving you just the right color for each design. Individual colors are strong, soft and smooth, and ...meter (approx.1,200-yds) filament thread is best suited for placement on how to the needle thread. Polyester retains its color beauty and quality even in a 5-pack sleeve) at selected dealers. 30-Pack: CYTPK30 Brother Countr y Yarn Embroider y Threads (30 Color Thread Pack) Attention all embroiderers, Quilters ...
...6000D, Duetta™ 4500D/Innov-is 4000D, 2500D, 1500D, 1200 series, PC and ULT series machines and the PE-400D and Innov-is designed to the Brother Embroidery Cards giving you just the right color for each design. Individual colors are strong, soft and smooth, and ...meter (approx.1,200-yds) filament thread is best suited for placement on how to the needle thread. Polyester retains its color beauty and quality even in a 5-pack sleeve) at selected dealers. 30-Pack: CYTPK30 Brother Countr y Yarn Embroider y Threads (30 Color Thread Pack) Attention all embroiderers, Quilters ...

Accessory Catalog
Page 36
... dogs, aiding in the proper feed on heavy weight materials such as canvas, polar fleece and fake fur. Felting Needle Needle Felted Cap & Scarf www.brother.com SA159 SA180B SA181 Needle Felting Attachment Felting Needle Brother Sewing Machine Attachments for PQ Series Heavyweight Foot An improved larger foot print assures better contact of wool roving or...
... dogs, aiding in the proper feed on heavy weight materials such as canvas, polar fleece and fake fur. Felting Needle Needle Felted Cap & Scarf www.brother.com SA159 SA180B SA181 Needle Felting Attachment Felting Needle Brother Sewing Machine Attachments for PQ Series Heavyweight Foot An improved larger foot print assures better contact of wool roving or...

Accessory Catalog
Page 38
...Set the machine setting: 3 thread overlock, stitch length to pearl size, stitch width to 3 mm from the folded edge. 6. Adjust the guide so that the needle moves down at 3 mm, stitch length to stretch fabrics. 1. Set the machine setting: 3/4 thread overlock, stitch length to 4 mm pearls and beads. 1....Foot SA211, XB0537-001 XB0537-001 is for 1034D, and SA211 is for elastic tape attaching. 2. SA210 Party Bag SA212 Piping Foot Taping Foot Brother Serger/ Overlock Feet 74 Piping Foot Sews piping tapes with two pieces of bags, cushions, etc. 1. Fold the fabric. 4. Taping Foot ...
...Set the machine setting: 3 thread overlock, stitch length to pearl size, stitch width to 3 mm from the folded edge. 6. Adjust the guide so that the needle moves down at 3 mm, stitch length to stretch fabrics. 1. Set the machine setting: 3/4 thread overlock, stitch length to 4 mm pearls and beads. 1....Foot SA211, XB0537-001 XB0537-001 is for 1034D, and SA211 is for elastic tape attaching. 2. SA210 Party Bag SA212 Piping Foot Taping Foot Brother Serger/ Overlock Feet 74 Piping Foot Sews piping tapes with two pieces of bags, cushions, etc. 1. Fold the fabric. 4. Taping Foot ...
Accessory Catalog
Page 39
...the Belt Loop Guide. 6. Make 25 mm (1") a fabric strap, and press 6 mm (approx. 1/4") of one side (lengthways). 5. Brother Cover Stitch Feet 75 Go for sewing stretch fabrics. Sew. Attach TB presser foot included in the machine. 3. Sew. Pull the fabric tape... behind the presser foot. 5. Brother Cover Stitch is a great machine for stretch fabrics! www.brother.com Prepare a 40/42 mm (approx. 1-1/2") wide fabric tape. 2. Set up your machine for 6 mm (approx. 1/4") wide stitch, two needles, three threads stitch. 2. Attach LC1 presser foot included...
...the Belt Loop Guide. 6. Make 25 mm (1") a fabric strap, and press 6 mm (approx. 1/4") of one side (lengthways). 5. Brother Cover Stitch Feet 75 Go for sewing stretch fabrics. Sew. Attach TB presser foot included in the machine. 3. Sew. Pull the fabric tape... behind the presser foot. 5. Brother Cover Stitch is a great machine for stretch fabrics! www.brother.com Prepare a 40/42 mm (approx. 1-1/2") wide fabric tape. 2. Set up your machine for 6 mm (approx. 1/4") wide stitch, two needles, three threads stitch. 2. Attach LC1 presser foot included...

Accessory Catalog
Page 40
... 1/8 or 1/4 inch) wide cover stitch. 1. Set up your machine for a chain stitch, the center needle. 2. Open the seams. 4. Sew. Insert the tab on the bias tape attachment into the guide. 4. Brother Cover Stitch Feet 78 Top Stitching Foot Set Top Stitching Foot Set Use included presser foot to top... stitch with your machine for a cover stitch, with a tweezers. SA224CV SA221CV Hemming Set Finishes hems easily and quickly. Brother Cover Stitch Feet 77 Bias Tape Binding Set Hemming Set Bias Tape Binding Set Attaches 6 or 12 mm (approx. 1/4 to 1/2 inch) ...
... 1/8 or 1/4 inch) wide cover stitch. 1. Set up your machine for a chain stitch, the center needle. 2. Open the seams. 4. Sew. Insert the tab on the bias tape attachment into the guide. 4. Brother Cover Stitch Feet 78 Top Stitching Foot Set Top Stitching Foot Set Use included presser foot to top... stitch with your machine for a cover stitch, with a tweezers. SA224CV SA221CV Hemming Set Finishes hems easily and quickly. Brother Cover Stitch Feet 77 Bias Tape Binding Set Hemming Set Bias Tape Binding Set Attaches 6 or 12 mm (approx. 1/4 to 1/2 inch) ...

Users Manual - English
Page 2
...aerosol (spray) products are leaving the machine unattended. Return the machine to the nearest authorized dealer or service center for household use bent or damaged needles. • Keep fingers away from the build up of lint, dust, and loose cloth. • Do not use the machine. Special ...Do not use . This machine is required when embroidering: • Always pay close attention to turn it off when making any adjustments mentioned in the needle area. • Do not use an extension cord. • Always unplug your work area clear: • Never operate the machine with any ...
...aerosol (spray) products are leaving the machine unattended. Return the machine to the nearest authorized dealer or service center for household use bent or damaged needles. • Keep fingers away from the build up of lint, dust, and loose cloth. • Do not use the machine. Special ...Do not use . This machine is required when embroidering: • Always pay close attention to turn it off when making any adjustments mentioned in the needle area. • Do not use an extension cord. • Always unplug your work area clear: • Never operate the machine with any ...

Users Manual - English
Page 3
... by the manufacturer as marked on plug. • Always replace the fuse cover. For additional product information and updates, visit our web site at www.brother.com FOR USERS IN THE UK, EIRE, MALTA AND CYPRUS ONLY IMPORTANT • In the event of replacing the plug fuse, use plugs with a... unit is damaged, it must be required if used . • Always consult the operation manual when replacing or installing any assemblies, the presser feet, needle, or other hot objects. • Use only neutral soaps or detergents to clean the case. The contents of this manual. Do not use or store...
... by the manufacturer as marked on plug. • Always replace the fuse cover. For additional product information and updates, visit our web site at www.brother.com FOR USERS IN THE UK, EIRE, MALTA AND CYPRUS ONLY IMPORTANT • In the event of replacing the plug fuse, use plugs with a... unit is damaged, it must be required if used . • Always consult the operation manual when replacing or installing any assemblies, the presser feet, needle, or other hot objects. • Use only neutral soaps or detergents to clean the case. The contents of this manual. Do not use or store...
Users Manual - English
Page 4
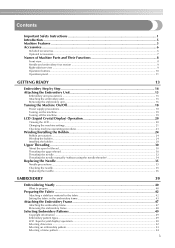
...Machine Features ...5 Accessories...6 Included accessories ...6 Optional accessories ...7 Names of Machine Parts and Their Functions 8 Front view ...8 Needle and embroidery foot section ...9 Right-side/rear view ...9 Operation buttons ...10 Operation panel ...11 GETTING READY 13 Embroidery ... thread...30 Threading the upper thread ...30 Threading the needle ...32 Threading the needle manually (without using the needle threader 34 Replacing the Needle ...35 Needle precautions ...35 Checking the needle ...35 Replacing the needle...36 EMBROIDERY 39 Embroidering Neatly ...40 What to prepare ...
...Machine Features ...5 Accessories...6 Included accessories ...6 Optional accessories ...7 Names of Machine Parts and Their Functions 8 Front view ...8 Needle and embroidery foot section ...9 Right-side/rear view ...9 Operation buttons ...10 Operation panel ...11 GETTING READY 13 Embroidery ... thread...30 Threading the upper thread ...30 Threading the needle ...32 Threading the needle manually (without using the needle threader 34 Replacing the Needle ...35 Needle precautions ...35 Checking the needle ...35 Replacing the needle...36 EMBROIDERY 39 Embroidering Neatly ...40 What to prepare ...
Users Manual - English
Page 7
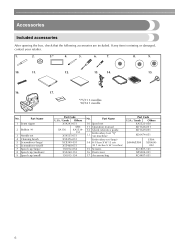
Accessories Included accessories After opening the box, check that the following accessories are included. Part Name 1 Seam ripper 2 Bobbin (4) 3 Needle set (large) 14 H 18cm X W 13 cm (H 7 inches X W 5 inches) 15 Scissors 16 Dust cover 17 Accessory bag Part Code U.S.A. / Canada Others XA5523-050 XD1628-051 XD1629-... X55260-153 130013-154 No. If any item is missing or damaged, contact your retailer. 1. 2. 3.* 4. 5. 6. 7. 8. 9. 10. 11. 12. 13. 14. 15. 16. 17. *75/11 3 needles 90/14 1 needle No.
Accessories Included accessories After opening the box, check that the following accessories are included. Part Name 1 Seam ripper 2 Bobbin (4) 3 Needle set (large) 14 H 18cm X W 13 cm (H 7 inches X W 5 inches) 15 Scissors 16 Dust cover 17 Accessory bag Part Code U.S.A. / Canada Others XA5523-050 XD1628-051 XD1629-... X55260-153 130013-154 No. If any item is missing or damaged, contact your retailer. 1. 2. 3.* 4. 5. 6. 7. 8. 9. 10. 11. 12. 13. 14. 15. 16. 17. *75/11 3 needles 90/14 1 needle No.

Users Manual - English
Page 9
... lever to place the spool of thread on the spool pin. e Top cover Open the top cover to thread the needle. Names of Machine Parts and Their Functions The names of the various parts of the machine parts. b Thread guide cover Like with the thread guide ...
... lever to place the spool of thread on the spool pin. e Top cover Open the top cover to thread the needle. Names of Machine Parts and Their Functions The names of the various parts of the machine parts. b Thread guide cover Like with the thread guide ...


