
Accessory Catalog
Page 13
...evenly spaced by trying different combinations of the presser foot is Project Book (See pages 16 and 17 for most consistent results. www.brother.com Install and manually thread a twin needle. 2. Adjust the amount of tuck or gather by placing the completed row in the center position. 3. ...Draw a reference line to guide your first row of the grooves. 4. Brother Embellishment Feet 23 Bed Runner & Pillowcase Innov-is moved forward, its teeth catch...
...evenly spaced by trying different combinations of the presser foot is Project Book (See pages 16 and 17 for most consistent results. www.brother.com Install and manually thread a twin needle. 2. Adjust the amount of tuck or gather by placing the completed row in the center position. 3. ...Draw a reference line to guide your first row of the grooves. 4. Brother Embellishment Feet 23 Bed Runner & Pillowcase Innov-is moved forward, its teeth catch...

Accessory Catalog
Page 34
...6 yds AB C A (White): SA-EBT B (Black): SAEBT999 C (White only): EBT-PE Christmas Tree Ornament Innov-is designed to be hung on a wide range of colors specifically designed for Brother Embroidery machines, but compatible with a stabilizer. Dependable thread delivery through machine tensions. Out metallic thread... Brother Bobbin Threads are also available (sold in Japan for your sewing counter or can illustrate more of the proper stabilizer helps to last a long time. Individual colors are strong, soft and smooth, and perfectly balanced to hoop your instruction manual ...
...6 yds AB C A (White): SA-EBT B (Black): SAEBT999 C (White only): EBT-PE Christmas Tree Ornament Innov-is designed to be hung on a wide range of colors specifically designed for Brother Embroidery machines, but compatible with a stabilizer. Dependable thread delivery through machine tensions. Out metallic thread... Brother Bobbin Threads are also available (sold in Japan for your sewing counter or can illustrate more of the proper stabilizer helps to last a long time. Individual colors are strong, soft and smooth, and perfectly balanced to hoop your instruction manual ...
Users Manual - English
Page 1
GETTING READY EMBROIDERY APPENDIX Computerized Embroidery Machine Operation Manual
GETTING READY EMBROIDERY APPENDIX Computerized Embroidery Machine Operation Manual
Users Manual - English
Page 2
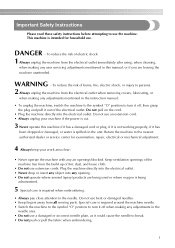
... needle area. • Do not use an extension cord. • Always unplug your machine if the power is cut. 3 Never operate this manual, or if you are being used or where oxygen is being administered. 5 Special care is required when embroidering: • Always pay close attention ... air openings blocked. Plug the machine directly into the electrical outlet. • Never drop or insert any user servicing adjustments mentioned in the instruction manual. • To unplug the machine, switch the machine to the symbol "O" position to persons. 2 Always unplug the machine from the build up...
... needle area. • Do not use an extension cord. • Always unplug your machine if the power is cut. 3 Never operate this manual, or if you are being used or where oxygen is being administered. 5 Special care is required when embroidering: • Always pay close attention ... air openings blocked. Plug the machine directly into the electrical outlet. • Never drop or insert any user servicing adjustments mentioned in the instruction manual. • To unplug the machine, switch the machine to the symbol "O" position to persons. 2 Always unplug the machine from the build up...
Users Manual - English
Page 3
Benzene, thinner, and scouring powders can damage the case and machine, and should contact your local authorized Brother dealer. Use this manual. Use accessories recommended by the manufacturer as contained in this machine only for the plug supplied with a disability. 2 Save these instructions. Never use... persists, please consult your authorized dealer to obtain the correct lead. For additional product information and updates, visit our web site at www.brother.com FOR USERS IN THE UK, EIRE, MALTA AND CYPRUS ONLY IMPORTANT • In the event of replacing the plug fuse, use...
Benzene, thinner, and scouring powders can damage the case and machine, and should contact your local authorized Brother dealer. Use this manual. Use accessories recommended by the manufacturer as contained in this machine only for the plug supplied with a disability. 2 Save these instructions. Never use... persists, please consult your authorized dealer to obtain the correct lead. For additional product information and updates, visit our web site at www.brother.com FOR USERS IN THE UK, EIRE, MALTA AND CYPRUS ONLY IMPORTANT • In the event of replacing the plug fuse, use...
Users Manual - English
Page 4
... Installing the bobbin ...28 Upper Threading ...30 About the spool of thread...30 Threading the upper thread ...30 Threading the needle ...32 Threading the needle manually (without using the needle threader 34 Replacing the Needle ...35 Needle precautions ...35 Checking the needle ...35 Replacing the needle...36 EMBROIDERY 39 Embroidering Neatly...
... Installing the bobbin ...28 Upper Threading ...30 About the spool of thread...30 Threading the upper thread ...30 Threading the needle ...32 Threading the needle manually (without using the needle threader 34 Replacing the Needle ...35 Needle precautions ...35 Checking the needle ...35 Replacing the needle...36 EMBROIDERY 39 Embroidering Neatly...
Users Manual - English
Page 6
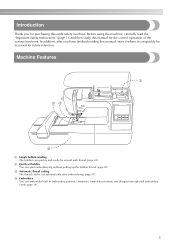
... start embroiderying without pulling up the bobbin thread (page 28). Before using the machine, carefully read the "Important Safety Instructions" (page 1), and then study this manual for purchasing this manual, store it where it can quickly be wound with thread (page 24).
... start embroiderying without pulling up the bobbin thread (page 28). Before using the machine, carefully read the "Important Safety Instructions" (page 1), and then study this manual for purchasing this manual, store it where it can quickly be wound with thread (page 24).
Users Manual - English
Page 7
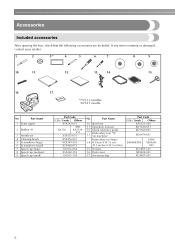
Part Name 10 Spool net 11 Operation manual 12 Quick reference guide 13 Embroidery foot "Q" (on machine) Embroidery set 4 Cleaning brush 5 Screwdriver (large) 6 Screwdriver (small) 7 Spool cap (large) 8 Spool cap (medium) 9 Spool cap (...
Part Name 10 Spool net 11 Operation manual 12 Quick reference guide 13 Embroidery foot "Q" (on machine) Embroidery set 4 Cleaning brush 5 Screwdriver (large) 6 Screwdriver (small) 7 Spool cap (large) 8 Spool cap (medium) 9 Spool cap (...
Users Manual - English
Page 14
... Installing the bobbin 28 Upper Threading ...30 About the spool of thread 30 Threading the upper thread 30 Threading the needle 32 Threading the needle manually (without using the needle threader 34 Replacing the Needle 35 Needle precautions 35 Checking the needle 35 Replacing the needle 36 1 GETTING READY The various...
... Installing the bobbin 28 Upper Threading ...30 About the spool of thread 30 Threading the upper thread 30 Threading the needle 32 Threading the needle manually (without using the needle threader 34 Replacing the Needle 35 Needle precautions 35 Checking the needle 35 Replacing the needle 36 1 GETTING READY The various...
Users Manual - English
Page 24
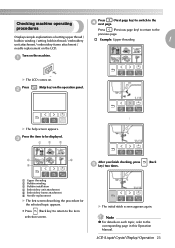
procedures Press (Previous page key) to return to the corresponding page in this Operation Manual. Press b (Help key) on the machine. LCD (Liquid Crystal Display) Operation 23 c 1 2 3 4 6 After you finish checking, press (Back 5 e key) two times. Turn on the operation ...
procedures Press (Previous page key) to return to the corresponding page in this Operation Manual. Press b (Help key) on the machine. LCD (Liquid Crystal Display) Operation 23 c 1 2 3 4 6 After you finish checking, press (Back 5 e key) two times. Turn on the operation ...

Users Manual - English
Page 33
... open the shutter before removing the upper thread, be threaded. z If the needle threader cannot be used with your right hand to "Threading the needle manually (without using your right hand, as shown. 1 a Needle bar thread guide 32 GETTING READY While using the needle threader)" (page 34). Be sure to thread...
... open the shutter before removing the upper thread, be threaded. z If the needle threader cannot be used with your right hand to "Threading the needle manually (without using your right hand, as shown. 1 a Needle bar thread guide 32 GETTING READY While using the needle threader)" (page 34). Be sure to thread...

Users Manual - English
Page 35
... thread the needle. GETTING READY Raise the presser foot lever, pass the end of the e thread through the embroidery foot hole. 34 Threading the needle manually (without using special thread, thread with a thickness of 130/20 or thicker which cannot be used with the needle threader, thread the needle as described...
... thread the needle. GETTING READY Raise the presser foot lever, pass the end of the e thread through the embroidery foot hole. 34 Threading the needle manually (without using special thread, thread with a thickness of 130/20 or thicker which cannot be used with the needle threader, thread the needle as described...
Users Manual - English
Page 84
... 28 bobbin winder 8 LCD button 51 , LCD operation 20 50 3 bobbin winding 24 bobbin winding thread guide 8 M Brother poly #90 bobbin thread 7 buzzer 82 machine settings 21 , main power switch 9 19 C characters 52 maintenance 70 manual needle threading 34 , memory key 11 63 cleaning 70 cleaning brush 6 N D dust cover 6 E , embroidery card 7 55...
... 28 bobbin winder 8 LCD button 51 , LCD operation 20 50 3 bobbin winding 24 bobbin winding thread guide 8 M Brother poly #90 bobbin thread 7 buzzer 82 machine settings 21 , main power switch 9 19 C characters 52 maintenance 70 manual needle threading 34 , memory key 11 63 cleaning 70 cleaning brush 6 N D dust cover 6 E , embroidery card 7 55...


