
Users Manual - English
Page 2
... Do not unplug by the manufacturer as a toy. Special care is being used by or near children. 2. Always use as threading needle, changing needle, threading bobbin, or changing presser foot, and the like. 15. "IMPORTANT SAFETY INSTRUCTIONS" When using a embroidery machine, basic safety precautions... all instructions before using and before changing the light bulb. Use this embroidery machine only for its intended use the proper needle plate. The embroidery machine should always be taken, including the following: "Read all moving parts. Switch the embroidery machine to...
... Do not unplug by the manufacturer as a toy. Special care is being used by or near children. 2. Always use as threading needle, changing needle, threading bobbin, or changing presser foot, and the like. 15. "IMPORTANT SAFETY INSTRUCTIONS" When using a embroidery machine, basic safety precautions... all instructions before using and before changing the light bulb. Use this embroidery machine only for its intended use the proper needle plate. The embroidery machine should always be taken, including the following: "Read all moving parts. Switch the embroidery machine to...

Users Manual - English
Page 4
...and removing the embroidery card. Do not touch the balance wheel, thread take-up, needle, or other parts to inspect and adjust the machine yourself. Do not store your machine turns on the needle while sewing. If the problem persists, please consult your nearest authorized service center. ...or detergents to turn off the power switch and unplug the cord when: ● Operation is complete ● Replacing or removing the needle or any assemblies; needle, or other moving parts. 2. Do not drop or hit the machine. 4. PLEASE READ BEFORE USING YOUR EMBROIDERY MACHINE For safe ...
...and removing the embroidery card. Do not touch the balance wheel, thread take-up, needle, or other parts to inspect and adjust the machine yourself. Do not store your machine turns on the needle while sewing. If the problem persists, please consult your nearest authorized service center. ...or detergents to turn off the power switch and unplug the cord when: ● Operation is complete ● Replacing or removing the needle or any assemblies; needle, or other moving parts. 2. Do not drop or hit the machine. 4. PLEASE READ BEFORE USING YOUR EMBROIDERY MACHINE For safe ...

Users Manual - English
Page 5
...SELECTION KEY 11 How to clear the language selection 12 BOBBIN WINDING AND INSTALLATION 13 Setting the bobbin 15 UPPER THREADING 16 Auto needle threading device 17 PREPARATION BEFORE EMBROIDERING 18 Attaching stabilizer material 18 Embroidering different types of fabric 18 Setting the fabric in the embroidery... 23 ADJUSTING THE LCD SCREEN CONTRAST 24 If the LCD is hard to see when the power is turned on 24 CHANGING THE NEEDLE 25 CHAPTER 2 EMBROIDERING 26 EMBROIDERY 26 Start embroidering 28 Embroidering advice 29 HOW TO SELECT PATTERNS 30 Selecting built-in embroidery patterns ...
...SELECTION KEY 11 How to clear the language selection 12 BOBBIN WINDING AND INSTALLATION 13 Setting the bobbin 15 UPPER THREADING 16 Auto needle threading device 17 PREPARATION BEFORE EMBROIDERING 18 Attaching stabilizer material 18 Embroidering different types of fabric 18 Setting the fabric in the embroidery... 23 ADJUSTING THE LCD SCREEN CONTRAST 24 If the LCD is hard to see when the power is turned on 24 CHANGING THE NEEDLE 25 CHAPTER 2 EMBROIDERING 26 EMBROIDERY 26 Start embroidering 28 Embroidering advice 29 HOW TO SELECT PATTERNS 30 Selecting built-in embroidery patterns ...
Users Manual - English
Page 6
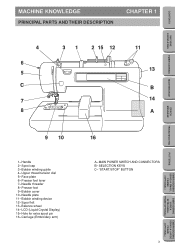
... THEIR DESCRIPTION CHAPTER 1 4 6 5 C 7 8 31 2 15 12 11 13 B 14 A ERROR MESSAGE TROUBLESHOOTING PATTERNS EMBROIDERING USING A SMALL FRAME (OPTIONAL) 9 10 1- Carriage (Embroidery arm) 16 A- Needle threader 8- Spool felt 13- Needle plate 11- Spool cap 3- Presser foot 9- LCD (Liquid Crystal Display) 15- SELECTION KEYS C- Balance wheel 14- Bobbin cover 10- MAIN POWER SWITCH AND...
... THEIR DESCRIPTION CHAPTER 1 4 6 5 C 7 8 31 2 15 12 11 13 B 14 A ERROR MESSAGE TROUBLESHOOTING PATTERNS EMBROIDERING USING A SMALL FRAME (OPTIONAL) 9 10 1- Carriage (Embroidery arm) 16 A- Needle threader 8- Spool felt 13- Needle plate 11- Spool cap 3- Presser foot 9- LCD (Liquid Crystal Display) 15- SELECTION KEYS C- Balance wheel 14- Bobbin cover 10- MAIN POWER SWITCH AND...
Users Manual - English
Page 8
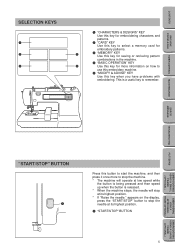
... operate at low speed while the button is being pressed and then speed up when the button is a useful key to stop the needle at its highest position. 1 "START/STOP" BUTTON 5 EMBROIDERING USING A LARGE FRAME (OPTIONAL) CONTENTS MACHINE KNOWLEDGE SELECTION KEYS 1 2 4 1 "CHARACTERS & DESIGNS" KEY..."BASIC OPERATION" KEY 5 Use this key for more to stop the machine. * The machine will stop at its highest position. * If "Raise the needle." appears on how to use this embroidery machine. 5 "MODIFY & ADVISE" KEY Use this button to start the machine, and then press it once more...
... operate at low speed while the button is being pressed and then speed up when the button is a useful key to stop the needle at its highest position. 1 "START/STOP" BUTTON 5 EMBROIDERING USING A LARGE FRAME (OPTIONAL) CONTENTS MACHINE KNOWLEDGE SELECTION KEYS 1 2 4 1 "CHARACTERS & DESIGNS" KEY..."BASIC OPERATION" KEY 5 Use this key for more to stop the machine. * The machine will stop at its highest position. * If "Raise the needle." appears on how to use this embroidery machine. 5 "MODIFY & ADVISE" KEY Use this button to start the machine, and then press it once more...
Users Manual - English
Page 9
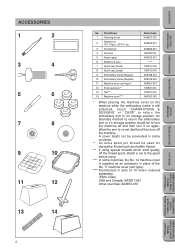
... (OPTIONAL) EMBROIDERING USING A EXTRA-SMALL FRAME (OPTIONAL) EMBROIDERING USING A SMALL FRAME (OPTIONAL) PATTERNS TROUBLESHOOTING ERROR MESSAGE EMBROIDERING MAINTENANCE MACHINE KNOWLEDGE CONTENTS Parts Name 1 Cleaning brush 2 Needle set 75/11 3pcs., 90/14 1 pc. 3 Screwdriver 4 Scissors 5 Seam ripper 6 Bobbins (4 pcs) 7 Spool cap (Small) 8 Spool cap (Large) 9 Embroidery sheet (Regular) 10 Embroidery frame...
... (OPTIONAL) EMBROIDERING USING A EXTRA-SMALL FRAME (OPTIONAL) EMBROIDERING USING A SMALL FRAME (OPTIONAL) PATTERNS TROUBLESHOOTING ERROR MESSAGE EMBROIDERING MAINTENANCE MACHINE KNOWLEDGE CONTENTS Parts Name 1 Cleaning brush 2 Needle set 75/11 3pcs., 90/14 1 pc. 3 Screwdriver 4 Scissors 5 Seam ripper 6 Bobbins (4 pcs) 7 Spool cap (Small) 8 Spool cap (Large) 9 Embroidery sheet (Regular) 10 Embroidery frame...

Users Manual - English
Page 13
The operation procedure for winding a bobbin will be displayed. 1 "BASIC OPERATION" key Example: To find out how to wind a bobbin 1. CONTENTS MACHINE KNOWLEDGE EMBROIDERING MAINTENANCE ERROR MESSAGE TROUBLESHOOTING Example: To find out the combination of fabric, needle and thread 1. Touch "WINDING BOBBIN". Touch "FABRIC AND THREAD AND NEEDLE". 2 "MODIFY & ADVISE" key 10 PATTERNS EMBROIDERING USING A SMALL FRAME (OPTIONAL) EMBROIDERING USING A EXTRA-SMALL FRAME (OPTIONAL) EMBROIDERING USING A LARGE FRAME (OPTIONAL) Press "BASIC OPERATION". 2. Press "MODIFY & ADVISE". 2.
The operation procedure for winding a bobbin will be displayed. 1 "BASIC OPERATION" key Example: To find out how to wind a bobbin 1. CONTENTS MACHINE KNOWLEDGE EMBROIDERING MAINTENANCE ERROR MESSAGE TROUBLESHOOTING Example: To find out the combination of fabric, needle and thread 1. Touch "WINDING BOBBIN". Touch "FABRIC AND THREAD AND NEEDLE". 2 "MODIFY & ADVISE" key 10 PATTERNS EMBROIDERING USING A SMALL FRAME (OPTIONAL) EMBROIDERING USING A EXTRA-SMALL FRAME (OPTIONAL) EMBROIDERING USING A LARGE FRAME (OPTIONAL) Press "BASIC OPERATION". 2. Press "MODIFY & ADVISE". 2.
Users Manual - English
Page 18
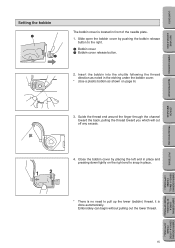
... KNOWLEDGE Setting the bobbin 1 2 The bobbin cover is located in the etching under the bobbin cover. * (Use a plastic bobbin as noted in front of the needle plate. 1. Slide open the bobbin cover by placing the left end in place and pressing down lightly on page 6) EMBROIDERING MAINTENANCE ERROR MESSAGE 3. Close the...
... KNOWLEDGE Setting the bobbin 1 2 The bobbin cover is located in the etching under the bobbin cover. * (Use a plastic bobbin as noted in front of the needle plate. 1. Slide open the bobbin cover by placing the left end in place and pressing down lightly on page 6) EMBROIDERING MAINTENANCE ERROR MESSAGE 3. Close the...

Users Manual - English
Page 19
...4. CONTENTS MACHINE KNOWLEDGE UPPER THREADING Thread according to the number and arrow marks on the top of the spool. * If using the auto needle threading device (See page 17) or manually. 5 * Be sure the spool felt is not raised, the upper thread cannot be sure to... raise the presser foot before you use a 90/14 home sewing machine needle. 1 Insert the extra spool pin into the hole on the machine. 1 1 "BASIC OPERATION" key 3 A * 1 2 4 EMBROIDERING MAINTENANCE ERROR MESSAGE TROUBLESHOOTING PATTERNS ...
...4. CONTENTS MACHINE KNOWLEDGE UPPER THREADING Thread according to the number and arrow marks on the top of the spool. * If using the auto needle threading device (See page 17) or manually. 5 * Be sure the spool felt is not raised, the upper thread cannot be sure to... raise the presser foot before you use a 90/14 home sewing machine needle. 1 Insert the extra spool pin into the hole on the machine. 1 1 "BASIC OPERATION" key 3 A * 1 2 4 EMBROIDERING MAINTENANCE ERROR MESSAGE TROUBLESHOOTING PATTERNS ...

Users Manual - English
Page 20
... spool, attach a net to the spool before using. * Cut the net to match the size of the machine. 17 Lower the needle threader lever until it is lowered. 4. Hook the thread into the guide and pull it across to be used while the... passed through the wire loop thread guide (number "6") and gently pull the thread towards you and check that it stops. Release the thread from the needle threader lever. 7. ERROR MESSAGE TROUBLESHOOTING PATTERNS EMBROIDERING USING A SMALL FRAME (OPTIONAL) EMBROIDERING USING A EXTRA-SMALL FRAME (OPTIONAL) EMBROIDERING USING A LARGE FRAME (OPTIONAL) ...
... spool, attach a net to the spool before using. * Cut the net to match the size of the machine. 17 Lower the needle threader lever until it is lowered. 4. Hook the thread into the guide and pull it across to be used while the... passed through the wire loop thread guide (number "6") and gently pull the thread towards you and check that it stops. Release the thread from the needle threader lever. 7. ERROR MESSAGE TROUBLESHOOTING PATTERNS EMBROIDERING USING A SMALL FRAME (OPTIONAL) EMBROIDERING USING A EXTRA-SMALL FRAME (OPTIONAL) EMBROIDERING USING A LARGE FRAME (OPTIONAL) ...

Users Manual - English
Page 28
...thrown away to prevent damage to its highest position. 2. Secure it will go with the flat side of the needle facing away from you. Slide the needle out. 2 3 4 4. ERROR MESSAGE TROUBLESHOOTING PATTERNS EMBROIDERING USING A SMALL FRAME (OPTIONAL) EMBROIDERING USING A ...A LARGE FRAME (OPTIONAL) 1 2 Checking for a bent needle 1 Place the needle on . CONTENTS MACHINE KNOWLEDGE EMBROIDERING MAINTENANCE CHANGING THE NEEDLE Set the needle securely. 1 1 "BASIC OPERATION" key 1 1. Insert the new needle into the needle shaft as far up as it by firmly tightening the screw...
...thrown away to prevent damage to its highest position. 2. Secure it will go with the flat side of the needle facing away from you. Slide the needle out. 2 3 4 4. ERROR MESSAGE TROUBLESHOOTING PATTERNS EMBROIDERING USING A SMALL FRAME (OPTIONAL) EMBROIDERING USING A ...A LARGE FRAME (OPTIONAL) 1 2 Checking for a bent needle 1 Place the needle on . CONTENTS MACHINE KNOWLEDGE EMBROIDERING MAINTENANCE CHANGING THE NEEDLE Set the needle securely. 1 1 "BASIC OPERATION" key 1 1. Insert the new needle into the needle shaft as far up as it by firmly tightening the screw...

Users Manual - English
Page 31
... off any excess thread at the edge of the thread. 2. The machine will stop the machine and raise the presser foot again. After threading the needle, pass the thread from the top to the bottom through the hole of the presser foot, and gently pull the end of the design. After...
... off any excess thread at the edge of the thread. 2. The machine will stop the machine and raise the presser foot again. After threading the needle, pass the thread from the top to the bottom through the hole of the presser foot, and gently pull the end of the design. After...

Users Manual - English
Page 32
CONTENTS MACHINE KNOWLEDGE Embroidering advice Thread Embroidery thread #50 Needle Home sewing machine needle 75/11 * The recommended lower (bobbin) thread is #60 - #90 synthetic thread. * For thin and stretch fabrics which are ... fabric before embroidering. * If embroidering on a thick fabric with stabilizer (see page 18), it is recommended that a stronger 90/14 home sewing machine needle be used. EMBROIDERING MAINTENANCE ERROR MESSAGE TROUBLESHOOTING PATTERNS EMBROIDERING USING A SMALL FRAME (OPTIONAL) EMBROIDERING USING A EXTRA-SMALL FRAME (OPTIONAL) EMBROIDERING USING A LARGE...
CONTENTS MACHINE KNOWLEDGE Embroidering advice Thread Embroidery thread #50 Needle Home sewing machine needle 75/11 * The recommended lower (bobbin) thread is #60 - #90 synthetic thread. * For thin and stretch fabrics which are ... fabric before embroidering. * If embroidering on a thick fabric with stabilizer (see page 18), it is recommended that a stronger 90/14 home sewing machine needle be used. EMBROIDERING MAINTENANCE ERROR MESSAGE TROUBLESHOOTING PATTERNS EMBROIDERING USING A SMALL FRAME (OPTIONAL) EMBROIDERING USING A EXTRA-SMALL FRAME (OPTIONAL) EMBROIDERING USING A LARGE...

Users Manual - English
Page 46
B 8 This moves the needle position to the middle of the fabric or if you can check the embroidering position.(Refer to page 44) 0 Touch this key to return to ... KNOWLEDGE CHANGING THE SETTINGS FOR THE SELECTED PATTERN Moving the position (LAYOUT) The position for embroidering the pattern can be embroidered. 4 Indicates the current center needle drop position. 5 Indicates the embroidering position and embroidering area for the selected design, so that you want to embroider a pattern somewhere such as in 90...
B 8 This moves the needle position to the middle of the fabric or if you can check the embroidering position.(Refer to page 44) 0 Touch this key to return to ... KNOWLEDGE CHANGING THE SETTINGS FOR THE SELECTED PATTERN Moving the position (LAYOUT) The position for embroidering the pattern can be embroidered. 4 Indicates the current center needle drop position. 5 Indicates the embroidering position and embroidering area for the selected design, so that you want to embroider a pattern somewhere such as in 90...

Users Manual - English
Page 47
... will move one step; key. * The embroidery position or area display can be used for the currently selected pattern and size. * Do not lower the needle. If the arrow key is touched, the embroidery frame will move and the presser foot will trace the embroidery area to be moved by touching... position will then move. * If you would like to move the pattern. Use the hole of the presser foot as a guide, and never lower the needle while it is touched continuously, the frame and display will move continuously. Example: To move the embroidery position to the upper right corner Touch the...
... will move one step; key. * The embroidery position or area display can be used for the currently selected pattern and size. * Do not lower the needle. If the arrow key is touched, the embroidery frame will move and the presser foot will trace the embroidery area to be moved by touching... position will then move. * If you would like to move the pattern. Use the hole of the presser foot as a guide, and never lower the needle while it is touched continuously, the frame and display will move continuously. Example: To move the embroidery position to the upper right corner Touch the...

Users Manual - English
Page 48
... 1. Touch "START/CENTER" to select "START" and then touch the arrow key to align the hole of the frame as the presser foot prevents the needle from a specific starting position on the fabric in the frame as shown in the illustration. ERROR MESSAGE TROUBLESHOOTING PATTERNS EMBROIDERING USING A SMALL FRAME (OPTIONAL) EMBROIDERING...
... 1. Touch "START/CENTER" to select "START" and then touch the arrow key to align the hole of the frame as the presser foot prevents the needle from a specific starting position on the fabric in the frame as shown in the illustration. ERROR MESSAGE TROUBLESHOOTING PATTERNS EMBROIDERING USING A SMALL FRAME (OPTIONAL) EMBROIDERING...

Users Manual - English
Page 53
...". 2. Example: ABCDE in the same frame. Input "ABC", then touch "SET" and then "LAYOUT". Touch the arrow keys to move the start point of the needle to the finishing position of "DE".) Finished pattern 50 PATTERNS EMBROIDERING USING A SMALL FRAME (OPTIONAL) EMBROIDERING USING A EXTRA-SMALL FRAME (OPTIONAL) EMBROIDERING USING A LARGE FRAME...
...". 2. Example: ABCDE in the same frame. Input "ABC", then touch "SET" and then "LAYOUT". Touch the arrow keys to move the start point of the needle to the finishing position of "DE".) Finished pattern 50 PATTERNS EMBROIDERING USING A SMALL FRAME (OPTIONAL) EMBROIDERING USING A EXTRA-SMALL FRAME (OPTIONAL) EMBROIDERING USING A LARGE FRAME...

Users Manual - English
Page 54
... or decorative patch is sewn after embroidering of the frame pattern in the center of the outside using the center needle layout function. Select a frame pattern and embroider it. Making badges or decorative patches 1. Using the "+" mark inside the...EXTRA-SMALL FRAME (OPTIONAL) EMBROIDERING USING A LARGE FRAME (OPTIONAL) This mark can be attached to be used as a guide, align the needle using the "- - -" stitch slightly larger than the original frame pattern. 2. CONTENTS MACHINE KNOWLEDGE EMBROIDERING MAINTENANCE ERROR MESSAGE TROUBLESHOOTING EMBROIDERING APPLICATIONS ...
... or decorative patch is sewn after embroidering of the frame pattern in the center of the outside using the center needle layout function. Select a frame pattern and embroider it. Making badges or decorative patches 1. Using the "+" mark inside the...EXTRA-SMALL FRAME (OPTIONAL) EMBROIDERING USING A LARGE FRAME (OPTIONAL) This mark can be attached to be used as a guide, align the needle using the "- - -" stitch slightly larger than the original frame pattern. 2. CONTENTS MACHINE KNOWLEDGE EMBROIDERING MAINTENANCE ERROR MESSAGE TROUBLESHOOTING EMBROIDERING APPLICATIONS ...

Users Manual - English
Page 61
...) 2 58 3 5 4 4. O 6. Put the inner rotary hook back in the race can cause poor quality stitching. Remove the needle plate. CONTENTS MACHINE KNOWLEDGE CLEANING Always keep the machine clean. 1. Turn off the power, remove the needle, and then raise the presser foot lever. 1 Use a screwdriver to loosen the screw to spring of the...
...) 2 58 3 5 4 4. O 6. Put the inner rotary hook back in the race can cause poor quality stitching. Remove the needle plate. CONTENTS MACHINE KNOWLEDGE CLEANING Always keep the machine clean. 1. Turn off the power, remove the needle, and then raise the presser foot lever. 1 Use a screwdriver to loosen the screw to spring of the...

Users Manual - English
Page 62
..." is raised. This message is required, machine will not start and will instruct you to raise the needle to the highest position. This could be displayed after the display warns you with a bent needle. This message is displayed when the "START/STOP" button is pressed while the presser foot lever is touched...
..." is raised. This message is required, machine will not start and will instruct you to raise the needle to the highest position. This could be displayed after the display warns you with a bent needle. This message is displayed when the "START/STOP" button is pressed while the presser foot lever is touched...


